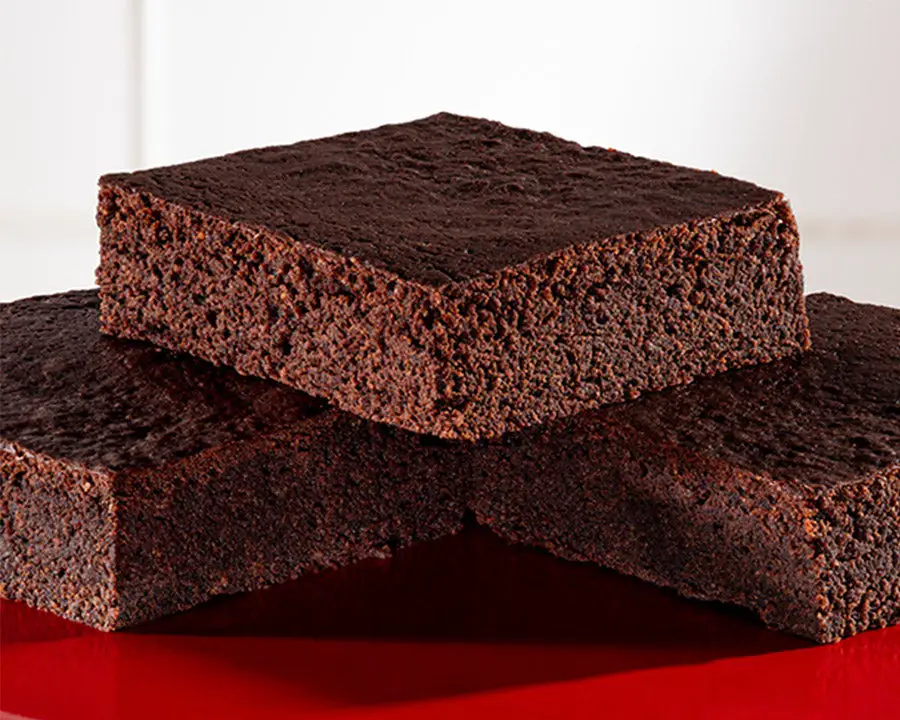
Best Substitute For Whole Grain Mustard

whole grain mustard

Whole Grain Mustard Substitute

substitute for whole grain mustard


Are you looking for a substitute for whole grain mustard? If you are, then I suggest that you go through this article carefully as it will help you choose your best substitute.

Mustard seeds are a brown or yellow hot-tasting and hot-smelly paste that is made from crushed seeds of some plants. It’s typically utilized as a food ingredient or served with meat. There are three kinds of mustard seeds including yellow mustard seeds black mustard seeds and mustard seeds that are brown.

The benefit of using mustard seeds in cooking is that it has the ability to enhance the taste. The issue is that the tiny seeds are difficult to come across. So, in some instances, you’ll need to find a substitute for mustard seed.

The good thing about this condiment is that you can replace it with many other ingredients. In this post, I would like to take a close look at the best substitutes for whole grain mustard.

What is Whole Grain Mustard?

The plant is indigenous to Europe. There are a variety of kinds, and people make use of seeds in a variety of foods and condiments.

The seeds can be bitter and have a strong pungent taste, other ingredients such as vinegar, honey and other components create a sweeter, spicier and tangier. It’s also tastier.

You can find ready-made items available in a variety of varieties. You can pick your favorite. However, you can create your own favorite flavor by yourself using mustard seeds. The mustard plant is a rich source of nutrients, both in the seeds and leaves.

The leaves are rich in vitamins such as copper, zinc, and calcium. The seeds are high in manganese, fiber, magnesium, and selenium.

So, what do you do if whole grain mustard isn’t readily available? Here are the alternatives.

Top 5 Substitutes for Whole Grain Mustard

In case you do not have full grain mustard, or would like to switch to an alternative, there are a few options.

1 – Horseradish

Horseradish can be a good alternative to whole grain mustard.

This is an edible root plant and is also part of the mustard family. It offers a similar taste and heat similar to whole grain mustard. You can also grate it, and then add other ingredients such as honey, vinegar or spices, to create a dip spread or sauce. It is also possible to find prepared versions that have smooth texture.

If you don’t have the time or want to make it, pick one among the numerous brands available found on supermarket shelves. In addition to being a robust and delicious vegetable, horseradish can also provide many health advantages. It is able to fight cell damage as well as improve respiratory health. It can help to reduce inflammation.

The ratio that is appropriate for it is:

1 tablespoon whole grain mustard equals 1 teaspoon of horseradish (you may increase the amount if you want).

2 – Wasabi Sauce

Wasabi is also an ideal alternative for whole grain mustard.

As a member in the same mustard family, you’ll enjoy a similar, but more subtle taste.

It is a common ingredient in sushi and noodles of Japanese food.

You can find a variety of ready-made goods available on the market, but the flavor will differ due to the ingredients being different.

Certain varieties can be overwhelming. If you’re not looking for an intense and powerful taste, you can prepare your own version at home.

  • Mix 10 ml of wasabi powder with 15 ml water.
  • After a few minutes Add about 125ml of mayonnaise and blend them together.
  • Use it for spreads, dip, or sauce, and enjoy your homemade paste.

The ratio that is appropriate for it is:

1 tablespoon whole grain mustard equals 3 teaspoons wasabi (add more if you want) .

3 – Stone Ground Mustard and Celery Seeds

It is also possible to make use of stone-ground mustard instead the whole grain mustard in case you don’t own it. With the stone ground variety the mustard is quite crushed.

You will get the same flavor.

Stone ground mustard in combination with celery seeds may provide a flavor that is somewhat like the taste of whole grain mustard. For those who don’t own a ready-made recipe, you can make your own spice.

All you need just add celery seeds to the stone-ground mustard until you achieve the right flavor according to your personal preference.

But, start the process in small, tiny portions until the flavor isn’t to your taste.

It is possible to add vinegar or ginger, garlic and honey if you like a bit of sweetness.

The most important thing is to continue testing until you find the perfect taste.

The ratio that is appropriate for it is:

1 teaspoon of whole grain mustard equals 3/4 teaspoon stone-ground mustard as well as celery seeds (add additional if needed).

4 – Yellow Mustard

The most adored condiments in America yellow mustard can also be a good alternative to whole grain mustard.

If you enjoy the aroma of mustard, but aren’t able to take the heat, yellow mustard is perfect to use in a variety of dishes.

It is the mildest taste among the mustard-based products.

But when mixed with vinegar, water, and other spices, the yellow mustard is delicious and creates a delicious sauce dressing or dip.

Make use of it for barbeque meat as well as burgers, marinades, and other dishes as you wish.

If you’re looking to add more spice you can sprinkle the pepper spice.

A suitable ratio is:

One teaspoon of whole grain mustard equals 1 1/4 teaspoon mustard yellow.

5 – Spicy Brown Mustard

If you’re looking to add some flavor and heat similar to mustard made from whole grains, then the spicy brown is a fantastic alternative.

Contrary to other varieties, such as yellow there is a small amount of vinegar used to soak mustard seeds in brown.

So, the sharp taste retains. Brown mustard is sour and spicier than the yellow variety. It has a rougher consistency than the yellow since the skin remains in the paste. It’s also a versatile ingredient that it can be used in numerous ways.

Spices like nutmeg cinnamon and ginger mix well with a spicy brown flavor to give the flavor a distinctive character.

It is a great addition to sausages, meaty sandwiches and pastrami, roast beef and more.

The ratio that is appropriate for it is:

1 tablespoon whole grain mustard = 1 teaspoon of spicy brown mustard.

Wrapping up

Substitute for Whole Grain Mustard

Whole grain mustard is ready-to-eat mustard made of the least amount of crushed or ground mustard seeds. It can be used as any other mustard. It is excellent on sandwiches as well as in potato salad as well as on roast beef.

It’s true that it may not be widely available and can be expensive if you locate it. Here are some whole grain mustard alternatives which are likely to be more easy to locate and less expensive.

The majority of us are conditioned to think of mustard as an ingredient.

According to an expert, Harry Lalousis, mustard can enhance the flavor of both sweet and savory dishes. Therefore, even if aren’t able to find whole grain mustard, check various other alternatives as its substitute.

If you’re not able to find mustard, the wasabi or horseradish options will surely work perfectly as substitutes.

What does Whiskey Taste Like?

What does Whiskey Taste Like? 

What does Whiskey Taste Like? 

whiskey taste

So, what does whiskey taste like? If this is the question that has prompted you to land here, I would say you are on the right spot. For one thing, in this blog post, I have gathered all relevant information about whiskey in general and what it tastes like. Read along if you want to know more about it.

Whiskey is still one of the most loved alcoholic beverages in the world. Its unique flavor and aroma are great when mixed with other spirits.

There are many types of whiskey available, including sweet Tennessee Bourbon whiskeys and robust Scotch whiskies.

There are many whiskey brands that produce whiskies with different aromas and flavors.

This article is for those who are just starting to learn about whiskey.

We’ll explain the main differences between whiskeys and their common flavors.

What is Whiskey?

Whiskey/whisky can be used to refer to a variety of alcoholic beverages made from fermented grains.

Barley, malted barley and wheat are the most commonly used grains to make whiskey.

Whiskies made only with water and malted barley, are called Malt Whiskies. Whiskies made from a mixture of grains are called Grain Whiskies.

Blended whiskey is a mix of different whiskeys to create a variety of flavors.

Whiskies can also be classified based on where and how they were made.

There are many types of whiskey, and each type can have very different flavors. This is why whiskey sampling has become so popular.

Types of whiskey

What does whiskey taste like? These are some of the most popular flavors in whiskey.

Scotch whiskey

What is it?

Scotch whisky can be made using water and masted barley in Scotland. However, they can also include other grains. A malt Scotch whisky will be one that contains 100% water and malted barley.

The mash may contain additional grains such as wheat or corn, and it will be called grain Scotch whisky.

Scotch whiskies are also available in:

Single malt — A 100% malt whisky made with malt from a single distillery

Blended Malt — 100% malt whisky that has malt from multiple distilleries

Blended — A blend of malt and grains whiskies

Cask strength — undiluted and bottled at a very high level from the cask

One cask — The bottle was filled from one cask

Scotch whiskies are limited to 700 liters of oak barrels for at least three years.

End product must contain at least 40% Alcohol by Volume (ABV).

Scotch whiskies are distilled twice and most of them will be made in pot stills.

What does scotch whiskey taste like?

Scotch whisky exposes barley grain to smoke during drying. The whisky will have distinct aromas and flavors due to this process as well as the time it spends maturing in an oak barrel.

These flavors include:

  • Alcohol
  • Smoke
  • Leather
  • vanilla
  • peat
  • Grains
  • wood/oak
  • Cedar
  • Malt
  • Fruit
  • Nuts
  • Tobacco

Each flavor’s presence will vary depending on the methods used at the distillery, the grain mix and the type of Scotch (e.g. Single malt or grain Scotch?

Irish Whiskey

What is it?

Irish whiskey must be made in Ireland, as the name implies.

Irish whiskey is made from kiln dried barley, which doesn’t contain peat. It has a milder flavor than Scotch whisky.

It is also triple-distilled using column stills. This gives it a cleaner taste, making it a popular choice for cocktails.

What does Irish Whiskey taste like?

Alcohol, malt and vanilla cream are the dominant flavors.

Bourbon Whiskey

What is it?

Bourbon whiskey is made with a mash of at least 51% corn, aged in new charred oak barrels and distilled from it.

Barley, wheat, and rye are also used in the mash. Some types of whiskey must only be made in certain areas.

Kentucky whiskey, for example, must be made in Kentucky and aged there. Some bourbons may also filter their whiskey through pieces of maple charcoal before it is aged (the Lincoln Country Process).

What does the Bourbon Whiskey taste like?

Bourbon is a sweet whiskey that has hints of honey, vanilla, caramel and oak. Bourbon may have a smokey taste due to the charcoal and charred oak barrels.

Malt Whiskey

What is it?

A malt whiskey must have a mash bill containing at least 51% malted barsley. This is the same requirement for Scotch whisky. However, malt whisky can use other types of barrels, may not have peat and may be distilled in a different way.

What does Malt Whiskey taste like?

Malt whisky’s most popular flavors include alcohol, leather and vanilla.

It can be either smokey or not, depending on how it was made.

Rye whiskey

What is it?

A mash bill containing at least 51% of rye is a rye whiskey. Canadian rye whiskeys are sometimes called “rye whiskey”, but they actually contain less than 51% of rye.

What does Rye whiskey taste like?

Rye whiskey is a sweeter version of bourbon. Rye whiskey is spicier than bourbon and has a lower body. It can be flavored with oak, spices and caramel, vanilla, charcoal, alcohol, and other flavors.

Wheat whiskey

What is it?

A wheat whiskey must have at least 51% wheat in its mash bill.

What does wheat whiskey taste like?

Wheat whiskey’s dominant flavors include honey, wheat bread and cedar. Cherry, oak, and cherries are also prominent. It’s a lighter whiskey than Bourbon whiskey and is less sweet.

Whiskey has many other species

There are many other unique single and blended whiskies that can be produced in Japan, Australia, England, and other countries, as well as the whiskeys already mentioned.

These whiskies are made using a variety of whiskey production methods. This  results in many delightful as well as interesting whiskies that are worth trying.

The best way to discover the taste of whiskey is to have more whiskey.

It will be a lot fun to explore the world of whiskey, and discover new products you like.

How to drink whiskey

It is easy to drink whiskey.

However, the most important aspect of this process is to ensure that you drink it in moderation.

Scotland had passed legislation several years ago that limited the amount of alcohol per person for a longer period (i.e. all at once).

This will prevent people from binge-eating and eating more than their bodies can handle.

It is vital to eat something when you drink whiskey. This will ensure that alcohol doesn’t go directly to your liver and cause detoxification, which can lead to a hangover, or worse, even death.

Drinking whisky starts with pouring the liquid into a glass using a suitable container. Most people prefer an old-fashioned glass.

To open the flavors and aromas, you need to add some water.

Next, add ice cubes. Finally, taste it (i.e. smell it) before you enjoy it or for further analysis.

Whiskey takes three to five minutes to reach the stomach, and six to detect it in the bloodstream.

If you consume whiskey too quickly, your body might not be able to taste all the flavors and feel any effects.

Whiskey is usually drunk straight, without any mixers.

Only one exception to this rule is when you wish to drink whiskey on the rocks (i.e. with ice cubes), or in mixed drinks such as whiskey sours, manhattans and old fashions.

If the liquid is neat, it should be stirred around to allow all its flavors to mix.

These are the steps to enjoying whiskey.

Be careful with your drinking.

Similar Questions

Why add water to whiskey?

Whiskey is a hard drink that has many different tastes. This is because Whiskey’s primary ingredient is alcohol. It is stronger due to the amount of alcohol.

Water is used to dilute alcohol. This preserves the alcohol’s quantity and enhances the flavor.

What is the difference between Bourbon and Scotch Whiskey?

Bourbon whisky is made with mashed corns. It is made in the USA by Distiller, which uses 51 percent aged and fresh corn mash. You can also add other flavors such as oak or wheat to the mix, and distill minimum 40 percent alcohol.

Scotch Whiskey is made from malted Barley. Scotch Whiskey’s name, which is bare, refers to its production region in Scotland. There are two types: single malt and single grain. Scotch contains water, malted barley, and 40% alcohol.

Wrapping up

Whiskey is a popular choice because it enhances the flavors of food.

So, what does whiskey taste like? Just being curious?  Well, it all depends on where it comes from. Japan, Ireland, Canada: The lightest flavor (typically), grains, spices, woody notes and maybe some citrus.

Scotland: Malted barley has a stronger, more noticeable flavor. Peat is a strong influence on some people. Some love it, while others hate it.

USA: Rye has spicy, lemony flavors; Bourbon is sweeter with lots of caramel, vanilla and coconut. Sometimes, it’s even fruitier (peach). Tennessee Whiskey is similar to Bourbon but might have a little maple flavor due to the way it is processed.

All of them share the same flavor characteristics: woody, spicy, and grainy. I agree with liquor experts who suggest that you will have to smell it to get a sense of its texture and taste. However, the taste should not be inconsistent. Otherwise, you will not be able to get full satisfaction out of the drink.

How Does Lotus Root Taste Like? 

Lotus Root Taste

How Does Lotus Root Taste Like? 

How Does Lotus Root Taste Like? 

The lotus root is a very popular Asian ingredient. It can be stir-fried in sesame oil, or, if you like, you can even eat it raw. The lotus root looks like a cross between a carrot and a swede. But what does lotus root taste like? This guide will discuss the flavor, texture and uses of lotus root in cooking.

How does fresh lotus root taste like?

The sweetness of fresh or raw lotus roots is mild. What texture is raw lotus root? It is crunchy with a little starch and a bit like celery. Some even call it Taro-like, a little nuttier.

If you are looking for a crunchy vegetable then this is the one to try.

You can also see how artichoke tastes.

How can you cook lotus root?

  • Boil
  • Fry
  • Bake
  • Microwave

What does Lotus Root look like?

Lotus root is a large root vegetable that often has purple-to-white skin. The color of the root changes as it ages to become brownish. It has holes that make it edible. It can also hold sauces similar to tube pasta.

What does Lotus Root smell like?

Lotus root should smell mildly sweet when it is freshly sliced. If you notice a slight sour taste after cutting the root, it is likely that it has become spoiled.

How do you choose a lotus root?

The first step to creating the perfect lotus root is choosing a healthy and fresh root. You want firm, plump specimens without any marks, bruises or soft, mushy areas.

How to prepare a lotus root?

It is easy to prepare lotus roots for cooking. A good knife and a sharp peeler are the most important tools.

You can start by cleaning the root by running your hand under water.

Next, cut off the ends.

Use the peeler to remove the skin. This will reveal the flesh beneath.

Then, use a sharp knife to cut it into 1/4 inch thickness.

Sprinkle lemon juice on the cut lotus roots to stop the browning and oxidation. You can also store them in a vinegar bath. Be sure to rinse the vinegar off before you cook.

How to Eat Raw Lotus Root?

It can be used in salad dressings. It is better to use a young lotus root. The root becomes more difficult the older it gets.

Top 5 Ways to Cook Lotus Root

Lotus root is flexible and can be prepared in many different ways, including baking, boiling, microwaving, air frying, and baking.

How to Stir Fry Lotus Root

Stir fry with Lotus root is great and retains its crisp texture, making it perfect for stir-fry recipes.

Another great feature of lotus roots is their ability to absorb the flavors and sauces Szechuan sauce.

How to Stir Fry: Cut the onion into thin slices. Turn the heat up to medium-high, and cook for four minutes.

What other vegetables go well with lotus roots?

  • Edamame
  • Broccoli
  • Asparagus
  • Snow peas
  • Celery
  • Red peppers

How to Boil Lotus Root

Boiling is a great way to reduce your fat intake. Boil lotus root slices can be served in a bowl with green beans. You can also sprinkle it with some chili and soy sauce.

Boil a pot of water. 1/4 teaspoon lemon juice is what I prefer to add. Add the 1/4″ slices to the boiling water. Cook for 4-5 minutes. To drain the lotus root, use a sieve.

How to Bake Lotus Root?

Baking lotus roots is one of my favorite ways to make crispy chips. This lotus root snack is great for kids.

Slice the lotus root into quarter inch slices. Place the slices on a parchment-covered baking tray. Place the slices evenly spaced on a baking tray covered with parchment paper. Keep them separated. Olive oil can be sprayed or lightly drizzled. Season the oil with salt and pepper. Salt, pepper, red pepper flakes. Bake one side for 10 minutes, at 340F. Turn the lotus chips over and bake for another 10 minutes. Make sure they are done. You can return them for 5 more minutes if they aren’t.

How to Microwave Lotus Root?

Although it’s quick and simple, the results are not as crisp as oven baking.

The lotus root should be prepared the same way, in 1/4 inch slices. Place a dampened paper towel on a microwave-safe plate. Turn the microwave on high for 2 minutes, and then check that they are done.

You can also use lotus root in other ways.

As crunchy vegetable chips, dry in a dehydrator

Dry in the oven, and then grind into flour.

To make candied lotus, slice extra thin.

As a garnish for salads

You can preserve it by picking the lotus root

Lotus root Benefits

Although they are aquatic plants, lilies can also be found on land. Since ancient times, the roots have been used to treat ailments. Chinese herbalists first mentioned them around 500 BC.

Benefits of lotus roots include:

  • vitamin C
  • Riboflavin
  • thiamin
  • Improves digestion
  • It helps to prevent constipation
  • Promotes healthy skin
  • Boosts energy levels
  • Reduces stress
  • Treatments for arthritis
  • Menstrual cramps can be relieved
  • Reduce cholesterol
  • It’s good for your heart

What can I add to Lotus Root to increase the mild flavor?

  • Rice vinegar
  • Green onion
  • Shaoxing wine
  • Black bean dish
  • Sticky rice
  • Sesame oil
  • Oyster sauce
  • Sesame seeds
  • Lotus seed

Lotus Root Chips

  • Lotus root chips in take-away boxes Ingredients
  • 1/2 pound lotus root
  • 2 tablespoons peanut oil
  • Sea salt, to your liking

Method

Cut off the lotus root ends and peel them. To prevent them from turning brown, place them in a bowl with 2 Tbsp vinegar.

You will have to heat oil in a small saucepan. After the oil has warmed up, you will have to strain the lotus roots slices and dry them before adding to the pan. You should leave enough space between each piece.

Turn the root and cook for another 3-5 minutes, until they are golden brown on the bottom. If the roots are not cooking evenly on the outside, add more oil and reduce the heat.

To transfer lotus root chips onto a brown or paper towel, use tongs. Sprinkle salt. These chips are best enjoyed hot.

Lotus root soup

Ingredients

  • 3 cups lotus roots, sliced
  • 3 cups carrot, cut into large cubes
  • 10 Chinese mushrooms, soaked 2 hours and then sliced
  • 7 water chestnuts, shelled & halved
  • 2 Tbsp ginger
  • 2 cloves of garlic, crushed

Method

To make the soup, add one gallon (4 liters), of water to a large saucepan.

Boil for 2 to 3 hours, and then serve.

FAQ

Is lotus root safe to eat raw?

The lotus root can be eaten raw or added to salads. Avoid mature roots as they can be very tough.

How long does lotus root take to cook?

It takes 4 minutes to cook lotus root in the pan.

Because they are similar to potatoes, Lotus roots can be cooked easily. You can boil them in water until they are tender. Then, you can mash them with butter or olive oils if desired.

How do you store lotus root?

Washing and cleaning lotus roots before storing them is the best thing. Cut off 1/4 inch at the ends and any segmented joints. Place the Ziploc in a container with some water. It will keep in the fridge for up to six days.

Most well-known facts about lotus roots

The lotus root’s scientific name is the Nelumbo Nucifera. It is also called the sacred lotus, Indian lotus, or sacred lotus. It is part of the Nelumbonaceae Family.

These roots are often used in stir-fries or kinpira. They are loved for their unique taste and crunchy texture.

Lotus root contains high levels of vitamin C, thiamin and roboflavin.

The edible root, which can grow to 4 feet under water, is part of the lotus plant. It is easily identifiable by its colorful flowers and lily pads.

The root can be sliced open to reveal a pattern that is similar to an old-fashioned telephone dialer.

Wrapping up

So, what does lotus root taste like? I suppose I have already given you the answer in the earlier part of the post. Anyway, lotus root, a tasty vegetable, has been eaten as food for thousands of years. Because of its many uses, it’s often called the “Queen of Vegetables”.

Lotus root is a great source of vitamin C and potassium as well as iron, calcium, magnesium, fiber, protein, and iron. It is also high in antioxidants that protect cells from damage caused by free radicals.

Lotus Root is great in soups, stews and stir-fries. You can eat the roots raw or cooked. They have a mild, crispy flavor. It can be used in salads, stews, or raw.

It is important to clean the Lotus root before you use it for cooking. You might experience symptoms such as vomiting or fever if you don’t take care of it.


How Long Does Salami Last?

salami

How Long Does salami Last? Does It Go Bad? 

salami

How long does Salami last? If you are here because you have no idea about salami storage, you should go through this entire post.

Salami is a sausage that is made up of air-dried and fermented meat, generally pork. The word “salami” is the plural version of the Italian salami, meaning spicy pork sausage.

Salami is a common ingredient on sandwiches and there’s nothing better than making a sandwich when you’re in a rush.

While it’s not cooked Curing is an essential step to make salami, which means it’s not raw. Salami is typically prepared or smoked prior to or after it to give it the desired taste. This process doesn’t bring any advantages to cooking, but.

Three important steps involved in the creation of salami comprise:

  1. Fermentation
  2. The preparation of raw materials
  3. Drying and ripening

According to Wikipedia, the origin of salami is Italy as did the term we use in the present. Salami has also been ranked in the top ten of meats that are cold cut.

To determine how long salami can last, we should take a close look at the issue.

How Long Does Salami Last? Does Salami Go bad?

Salami can keep its good quality for a considerable period of time due to its low activity in water. Also, it contains flavors, preservatives, colorants and antioxidants.

The salami that’s semi-ripe retains its flavor even under display at the retail store. But eventually, it will begin to lose its flavor due to the development of rancidification that is constant.

Sensory degradation is the main key to the longevity of salami. It is a result of various types of the process of oxidation.

The main cause of degradation of salami’s flavor is rancidity. However, the development of other off-flavors, such as acid and mold could be the cause of the poor quality.

The salami that’s been opened will usually last and keeps its freshness for three 7 to 10 days based the method of storage you use to store it.

Yes, salami does go bad. It’s not surprising because you can’t keep any type or meat over a long period of time and expect it to spoil.

Salami is a shelf-stable food item. This means that it’s not expiring. It will dry out as it is left out.

The short shelf-life of salami is the reason you need to consume it fast since salami meat is able to remain in the fridge for just 3 to 5 days. It is possible to wrap it by wrapping it in foil or plastic and place it and store it in air-tight containers.

Deli meats such as salami bacon, ham and salami could be a cause of food poisoning.

It’s not a good idea to consume any processed meat if that it’s passed its best-before-day. It is recommended that you throw away your salami as fast as you can, regardless of whether you’ve put it in the freezer.

How long does salami last in the refrigerator?

Dry salami

Dry salami is one of the varieties of Italian sausage that is made from the combination of meat, salt and spices. It is packed into a casing and then left to ferment and air dry.

If the salami isn’t opened, it could last for as long as six weeks in the fridge unrefrigerated and, according to USDA, “indefinitely” in the refrigerator. However, cutting the salami can allow bacteria to get into the sausage.

Therefore, the salami that is cut into slices can be kept for a maximum of 3 weeks inside the refrigerator and an additional two months inside the freezer. However, if the salami is dated for use it is recommended to adhere to that.

What’s an example for dry salami? There’s Genoa salami that is produced by hand in Genoa, Italy, and includes pork, garlic, Fennel seeds, salt pepper and wine.

There’s also Sopressata which is more in fat than the majority of salamis, and is then press-cured during curing to decrease its weight and enhance its flavor.

There’s also French salami, also known as Saucisson Sec, which can contain ingredients such as wine, cheese or even fruits. Pepperoni is a different kind of salami made from dry ingredients. In Italy is known as salamino piccante.

Salami cooked

Salami Cotto, or cooked salami, is a meat in a casing which is cooked or smoking. Sometimes, it’s curried after cooking, whereas other varieties do not go through the curing or fermentation part that is required.

Mortadella and coppa roasted are two of the most common examples of salami cooked.

How long can salami keep after it’s cooked? According to the USDA the cooked sausage can last for up to 2 weeks inside the refrigerator in the case of not being opened or up to 7 days after opening.

If you want to extend a sausage’s shelf life, consider the freezer. Cooked sausages frozen in the freezer will last for up to two months.

For sausages and salamis that are labeled “uncured” meats that haven’t been preserved using sodium nitrite, or sodium nitrate,  it is recommended to check the expiry date on the package.

How long does vacuum-sealed Salami Keep at Room Temperature?

Salami vacuum-sealed in its entirety will last quite a long time at temperatures of room temperature. Even if it’s vacuum sealed salami, it can be stored at room temperature for about six weeks without refrigeration.

Because vacuum packing prolongs the shelf’s life, salami can last for months at ambient temperature.

This is possible only in the event that the package has not been opened and the salami is intact. If you bought a box of cut salami vacuum sealed, you must place it in the refrigerator, even when it’s still sealed.

Anaerobic bacteria are able to infiltrate the meat, even though there’s no air inside the packaging. If you want to make sure that salami does not get rotten, the best alternative is to keep your salami chilled in the fridge.

How Long Does Frozen Vacuum-Sealed Salami Last?

If you are certain that you will not consume the salami by the timeframes stated on the package. The best choice is to store it in a freezer. If it’s frozen before it expires, the salami will be safe for an indefinite time.

If it’s not vacuum sealed, it is safe to eat. United States Department of Agriculture (USDA) regulations stipulate that salami is safe for a long time. However, its quality could decrease or the taste change after about a month.

The seal on the vacuum can help you preserve the salami’s flavor and prevents it from being damaged if put with other food products inside the freezer.

If you choose to freeze it past the date specified on the package, the salami might be rotten. Before eating salami, check for signs of spoilage, i.e., changes in appearance, smell or flavor.

Even if it’s past an expiration period, it’s best to remove the meat from the freezer if you notice any changes.

How to tell if salami is bad?

There are a variety of ways to know whether your salami is bad:

The first indicator is if there is a smell of stale or unpleasant is present within your salami. If you detect it immediately, it’s best to be more cautious and avoid eating it.

Check if the surface of the salami is slick. Technically speaking, it’s harmless, though,  if there are evidence of yeast and bacteria growth. You shouldn’t eat any food that is slimy.

If the color of your salami appears odd, it’s likely becoming dingy.

Check for signs of mold inside the salami you purchase. The cause could be bacteria that make it unfit to eat.

Technically speaking, you can judge the salami’s quality by tasting it. If it smells and looks good, it’s probably safe to take a bite.

Also, try to check the date on the package and also how long the salami has been in the shop prior to making any purchase.

In the case of the deli meat, it’s safer to not take chances by throwing away meat that has passed the expiration date rather than being at risk of food poisoning.

Fresh and ready-to-eat salami comes with soft texture. It typically features a bright pink interior that is surrounded by white spots that are derived from the meaty.

However dry salami is darker red hue that may also be scattered. Salami that has been dried is tough in texture. It could also have an uneven surface as a because of losing moisture.

What should you do if have eaten bad salami?

Consuming meat that is gone off may cause food poisoning. It is characterized by nausea, vomiting diarrhea, as well as body pain and chills.

Although a mild case of food poisoning typically goes completely when your body is rid of all the harmful substance it ingested but eating in large quantities could cause it to persist for a longer time. It can cause dehydration, which can be dangerous when left untreated.

In this case the first step is consult a physician to determine whether you require restricted and receive an IV drip, or whether your symptoms can be treated at home.

Wrapping up

How Long Does salami Last?

When you open a package of salami, it’s likely that it will last longer if closed. It is possible to store salami in the refrigerator for a few days, if it is required.

Be sure to secure them in a loose manner. If they’re strong, you may want to avoid them from eating.

Salami that is ready-to-eat can last for months. Therefore, if you’ve got excess stock, it is possible to keep any leftover meat in a freezer.

Maintaining a close eye on the dates is vital to ensure the freshness of the salami. It is helpful to keep in mind to freeze it when you’ve finished taking a bite of salami.


What does Bang Star Blast Taste Like?

Bang Star Blast Taste

What does Bang Star Blast Taste Like? 

What does Bang Star Blast Taste Like? 

What does Bang Star Blast taste like? Is this what you want to know? If you have no clue, read this post which deals with it.

What does Star Blast Bang, a popular energy drink, has been around for more than ten years. It can be difficult to identify the taste of star blast bang.

It tastes like a sour lime, but others say it tastes more like a grape soda with an earthy aftertaste.

This drink has been very popular in recent years, and it is available at many convenience stores across the United States.

What’s Bang Star Blast Energy Drink?

Bang Star Blast is a refreshing and tasty energy drink that will get you started.

Caffeinated beverages have just enough sugar and caffeine to power you up in the mornings, but it’s light on calories so you don’t feel deprived later in the day.

Bang energy drinks are sugar-free, carb free, and crash-free. They last for hours, without any flatulence, and there are no associated risks.

Nutritional Information about Bang Star Blast Energy Drink

Bang is a soda that masquerades as an energy drink.

Each 16oz Bang can contains 300mg of caffeine. Studies have shown that this may increase endurance, strength and even essential amino acids.

Supplementing with creatine is a popular idea for fitness enthusiasts. Bang CEO Jack Owoc discovered this after creating Super Creatine.

It’s stable in liquids unlike other forms of creatine. This makes it more convenient to drink your favorite foods and drinks.

The Bang Star Blast also contains potassium sorbate, which is a preservative that stops the drink from getting fermented.

It also contains phosphoric Acid to give it its tangy taste and sodium benzoate which acts as an antioxidant that prevents fermentation while keeping the product fresh with natural flavors.

Bang Star Blast Energy Drink has 0 calories, but provides substantial energy.

This is a healthier energy drink alternative that doesn’t contain high fructose Corn syrup.

Recent research has shown that HFCS may be harmful to your health, causing insulin resistance and diabetes-like symptoms like weight gain or glucose intolerance if consumed in large amounts over a long period.

This drink contains caffeine that helps reduce stress and boost mental clarity. You’ll feel great all day without any side effects.

What does Bang Star Blast Energy Drink taste like?

This is the question you might ask after trying this fruity blast energy beverage.

This delicious combination is full of light carbonation and tangy berry flavors. It’s fairly easy to see why it’s called “Star Blast”.

This earth-shattering energy concoction will taste like starbursts, with a hint strawberry.

They use ingredients like sugar cane and citric acids (which are found in candy) to provide a truly satisfying experience each time.

Another expert said, “The flavor is refreshing and there was no aftertaste to speak about.”

How do you drink Bang Star Blast Energy Drinks?

Are you struggling to get through each day? Are you struggling with school, work, or relationships? Maybe you need some Bang Star Blast in the life.

You need an energy boost. This is a simple way to get energy.

Before enjoying your Bang Star Blast Energy Drink, make sure it is at least 2 hours in the refrigerator

This will provide a more pleasant taste and chillier refreshment.

To keep the drink colder, you can place it on ice or freeze it in cubes.

You can pour half the contents of the can into a glass filled with lots of ice. This will allow you to keep enough room for more later.

You can fill the remainder of the can with water, or any other beverage you choose.

Add ice to the glass and enjoy. We guarantee you’ll feel great in no time.

Where can I buy Bang Star Blast Energy Drink?

Bang Star Blast is the newest energy drink that has hit supermarket shelves.

This new product is available in both caffeinated and non-caffeinated varieties. It will be a popular choice for those who are looking for an alternative to Red Bull and Monster Energy Drink, and without the high sugar content of traditional soft drinks such as Coca-Cola or Pepsi.

This new beverage is available at all major convenience and grocery stores.

Bang Star Blast’s non-caffeinated version is available in 12-ounce and 16-ounce cans.

The caffeinated version is available in a 20 oz container for those who want to consume it more frequently without worrying about getting too much caffeine from other sources, such as coffee.

You can order it online at Amazon.com and Walmart.com.

Wrapping up

What does Bang Star Blast Taste Like? 

Bang Star Blast, the new energy drink, promises more bang for your bucks. It is low in sugar and has light citrus flavors with hints pear, grapefruit, and pear.

If you don’t get it in a store close to your home, you can order it online through Amazon Prime. It is indeed a great way to feel refreshed and energized. Try it and thank me later!


What Do Ants Taste Like? 

ants

What Do Ants Taste Like? 

what do ants taste like

What do ants taste like? No idea? Then you should take a close look at this article which deals with it in detail.

The consumption of insects or entomophagy, derived from the Greek entomos (insect) and Phobei (to consume),  is frequently hailed as a new requirement for anyone who wishes to live a healthy and balanced lifestyle that is ecologically mindful and healthy lifestyle. However, when choosing their food, it’s not just important that it is healthy and sustainably harvested. Nearly everyone places more importance on flavor.

What do ants taste like? It is said that some ants smell hot, sour, or even lemony like lemons. The reason is due to the acid that insects contain, and employ to defend themselves against predators. The acid is safe to consume – similar to citrus fruits that are safe, in the event that you’re allergic to them.

Famous science writer and chef David George Gordon, who created his Eat-A-Bug Cookbook, describes the flavor of insects by describing it as “like cracked pepper” and says “that the “exotic flavor” is almost indescribable.

What are Ants?

Ants are tiny bugs that move in a line, much like a marching band. If you smell anything sweet, they’re ready to eat it. They’ll even get to the picnic basket before you eat the picnic food.

Ants are all over the world. However, not all of them are edible. In reality there are more than 10,000 species throughout the world and only a handful of species are edible.

The most effective way to spot the ants is to consume ants that are red generally. However, this doesn’t mean it is only possible to eat red insects. There are ants to be eaten indigenous to their area by doing research about them on the internet.

As with ants, larvae are also consumed by those who prefer to consume the ants.

In most cases, when you prepare insects to eat, you’ll usually blend them with other foods and spices which makes them less recognizable for their flavor and also adds the texture of a crunch to your food.

For those who are just beginning to learn about entomophagy but don’t want to be too concerned about the food they are eating at the moment, this is a great way to ease into the concept.

One of the most interesting aspects of insects is the ability to provide them with food in a manner that makes them taste similar to what you would like. The advocates of this modern approach to eating suggest you raise larvae and add chili flakes pepper, or whatever else to their food you’d like to try.

Since When Have Humans Been Eating Insects?

The consumption of insects isn’t as common as you believe when you’ve been educated in the culture of the West. For two billion people across all over the globe, insect are an integral part of their daily diet!

If you think about it, Westerners aren’t that far of eating bugs. In fact, they are a huge fan of lobsters and shrimps and lobsters, which are closely related to insects since they’re all arthropods, which are invertebrates that have an exoskeleton.

The hunters and gatherers of prehistoric times were voracious eaters of insects. However, questions about food quality might have been the only thing on their minds.

In contrast, ancient Romans which are known for their lavish lifestyles and lavish lifestyle, also, enjoyed feasting on insects! In the early century, the aristocrats ate cossus as a food item that was made by feeding larvae fed with wine and flour.

In fact, the Bible advises that in the Old Testament to eat locusts as well as beetles and grasshoppers!

Instead of asking when and why humans started feeding on insects since the beginning of time, it would make more sense to consider the reason why certain Western societies have partially stopped eating insects.

One of the most commonly cited reasons is the rise of agriculture. The meat consumption replaced eating insects as animals like cattle were able to have additional uses apart from their role as food sources.

While you are able to consume a grasshopper but you can’t drink its milk, or obtain leather and fur from it. In addition, there was an increasing aversion to insects as they were predominantly blamed for the destruction they caused to crops.

As cities expand, and urban areas showed an increased population density and the lowest standard of living, insects were also well-known for carrying disease.

The explanation may not be complete, however, as it doesn’t provide a reason for the continual consumption of insects, even in modern urban and agricultural zones.

Is Eating Insects Healthy?

Yes it is. Insects aren’t high in fat and are a great source of protein and plenty of vitamins such as zinc and iron and essential fatty acids, such as Omega-3.

In certain cultures, insects are linked to as having medicinal properties. In the renowned Compendium of Materia Medica, which is a Chinese medical manual written by Li Shizen in the times of the Ming dynasty (1368-1644) there are numerous recipes that include insects.

Richard Vane-Wright has argued that walking through a store will reveal that Westerners are living on a restricted diet in relation to fish, meat fruits, and the vegetables they consume. Contrary to the limited range of foods you can discover in the supermarket, there are more than 20,000 species of insects found in the UK itself! In addition to their advantages regarding the environment and health, they can also add more diversity to our food.

How To Use Edible Ants in Recipes

Ants can be consumed raw, picked or salted, cooked, fritted and in every other way that you could imagine.

Although it’s somewhat scary to test out insects for the first time, but remember, what you’re doing your part to help the planet. How?

Alongside in the case of ants, you’re also eliminating the natural plants of pests and insects by eating these.

There’s no requirement for pesticides or other powerful chemicals that could actually harm the environment and create physical health issues for our bodies.

Most of the time, you can consume ants in their raw form and this is the best way to get all the nutrients naturally.

If you’re someone who has never eaten before, I recommend that you make this healthy recipe called “Chapra” from Chattisgarh, India, made with red ants and their eggs.

You’ll only need to create a fine paste of the ants as well as some other ingredients. This paste you can use as a dip sauce or to marinate other meats.

In addition you could also try the well-known Cambodian Red Tree Ant’s meal. The primary ingredients are lemongrass and ants and lemongrass, which work well when you include the ants into your dishes.

Before you begin to experiment with any recipe for ants, make sure that you aren’t allergic to it. If you are, you should refrain from eating insects.

Wrapping up

What do ants taste like?

So, what do ants taste like? Well, I suppose you have already got your answer to that question. Anyway, there are many advantages to eating ants and eggs. They are nutritious, delicious and can benefit humans as well as the environment.

In the present, when it’s getting harder to get protein from animals eating ants, eating insects is a great way to get the proper protein.

Hopefully, this blog post can help you try out ants and other insects since in future there might be an acute food crisis that might harm human society in general.


What Does Beaver Meat Taste Like?

What Does Beaver What Does Beaver Meat Taste Like?Meat Taste Like? 


What does beaver meat taste like? If you have no clue, you should go through this blog post because here you will have all the necessary information about it.

Do you think beaver meat is worth the effort if require food? The answer is yes. Beaver meat can be eaten and it’s delicious. The best thing about taking a bite of beaver’s meat is that it’s full of fat and really tastes similar to pulled pork.

Beaver meat was once considered to be a speciality until recently across all of the US as well as Canada. This article will cover the beaver tail meat, as well as whether you can consume beaver’s meat and, most importantly, what does beaver meat taste like?

What exactly is Beaver?

Beavers are huge semi-aquatic rodents which prosper throughout the Northern Hemisphere.

They are the second largest living rodents in the world, after the Capybaras. Beavers are caught in the United States and Canada, which  are the largest users of beaver meat.

The feet and the liver of beaver is the ideal food item to consume as it is the most abundant source of protein found in our bodies.

It is additionally a very popular option to eat due to its distinctive medicinal properties.

In comparison with other red meats, beaver meat provides the highest amount of calories and fats.

The reason for this high level of fat and calories is due to the fact that the beavers are large even during winter.

Can You Eat Beaver Tail Meat?

You can indeed eat the meat of a beaver tail. Beavers are rodents closely connected to marmots and squirrels. They are often mistaken for muskrats, but they’re very distinct. Muskrats’ tails have a flat bottom, while the beaver’s tails are round at the top. The tails of Muskrats are larger in size.

The meat of the Beaver is thought to be delight in many circles due to the fact that it was plentiful, simple to preserve and fed lots of people who were along the trails.

Since they are rodents it is a sign that they may be carriers of parasites, so ensure you cook them properly prior to eating them. There are glands beneath their front legs, which need to be removed prior to eating.

What Does Beaver Meat Taste Like?

So, what exactly does the taste of beaver’s meat? While Lewis and Clark was on their way across the US One of their favorite food items was beaver. They particularly enjoyed taking a bite of the tail.

Many believe tastes similar to bacon because of its rich fats content. I was surprised to find that the beaver I had, tasted similar to pulled pork.

The secret to making it taste great is to remove the fat as much as is possible from the exterior. The fat is slightly stronger flavor, and the parts of the beaver where I had removed all the fat tasted the most delicious.

I didn’t put lots of spices in the meat of the beaver tail that I cooked, but I was in love with the hot sauce made of sweet chili drizzled over the. When I next cook beaver meat, I think I’ll prepare pulled beaver meat tacos, and then simmer it down in a crock in the pot for six hours or more.

How to cook Beaver Meat

If you want to cook a beaver you just need to remove the skin and wash it. Then, you can put it in a aluminum pan, and bake it. If the oven is set at 350 degrees, you’ll be required to cook the fish for around 2 hours. It is also recommended to add salt pepper, garlic powder and salt.

Beaver Meat Recipe

Ingredients:

  • 1 large beaver skinned and washed
  • 1 teaspoon salt
  • 2 teaspoons of fresh ground pepper
  • 4 cloves of garlic

Directions:

Wear rubber gloves for handling the beaver. Cut off the feet and tail of the beaver using an incredibly sharp knife. It is essential to get rid of them prior to cooking. They release toxins when cooking, which must be removed.

Cut the glands off both sides of the ribcage, and eliminate them. Clean the meat thoroughly using warm water. After it has been washed and dried, pat it dry using a towel and place it into an aluminum oven dish skin-side up.

Add salt and pepper. Add garlic. Cook the beaver at 350 ° in a covered pot for about 2 hours or it is tender.

Information about Beaver Meat

If you’re wondering if you should try eating some beaver’s meat, I strongly suggest it. They are delicious and have plenty of meat. Make them as if it was a pork loin. I’m not sure how you can be wrong in any dish. The meat of the Beaver is rich in B vitamins, protein, Potassium and Iron. The liver is full of Vitamin A which is beneficial for bone health eyes, skin and.

Beavers are a fantastic source for furs and food. They can be considered an excellent source of food in any circumstance in which you need to live in wild. There are plenty of them, simple to locate and easy to capture even in Winter months.

What is the difference between Beaver Meat And Beaver Tail Meat?

The beaver’s flesh is definitely delicious and contains plenty of protein. It’s not easy to eat if you do not bite into the tiny pieces however. When compared to beaver tails I was able to find it not nearly as delicious and was a bit less soft. It’s best to use an abrasive knife or better a saw that is able to cut through bone to cut the meat away and tail.

Overall both of the beaver meats are tasty meat. I’m happy to buy it when it was available. It’s not something I’d like to consume every day or more than once per month. This is due to the way beavers store toxic substances in their organs.

This is the reason you have to cut the glands on either side of your ribcage to eliminate them. If they’re not removed, they can cause vomiting.

Wrapping up

So, what does beaver meat taste like? I think I have already given the answer and hence would not like to repeat it here.

The carcass of a Beaver is a fantastic source of fur and food. It’s easy for you to find the trap or hunt in the wild. The meat of the beaver is amazing when cooked using salt, pepper garlic powder, along with sweet chili sauce to make cooked beaver tacos! If you’re interested in learning more about the nutritional facts associated with this kind of meat, go here.

Can you eat beaver’s meat? Absolutely. Follow the steps above and then season it with your preferred spices to create a delicious nutritious and nutritious meal.

If you’re thinking of eating the beaver’s meat after reading this, test it. There’s a good chance that you’ll enjoy enjoying this tasty delicacy to the fullest extent.

How Long Does Queso Last?

queso

How Long Does Queso Last?

How Long Does Queso Last?

Queso is a form of cheese dip very popular in Mexican food. You can make it using the cheddar cheese, Colby as well as Monterey Jack cheeses.

It is also being served as an appetizer in bars and at parties across in the United States.

Most people haven’t had the chance to experience queso, and they don’t know what to do with it. In addition, they are looking for an answer to the following query: How long does queso last?

This article will help answer these questions and many more.

How do you define Queso?

Queso is a Mexican cheese sauce that can be prepared using either American-style white cheese or American yellow cheese.

The dish was originally developed within Central America and the Caribbean but has since become an iconic element of Tex-Mex cuisine.

Queso is a fantastic dip for tortilla chips , or an additional topping for tacos, burritos or nachos.

It’s also widely used to fill quesadillas (a kind of tortilla that is stuffed with food).

A few dishes that incorporate Queso includes: Fajitas con Queso; Enchiladas Verdes as well as Fiery Queso.

It’s important to know that the term “queso” is not limited to Tex-Mex cuisine.

Queso is an ingredient in a variety of dishes such for: Quesadillas as well as Nachos; Spaghetti with vegetables as well as cheese Sauce; Macaroni & Cheese and Stews or Soups with Cheese additions.

In Mexico there are numerous varieties of cheese sauces which Queso came from, such as Chihuahua cheese sauce, Menonita cheese sauce, Puebla Style cream sauce, as well as Sonora cheese sauce to mention some.

What is the best way to Make Queso?

Do you enjoy Mexican food? If yes, this recipe is for you.

This step-by-step tutorial explains how to make Queso at home from scratch.

Follow these easy steps to discover the ingredients you should make use of and why they are crucial in creating your ultimate dip that is certain to be a hit with your most-loved chips.

Ingredients:

  • Evaporated milk
  • Cheddar Cheese
  • Tomato Paste
  • Jalapeno Peppers
  • Garlic Powder
  • Salt, and Pepper for taste
  • The cayenne pepper and the cumin

Directions:

In a medium-sized saucepan in a medium sized pot, melt butter on moderate temperature.

Incorporate jalapenos, tomatoes and garlic powder into the pot.

Cook for approximately five minutes. This allows the ingredients to release juices, which will assist to maintain the consistency of the dish later when you include milk and cheese to it.

Next, add evaporated milk, stirring it until the liquid has completely evaporated from the pan (about about three mins).

While stirring constantly, gradually add cheddar cheese (one cup at each time) until the cheese is completely melted into sauce.

Re-test the mixture before adding salt or pepper as is required to get the desired flavor degree. For those who love spice and want some extra spice: Add Cumin or Cayenne Pepper in the last few seconds of tasting.

Transfer the mixture into a pot and cook over low heat until desired thickness has been reached (about about five minutes).

Remove from the heat and place in the bowl or dish for serving.

The recipe is simple to prepare and can make enough food for four portions according to the level of your guests’ appreciation for it.

Queso is served with tortilla chips for an appetizer or with other Mexican food items at dinnertime.

Also, if you wish for this queso with an extra spice, add Cumin along with Cayenne Pepper in the next tasting until the desired amount of spice is achieved.

This recipe is fantastic since the melting cheese goes creating a cohesive sauce that connects all these ingredients together.

How do you store Queso?

Queso is generally an unrefrigerated food item.

It will spoil more quickly than bread or yogurt, but it can be slowed by filling coolers with ice packs to keep it cool and fresher for longer.

If you’d like to store to keep your Queso to be used later or even save some (or should you plan on not eating the entire portion), wrap it tightly using plastic wrap suggested.

Make sure not to cross-contaminate other foods, even though.

If there’s no option to store the Queso and you’re not able to refrigerate it, then you’ll need to find a facility which will store it for you.

A lot of grocery stores offer queso in their cheese section. They can also be found in Latino supermarkets.

If you cannot find it locally, you should plan to freeze immediately you can following purchase, though this might not be possible with certain cheeses.

How Long Does Queso Last? Does Queso Go Bad?

Queso is able to last an extended time since it is not cooked.

If you keep the queso in a sealed seal, it will last for up to five hours in the freezer.

If you intend to keep it for a long period of time be sure you’ve put in preservers such as the oil of canola or vegetable.

If the queso is kept with no ingredients, it can begin to give off an unpleasant smell and taste within a few days of storage.

To ensure freshness of your queso longer, make sure to add hot sauce as well as chopped jalapenos to the dish before it completely cools down.

If you buy queso from a store, you can keep it in an air-tight container up to two weeks prior to eating it.

Queso from a store is best consumed within one week of opening the jar or package because the flavor and texture begin to diminish after this time.

If you’d like for yourself some fresher Queso,  you can freeze some.

Freezing Instructions:

Place small portions in freezer bags that have as the air squeezed out as you can (don’t ignore the cubes of ice.) Close the bag tightly and freeze.

After they’ve been frozen put them all together on flat surfaces until they’ve formed a small cheese block.

Then, put them back in the freezer bag to allow you to take one portion at a given time whenever you need it.

How can you tell the difference between good and bad Queso?

Queso can be made using processed cheeses, or cheeses that are fresh, blended with other chilies.

The color of queso may vary according to the type of cheese that is that is used to make it.

For instance, a white and yellow, for example indicates that it was created with American processing cheddar as well as Monterey Jack. If it’s red or orange there are peppers included inside the blend.

What would bad queso look like? The most effective way to determine whether a cheese pot is good or not is by looking at its color.

If you see massive white clumps that are present in your liquid, you could have an issue related to mold.

Sour and unpleasant smells are also signs that it’s time for removal.

Another indicator that your queso isn’t good is if it’s darker, or is perhaps too thick.

It is often identified as white clumps, and generally smells sour.

There are a variety of reasons it is not recommended to eat moldy food, among them that the fungus can cause allergic reactions , such as vomiting headaches, hives, headaches and breathing difficulties.

Frequently asked questions

How Long Can You Store Queso in the Fridge?

Queso is not able to stay very well in the refrigerator. Queso that is fresh can be stored in the fridge for around five days. Queso that is preservative-free like the ones you can buy at a supermarket can last for about two weeks.

If you purchase queso from the restaurant, it can be kept in the refrigerator for 3 to 5 days. Keep an eye out for signs of mold on the surface.

Is Queso Fresco A Good Melting Cheese?

Queso fresco isn’t a melting cheese. If you’re looking for melting cheese, this isn’t the one you’re looking for. This is because it doesn’t melt well under heat like other cheeses.

It is usually utilized as a filling, rather than dip. It will soften but won’t melt when heated.

There are a few options for more melting cheeses include provolone, mozzarella, and cheddar. A different option, Mexican cheese, which is similar in taste to Monterey Jack, is Oaxaca cheese. It’s great with guacamole.

How Do You Eat Queso Fresco?

There are a variety of ways to enjoy queso fresco. It is a great choice for lighter and heavier meals. Queso fresco goes well with enchiladas, quesadillas, huevos, rancheros and carne asada as well as salads and grill vegetables.

What exactly is Queso Fresco and what is the best method to use it?

Queso fresco is rich and fresh. If you make it yourself, the milk is allowed to ferment and curdle. The curdled milk can be strained using cheesecloth and then pressed. Some let it sit for a few days, whereas others make it available for sale or consumption immediately.

The best thing about queso fresco is that it’s very crumbly. It can be easily used in any recipe. Queso Fresco is a delicious snack to eat with tortilla chips, and then include an ounce of sour cream or salsa to go with the cheese.

It is also possible to stuff tacos with queso fresco, or mix it into salads. Queso fresco is delicious on cooked beans too.

Queso fresco may also be cut or chopped rather than crumbling. If you slice it, or cut into cubes it will go well with dried fruits and even meat. This is a healthy and nutritious snack.

You’ll want a special serving dish for cubed, or crumbled queso.

What Do You Do with Your Old Queso Fresco?

Queso fresco cheese makes an excellent addition to almost every Mexican food item. You can easily break up queso fresco, and sprinkle onto your favorite tacos, quesadillas and nachos. It is also empanadas, enchiladas and tamales to mention some. It’s good to sprinkle on salads too.

It is an excellent filler in tacos, too! You can purchase the lazy susan taco station and make use of one or two bowls to store the cheeses you’d like to include in tacos.

Queso fresco’s texture is similar to the texture of ricotta and feta. Queso fresco can be described as a smoky cheese. It is not able to melt and is more used to accompany a meal instead of a cheese which melts faster and can be used as a dip.

Dinner Ideas Using Queso Fresco

Queso fresco goes well with almost any Mexican food. It is great as a topping or filling. Spiced dishes stand out when you add queso frisco.

Tacos

Tacos are an excellent meal option for any time any day of the week. You can pick between soft or hard shells for taco evening or even a combination of both. You can crush some queso fresco pieces to mix in with the other taco toppings.

Supreme Nachos

The best thing about Nachos is they are able to be anything you’d like to make them. You can garnish your nachos with anything you want, from beef lettuce, guacamole, lettuce jalapenos, tomatoes, and onion, or even shredded queso fresco and cheddar cheese.

Quesadillas

Quesadillas are simple to prepare and taste delicious when served by adding queso fresco. Add this to your beef or chicken to make delicious quesadillas.

Tamales

Tamales are made from corn dough, which has beans or meat in the middle. You can easily add queso fresco into your tamales. You can simply crumble some and then sprinkle it in with the rest of the filling for your tamales.

Enchiladas

Enchiladas are like burritos. Add a splash of queso fresco. It’s not just a flavor enhancer but also looks appealing when served over the sauce, too.

Empanadas

Empanadas typically contain an ingredient of protein like chicken, beef or pork. They are served with basic vegetables like corn or carrots. They’re like pockets of dough that has the filling in them. This is a great addition to any meat and vegetable combo you prefer. You should:

  • Cut circles out of the crust of pie.
  • Fill the container with the cooled ground beef and cheese.
  • Fold over and then crimp edges using edges with a fork.
  • Spray the air fryer basket with oil
  • Then, adjust the air fryer to 350 degrees to 375 degrees, and cook for about 8 minutes.
  • Turn each one gently. Spray once more.
  • Using oil or brushing with butter, then with butter or oil for one additional minute.
  • Serve them with sour-cream and salsa.

Wrapping up

So, how long does queso last? Well, many folks believe Queso can last a long period of time, but others do not.

It is made typically from Monterey Jack Cheese, as well as other ingredients, like peppers or tomatoes.

It can last up to 5 days within the refrigerator in terms of the duration of time.

And, last but not least, you should always verify the expiration date in order to make sure it’s still acceptable.


You may also read: What does Guacamole taste like? 

What Does Ratatouille Taste Like?

Ratatouille

What does Ratatouille taste like?

What does Ratatouille taste like?

What does ratatouille taste like? Does it taste good? If you want know the actual answers to all these, you should go through this post now.

To begin with, perhaps the aroma of ratatouille makes you think of the Pixar animated film Ratatouille! The film was the first time for many people to learn about this delicious dish, and also its pronunciation.

If you’re not familiar about it, ratatouille can be described as a kind of stew made from vegetables that was developed in France. The dish is made up of only vegetables and is delicious which is why it’s a match to be a perfect meal for vegans.

It is also perfect for anyone who is on an exercise program to lose weight since it is loaded with nutrients and is low in calories. What is ratatouille’s flavor like and what exactly is this delicious dish? Ratatouille is actually the name of a stew made from coarse ingredients that originates from Nice, France.

The recipe comes in many variations, but usually has lots of tomatoes, onions, zucchini as well as garlic and capsicum. The vegetables are usually cooked in olive oil and are seasoned with thyme and oregano, marjoram, bay leaf, and basil.

Ratatouille is a scrumptious recipe that is enjoyed as a complete meal by pairing it served with bread, or as a sauce for pasta. It is also used as a dish to accompany eggs or chicken. The ingredients are mixed together in the pot along with garlic and olive oil prior to serving over rice or spaghetti for the main dish.

But what does ratatouille taste like? To learn more about this recipe that is perfect for evening meals at home continue reading.

What is Ratatouille?

Ratatouille is a food item of France, having a Provencal origin.

The name is derived from the word “ratte” meaning “rattail,” which means throw in this context.

Though it’s to be one of the Spanish national meals, the ratatouille recipe was developed in the hands of French chefs who came from Provence and Nice while working with Italian recipes that they learned from the local chefs.

In France the traditional ratatouille dish is eaten as hot dish during summertime, served with bread, boiled potatoes or green salad.

Similar to other dishes that simmer for long periods (such like Cassoulet). It is made of the staples of your kitchen: onions, tomatoes, garlic fresh herbs such as basil leaves and thyme leaves and olive oil.

Additionally, you’ll require zucchini and eggplant to compensate for the fact that you left out the other half of its classic ingredients, which is sausages and peppers.

Ratatouille is also delicious cold in the summer months. It is consumed as a main meal or as a side dish.

It is often served with cheese, which is either sprinkled over the hot ratatouille just before serving or added while the cooking.

Why is Ratatouille famous?

Ratatouille is a cult Disney film about a curious Rat named Remy who finds himself in love with food.

The dish and the movie are named in honor of the French Provencal stew, often served with “ratatouille,” or vegetables and eggplant.

It was nominated to win the Academy Award in 2007 for Best Animated Feature Film of the Year. It also earned Pixar their first Oscar since the time it was first launched.

Since the film was made public in 2007, the animated film has been making waves.

The dish became well-known on the streets of the actual world. The plates are now available in Disney World, Disneyland Paris and Tokyo Disneyland.

It’s also an option on the menu at many restaurants across America which includes Denny’s along with Le Pain Quotidien.

Are you a fan of Ratatouille?

While it isn’t clear if ratatouille can be beneficial for you, this dish sounds delectable.

This easy recipe, from The Kitchn includes zucchini and eggplant as its primary ingredients, with garlic tomatoes, onions and thyme completing the list of ingredients that give it a delicious flavor.

The ingredients in this recipe are all healthy for you.

Eggplants are high in nutrients and antioxidants such as vitamins A and E , as well as an adequate amount of B-complex vitamins which aid metabolism.

Zucchini is low on calories, and does not contain cholesterol or saturated fats.

It does, however, have lots of fiber (making it more nutritious than potatoes) If you’re trying to control the weight you put on, zucchini can be helpful in that regard too.

The tomatoes are a great source of vitamin C and lycopene which are both known to prevent cancer.

In addition it has antioxidant properties and iron, calcium, and omega-3 fatty acids, along with other nutrients.

Ratatouille is beneficial for your health since it is healthy and packed with vitamins which a diet based on must-have vegetables. However, if you’re not interested in all the veggies that are in it, you can substitute with whatever that best suits your tastes.

What does Ratatouille smell like?

To answer your question, the dish is a fragrant mixture of various vegetables.

Ratatouille smells like garlic, onions tomatoes, herbs, and onions which have been sautéed in olive oil to the point that they become soft or slightly browned along with herbs like thyme or parsley.

The dish is sweet in flavor from the juices of tomatoes and onions along with a spicy flavor because of black peppercorns.

There are also smell of bay leaves making ratatouille by itself and will impart an earthy smell of the bay into your kitchen.

Does Ratatouille Have Meat?

Ratatouille is a dish that is vegetarian and is not made with meat. As I have already mentioned, it is the name of a French recipe that is made of stewed veggies, generally consisting of onions, tomatoes garlic, bell peppers.

There’s not a mention of meat anywhere in this vegetarian meal.This means that there’s no animal products in the ingredients list.

What is Ratatouille Smell Like?

Ratatouille is a French food that is made up mostly of vegetables. The literal translation of ratatouille is “to mix” as well as “toss.”

Ratatouilles are generally eaten as an appetizer along with bread; however, they are also eaten by themselves.

Ratatouille is a distinct flavor and is difficult to define.

It’s composed of an acidic mixture that contains zucchini, eggplant and tomato sauce that are cooked until full of flavor.

The food is typically served warm so that the flavors to mix and get more intense.

While ratatouille may have a distinct flavor than other cuisines, it is very well-loved around the world due to its distinctive taste.

It’s a great source of veggies that contain vitamin A and C like broccoli and spinach as an example.

This makes it a fantastic choice for those looking to eat healthy food while tasting new foods.

What is the relationship between Ratatouille and couscous rice?

To make a traditional French dish, ratatouille pairs well with couscous, or rice or potatoes.

Ratatouille is typically served as a dish to accompany meat dishes such as roast lamb or beef stew.

Ratatouille is a great dish to serve as a stand-alone dish with bread that can be used to scoop up the veggies to serve as an appetizer.

Ratatouille is also delicious when transformed into sauces, soups and dips like tapenade, gazpacho, or the baba the ghanoush.

How do you make Ratatouille?

If you’ve not had the chance to cook ratatouille you can try it as some variety.

It’s a simple and delicious recipe made from zucchini, eggplant and tomatoes simmered with olive oil and herbs.

This is how you can make Ratatouille:

Set your oven’s temperature to 190°C (375 degreeF). Cut the tomatoes, eggplant, zucchini, and squash into 1/16-inch round pieces. Tip: Don’t stress about perfect slices; any pieces that are uneven will be fine.

A 12-inch oven safe skillet at medium-high heat, add olive oil and followed by the onions, garlic and peppers. Then stir for 10 mins or until they are tender Then sprinkle salt and pepper. Mix in tomato sauce on the heat to a low. Stir in basil and keep stirring until the sauce is poured onto an uncluttered surface to form an even layer.

Lay the cut vegetables in different patterns over sauce, starting from the outer edges towards the middle. Season them using salt and pepper. To season your herb Mix basil, garlic parsley, thyme salt pepper olive oil, and salt in small bowl.

Spread the veggies over before wrapping the pan in aluminum foil. Bake for about 40 minutes with the foil uncovered (for another 20 minutes) until the vegetables soften.

Ratatouille is a great choice for the main dish or as a side. It’s delicious the next day when it is served warm with foil, then and then reheated in the oven at 350F for approximately 15 minutes or heated up in microwaves until the temperature you prefer.

Wrapping up

What does Ratatouille taste like?

So, what does Ratatouille taste like? Well, I have already talked about it in details, so will not repeat it again. At any rate, Ratatouille, an iconic French dish ,can be prepared with numerous ingredients and tastes.

Famous food writer John T Edge, in a recent article says, “Ratatouille isn’t about eating or tasting; the focus is on cooking.”

Ratatouille comes in many styles and flavors that are based on the regional cuisines and ingredients. So, it is a good idea to make your own version something that suits your personal taste and preference..


What Does Peacock Taste Like?

peacock

What Does Peacock Taste Like? 

What Does Peacock Taste Like? 

I am sure you are here because you are looking for some information about peacock. And the main question that you would like to ask is: what does peacock taste like? If you are really interested, I suggest that you go through this entire blog post as it deals with al the questions related to peacock.

Based on the country you live in, peacocks can be considered to be a treat on the menu or takes care of by the Government as one of the disappearing species. Yes, in some areas they’re in danger of disappearing, and therefore, shouldn’t be considered as an alternative protein option for your meals.

When you are thinking of eating peacock, you must check what the law of the country says and whether you should eat them. Or else, this might get you into big trouble.

What is A Peacock?

Peacocks are part of their home in the Phasianidae species and can be closely with other species including quail as well as pheasants and chickens. The male is known as a peacock, and is often seen with an appearance that is more vibrant, while the female is known as peahen. They usually have the same shades of feathers.

The most popular species of peacock seen throughout the globe includes the blue peacock. Peacocks of green are thought to be to be sacred within India and is more difficult to find. The Congo peafowl is found in Africa and is rapidly reducing its population.

Males are famous for their lavish display of feathers that vary in colors, including green and blue, while peahens are predominantly gray and have brown. The birds utilize their feathers to lure the attention of a potential partner.

Peacocks are omnivores. They generally take food from insects, plants as well as other small creatures. They can grow very large and are classified as the largest birds that can fly. When fully grown, the birds can weigh as much as 14 pounds and will reach an average height of 130cm.

They are usually seen roaming free in the wild. They typically prefer to hang high on the trees or the roofs of structures.

Disclaimer: Peacocks aren’t found in the U.S and have been brought in for the purpose of becoming domesticated animals; therefore, they are not suited to hunt. Don’t try hunting or killing the Peacock when you reside inside the U.S.

Do Peacocks Taste Good?

Peacocks and peafowls are believed to taste similar to chicken. There are some who claim that after brining the meat will taste like a turkey. Others compare it to the meat of a Guinea fowl.

Based on accounts of what I’ve gathered, peacock has a flavor similar to pheasants or turkey. In certain parts around the globe, peacock meat can be expensive because of its rarity. In other areas, it is considered to be taboo as food on a plate. China is prohibited from eating green peacocks in all.

Peafowl, or peacock meat, offers many nutrients that can attract those living on the open plains. Similar to its counterparts the chicken as well as other meats from poultry peacocks are rich in protein. The meat is also rich in minerals and vitamins, such as Potassium, Vitamin B6, Vitamin B12 Magnesium, Iron, Zinc and Niacin.

These minerals and nutrients offer many health benefits. If eaten the breasts of the bird strengthen teeth and bones because of the high content of phosphorus and increased metabolism and immune system due selenium.

Is it Legal to Eat Peacocks in the United States?

As we mentioned earlier, China has specific laws that safeguard the green peacock at the national level. However, the blue peacock is typically bred in captivity with the sole purpose of eating.

Because this bird is not considered native to most countries that it could be found in The C.I.T.E.S. international treaties have guidelines to safeguard them.

In America Peacock meat is known to be scarce, but it’s legal to eat it. The main issue is transport of the birds across borders as they are not transported to efficient use. Domesticated birds like geese, chickens, certain farm-raised ducks like ostriches, pheasants and emus, may be bought for food but only after breeders have gone through several hurdles.

In certain states, you’ll be required to obtain local, state and federal approval to eat certain bird species (including parrots) even if you’ve kept and bred the birds. The peacock population appears to be stable at present. However, your state’s regulations will determine if you’re allowed to try the meat of a peacock.

People who are avid birders in the U.S. are willing to spend a lot of money for eggs of ducks, geese and other birds that are rarer. They’re more expensive, which means the public at large will not buy the eggs.

In the end, peacocks are not protected throughout the U.S., and there are no laws that prohibit the sale of peacock’s meat. The most popular place to find peacock meat that is domestic is California.

Therefore, based on your morals and beliefs you may cook and purchase peacock and peahen meat since it is actually legal within the U.S. The question of whether or not it’s morally acceptable is entirely up to you.

What Do You Cook Peacock?

When you cook the bird at home, or in the wild on an open flame, you can think of it like you would: chicken turkey, quail or the pheasant. The meat is lean and has to be cooked slowly in order to ensure a delicious and succulent result.

It is possible to keep the bones stored to make a stock that will supply you with the nutrition you require and provide you with food for a couple of days. The breast of the bird needs to be cooked in order to be as fat like the rest. If you are cooking over an open flame it is ideal to replicate an enclosed oven or the pot for cooking.

The legs taste best after they’ve been cooked for about 3 hours. This produces tender and juicy meat that will please a tough-working wild animal with a full stomach.

What do Peacock Eggs Tastes Like?

If you’re interested in finding the taste of peacock eggs it could be for an extended period of period of time. Peahen eggs are, however, are laid between four to eight times per year. The hen only produces just a few eggs per breeding season. Peahen eggs are expensive to purchase eggs.

The eggs have a similar flavor as a chicken egg. They contain the same nutrients when eaten. They are generally higher in fat content, and a higher yolk-to-white ratio. The egg’s appearance is similar to the appearance of the turkey egg.

Consuming eggs from peacocks will depend completely on your personal circumstances and opinions about this magnificent bird. Blue peacocks’ population is healthy and stable, unlike that of Congo peacock. It might be the right moment to test this delicious delicacy to check if it’s good. Check the regulations and rules of your particular state as it relates to the legality of eating the magnificent meat of a bird, or eggs.

Why peacock meat is so rare?

The reason peacock meat is so scarce lies in economy of supply and demand.

There’s not a lot of demand for the peafowl meat, and it’s expensive to manufacture. Because it’s costly to produce it, not many people are purchasing it.

It’s a vicious cycle that makes total sense and follows the same logic that is applied to many foods and consumables.

It’s not the same as the meat of chicken, for instance. Almost everyone is fond of chicken and it’s in great demand.

This is why scientists and farmers have selectively bred chickens over the many years to make them larger, heavier, quicker to reach butchering age, and ultimately faster and cheaper for the meat to be placed and  sold in supermarkets.

The logic runs a bit deeper for peafowls, but. Some of the reasons that the meat of peacocks is lower demand are because of:

The taste preference of gamey meat is a favorite flavor, but not for all. Some people enjoy it, but I can understand the reason why you don’t want to take it in as much. Chicken, on however, is more appealing to a wider population.

Costs – Peacocks cost significantly more money and takes much longer to raise a bird to butchering age than chicken. Peacocks also produce less meat than chickens and, therefore, peacocks are always going to be serving an entirely different segment on the food market.

Wrapping up

So, what does peacock taste like? I think you have already got your answer. The peacock is a magnificent and exotic bird, and abundant in nutrients.

While it provides numerous health benefits but it also makes an exquisite meal so provided you cook it properly and with the right spices, you’re guaranteed to get its delicious flavor.

If you’ve never tried this before, it might not be able to get enough when you try it.

How Long Does Flan Last? 

flan

How Long Does Flan Last? 

How Long Does Flan Last? 

How long does flan last? If you are looking for an answer to this question, you should go nowhere. For one thing, in this post, I am going to discuss in detail about flan and how long it lasts along with other relevant information. Read along if you are interested.

Flan is a sweet, baked treat that is made with sugar and eggs. Flan is available in numerous varieties around the globe.

Spanish food has gained a lot of popularity and has been introduced to different countries through the colonization efforts. Flan is often consumed for a snack or an element of a meal.

In this blog, we will cover the length of time that flan can last and the best way to store it when you decide for making it yourself.

What exactly is Flan?

Flan is an ice cream dessert people from Spain and Portugal typically eat, however, it’s also a global hit. It is composed of eggs that are mixed with milk and sugar.

It is cooked in the oven, with a caramel sauce at the bottom and may be topped with chocolate or whipped cream or even nuts.

Flan can be served with whipped cream, making it even more delicious.

The texture of flan should be silky smooth similar to custard but not as thick.

Flan is a famous dessert from south Spain it has been popular since the middle ages and has the same characteristics with other desserts such as crème caramel, panna cotta or the zabaglione.

It’s a fairly simple recipe that can be made at home, especially for people who are comfortable cooking eggs.

How do I store Flan?

Flan typically has eggs and milk. They are combined with sugar prior to making a ramekin.

After cooling off from cooking, flan needs to be refrigerated overnight so that the custard has time to get set to ensure that when you cut into the delicious cake it’s delicious goodness won’t be wasted.

Flans taste better after they’ve been refrigerated after cooling . However, they don’t require any special attention after being they are stored away. They should be in a sealed container until the time they need to be used again.

How Long Does Flan Last? Does Flan Go Bad?

The flan is baked inside a casserole known as “flan mold” until set.

After the flan has set it will be covered with an outer layer that’s hard to touch, and the inside of the coating is a semi-solid liquid custard.

There are a variety of regional variations of flan. Flan is made using various varieties of sugar, milk vanilla beans, other flavors.

Flan, in general, is best enjoyed when freshly baked.

Flan will last from two to three days in the fridge.

If refrigerated, flan must be stored in a piece of wax or plastic paper that covers the top 1 inch to one and a half inches of the flan’s surface.

This layer prevents the custard from getting wet. of the custard. It also prevents any other food items from being absorbed into it.

Flan can last up to two weeks in the fridge, and is just as tasty without flavor or texture changes.

How do you tell the difference between bad or good flan?

Flan is a light and sweet custard dessert. It is served as a single dish or on large trays.

It is a common food in many Latin American countries including Mexico in addition to Cuba.

Flan can be made using various flavors (chocolate or caramel) or with additional ingredients to add flavor (vanilla extract or cinnamon).

The best way to know whether your flan dessert has gone bad is to look at its scent. When the custard turns sour, it releases a strong unpleasant smell.

The custard-like foam that is on top of the flan can also separate from the remainder of the dish. Additionally, the liquid component of the flan could appear as a dense, gelatinous mass.

Another indicator that your flan is deteriorating can be seen in the way the flan feels, soft or hard.

If the custard appears to be watery, it could be a sign that you’ve got an expired or spoiled flan before you.

How to tell whether your flan is completely ready?

Your flan is finished when it’s light-colored and soft to the touch, but not completely solid. To confirm, put the blade of the knife into the middle of the flan, and about halfway down. The blade should be with a clean edge. Take the baking dish from the oven, and then take the flan out of the bath of water.

Can you freeze flan?

Can you freeze Flan? Yes, and if you do the right thing, you can freeze it for as long as 3 months indefinitely without altering its flavor or the texture.

Flan is among the most popular and well-loved desserts around the world. Flan’s beautiful, soft and flan with a wobbly texture and a delightful sweet flavor are sure to please the masses.

It’s not too hard to create, however you might believe that it isn’t going to have a long shelf-life due to the delicateness of its texture. But , you may be wrong.

The main ingredients in most flans are cream, eggs that are whole and sugar. However, for egg whites, they are the same components used for making Ice cream. Ice cream freezes at the temperature of 0°F, so why don’t you make flan?

Why is it that my Leche Flan has bubbles?

Flans contain ugly bubbles around and the inside isn’t smooth. This is due to the high temperature of baking or steaming or a prolonged baking time which causes the milk boil in the mix. This leads to flans that are overcooked.

How long can custard be kept in the refrigerator?

We typically recommend that you wait 3 hours before you take it away, in the risk zone of between 40 and 140 degrees F. If you have eaten it and feel fine, it is probably fine but don’t give it to anyone who is in the group at risk.

Can you make flan in the mold of a silicone?

This recipe yields a small flan, which can be found in one of my silicone baking molds that is approximately 9” in diameter. You can also use non-silicone baking pans.

Can flan sit out overnight?

Can flan be consumed even if it’s left out for an extended period of time? I wouldn’t suggest that. Although it is loaded with sugar as an ingredient used to preserve food, flan also has milk as well as eggs, which contain an abundance of protein and moisture content. This creates a great place for the growth of unwanted harmful bacteria.

How do you take flan off the mold?

The flan should cool off in the hot water bath till it is sufficient to hold the dish; then chill for 8 hours prior to serving. To remove the flan from the mold take a knife and run it around within the mould. place a plate topside down on the mold. Invert the flan onto the platter.

Can you get food poisoning due to flan?

Some food experts say that leche flan could become a source for bacteria in the event that it becomes spoiled. Ingestion of it could cause stomach pain and headaches.

What is the shelf-life of flan?

Keep any remaining leche flan in the refrigerator inside an airtight container up to 3 days.

Does flan in a sealed container go bad?

Flan can last from two to three days when stored in the fridge. When refrigerated, it should be stored in a sheet of wax or plastic paper that covers the top one inch to one and a half inches on its top. Flan is good for 1 to two weeks in the freezer, and is as delicious with no flavor or texture changes.

Does flan get spoiled when it is not refrigerated?

Flan can never spoil since the primary ingredients are dairy or cooked milk. This kills the bacteria that spoil food, and sugar is also included, which is used as a preservative for ages. The same is true for fluid milk. It doesn’t spoil for weeks based on the date it was made.

Do I have to eat flan on the same day?

Is it possible to store hot flan in the refrigerator? Flans are served warm in room temperature, or chilled. Store the flans within the oven until they are ready to serve on a plate. Custards can be stored in the refrigerator for around two days. They are perfect to prepare ahead of time for parties.

Can you re-cook flan?

Therefore, do not make an overcooked flan, and take them off the stove. The desire to cook an additional few minutes is normal when the flan’s center of the flan is still wobbly. Don’t do it. It’s better to keep it undercooked rather than overcook (as flan continues to cook after you remove it your oven.)

Flans are cold or hot?

The flan will fall on the plate using a squelch and then lift it off the pan then let the caramel flow across the top. (If the flan isn’t able to emerge, then flip it over and set on the bottom of the pan on a hot, wet cloth for just a couple of minutes to soften the caramel.) Serve chilled, cut into slices.

Can you keep flan at room temperature?

Flans are served warm in room temperature or chilled. Store the flans inside the dish of baking until they are ready to serve on a plate. Custards will keep in the refrigerator for around two days. They can be made ahead of time for parties.

Do I need to reheat flan?

Flans are baked in smaller souffles and ramekins until they are set. They are not only adaptable; these flans possess an additional benefit. The flans are baked, then unmolded one day in advance and returned to the oven when required.

Do I need to be covering my flan while baking?

A foil-covered flan will help in cooking. Set the dish on the rack in the middle and bake for 30 to 40 minutes. Check at intervals of 10 minutes, until your flan is displaying the appearance of jello within the center and the sides are cooked. After you take the custard out of the oven they will firm up when they cool.

What can I do to tell when flan is ready?

The flan is done when it is lightly colored and soft to the touch, but not quite solid. To confirm, put the blade of the knife into the middle of the flan, and about halfway down. The blade should be with a clean edge. Take the baking dish from the oven and take the flan out of the bath of water.

Do you want to eat flan hot?

Flans are ready! Super quick dessert. It can be served hot or cold. Make sure to spoon some caramel sauce on top when serving it. If you have any leftover, put it in the refrigerator.

What can you serve with flan?

By adding cream condensed milk, cheese along with evaporated milk. This recipe for flan is guaranteed to be delicious and smooth! Serve it with a gorgeous salad of fruits to soak up the sweet caramel sauce and make for the ultimate dessert.

Can you freeze caramel flan?

Yes, you can. Similar to the majority of baked products, you can freeze flan to extend its shelf life by 1 to two months. Flan is extremely freezer-friendly and does not cause any damage to texture or changes in flavor or taste. Flan is made using foods that are freezer-friendly.

How do you cool flan quickly?

Remove the baking pan and all the ingredients out of the oven and allow it to rest in water at most an hour. After it has cooled, cover the flan with cling film before transferring it to the refrigerator. Then, chill for at minimum 4 hours or up to an overnight.

Can you freeze cheese flan?

It can be kept on the shelf for up to 3 months but keep in that the filling is likely to cause the crust to get soggy. Hence to get the best results, we suggest making it use within one month. You can bake this directly into the oven after it has been frozen.

Why does my flan taste eggy?

Your flan can taste eggy. Freshly cooked flan has more of an eggy taste. But, this is likely due to an imbalance in the egg: liquid ratio.

Wrapping up

So, how long does flan last? Well, I have already discussed this topic in the earlier part of the blog post.

In the end flan, we can say is a kind of dessert that lots of people like, but it is a food that can spoil.

We hope that you have enjoyed this post on flan’s shelf life.

Flan is an incredibly delicious, versatile and delicious dessert. It is served with fruit for breakfast, substituted of ice cream to add an innovative twist on your preferred flavor, or garnished with whipped topping for an experience that is more traditional. Try it if you haven’t.


How Long Does Asparagus Last?

asparagus

How Long Does Asparagus Last?


So, you bought asparagus, ate about half of it and then put the remainder in  storage. But then, after a few days or so, you will definitely start wondering: how long does asparagus last? Not unlike, isn’t it? Read on for more information about asparagus storage.

You don’t want it to go to waste in the time you get a opportunity to utilize it. It’s also a costly vegetable as well as you’re a conscientious spending person.

Perhaps you’ve heard that asparagus is a food item with a extremely short shelf-life and you would like to discover the best method to keep it in storage it to ensure that you can store the asparagus in the place it should be once you get back home.

If one of these sounds familiar, this article is intended for you. Let’s get started.

How long does asparagus last in the fridge?

  • Asparagus 3- 4 days :4 days
  • Asparagus wrapped in a dry paper towel: 5 – 7 days
  • Asparagus in a glass jar with water: 10-14 days
  • Cooked  asparagus: 3- 5 days

Fresh asparagus is good for three to four days inside the refrigerator by itself. To get longer storage time, you need to either wrap it in a damp paper towel or put it on its side in a container that has water in it. The former will give you the opportunity to store it for up to a week but the latter could allow asparagus to last to up to 2 weeks.

As you can see, the durations vary significantly based on how you’re willing to invest when it is time to move to storage.

If you’re prepared to invest a few minutes to go an extra mile (more details on techniques in the section on storage), you can triple the length of time asparagus lasts for.

TIP

If you want to preserve it for a longer period,  freezing is the best option to take.

Another crucial aspect in making the asparagus to last for as long as is possible is picking the best asparagus you can find in the grocery store or supermarket.

Here’s how to choose asparagus from the grocery store:

Pick bunches with glowing green spears, which feel hard to the feel

Avoid slimy, limp, or darkening asparagus

When it is to cooking asparagus it maintains its freshness for around 3 to five days after being stored in the fridge. Similar to its raw counterpart that you can freeze, this is how you keep it over time.

How to store Asparagus

You should store asparagus in the refrigerator in an un-sealed plastic bag. If you would like to preserve it for a longer period, wrap the spears’ bottoms with a damp towel or set them up in a container with a little water. Both  these methods can help asparagus spears to keep their the moisture and improve their quality.

When it is time to the storage of cooked asparagus, simply transfer asparagus spears to an airtight container. Close the cap and then refrigerate, or freeze.

These are the basic points and let’s discuss the specifics.

First, asparagus that is raw is available using a rubber band that is placed around the asparagus. Don’t remove this band when you get at home. It can help secure the spears while in storage.

In addition, unlike other vegetables that are grown in the garden, asparagus thrives in a humid environment. This is why placing it in a half-opened bags of plastic is a suitable alternative. The bag not only helps retain water, but it also lets it to breath.

To make it to last more time, you must to provide it with more moisture There are at a minimum two methods to do this.

The easiest solution is to cover the stalks’ bottom inside a wet (not dry) paper towel, then put them back in the bag and leave it un-sealed.

The most efficient method of storage is to place asparagus in a glass jar filled with water, then cover by a plastic bag

The Best Method To Store Asparagus

If you want the stalks to keep their freshness for a month or longer, you should try a more efficient method of storing them in a container having water in it.

For this, you need a jar or container (or a cup, as you will see in the image) that has about one inches of water.

Put the asparagus upright into the container. Cover the stalks’ tops with a freezer bag or plastic. Do not tie the bag, simply hang it over the asparagus. The vegetables still require air circulation to remain fresh. Replace the water if it becomes cloudy.

Does Asparagus require refrigeration?

There’s no need to chill asparagus when you plan to cook it the day you purchase it. However, if you require it to keep its quality for longer than that, placing it in the refrigerator is absolutely necessary.

How long will asparagus last within the Fridge?

If you throw your fresh asparagus in the fridge in a bags made of plastic, it lasts anywhere from three to four days before beginning to get rotten, similar to in how bell peppers are stored in the refrigerator.

If you decide to wrap the bottom of the stalks in a moist towel, and then place them in the refrigerator, you extend the freshness for another three days.

If you make the effort to place your asparagus in a container that has one inch of water, the asparagus will remain fresh for up to fourteen days.

How Long Does Asparagus Last after Cooking?

Once you cook asparagus, its quality quickly changes. When it is stored within an airtight container it lasts up to up to three to seven days. To keep it more, it is an option to keep it in the freezer.

Place the cooked asparagus in a container for freezing, take out the air, then place in the freezer. If you are freezing asparagus that has been cooked is necessary, do it immediately after cooking, rather than waiting a few days because the nutritional value decreases.

Can you freeze asparagus?

Even  if you use the elaborate storage techniques outlined in the previous paragraph, asparagus does not last as long. It’s also way too expensive to throw away it to be thrown away.

Fortunately, it freezes fairly well. If you purchased too much food on a sale or your plans have changed and you don’t have the time to make it within a couple of days after purchasing and the option of freezing it is the best way to go.

How to Freeze Asparagus

This method of freezing is almost identical to what I use to store broccoli (read more about it in my article about the storage duration of the broccoli).

Here’s how you can freeze asparagus:

Prep. Trim, wash and cut the asparagus.

Blanching

It’s now time for the asparagus to be blanched. Before you place the asparagus in hot water separate the stalks according to the thickness. Small ones should be blanched at 90 seconds for more, large ones for 120 seconds, and the thick asparagus to up to 180 minutes. In general, each spear should change to a vibrant green color after the blanching.

Cooldown

After boiling then transfer the stalks to cold water.

Dry them thoroughly. Remove the water and allow the spears to hang to dry over 10-15 – 20 mins. Dry them with paper towels.

Packaging

The stalks should be divided into a small amount if you do not need all of them at the same time. Then place them in a distinct freezer bag. You can squeeze the air out from the bag and close it with a tight seal. You can also add a label that includes a date if you like.

The bags can be frozen.

How to Find Out If Asparagus is Bad?

Throw away asparagus if:

There’s mold. If there’s a fuzzy look on the spears or black spots appear all over the place, then asparagus is not good.

It’s soft or it’s mushy. The tips typically get darker and limp in the beginning before the stalks turn wrinkled. It’s a broad spectrum, naturally – you could use soft spears, however when slimy residue forms it the stalks need to be removed.

It’s an odor that’s funky. Asparagus doesn’t have much smell of its own. So, if it develops an off smell, it’s an appropriate time to allow it go. Don’t be afraid to use your senses.

Apart from that the asparagus spears may begin to begin to lose the color. Color loss is a indicator that they’re not going to last long, so it is best to take them in as fast as you can.

Similar to other vegetables, you can cut out the ones that aren’t good (and some) or throw away the spears that have been spoiled and use the remainder. If, however, the majority of the stalks have been used to use, you probably should throw all of them away.

When you cook the vegetable before cooking, make sure to give it a fresh sniff. If it does not smell fresh, however it has a unpleasant, rotten smell to it toss it out.

Tips on purchasing fresh asparagus

One aspect to take into consideration when purchasing fresh asparagus spears is the season. The asparagus season is between February and June. April is the best month to buy fresh ones because it’s the peak of its growth season.

Being aware of when to buy the best quality asparagus is the first step. you should also be aware of what to look for in the local supermarket to get the highest quality. When you are choosing the freshest spears, search for ones that have a hint of violet and bright green.

Check the stems for firmness. Beware of buying stems that are limp. Some might advise you to get the best flavor select stems with thinner ones but the thickness does not affect the flavor.

Best Strategies to Utilize Asparagus Leftovers

Despite the most ardent intentions, at times you find yourself with leftover asparagus. Although it’s sometimes okay to re-use the same roast or steamed vegetable for two nights at a row is generally not recommended. Instead of heating your spears, you can use them to serve as a construction block to make something fresh and exciting.

One method to make use of your leftovers is to mix them. Begin by reducing a thick cream into a saucepan, then sprinkle on some pepper and salt, and then add your leftovers chopped up. It should be heated long enough to make your spears toasty and serve it on toast.

Another excellent side dish for leftovers is to mix asparagus along with the peas. Sugar peas are a great choice however so do snow peas and snaps. Cook your peas and then toss into the asparagus to cook to a simmer. Incorporate butter and mix the vegetables until well coated. Sprinkle on some Italian seasoning, and serve warm.

If you want to find ways to make some food leftovers in a main course There are a variety of methods to make it. Cut the asparagus into pieces that are bite-sized and add it to the next dish of stir-frying. It is also possible to add it to any pasta dish.

Once it’s cooked, toss it into the dish at the end to cook it. Rice fried and skillet dishes are fantastic options for leftover asparagus.

If your asparagus leftover is slightly overcooked, or you would like to make use of the fresh asparagus prior to it goes to waste, you can make pickled asparagus.

Wrapping up

How long does asparagus last? No need to ask this question again. For, I have already given the answer in this post. Anyway, Asparagus is a great ingredient for cooking and is certainly a healthier option, particularly when your life has become hectic that there’s not enough time for a balanced food diet.

It is high in minerals, vitamins, and antioxidants, each of which is vital for nutrition and growth.

Asparagus can also contribute to a better mood and less hangovers due to alcohol-related intoxication. To ensure that you get all the benefits from asparagus it is crucial to consume fresh ones.


You may also like: What does cactus taste like?

How Long Does Sangria Last?

sangria

How Long Does Sangria Last? 

How long does sangria last? Let me tell you if summer is around, can sangria be far behind? Absolutely not. With the advent of summer, the refreshing drink that you enjoy on your backyard garden or your lawn, or on the sea beach, is back. The most well-known of all is Sangria. This wine-based fruit drink makes one feel like they’re in the sands of Spain or Portugal.

It is possible to purchase sangria by the bottle, or create your own at your own home. Sangria is usually made using Spanish wines, particularly red, but rose and white wine versions are also becoming increasingly popular.

You can also add some chopped-up fruits. The most sought-after are apples, berries, and lime or lemon juice liquefied with brown sugar , brandy, or rum in the wine and voila! Your sangria is created.

This is the type of beverage that is simple enough to make a large batch at once. You can make multiple pitchers in one go and each one can have distinct tastes.

How long can sangria last in the refrigerator? How long does sangria last in the fridge will differ based on the kind of fruit you’ve selected to include. In general, sangria will last in the refrigerator for up to three days.

Three days after the date, sangria is likely to become stale, begin to lose its freshness and then become undrinkable.

The sangria that you have left in the refrigerator is the ideal place to keep it. Make sure to keep it from being left outside for long.

If you’re planning to take the whole three days in order to consume it, storing it in a sealed container is the best option. However, should you intend to finish it quickly, then a layer of plastic wrap over the pitcher is sufficient.

The method you choose to make your sangria will influence the amount of time it will last. The best method to ensure the longevity of sangria is to let the wine and fruit rest in the fridge for 12-24 hours.

It allows the pieces of fruit to absorb the wine. If you don’t allow the fruit time to soak up the alcohol the sangria may become stale faster.

The wine you pick will also influence how long your sangria can last. White wine sangrias will last longer, up to five days in the refrigerator. However, a typical red wine shouldn’t be kept in the fridge, and must be consumed within three days.

After three days, the wine is likely to undergo oxidation and become rancid.

Avoid Oxidation of the Base Wine

The contact with oxygen is a major enemy for wine. When wine – as well as sangria – comes into contact with air, it triggers an oxidation reaction.

When it’s in contact with air for too long, the alcohol is oxidized to Acetaldehyde. This will make wines smell like bruised fruits. Then it will transform into acetic acids, and this process transforms the wine into vinegar.

The color of the base wine will change due to the process of oxidation. The reactions cause wine to change into an amber-colored shade. White wine is then darker and red wine gets less luminous and dull.

How Can You Tell If Your Sangria is Bad?

As with any alcohol-based wine drink exposure to the oxygen and air can do the most harm. It is easy to determine the signs that your sangria has gone bad from the appearance and smell.

If your sangria appears as if it’s changed color, then it’s probably gone bad. The smell will start to change, too.

There are a variety of methods to determine the condition of your sangria. bad.

Be sure the liquid isn’t cloudy or has any sediments or bubbles floating around. If your sangria doesn’t appear like the typical wine would look, then it’s an indication that something’s not right.

It is important to pay careful attention to the color in your sangria. Red wines appear clearer and white wine may become yellow during the process of the process of oxidation. The sangria you drink is in its peak in the moment that reds appear bright and the whites transparent.

If your sangria has a vinegary smell, it means the base wine has gone rancid, and you need to dispose of it.

If your sangria is sour tasting is a indication that the drink has gone bad.

It’s the process of oxidation that occurs in the wine in your sangria which can make it more acidic. It will also make it smell and taste like vinegar. The cover of your sangria in the refrigerator can aid in preventing some of these reactions. However, it’s something you should watch for if the bottle has been left out for a long period of time.

It’s also crucial to be aware of the fruits in your sangria. It could turn soft or mushy if it’s in proper conditions, which can cause a sour smell.

Beyond a tasting to determine the quality of the drink, don’t drink sangria which has been spoiled. It’s unlikely to cause lasting harm, but it may cause you to feel sick and is better to stay clear of it.

How Can You Make Sangria Last Longer?

If you’ve made a large batch of sangria and prefer to drink the drink in moderation. You can extend its shelf life with the freezing. Take out all the solid fruit and then pour the sangria into an ice-cube tray that is placed in the freezer. When the sangria cubes have frozen solid, place them in a freezer bag to keep them. You can then have it ready to defrost the future.

It is possible to freeze the sangria, which could add a couple of weeks to its shelf life and is an enjoyable treat on a hot day.

Store Sangria Safely – How To Freeze Sangria

Food that is frozen can be preserved. Food stored in freezers will not be affected by external elements. It is a long-lasting solution to all of your storage requirements as the flavor will be retained for up to 3 months.

Sangria is among the few drinks stored in freezers that last very well. Sangria can be stored for five days in the refrigerator, until they start to get snarky or lively. The drink can last for 3 months if kept in the refrigerator.

Sangria could be frozen to make cool ice cream to enjoy on warm summer days.

It is recommended to ice it, and then be instructed to keep it for a longer time frame if you create huge quantities of Sangria. It’s a most simple process, without ingredients needed to make Ice sangria.

Here’s an outline of the steps to freeze:

Step 1: Separate The Fruit Ingredients From The Drink

Be aware that the constituents of the fruit deteriorate more quickly that the wines itself. This means that it increases the chance of fruit becoming rotten if you store wine in a refrigerator for more than four days. It is suggested that when freezing, the ingredients of the fruit be kept separate from the beverage.

Step 2: Put Sangria In A Sealable Bag Or Airtight Container

Make sure you have a watertight, waterproof bottle or a jar that is airtight. When the beverage is clear from any fruit pieces, then you are able to transfer the drink into an airtight and healthy bottle.

Place the recipe for the Sangria inside the bottle. Allow the wine to extend several inches. Cover the wine, label the date of freezing and then move into the freezer.

What Should Be Noted In Preparing Sangria?

Fewer things are more fun than Sangria. The fruit is fresh and sweet, and are vital to a great Sangria recipe. How can the Sangria glass hold all these wonderful ingredients?

There is there is no Sangria law. But, I’ve listed the most important things to keep in mind in order for the taste of your Sangria to be perfect.

The Right Balance Of Wine

The red wine is a renowned wine that is used to make Sangria.

Sangria’s base is one glass or two of red wine. Include a few shots brandy to add a little more flavor. A sophisticated bartender is able to count on diners’ desires to adjust their alcohol level in the Sangria glass. The bartender will add more wine if you so desire.

Freshness Of Fruit

Fresh, seasonal fruits are essential ingredients in making your perfect Sangria.

Cocktails are great when they are made with high-quality seasonal ingredients. This is why bartenders frequently alter the flavor of Sangria in accordance with the season.

It’s your chance to sample the finest of the season. Winter is a time for citrus fruits like lime, lemon, or mandarin combination. In summer, nature gives the amazing aromas of strawberry fruit, peach and mango.

There are a variety of tools like the apple corers compactly to separate the fruit into distinct pieces with the same the quality.

Mix citrus and apples for the flavor of autumn. Add a few teaspoons sugar for more sweetness. It’s not necessary to add sugar, however when you have gorgeous fresh, ripe, and delicious fruit. Sangria recipe ideas can also be influenced by the season’s fruits, to make fresh Sangria any time.

Bartender’s Skills

How long will it take to shake the shaker in order to make the classic Sangria? What fruit should you mix wine to get the perfect taste? What is the right amount of fruit? How do you decorate Sangria to draw the attention of your guests?

A bartender who is skilled can solve all these problems and serve you the finest Sangria. You can also be an excellent bartender if consistently practice and learn the rules of a bartender.

But, these notes should not pose too much of a problem to stop you from making Sangria. Try to improve slowly and then find your favorite recipe. suitable for novices.

Tips For Making The Best Sangria

Sangria is fairly easy to make. But do you want tips on creating your Sangria like the one served by a bartender, who is a pro? Here are some ideas I have that are worth considering. They’re simple, yet they have incredible effects!

Use The Right Wine

It is possible to believe that the price higher-priced the wine is, the better its taste. It’s true, perhaps, but it’s not essential to use regarding Sangria. Alcohol isn’t all that creates Sangria drinkable, as it is lost in the aromas of fruit and other.

Numerous examples have demonstrated that people don’t realize the huge difference between high-end wines or Sangria as opposed to cheaper wine. Therefore, you can save money by choosing the best wine, instead of buying the most expensive ones.

However, it does not mean you should make use of cheap, low-quality wine to make your Sangria. Quality wines of inferior quality can affect the taste and shelf life of Sangria and may even lead to poisoning.

Mash Some Fruit

Are you concerned that the slices of fruit are not yet bringing the full fruit taste you’re looking for? Puree a few fruits and mix them in with Sangria.

The two fruits typically employed are lemons and oranges. You keep the zest intact when you crush since there are essential oils that give off an aroma that is pleasant. It is possible to crush any fruit you want, e.g., apple or pear, strawberry and so on.

For the fruits to more sweet to make it sweeter, sprinkle a few drops of sugar on the fruit as you smash it. After taking the fruit out of the wine for a few hours in the fridge to strain the fruit prior to serving the Sangria since they’re not as attractive.

Crushing some fruit can get your guests to be awed by the unique flavors and bold flavor of Sangria at your events. Make use of this technique and make several interesting Sangria dishes for your guests.

Soak Fruit In Wine Overnight

The slices of fruit will be bursting with rich taste and lovely color when they are soaked overnight.

A lot of Sangria recipes require the wine to be kept in the refrigerator for a night or for at minimum several hours. This lets the fruit soak into the wine, allowing the juices to be absorbed into the mix and make the drink sweeter. I believe that sweetness is derived from the fruit and the wine.

Additionally, to make to make your Sangria more attractive make use of fruit and vegetable choppers to make equal slices.

If you want to include berries, cover the tiny pieces of the fruit into a distinct container with a little wine, and then leave it in the fridge for at least a few hours. After that, return the wine to the Sangria and add a few pieces of fruit to each bottle.

Boost It Up With Some High-Proof Spirits

Sangria is a light drink made of fruit that is perfect for anyone. However, if you’re looking for something different, you can enhance the drink with a few spirits. Spirits can give a distinct and distinct flavor for your Sangria.

How To Know If Sangria Is Bad?

If you consume damaged Sangria, there is the risk of moderate to high of getting poisoned based on the condition of the Sangria. The reason for this is the oxidation process that converts Sangria to acid and vinegar when it isn’t stored in a proper manner and consumed for the required amount of time.

To avoid these dangers and to reduce the risk, look at the following warnings prior to drinking Sangria to ensure that the Sangria is of high-quality.

Color Change

The most well-known indicator that you shouldn’t overlook is color change. It indicates that the alcohol is beginning to alter its properties through oxidation and.

Sangria that loses its consistency is also beginning to alter its color. Red wine could turn orange, while white wine could turn yellow. The most obvious sign is discoloration of the grapes. If the slices of the fruit do not retain their fresh color and are turning brown or wilted, it is time to throw away the Sangria.

If the color variance is only small and the color is not too different, the Sangria is still a good choice in the event that it doesn’t show any indications of spoilage.

Unpleasant Smell

A peculiar smell could come from Sangria that’s been skewed. Be on the lookout for it! Like I said, when it is spoiled, Sangria can be oxidized to vinegar and acid and you’ll smell the strong and sour scents of both.

If you are able to spot these indications, don’t be scared to dispose of the beverage right away. I don’t believe you are looking forward to drinking the acid or vinegar, are you?

Mold

The fruits turn unattractive and toxic when they become moldy.

Dark, white, or even greenish spots typically signifying mildew can be found visible on the outside of food. Most often, mold is visible following the opening of the container due to bacteria.

In the case of drinks, mold may be difficult to detect. As for Sangria, you can see through the slices of fruit.

You can also check the quality of your fruits after packing your Sangria along with your fruit. The development of mold can be a result of Sangria that has pieces of fruit that have gone rancid.

Wrapping up

So, how long does sangria last? I suppose I have already given the answer in details. Anyway, Sangria may spoil as with any other wine-based beverage. The lines blur in determining when sangria that is questionable is at the point where it becomes undrinkable, but making sure the bottle is tightly sealed will prevent any oxidation.

The fridge is the ideal storage space for it to last up to 3 days. However, it’s recommended to consume the drink as quickly as you can. The more fresh the batch, the better it’ll taste.

Be sure to monitor the fruits you’ve added to see if it’s still in good condition. If any fruit has turned bad, it may ruin the entire pitcher.

How Long Do Sprinkles Last?

sprinkles

How Long Do Sprinkles Last? Do Sprinkles Go Bad? 

How long do sprinkles last

How long do sprinkles last? Do sprinkles go bad? I am sure such questions crop up in your mind before you go to buy or cook a dish with these ingredients. Read on if you have no idea.

Sprinkles might not be the best, but they definitely created desserts that looked vibrant and enjoyable. And that’s what matters!

If you’re an amateur baker, you’re likely to include them in your list of dessert-related add-ons.

If you’re a responsible baker, among the initial issues to ask is how long can sprinkles keep?’ Well, sprinkles are typically more durable than the majority of other dessert additives.

However, they can also spoil, so you should be aware of what you should be looking for to tell if you need to throw away a batch of sprinkles.

The most crucial thing to do with any food is knowing the components of its food as they influence the shelf-life. For sprinkles, they’re basically attractive confectionery pieces which is made from sugar, cocoa, cornstarch and an emulsifier.

Sprinkles get their color thanks to the aid by food coloring substances. This, along together with sugar that gives sprinkles their longevity.

How Long Do Sprinkles Last? Do Sprinkles Go Bad?

Like any food item that is packaged sprinkles will come with an expiry time which can last for months or even a one or more years. If stored correctly you are able to make use of this sweet treat until the date the manufacturer claims that they are safe to use.

However, even when the date is passed, there’s a good possibility that the old batch of sprinkles are still edible. It’s all about the proper storage of them and that too in a sealed container.

Sprinkles are said to be useful for up to 3 years beyond their expiry date If you seal them correctly and keep them in a safe place.

There are food critics who affirm sprinkles (like any other sweets) are not rotten for any reason. This is certainly true to an extent.

If the sprinkles are composed with poor quality sugar or other low-quality ingredients, it’s likely that they’ll spoil faster than later.

But, if they’re made from top-quality materials is likely to can be used for many years provided they are stored properly.

The idea that sprinkles do not go bad even if you don’t use them is our argument. Sprinkles are probably safe to consume for a long time (again it depends on whether you store them in ideal conditions).

But, they’ll begin to lose flavor with time, regardless of whether they are actually rotten. Sprinkles will also change their texture when stored in a prolonged manner.

As I have been harping on about how crucial it is to properly store this sweet treat, here’s the reality. Sprinkles don’t do well in a place which is humid, hot, or if you let them sit at ambient temperatures following refrigeration.

Food items generally can last longer when kept refrigerated or frozen. The same can be done with sprinkles; however this doesn’t extend their lifespan.

However, refrigerating them causes them to melt more quickly when you open them and place them on desserts which are to cool. Sprinkles frozen in the freezer may be more suitable.

But, the best environment for storing sprinkles, so that they don’t spoil, is at room temperature (preferably in a dry and cool area).

How to Tell if Sprinkles are Bad?

It is essential to recognize the signs of spoiling or bad sprinkles, because if you don’t, you could be at risk of health issues. A few signs to look for include:

Sprinkles are a source of oil. This causes them to develop a strange smell after they’ve gone bad.

The easiest way to determine that sprinkles aren’t performing of the highest quality is to observe variations in the color. As time passes, they’ll tend to lighten. Some wrinkles may appear to be spots.

Another method to detect good sprinkles is to be able to feel their texture. Sprinkles that are of good quality appear firm and crisp when you bite them. If they get rotten they become soft and spongy feel.

Sprinkles stored for too long will have dry-looking appearance. If you chew on the sprinkles, you’ll see that their taste has diminished.

The signs above suggest that the sprinkles are rotten. But, as bad as the contents of this confectionery may be, they might not be enough to trigger any major health concerns.

You are nevertheless advised to avoid using sprinkles that aren’t in their best health.

Can you refrigerate sprinkles?

You can indeed store sprinkles in a refrigerator. Sprinkles have a decent shelf-life when stored in the pantry. It isn’t recommended to keep them refrigerated unless the pantry is an option. Place your sprinkles inside a zip lock bag or air-tight container in the refrigerator.

To keep your baked goods refrigerated or desserts with sprinkles, cover them in a plastic sheet. This prevents the sprinkles from taking on unpleasant odors and also prevents them from melting once they leave the refrigerator.

Can you freeze sprinkles?

Sprinkles can be frozen however it is not advised. The reason is that freezing temperatures affects the texture of the sprinkles upon thawing.

If you’re planning to store your sprinkles in a freezer ensure that you place them in a sealed air-tight container or zip-lock bag. To let them thaw, place the bag or container with frozen sprinkles in the fridge.

Do sprinkles expire?

Like all other food products sprinkles expire, too. Sprinkles, if stored in a shelf-stable state, can last for up to three years after their expiration date if they are stored properly. The stability of the shelf is due to the large percentage of sugar contained in the sprinkles.

So, sprinkles will not easily end up rotting or rotting until you take care of the process. After the sprinkles reach their expiration date, the quality may not be the same. Sprinkles of high-quality have a longer expiry time than sprinkles of poor quality. In the event of exposure to moisture, it can trigger the degradation of sprinkles.

What is it that makes sprinkles susceptible to expiration?

The fluctuation in temperature and the exposure to moisture makes the sprinkle susceptible to decay. If you are storing sprinkles in the pantry be sure to keep them away from sources of heat, such as direct sunlight as well as the stove top.

How do you prepare sprinkles from scratch?

Ingredients

  • 1 1/2 cups sugar powder split
  • 1 Tbsp cornstarch
  • 1 1/2 Tbsp of water, not hot water
  • 1 Tbsp of light corn syrup
  • 1/2 teaspoon vanilla extract (or any flavor you like)
  • Food coloring gel

Instructions

In a bowl mix 1 cup powdered sugar corn syrup, water as well as vanilla extract. Stir well until homogenous.

Add the remaining the sugar that has been powdered. Stir until well combined.

Add the food coloring and mix. Add more food coloring until desired hue is obtained. Colors in food have their distinct flavor, so ensure that you don’t go overboard with it.

Use a piping bag with an #4 Wilton tip using dyed dough.

Create elongated lines of sprinkle-width horizontal across two sheets of cookie that are lined by parchment or wax. Also, you can draw tiny dots or whatever shape you prefer for versatility.

The dough should be dried for at minimum 12 hours.

After drying, remove the drawn shapes of sprinkles off the papers and slice them to size for sprinkles with the sharp edge of a knife.

Sprinkle these sprinkles on baking, or for decorating cakes. Transfer them to an airtight container to store.

Wrapping up

How Long Do Sprinkles Last?

This article has addressed this question “How long do sprinkles last?” and “can sprinkles go bad? And I am sure, equipped with this information, you should be able to handle sprinkles in a much better way.

There’s a lot to learn using sprinkles, beginning with their form. The most well-known kinds of sprinkles include Nonpareils (available in the form of small balls), dragees (usually larger than regular sprinklers) and Jimmies (best known as sugar-based strands) as well as quins (in different shapes in a variety of colors, shapes, and sizes).

Sprinkles are about giving bakers an opportunity to enjoy themselves with their baked goods. Then, you can splash a lot of sprinkles onto the cupcakes you bake if you would like!

How To Reheat Mussels? Your Top Guide

How To Reheat Mussels? How to reheat mussels? If you want to know all about mussels, and how to reheat it, you should take time to go through this blog post. Mussels can be thought of as an acquired taste because they are not popular with everyone. However, in recent times they have gained a lot of attention as a highly nutritious dietary product. Seafood in general is a standout in terms of nutritional value and health benefits, however the majority of seafood types require additional care in preparation process and, later when it comes to storage. Mussels aren't the same. Whatever your plans for mussels, whether it's cooking or freezing the mussels, you should be on the lookout for them to avoid the risk of food poisoning. What are Mussels? Mussels are one of the most sought-after types of seafood that is found in coastal areas like those in the Atlantic as well as the Pacific. They are found in saltwater as well as freshwater, and are typically consumed in raw form. They can be prepared in many methods, such as frying poaching, steaming, or poaching. There are a variety of mussels that have regional variations that can affect the texture or taste. The most sought-after kind that is most popular is Blue Mussels from New Zealand. However, they also originate from Ireland, Scotland, Canada, Wales, and Japan. The most common method of prepare mussels is to cook them in a pan with garlic, wine parsley, tomato sauce for about 12-18 mins. This recipe can be cooked enough to feed two people. In the next section, we will discuss how to cook mussels again when they've been cooked. Can You Eat Leftover and Cooked Mussels? The answer is yes. Mussels are edible leftovers since they've been cooked and consumed. Mussels cooked shouldn't be heated in the microwave since they tend to become hard and overcooked when heated and again. This will take away any flavor or moisture that was left after cooking them. To get the best outcomes, it is suggested to cook leftover mussels over a stove to prevent the possibility of drying, overcooked mussels. How to Store Leftover and Cooked Mussels? Mussels are among the most frequently-found seafood found in North America, and they're among the easiest to cook. Steam mussels on their own, or you should serve them with rice, pasta or garlic breadcrumbs or any other dish you prefer. But storing leftover cooked mussels is a challenging task that few people are able to accomplish correctly. When you've finished cooking your dinner, don't toss out the remaining broth. Keep your food in an airtight or sealed container. You can take it out the following day. You can also keep cooked or steamed mussels in a freezer to be used later. If you intend to freeze cooked mussels be sure to keep your mussels inside an airtight container. In the event that you cooked them in the broth be sure to remove them from the broth before storage, to ensure they don't go too soggy or get spoiled. For freezing, remove the shells of the mussel after cooking and then remove the flesh. Place the shell inside an airtight container. Freeze for up to 2 months. How to Tell if Leftover and Cooked Mussels are Bad? Just made some mussels and you're now thinking if they're suitable for eating? Here's a list that will tell you what to do. The first step is to throw away mussels that do not open, since it is likely that they're dead and unfit to eat. Then, throw away any mussels that have broken shells, as this is an indication of spoilage or overcooked. Also, you should ensure that the texture and smell are fresh and the food is not damaged or overcooked. If the mussels smell unpleasant that resembles seafood that has gone bad, you should avoid eating them too. If they meet the above requirements, then you'll be able to know the mussels you purchase are safe to be eaten and fresh. How to Reheat Mussels on Stovetop? Are you in the mood for mussels but aren't sure how to cook them on the stove? Here's the information you require and some suggestions. It is recommended to take the flesh out of the shell, and dispose any mussels that are not opened prior to reheating them. While pre-cooked mussels can be tough and dull however, they are less chewy than freshly cooked ones. To avoid this taste and to avoid blandness, take the shell off prior to heating them up again. To heat cans on the stovetop Cook in a pan using cooking oil on medium-high heat. Add mussels to the pot, and cook for approximately 3 minutes or until hot enough to consume. Don't overcook them as they will turn hard. How to Reheat Mussels in Broth? Many chefs agree to heat up mussels in broth that is made from the mussel cooking water, along with additional onion garlic, butter, and onions. Also, they can be heated in champagne or white wine. Mussels are typically made by cooking them in an oven-safe dish on moderate heat for around five minutes or until they break open in the pan and let the juices out into the sauce. To warm mussels, first, separate their broth from them or the dishes with which they were served. Clean any remaining shells and place them aside until you heat the dish that is served. It is best to bake your meal within the oven for just a couple of minutes before pouring in the broth or any other liquid. Then, add the mussels to the dish, and place them in the oven for a couple of minutes. So, you can ensure the dish is cooked to the perfect temperature and ready for serving and yet preserve all its flavor and aroma from the cooking process. If you're concerned that your brothy stuff after reheating may be too salty, try adding some tomato juice to help balance it prior to serving. If you want add spice, try using cumin or paprika chili powder or curry paste into the liquid. But don't forget the addition of citrus. How to Heat Frozen Cooked Mussels? Did you realize that mussels are an ideal option for your New Year's Eve dinner? And to make the experience even simpler, all the preparation is already done. If you think frozen cooked mussels sound you would like Here's how to make them a hit to cook. If your frozen mussels aren't been cleaned then it is possible to cook them either by steaming them for about 5-7 minutes in 1 inch of water, or wine, or sautéing them with oil and butter over a high temperature. You can discard the shells that haven't been opened. It is essential to take off the beard prior taking a bite of frozen or mussels. This can be accomplished using fingers or a knife. To heat up frozen mussels, put the mussels in bowls, then add hot water enough to fill them up. Wrap the plastic with a lid, lid and microwave at high power for approximately 30 seconds to 1 minute. This is all there is to it. A couple of minutes of prep time will let you take pleasure in your favorite meal anytime in the near future. What to Do with the Leftover Mussels? Are there any leftover mussels in your refrigerator? Before throwing them out, make this recipe. It's easy and delicious. Cleaning up is easy and a lot of recipes are made in one pot and don't require a lot of effort clean up after eating. What else can you ask for an evening meal? Mussels Marinara Mix cooked pasta with leftover tomatoes in a pot at medium-low temperature. Add spices, and then add mussels once the mix gets to a boil. When they're cooked the cheese is served with parmesan sprinkled over the top or fresh parsley as a garnish. Mussels filled with Garlic and Parsley In a skillet on medium heat, cook the garlic with butter. Add chopped parsley to the mix and simmer for about a minute before adding the wine. After simmering for 5 minutes, add the mussel meat to the stew and allow the pot with water to cook through (about 4 minutes). Serve right away with bread that is crusty. Mussel Chowder in a pan at medium-high heat, cook the garlic with butter for about one minute before adding celery and potatoes. Once the veggies are cooked, add cream or milk to create the base for the chowder. Bring it to a boil, reduce the heat to simmer for 5 minutes, stirring frequently. Include mussels now since they cook quickly after being added because they have been cooked. Serve with a garnish of parsley If desired. Mussels and Rice Cook the water to a boil , then season them with salt. When the water is boiling, add the steaming rice, and cook for 5 to five minutes or till the rice is completely cooked. Place the meat of the mussel over the top of the rice mix Then cover the rice with enough water to allow them to steam (about 4 minutes). In this regard how do you heat mussels? It is possible to reheat mussels by taking them out of their shells, and then microwave them rapidly on a small plate that is covered with a moist paper towel. Always reheat mussels in a separate vessel from the soup or dish they're in, and then add them only after the remainder of the dish is cooked. If you try to heat the entire meal, I can assure you that most of the time the mussels will begin to lose their texture and flavor. There are many safe ways to cook them, without risking food poisoning, or loss of flavor and texture. In this regard, you should read below for our complete instruction on how to cook mussels. A Complete Guide to Reheating Mussels Mussels belong to the mollusk family of seafood. The cultivation of them was started thousands of years ago by ancient cultures. They are extremely healthy and nutritious, which makes them a favorite of many people who lead a healthy and balanced lifestyle. There are a variety of mussels; the majority does not recognize them unless they are very knowledgeable about the particular species. Of all, Mediterranean mussels are the most frequently found species in shops, but you will find other types particularly in areas close to the ocean or the coast. The correct method of handling mussels is essential if you wish to prevent food poisoning and other serious illnesses. But dealing with fresh mussels can be an issue to be discussed at a different time and isn't relevant to our current discussion. We will now concentrate on the already cooked mussels must be reheated in a safe and secure manner. How to Reheat Mussels In the beginning, you can cook mussels on their own or in an appetizer, but the various methods require different steps. In both cases there are a few steps that must be followed unless you do not want to have bad tasting mussels. Here are two of the most frequently encountered situations: The sole method of reheating mussels is to cook them. If you are planning to eat the mussels by themselves it is essential to always get them out of their shells before eating them. The mussels that are cooked before cooking can become hard and chewy, which is the reason you should take them out of the shells to stop them drying out. Many people make the error to cook them on a large platter. However, we recommend using as little of an area as you are able to. The most important thing is to ensure that the mussels are kept condensed. This is the best method to keep them moist and avoid drying that can lead to loss of flavor. The next step is to prepare a moist newspaper towel that covers the stack of mussels, in order to preserve as much moisture as you can. If they're well-condensed and covered then you can put them into the microwave. It is important to set your microwave at a low power setting at least 30% if the microwave is able to handle these settings. Reheat for 15 or 20 seconds at a stretch and test after every time. You can reheat them to your liking. However, overheating them isn't recommended as it could dry them out, or you'll have to consume them swiftly because they'll lose value once the temperature falls. Cooking with broth or other recipes The best method to cook mussels is to use broth or a similar dish , though it may need a little additional effort. In order to do this, you'll need to separate the mussels from your dish or broth. Put them aside to cook the dish you are serving. Make sure you remove the shells, if they're still intact. Ideally, cook your dish to the required temperatures on your stove. Once it's sufficiently warm, take it off your stove, and then add mussels. We suggest heating your food until it is very warm, as the moderate temperatures might not be enough to cook the mussels later. If the dish or broth is sufficiently heated, it will be sufficient to cook your mussels without the possibility drying out or losing quality. Make sure you stir the dish thoroughly to ensure that each mussel passes through the middle. It doesn't matter if there is an ice-cold broth on the table you, or any other food item, like pasta for instance. The principle is the same. You must never add the mussels until the other food items have been heated. How long will cooked mussels last? Before we get started it is important to note that cooked mussels must be stored in a refrigerator for not more than 2 days after they have been cooked. If you keep them longer than that, we advise throwing them away. While they might be safe and healthy, you cannot be certain of the growth of bacteria. Apart from that it is possible to put the mussels into the refrigerator for up to five days. However, you should be sure to put them in a sealed container. It is possible to make use of freezer wrap or premium aluminum foil, but we advise against it in order to prolong the shelf time for your mussels. If you're not sure if you'll eat them in these weeks or not, then we recommend freezing the mussels. This they will normally keep their freshness for a period of about 3 months. If you are planning to make use of the mussels and you'll need to let them thaw in the morning, we suggest putting their in refrigerator for a night. It is possible to keep the mussels in the refrigerator for a few days after freezing and thawing. What can you discern if mussels have been contaminated? The easiest way to determine whether your mussels aren't suitable to consume will be to smell the mussels and take a look at them. If you notice a sour smell in the heap of mussels, you need to dispose of the whole batch. Also, if the mussels appear slimy, they're most likely to be toxic. Mussels that do not open can be removed. This usually signifies that the mussel has become dead and therefore unhealthy to consume. Related Questions What happens when you eat bad mussels? The poisoning of seafood by food is one of the most hazardous forms of food poisoning. It could cause severe illness. This is why it's vital for you to prepare your seafood as fast as you can after purchasing. As I am not a medical expert, let me simply mention the most common symptoms and what to do in the event of food poisoning caused by seafood. If you consume mussels that are contaminated, you could expect to experience reactions such as diarrhea and vomiting. This is usually the initial phase of the issue that is followed by numbness and tingling in the jaw and headaches. There are also cases of temporary fever. What is the time it takes to notice the first signs? Most of the time, it takes up to a few hours, but there are occasions where people notice that they have symptoms within 48 hours. This can be a huge problem since it is possible that you do not know that the food poisoning is from mussels or other seafood and you might not be aware of it and get more serious issues. Although shellfish poisoning isn't necessarily serious If you or others around you develop unexpected symptoms that don't diminish quickly, we suggest seeking medical attention immediately. If you are able, contact the emergency line in your town and speak with the department of poison control. How do you properly freeze mussels? In the case of mussels, it is possible to store mussels that are fresh or cooked. The idea is similar. If you are planning to freeze fresh mussels be aware that you have to do it quickly. Like fresh mussels have to cook within a few hours after purchase, we suggest freezing them the same day. Be sure the mussels you purchase are sealed or as close as they can be. If you spot any mussels that are not closed, we advise to throw them out as they could damage the entire pack later on. Make a freezer bag that is heavy-duty or a couple of smaller ones and begin filling them of your mussels. Be sure to leave some headroom and get as much air as you can. If you'd like to create another layer of protection against freezer burn, place the freezer bag into another bag and let out the maximum amount of air. Make sure to keep the mussels as far as you can from the freezer's door to protect them from temperature fluctuations. Consume the mussels within 3 to 4 months if you're focused on the quality. They'll last for a longer time in the freezer and are safe to consume however not in the same freshness. Wrapping up So, how to reheat mussels? I have already given answer to that question in the earlier part. Anyway, it is always good to have leftover mussels to freeze. Why? If you require them they'll be ready to cook and taste fresh. If you don't have time to cook the entire mussel, you may take a look at these two options to heat leftover mussels.

How To Reheat Mussels

How To Reheat Mussels


How to reheat mussels? If you want to know all about mussels, and how to reheat it, you should take time to go through this blog post.

Mussels can be thought of as an acquired taste because they are not popular with everyone. However, in recent times they have gained a lot of attention as a highly nutritious dietary product.

Seafood in general is a standout in terms of nutritional value and health benefits, however the majority of seafood types require additional care in preparation process and, later when it comes to storage.

Mussels aren’t the same. Whatever your plans for mussels, whether it’s cooking or freezing the mussels, you should be on the lookout for them to avoid the risk of food poisoning.

What are Mussels?

Mussels are one of the most sought-after types of seafood that is found in coastal areas like those in the Atlantic as well as the Pacific.

They are found in saltwater as well as freshwater, and are typically consumed in raw form.

They can be prepared in many methods, such as frying poaching, steaming, or poaching.

There are a variety of mussels that have regional variations that can affect the texture or taste.

The most sought-after kind that is most popular is Blue Mussels from New Zealand. However, they also originate from Ireland, Scotland, Canada, Wales, and Japan.

The most common method of prepare mussels is to cook them in a pan with garlic, wine parsley, tomato sauce for about 12-18 mins. This recipe can be cooked enough to feed two people.

In the next section, we will discuss how to cook mussels again when they’ve been cooked.

Can You Eat Leftover and Cooked Mussels?

The answer is yes. Mussels are edible leftovers since they’ve been cooked and consumed.

Mussels cooked shouldn’t be heated in the microwave since they tend to become hard and overcooked when heated and again. This will take away any flavor or moisture that was left after cooking them.

To get the best outcomes, it is suggested to cook leftover mussels over a stove to prevent the possibility of drying, overcooked mussels.

How to Store Leftover and Cooked Mussels?

Mussels are among the most frequently-found seafood found in North America, and they’re among the easiest to cook.

Steam mussels on their own, or you should serve them with rice, pasta or garlic breadcrumbs or any other dish you prefer.

But storing leftover cooked mussels is a challenging task that few people are able to accomplish correctly.

When you’ve finished cooking your dinner, don’t toss out the remaining broth.

Keep your food in an airtight or sealed container. You can take it out the following day.

You can also keep cooked or steamed mussels in a freezer to be used later.

If you intend to freeze cooked mussels be sure to keep your mussels inside an airtight container.

In the event that you cooked them in the broth be sure to remove them from the broth before storage, to ensure they don’t go too soggy or get spoiled.

For freezing, remove the shells of the mussel after cooking and then remove the flesh.

Place the shell inside an airtight container. Freeze for up to 2 months.

How to Tell if Leftover and Cooked Mussels are Bad?

Just made some mussels and you’re now thinking if they’re suitable for eating? Here’s a list that will tell you what to do.

The first step is to throw away mussels that do not open, since it is likely that they’re dead and unfit to eat.

Then, throw away any mussels that have broken shells, as this is an indication of spoilage or overcooked.

Also, you should ensure that the texture and smell are fresh and the food is not damaged or overcooked. If the mussels smell unpleasant that resembles seafood that has gone bad, you should avoid eating them too.

If they meet the above requirements, then you’ll be able to know the mussels you purchase are safe to be eaten and fresh.

How to Reheat Mussels on Stovetop?

Are you in the mood for mussels but aren’t sure how to cook them on the stove? Here’s the information you require and some suggestions.

It is recommended to take the flesh out of the shell, and dispose any mussels that are not opened prior to reheating them.

While pre-cooked mussels can be tough and dull however, they are less chewy than freshly cooked ones.

To avoid this taste and to avoid blandness, take the shell off prior to heating them up again.

To heat cans on the stovetop

Cook in a pan using cooking oil on medium-high heat.

Add mussels to the pot, and cook for approximately 3 minutes or until hot enough to consume.

Don’t overcook them as they will turn hard.

How to Reheat Mussels in Broth?

Many chefs agree to heat up mussels in broth that is made from the mussel cooking water, along with additional onion garlic, butter, and onions.

Also, they can be heated in champagne or white wine.

Mussels are typically made by cooking them in an oven-safe dish on moderate heat for around five minutes or until they break open in the pan and let the juices out into the sauce.

To warm mussels, first, separate their broth from them or the dishes with which they were served.

Clean any remaining shells and place them aside until you heat the dish that is served.

It is best to bake your meal within the oven for just a couple of minutes before pouring in the broth or any other liquid.

Then, add the mussels to the dish, and place them in the oven for a couple of minutes.

So, you can ensure the dish is cooked to the perfect temperature and ready for serving and yet preserve all its flavor and aroma from the cooking process.

If you’re concerned that your brothy stuff after reheating may be too salty, try adding some tomato juice to help balance it prior to serving.

If you want add spice, try using cumin or paprika chili powder or curry paste into the liquid. But don’t forget the addition of citrus.

How to Heat Frozen Cooked Mussels?

Did you realize that mussels are an ideal option for your New Year’s Eve dinner? And to make the experience even simpler, all the preparation is already done.

If you think frozen cooked mussels sound you would like Here’s how to make them a hit to cook.

If your frozen mussels aren’t been cleaned then it is possible to cook them either by steaming them for about 5-7 minutes in 1 inch of water, or wine, or sautéing them with oil and butter over a high temperature. You can discard the shells that haven’t been opened.

It is essential to take off the beard prior taking a bite of frozen or mussels. This can be accomplished using fingers or a knife.

To heat up frozen mussels, put the mussels in bowls, then add hot water enough to fill them up.

Wrap the plastic with a lid, lid and microwave at high power for approximately 30 seconds to 1 minute.

This is all there is to it.

A couple of minutes of prep time will let you take pleasure in your favorite meal anytime in the near future.

What to Do with the Leftover Mussels?

Are there any leftover mussels in your refrigerator? Before throwing them out, make this recipe.

It’s easy and delicious. Cleaning up is easy and a lot of recipes are made in one pot and don’t require a lot of effort clean up after eating.

What else can you ask for an evening meal?

Mussels Marinara Mix cooked pasta with leftover tomatoes in a pot at medium-low temperature.

Add spices, and then add mussels once the mix gets to a boil.

When they’re cooked the cheese is served with parmesan sprinkled over the top or fresh parsley as a garnish.

Mussels filled with Garlic and Parsley In a skillet on medium heat, cook the garlic with butter.

Add chopped parsley to the mix and simmer for about a minute before adding the wine.

After simmering for 5 minutes, add the mussel meat to the stew and allow the pot with water to cook through (about 4 minutes).

Serve right away with bread that is crusty.

Mussel Chowder in a pan at medium-high heat, cook the garlic with butter for about one minute before adding celery and potatoes.

Once the veggies are cooked, add cream or milk to create the base for the chowder.

Bring it to a boil, reduce the heat to simmer for 5 minutes, stirring frequently.

Include mussels now since they cook quickly after being added because they have been cooked.

Serve with a garnish of parsley If desired.

Mussels and Rice Cook the water to a boil , then season them with salt.

When the water is boiling, add the steaming rice, and cook for 5 to five minutes or till the rice is completely cooked.

Place the meat of the mussel over the top of the rice mix Then cover the rice with enough water to allow them to steam (about 4 minutes).

In this regard how do you heat mussels? It is possible to reheat mussels by taking them out of their shells, and then microwave them rapidly on a small plate that is covered with a moist paper towel. Always reheat mussels in a separate vessel from the soup or dish they’re in, and then add them only after the remainder of the dish is cooked.

If you try to heat the entire meal, I can assure you that most of the time the mussels will begin to lose their texture and flavor.

There are many safe ways to cook them, without risking food poisoning, or loss of flavor and texture.

In this regard, you should read below for our complete instruction on how to cook mussels.

How to  Reheat Mussels: A Complete Guide

Mussels belong to the mollusk family of seafood. The cultivation of them was started thousands of years ago by ancient cultures. They are extremely healthy and nutritious, which makes them a favorite of many people who lead a healthy and balanced lifestyle.

There are a variety of mussels; the majority does not recognize them unless they are very knowledgeable about the particular species. Of all, Mediterranean mussels are the most frequently found species in shops, but you will find other types particularly in areas close to the ocean or the coast.

The correct method of handling mussels is essential if you wish to prevent food poisoning and other serious illnesses. But dealing with fresh mussels can be an issue to be discussed at a different time and isn’t relevant to our current discussion.

We will now concentrate on the already cooked mussels must be reheated in a safe and secure manner.

How to Reheat Mussels

In the beginning, you can cook mussels on their own or in an appetizer, but the various methods require different steps. In both cases there are a few steps that must be followed unless you do not want to have bad tasting mussels.

Here are two of the most frequently encountered situations:

The sole method of reheating mussels is to cook them.

If you are planning to eat the mussels by themselves it is essential to always get them out of their shells before eating them.

The mussels that are cooked before cooking can become hard and chewy, which is the reason you should take them out of the shells to stop them drying out.

Many people make the error to cook them on a large platter. However, we recommend using as little of an area as you are able to. The most important thing is to ensure that the mussels are kept condensed. This is the best method to keep them moist and avoid drying that can lead to loss of flavor.

The next step is to prepare a moist newspaper towel that covers the stack of mussels, in order to preserve as much moisture as you can. If they’re well-condensed and covered then you can put them into the microwave.

It is important to set your microwave at a low power setting at least 30% if the microwave is able to handle these settings. Reheat for 15 or 20 seconds at a stretch and test after every time.

You can reheat them to your liking. However, overheating them isn’t recommended as it could dry them out, or you’ll have to consume them swiftly because they’ll lose value once the temperature falls.

Cooking with broth or other recipes

The best method to cook mussels is to use broth or a similar dish , though it may need a little additional effort.

In order to do this, you’ll need to separate the mussels from your dish or broth. Put them aside to cook the dish you are serving. Make sure you remove the shells, if they’re still intact.

Ideally, cook your dish to the required temperatures on your stove. Once it’s sufficiently warm, take it off your stove, and then add mussels.

We suggest heating your food until it is very warm, as the moderate temperatures might not be enough to cook the mussels later.

If the dish or broth is sufficiently heated, it will be sufficient to cook your mussels without the possibility drying out or losing quality. Make sure you stir the dish thoroughly to ensure that each mussel passes through the middle.

It doesn’t matter if there is an ice-cold broth on the table you, or any other food item, like pasta for instance. The principle is the same. You must never add the mussels until the other food items have been heated.

How long will cooked mussels last?

Before we get started it is important to note that cooked mussels must be stored in a refrigerator for not more than 2 days after they have been cooked.

If you keep them longer than that, we advise throwing them away. While they might be safe and healthy, you cannot be certain of the growth of bacteria.

Apart from that it is possible to put the mussels into the refrigerator for up to five days. However, you should be sure to put them in a sealed container.

It is possible to make use of freezer wrap or premium aluminum foil, but we advise against it in order to prolong the shelf time for your mussels.

If you’re not sure if you’ll eat them in these weeks or not, then we recommend freezing the mussels. This they will normally keep their freshness for a period of about 3 months.

If you are planning to make use of the mussels and you’ll need to let them thaw in the morning, we suggest putting their in refrigerator for a night. It is possible to keep the mussels in the refrigerator for a few days after freezing and thawing.

What can you check if mussels have been contaminated?

The easiest way to determine whether your mussels aren’t suitable to consume will be to smell the mussels and take a look at them.

If you notice a sour smell in the heap of mussels, you need to dispose of the whole batch. Also, if the mussels appear slimy, they’re most likely to be toxic.

Mussels that do not open can be removed. This usually signifies that the mussel has become dead and therefore unhealthy to consume.

Related Questions

What happens when you eat bad mussels?

The poisoning of seafood by food is one of the most hazardous forms of food poisoning. It could cause severe illness. This is why it’s vital for you to prepare your seafood as fast as you can after purchasing.

As I am not a medical expert,  let me simply mention the most common symptoms and what to do in the event of food poisoning caused by seafood.

If you consume mussels that are contaminated, you could expect to experience reactions such as diarrhea and vomiting. This is usually the initial phase of the issue that is followed by numbness and tingling in the jaw and headaches. There are also cases of temporary fever.

What is the time it takes to notice the first signs? Most of the time, it takes up to a few hours, but there are occasions where people notice that they have symptoms within 48 hours.

This can be a huge problem since it is possible that you do not know that the food poisoning is from mussels or other seafood and you might not be aware of it and get more serious issues.

Although shellfish poisoning isn’t necessarily serious If you or others around you develop unexpected symptoms that don’t diminish quickly, we suggest seeking medical attention immediately.

If you are able, contact the emergency line in your town and speak with the department of poison control.

How do you properly freeze mussels?

In the case of mussels, it is possible to store mussels that are fresh or cooked. The idea is similar.

If you are planning to freeze fresh mussels be aware that you have to do it quickly. Like fresh mussels have to cook within a few hours after purchase, we suggest freezing them the same day.

Be sure the mussels you purchase are sealed or as close as they can be. If you spot any mussels that are not closed, we advise to throw them out as they could damage the entire pack later on.

Make a freezer bag that is heavy-duty or a couple of smaller ones and begin filling them of your mussels. Be sure to leave some headroom and get as much air as you can.

If you’d like to create another layer of protection against freezer burn, place the freezer bag into another bag and let out the maximum amount of air.

Make sure to keep the mussels as far as you can from the freezer’s door to protect them from temperature fluctuations.

Consume the mussels within 3 to 4 months if you’re focused on the quality. They’ll last for a longer time in the freezer and are safe to consume however not in the same freshness.

Wrapping up

So, how to reheat mussels? I have already given answer to that question in the earlier part.

Anyway, it is always good to have leftover mussels to freeze. Why? If you require them they’ll be ready to cook and taste fresh.

If you don’t have time to cook the entire mussel, you may take a look at these two options to heat leftover mussels. This can help you discover your preferred method to enjoy these delicious shellfish dishes.

If not, there are lots of other recipes waiting for you on YouTube. So, check those videos and prepare the recipe you like most.


How To Thicken Gumbo? All You Should Know! 

How To Thicken Gumbo? 

How To Thicken Gumbo? 

How To Thicken Gumbo? 

How to thicken Gumbo? This is a common question I see frequently in the forums for food and drink and, therefore, I’ve decided to dedicate an entire blog post on this subject. Check it out if you’re looking to learn more about Gumbo and the best way to thicken it in the proper proportions so that the dish turns out to be a delectable one.

Gumbo is a popular southern American food that is very popular in Louisiana and the Gulf Coast. It is made up of Chicken Okra, rice and various spices, based the region you’re living in Louisiana.

It was first made by slaves of West Africa to use every part of the animals they hunted developed. Gumbo is enjoyed using your hands and contains several variations of the recipe.

This popular dish is available in restaurants as well as at your home. Gumbo is simple to prepare however, it is extremely labor-intensive.

It is usually served for around 1 hour after it’s been prepared until you are able to take it out to eat. Gumbo is an excellent dish, and it can become extremely runny after serving.

The amount of gumbo’s thickness is dependent on the amount of time it cooks and whether you add thickening ingredients to it.

There are numerous methods to thicken your gumbo by using household items or things you find in supermarkets.

Learn more about how to thicken Gumbo.

First, you need to purchase every ingredient. Make sure you have a large pan that will hold all your ingredients.

Incorporate cooking oil and onions to the large saucepan.

This recipe calls for the addition of salt garlic powder, black pepper as well as celery seeds (optional) and the leaves of thyme (optional) as well as tomato sauce (in cans or ketchup) as well as chicken stock (from the box).

Take your ingredients, celery seeds, leaves of thyme, and tomato sauce.

If you’re looking for more spice in your Gumbo, you can add the three seasonings mentioned above to add some spice.

Celery seeds are small round-looking objects that taste just like celery. Thyme leaves are tiny, round items that taste similar to thyme.

The tomato sauce doesn’t provide any flavor, but instead enhances the flavor of the Gumbo.

Once all your ingredients have been placed in your pot, and then cooked some time then you can begin adding the rice in for approximately 25 minutes of cooking and beef stock from a container or beef broth that you can store in 20 mins.

After the gumbo has cooked for approximately 45 minutes, you are able to now add the chicken and Okra.

Once the Chicken is added, continue to cook it for another 15 minutes.

After everything is properly cooked and done together with some additions to thicken it added the gumbo, it is ready to serve.

Different variations of Gumbo

There is no set rule regarding the preparation of Gumbo. The cooking time is reduced when using seafood. Meat cooks longer to cook on the stove, and simmered until the meat is the meat is cooked to a thick.

It can take quite a while before it gets to your stomach. However, it’s worth the effort and time! Due to the lengthy cooking time, it’s recommended to cook it in large batches, and then put the remainder in the refrigerator to be used later. It can also last quite a long time within the freezer.

Tips: could take it out in portions and then place it in the freezer to make it easier to store.

It is possible to use chicken to make a Gumbo. Skinless, deboned chicken thighs can make a fantastic dish. It is also possible to use sausage for this. There’s no difference in the method of making the base.

The flavor blends beautifully with the kind of meat you pick. If you are planning to cook seafood gumbo, ensure that it isn’t cooked too long. Seafood cooks faster than beef and should be served within the last few minutes of cooking so that you don’t overcook it.

Apart from that it is possible to combine and mix any recipe you like! Actually, there’s no restriction that stops you from mixing the three! The ultimate gumbo combination is one that you must cook in truly huge quantities and then save for later, perhaps to save for the remaining time season.

Why should you consider thickening the Gumbo?

Sometimes, on the menu of a restaurant, and at home, you will be served a very spongy gumbo.

The broth is normally made of chicken stock including tomatoes and okra in it.

A few seasonings are used to add an extra taste; for example, spices such as garlic powder, celery seeds, leaves of thyme etc.

Irrespective of the flavor, the broth is extremely thin. Gumbo that is thickened can result in runny liquid into a rich and satisfying food.

The more dense the gumbo, the more likely you’ll eat it without becoming messy with your hands.

How to thicken Gumbo?

The consistency of gumbo is dependent on the time it takes to cook it and whether you add thickener to it.

There are numerous ways to thicken your Gumbo, with or without the ingredients you have at home or from the nearby grocery store.

The most well-known and most common method of thickening Gumbo is by adding a roux made of butter, flour and oil to the broth.

1 – Add Roux

To make a roux you need to add oil to the pot where Gumbo is cooked in.

Oil can be any kind of cooking oil, but vegetable or olive oil can complete the job just as effectively as peanut oil or coconut oil.

Add around three inches of cooking oil in the base of your pot. Incorporate flour and butter into the pot.

The flour and butter form a mixture that is known as the Roux. Mix the roux with a whisk until it is thick and clear.

Add salt If you think the roux may not be enough salty. Continue to whisk until it changes into to a light brown hue.

  1. Add Cornstarch

The other method of thickening the gumbo is to add cornstarch.

Incorporate approximately two tablespoons cornstarch to the pot. Then slowly add chicken broth into it.

Corn starch is likely to be absorbed into the broth, and will make it more thick until you can’t see any cornstarch as you stir.

  1. Add Flour

Flour can be added the same manner as cornstarch. Put about 1 tablespoon of flour to the pot then slowly pour chicken broth over it.

The flour will absorb the broth and will make it more dense until you don’t discern any flour while stirring.

This is a fantastic method of thickening that you can use in the absence of cornstarch or prefer a “roux”.

  1. Add a vegetable Soup Base

A soup made of vegetables is very thick and will give a wonderful taste to the soup, and make it thicker as required.

Add 1 packet in vegetable soup base to the pot. Add approximately one cup of water to the pot, stirring until the soup base is completely dissolved.

Add slowly more water until you have reached your desired thickness.

5 – Allow it to simmer

If you don’t want add anything, or don’t have any at the home, simmer it.

Simmering takes about an hour longer than be if you didn’t have the enough time for the gumbo to become thicker.

If you need to rush, mix in some cornstarch or flour and it’ll be ready to be enjoyed in no time.

6 – Add Chicken Soup with Cream

Another way to thicken the gumbo is using chicken cream soup.

Incorporate 1 can soup made from chicken cream and then pour it into the pot, stirring until it disintegrates in the broth.

Let it cook for a couple of minutes longer before serving.

7 Add Cornmeal Grits

This is among the most sought-after methods for thickening Gumbo.

Mix 1 cup of cornmeal, after which add water, and then mix till the mixture is smooth and nice without any lumps.

When you pour the mixture in the pot, make sure to stir it in one direction with ease to avoid lumps. Add the quantity of water needed to create the consistency you desire.

  1. Add Bread

Pick a couple of slices of bread. Then place it in the Gumbo. Don’t cut the bread into pieces, but put it in whole.

The reason for this is to ensure that all the tiny pieces are soaked in the broth from the gumbo, and to ensure that, when it is poured down your throat, it will not have any piece of bread that is not soaked.

You may slice the bread if you prefer. Let it soak for around 10 minutes or until it becomes soft and then take out the excess and throw it away.

How thick should Gumbo be?

The truth is that the answer is not definite as everyone is different in their preference to achieve a “perfect texture.” In general, Gumbo is thicker than the soup itself, and one could call it thicker than a smooth soup. It is possible to adjust the thickness by adding roux or other thickeners.

Gumbo, whether thin or thick, is a favorite dish for many because of its powerful flavor and combination of vegetables. You can maintain the gumbo’s consistency according to your preferences because  gumbo always tastes delicious whether it’s thick or not.

Wrapping up

How To Thicken Gumbo? 

There are numerous ways to thicken your gumbo. However, the main factor is to create it the way you like.

It can be as thick or soupy as you like. Be sure to prepare the soup according to your taste and the recipe you’re making.

Gumbo is a simple recipe with a healthy approach. It’s simple and hugely delicious. You can employ any of the listed Gumbo thickener techniques to get that perfect consistency.

Roux is a popular and widely used method; however, some are also fond of using the file powder or okra. Based on the ingredients that are available in your kitchen, you should select one of the thickeners in gumbo to get your desired texture. Now happy cooking!


What Does Twisted Tea Taste Like?

What does Twisted Tea Taste Like? 

What does Twisted Tea Taste Like? 


Twisted Tea can be described as a very popular beverage that many enjoy during the summer months. It’s not just a regular iced tea. It also contains alcohol, and is flavored with citrus due to the lemon. There are a variety of kinds of teas to choose from. But what does twisted tea taste like?

This article will address this question by providing you with the flavor of twisted tea , and the components that make this delicious beverage.

What exactly is  Twisted Tea?

Twisted Tea is a beverage company that manufactures what many believe to be the best iced tea on the planet. The company was established around 2001. It was based located in Cincinnati, Ohio.

In the time that Twisted Tea was invented in the early days, the founders were looking to create an iced tea that could be a hit with snow-lovers as well as sun-lovers.

They played around with different varieties of black tea until they discovered a flavor they enjoyed.

Twisted Tea Original Hard Iced Tea is made from the finest import Ceylon tea leaves, blended with natural fruit flavors.

Then it’s sweetened with cane sugar, and naturally flavor.

The people behind Twisted Tea know that a delicious beverage can create memories just as in the same way that it refreshes people. This is why they also make their iced tea with no any artificial or preservatives.

Presently, Twisted Tea has become one of America’s most loved brands of iced tea. Straight away the first time, it’s clear it’s different. Twisted Tea is different than other teas with ice on the market.

It’s as if you’re sipping the real thing, a glass of tea cold rather than a syrup that has been watered down mixed with cubes of ice.

Twisted Tea is in existence for more than 20 years and isn’t showing any signs of slowing any time soon.

Is Twisted Tea carbonated?

There is no carbonation, Twisted Tea is not carbonated.

The drink is classic in its flavor profile and doesn’t require the added boost of COsub2 to stand out from other beverages in this category.

The beverage is made with natural sweeteners, such as honey and cane sugar, which makes it extra sweet without adding calories or artificial flavors.

Twisted Tea comes in a range of flavors. It has an alcohol content of around five percent.

Twisted Tea Side effects

There are some side effects associated with Twisted Tea.

A few of the side effects that can be experienced when drinking excessive quantities of Twisted Tea include dizziness, nausea and vomiting.

However, these signs can result from other causes too, which is why it’s essential to speak with your doctor if you have symptoms for longer than 24 hours after having consumed any quantity of alcohol.

The most frequent negative side effect of having Twisted Tea is a hangover.

An upset stomach and nausea following the previous night’s sleep could result from alcohol consumption dehydration, alcohol poisoning.

The next time you decide to sip Twisted Tea, be sure not to overdo it.

What does Twisted Tea Taste Like? Does Twisted Tea Taste Good?

Twisted Tea’s flavor Twisted Tea is always changing and their most well-known flavors, including peach light, half & half. There are also the blueberry and raspberry teas for customers to select from.

Twisted Tea also has an assortment flavor selections that are limited-edition seasonal available for customers to try.

Twisted Tea is often referred to by the name of the “official cocktail of the season,” and it’s easy to understand why once you sip one sips It tastes exactly like a vacation.

Twisted Tea can be the ideal beverage to purchase at the local grocery store or gas station. It comes with mango, strawberry, peach blueberry, lemonade and flavor teas.

The original Twisted Tea has a light and refreshing taste that is ideal to drink at any time of the day.

People who have diverse tastes or preferences are able to drink this tea. It’s great to enjoy it early in the day or in the evening and it’s entirely up to you the time that you would like to enjoy to enjoy your Twisted Tea experience.

Twisted Tea’s look is bright orange and it tastes like sugar water. If you sip a cup from Twisted Tea, the taste remains inside your mouth to provide enjoyment. It is truly delightful and its flavor is easy to enjoy.

Imagine sipping orange juice during a vacation, with frozen ice cubes that are made of freshwater. You’ll get an idea of how that tastes like.

Where to buy Twisted Tea?

If you’re searching for Iced tea that is bottled it’s not that difficult to locate a well-known brand of the flavor you like best.

Where can they purchase Twisted Tea? In convenience stores and grocery stores all throughout the United States. You can also purchase through Amazon or other online retailers such as Walmart Online Grocery Store.

There are many varieties of Twisted Tea available on their website to purchase, or you can get the tea through an authorized distributor.

There are recipes and videos in YouTube that will help you in creating your perfect coffee.

You may watch it here:

How to store Twisted Tea?

Like any other beverage the best way for storing tea is to keep it in an area that is cool and dark.

The refrigerator isn’t advised due to the way that the moisture can affect certain types of teas with time and it’s also cold for certain people’s tastes.

A cabinet or pantry close to your stove is equally useful in the event that there’s not enough cool space within the home.

If you keep tea in the refrigerator make sure you keep it out of things that emit strong odors such as garlic and onions.

The oils could be absorbed into your cup of tea and alter its taste.

As I’ve already said, Twisted Tea is a perfect combination of select teas, alcohol as well as real lemonade flavor. It’s healthier than other refreshing drinks. It contains 5 percent alcohol, with the classic twist. Some refreshing drinks have the taste of urine beer or are very that they are bitter but this one is sweet, fruity syrupy and fresh in flavor.

It is a smooth malt drink with a lot of refreshing energy. In addition they blend all ingredients to create a the sweet tea taste. If the summer is around, you should be ready to combat the heat by drinking this delicious twist on hard tea iced.

Calories and the nutritional worth of twisted tea

Calories:194 calories  with 12 fl oz

  • Cholesterol:  0 mg
  • Total Fat:  Zero grams
  • Total Carbohydrate: 26 grams
  • Sodium: 8.1 mg
  • Sugar: 23 grams
  • Potassium: 271 mg
  • Calcium:34 mg
  • Protein: 0 g
  • Dietary Fiber: Zero grams
  • Alcohol: 14g

How long will it take to eliminate 194 calories?

It does not take long to burn those 194 calories. It is possible to burn these calories walking (3mph) within 55 minutes, or running (6mph) within 20 minutes, and cycling (10mph) in just 25 minutes. It’s not too difficult.

Do you feel hangover after drinking Twisted Tea?

When you drink other alcohol-based drinks, it is possible to get hangover for a short or prolonged periods of time. The best part about the Twisted hard iced tea that it will not cause drunk or hangover. The people who drink twisted tea might feel a sense of freshness, coolness, and plenty of calm. Twisted tea has become the top option when it comes to the best drinks for refreshing during summer.

Is there a healthier alternative?

Actually, no. For drinks that are summer-friendly Twisted tea is a better alternative over the majority of sugar syrups. After drinking tea cocktails you will experience a greater energy compared to other drinks. When compared to other drinks, it’s simple to consume and won’t cause abdominal discomfort. It is also more healthy tasting, more satisfying, and tastier as compared to other local drinks.

How can you make your own tea twisted?

12 packs of twisted tea are available for $13. This isn’t always the most welcoming choice for a party. However, this drink is a favorite of all people. Because of this, a variety of DIY enthusiasts are attempting to figure out how to make their personal Twisted Tea. Katie is a famous chef offers a superb Twisted Tea recipe that goes well with strong tastes. This recipe is easy to prepare and doesn’t take all that time-consuming.

Ingredients

The ingredients in this cocktail are suitable for six people serving.

  • Eight ounces vodka
  • Four cups lemonade
  • Six fresh mint leaves
  • Six black tea bags to make sweet tea
  • A half cup sugar

Recipe:

  • Fresh lemonade can be added to the ice cube tray.
  • Include a mint leaf in each cube.
  • You can freeze these cubes for at least 2 hours or freeze it for a few hours.
  • Within two hours divide the lemonades’ ice cubes in six large glasses.
  • Then, pour the vodka to the lemonade cubes of ice and sweet tea on top.

To make sweet tea, get an average pot and place the pot on the stove at a high temperature. Add the water to two cups into the pot and bring it to a boil. When it is boiling, turn off the flame and place the tea bags of black in the pot. Dip the tea bags in the water for five minutes before removing the tea bags. Add the sugar until it is completely dissolved.

Include four cups water into the mixture. Serve immediately or store in the refrigerator for up to a week.

Serve cold and relish this refreshing, cool drink to cool off in summer. It will make you awestruck.

Wrapping up

What does Twisted Tea Taste Like? 

So what does Twisted Tea taste like? I suppose I have already given you a detailed answer to this question. anyway,  Twisted Tea is a refreshing drink that can be purchased at most supermarkets. It is available in many flavors and is reasonably-priced in comparison to other drinks like wine or beer.

You must purchase Twisted Tea if you like an iced tea with an added twist. Taste it and see for yourself whether you enjoy the taste or whether it is just not your cup of Tea!


You may also read: How Much Alcohol Is In Twisted Tea

How Long Does Alfredo Sauce Last In The Fridge?

How Long Does Alfredo Sauce Last In The Fridge?

How Long Does Alfredo Sauce Last In The Fridge?

How Long Does Alfredo Sauce Last In The Fridge?

How long does alfredo sauce last in the fridge? No idea? If you are here to get an answer to this question, don’t go anywhere  because I am going to write all that you need to know about alfredo sauce and how to make it at home as well as how to store it.

Alfredo pasta sauce an amazing ingredient to mix with your favorite foods to make delicious rich, creamy meals.

You’re planning to purchase and cook with this pasta sauce made of cream to prepare your meals for this weekend, and you’d like to learn the expiration date dates and storage. What is the length of time that alfredo sauce will remain in the fridge after you’ve opened the jar? How do you store it to get the most shelf-life?

Read our article to have all the details to answer your query.

Brief Information About Alfredo Sauce

Before we get into the details of how long alfredo sauce can be stored in the refrigerator, let’s take a close look at the alfredo sauce details.

Alfredo sauce is an incredibly rich pasta sauce, which originated in Italy. It is typically made up consisting of butter Parmesan cheese and (often thick cream) to give it a delicious flavor that has a creamy texture.

In addition to these ingredients, manufacturers frequently add other ingredients like black pepper and garlic powder to improve the taste. It is also possible to add egg or starch to improve its texture.

What to Do With Your Creamy Alfredo Sauce?

The variety of foods that you can add this delicious sauce to and elevate their taste to a new level appears to be inexhaustible. We will list various ways to consider. Let’s first, throw your fresh pasta into this rich cream-based sauce and create a delicious meal in just a few just a few minutes.

It is also possible to mix this delicious sauce with cooked vegetables, like baked potato or stir-fried broccoli to make delicious healthy meals.

A different option would be to mix it with pesto sauce or tomato sauce to make marinade to cook beef, chicken or pork while roasting. We are sure that you’ll be amazed at the way it enhances the flavor and keeps the meat tender.

How Long Does Alfredo Sauce Last In The Fridge?

So, how long does the alfredo sauce last in the fridge? Do you notice any differences in the shelf-life of the store-bought or homemade alfredo sauce? Scroll down below to find out right away.

For The Homemade Alfredo Sauce

The homemade sauce for alfredo has an extremely short shelf life because it is only good for about an hour after the preparation.

If you are looking to extend the shelf life, place the fresh sauce in the refrigerator as soon as you can. In this instance how long is the alfredo sauce safe to keep in the refrigerator? It typically lasts between 3 and 4 days.

To extend the shelf life, it’s essential to freeze any leftover sauce. While freezing allows the pasta sauce made from scratch to remain intact for months on end, the taste of the sauce could change with time.

For The Store-bought Alfredo Sauce

What’s the deal with store-bought sauce? How long can the alfredo sauce that is not opened last? It is best to keep the pasta sauce sealed and keep it in a safe place in the pantry. time to expire the Classico alfredo sauce could be anywhere from 2 to 3 years when stored at the room temperatures.

What is the length of time alfredo sauce suitable for after opening? The answer is different based on the type of sauce. The shelf life of refrigerated alfredo sauce is 7 days if stored in proper conditions. Food experts recommend making use of the sauce within five days.

How long will Prego last after being opened?

The manufacturer suggests that you immediately refrigerate any leftover sauce below 40 F. After that, it will be at its highest quality for three days.

What’s the Bertolli sauce? How long will Bertolli alfredo sauce last after you’ve opened the jar? Similar to Prego this cream-based sauces can last three days if you keep it in the refrigerator.

If you’ve put alfredo sauce over your favorite food items, like tortellini, how long will cooked tortellini keep in the refrigerator? Refrigerate the tortellini that you have cooked within an hour of cooking the dish. It will stay fresh for three to five days.

How to Know If the Alfredo Sauce Is Bad To Use?

When we add fresh alfredo sauce that we have made to our meals, or with a pasta bowl will give us delicious and healthy meals to take pleasure in.

If the cream-based sauce becomes sour ingestion, it will increase the risk of food poisoning. So, how do you know whether alfredo sauce is rotten? Here are the indicators to quickly recognize spoilt alfredo sauce.

Signs that the alfredo sauce has turned bad

To reduce the chance of getting food poisoning or avoid stomach-related issues, it is essential to recognize the indicators that let you recognize that the sauce is deteriorating and that it is time to dispose of the sauce because nothing is more crucial that your wellbeing. These are the indicators which can assist you in deciding whether or not to eliminate the alfredo sauce

Smell

If the aroma of alfredo sauce is sweet or sour, it signifies that the sauce has gone bad and it is best to throw it out.

Color

If the distinctive creamy color of alfredo sauce has gone and it has turned to into a yellowish color, the sauce is bad. Avoid using this sauce.

Taste

If the aroma or color of sauce isn’t enough to make you think that it’s gone bad, then tasting a small amount of the sauce can help. The taste of a small amount of the bad sauce is not harmful to the person who is drinking it.

How To Store The Alfredo Sauce Properly?

Now that you are aware of how long alfredo sauce lasts after opening, it is time to learn some simple ways to preserve its excellent quality while storing it for later use.

Refrigerate the Unused Sauce

If you are making your own sauce, put it in a jar of sauce with a lid, and then bring it to the refrigerator. If you purchase the sauce from a store it is enough to cover the jar tightly and then refrigerate it.

What is the length of time pasta sauce good to keep after it has been opened and frozen? You can keep the sauce in good condition for three months or more when freezing it.

FAQs

How long does the alfredo sauce last in the freezer?

Alfredo sauce is fresh for up to three months in the refrigerator. It is possible to store Alfredo sauce in freezer-safe sealed plastic bags or air-tight containers. However, you must be aware that freezing your pasta with alfredo will keep the growth of bacteria at bay, but that doesn’t mean it won’t impact the flavor in the dish. Alfredo sauce could undergo an alteration in taste if kept excessively long time in the freezer.

How long does alfredo sauce last at room temperature?

The alfredo sauce can be stored when it is at room temp for approximately 4 hours. 40°F to 140°F is the best temperature at which bacteria can thrive. Additionally, alfredo is a dairy-based dish and is a prime candidate for bacterial contamination. Hence, should it be removed if exposed at temperatures of longer than four hoursit’s advised to dispose of it.

How long does the alfredo sauce keep in the fridge?

Alfredo sauce lasts for approximately 4-5 days if stored in the right conditions in the refrigerator. It should be stored in a sealed airtight container or bag. Alfredo pasta unopened can last between 6 and 8 months if it is stored correctly within the kitchen pantry.

If you purchase supermarket-bought sauces, it is recommended to be sure to read the best before or expiry date onto the label sauce container.

Does alfredo sauce go bad?

Like other foods as well, alfredo sauce may go bad. This is an aging cream sauce that is a perishable food item. It is therefore important to take care when storage.

How can you make homemade alfredo sauce?

Alfredo sauce is an Italian delight that compliments the noodles and pasta beautifully while making the taste delicious, is a favorite dip across the world.

The mouth-watering, delicious sauce is made with parmesan cheese, butter in addition to heavy cream for the main ingredients. The recipe is fairly easy to follow as you need to warm the butter and heavy cream over moderate heat.

Add garlic or other condiments that you prefer to add with constant stirring. After that, mix the cheese of your choice to the mix until it is well-mixed, and voila! You now have your silky smooth alfredo sauce waiting for you to enjoy.

You can also add salt, pepper or any other seasoning that you prefer to give the sauce your own personal touch. you could even substitute heavy cream with cream cheese.

Wrapping up

I hope that this article has all the info you require to get an authentic answer to the question “how long does alfredo sauce last in the fridge?”

Alfredo sauce is an excellent condiment for any food you like. If you intend to keep it for a long time it is necessary to preserve it appropriately.

It is crucial to keep in mind it is important to note that Alfredo sauce can be best enjoyed in the freshest state.

The most effective thing you can do is to make just the quantity of sauce you require. If you need it, you can easily whip up a fresh amount of sauce within only some minutes.

Making excessive sauce is not an excellent idea since the sauce that you have made yourself could be ruined very quickly. It’s not recommended throwing away the sauce due to this reason.

If you’ve ever made enough sauce, make sure to cool it down as quickly as you can, and if you feel that it’s gone bad just throw it away.

The bottom-line is, throwing away sauce is always a better option than getting sick.

Can You Freeze Tzatziki? All You Need To Know!

Can You Freeze Tzatziki?

Can You Freeze Tzatziki? Can You Freeze Tzatziki?

Can you freeze Tzatziki? If you have idea, I suggest that you go through this post for an authentic answer that would stand you in good stead. Read on for more information.

Tzatziki, a well-known Greek condiment, is simple to prepare and adds great flavor to many dishes.

Ever wonder if leftover tzatziki can be frozen or made ahead? Tzatziki sauce is more suitable for freezing than other dairy-based dips. It has a lower water content than most other dips. There will be some texture changes, but this won’t alter the taste of the sauce as long as it is properly defrosted.

Continue reading for more information about yogurt sauce, how to freeze it and how to defrost it properly.

What is Tzatziki?

There are many variations of tzatziki sauces, but it is most commonly known as a Greek condiment. This classic sauce is made of yogurt, cucumbers, lemon juice and garlic.

These are the basic components of traditional tzatziki. However, your taste buds will vary depending on the herbs and spices you use.

This spice packet from Amazon is my personal recommendation for making tzatziki.

The consistency of the tzatziki sauce will vary depending on whether it is made with diluted yogurt or strained yogurt. Tzatziki made from diluted yogurt will be quite watery. Greek yogurt is used to make the classic Greek tzatziki. It has a thicker consistency.

The sauce is mild in flavor. This sauce is extremely fresh and smooth. To balance it out, tzatziki can be paired with spicy foods.

Tzatziki can be used as a side dish or appetizer. This simple but effective condiment can be used in many ways. You can use it as a salad dressing to make a quick lunch.

Mixing tzatziki and a few fresh ingredients like tomatoes or feta cheese can create a light, flavorful Italian-inspired bruschetta.

You may have noticed a fresh sauce on your gyros wrap if you’re a fan of street food. It’s likely that it was tzatziki.

You can also enjoy the tzatziki sauce with Greek chicken souvlaki and kebabs.

How to Make Tzatziki

Tzatziki can be made in a matter of minutes. Simply chop up some ingredients and combine them with yogurt to make a delicious sauce.

Tzatziki can be made from plain Greek yogurt, which you can buy in any supermarket. It is a good idea if there is a Greek market close to your home to buy real Greek yogurt. It tastes much better than local Greek yogurt.

Plain Greek yogurt is fine, but be aware of the Greek keyword. Greek yogurt is strained, which is different from regular yogurt. This means that the yogurt is strained to remove excess water. Greek yogurt is thicker than regular plain yogurt.

You will need these ingredients to make Greek tzatziki sauce:

  • 1 cup plain Greek yogurt
  • 1 finely chopped or grated cucumber.
  • 3 tablespoons fresh chopped finely chopped dill (mint parsley, thyme).
  • Three finely chopped garlic cloves
  • 2 tablespoons lemon juice
  • Black pepper and salt

Make a tzatziki sauce by preparing these ingredients and stirring them together. Add a sprinkling of olive oil to the top.

Can You Freeze Tzatziki?

Tzatziki sauce lasts for approximately 4 days in the fridge. It is best to freeze the sauce if you are unable to finish it in a few days.

There are no health risks associated with freezing tzatziki sauce. It is not likely to be as smooth as fresh-made tzatziki.

The tzatziki sauce can be kept in the freezer for up to 3 months. It is important to remember that the texture of the tzatziki sauce will change the longer it is stored in the freezer.

What happens when you freeze tzatziki

Tzatziki can become separated due to the high water content of the sauce from yogurt, cucumbers and lemon.

Curdling occurs when the lemon juice in the tzatziki sauce causes them to be juicy. Cucumbers also change in texture. The yogurt’s acidity helps preserve their initial crunch.

The Greek yogurt is water-exuding when it’s in the freezer or fridge. The texture and taste of Greek yogurt will change slightly. Yogurt becomes more loose and less smooth. The flavor becomes acidic.

Yogurt contains a lot good bacteria. Some of the good bacteria in yogurt is destroyed when it’s frozen. It is safe to eat frozen Greek yogurt or tzatziki made from it.

How to Freeze and Defrost Tzatziki

You will need to be careful about how you store the tzatziki sauce in the freezer. Also, how you defrost it later.

How to freeze  Tzatziki Sauce

You will need a tightly-fitting container to store your tzatziki sauce in the fridge. You can wrap the container in plastic wrap by adding a few layers.

You can remove as much air from the container by placing it in a freezer bag. The bag should be sealed tightly to prevent air from entering.

Double wrapping the container ensures that the tzatziki stays fresh after being defrosted. You should always mark the date on your bag to ensure that you don’t eat expired sauces more than a few months later.

How to Defrost Tzatziki

It is not a wise decision to take tzatziki from the fridge and leave it on the counter to thaw. Frozen yogurt will eventually change in texture. There are steps you can take to get the best results.

For the initial stage of defrosting, place the tzatziki sauce into the refrigerator. Only after it has thawed slightly, you can take it out to fully defrost.

After the condiment has thawed you’ll see some water. Do not try to add it back into the sauce. Instead, pour it out. To achieve a better consistency, reduce water consumption.

The defrosted tzatziki sauce can be used as a dip with vegetables, chips, or crackers. You can also use it as a dressing to potato or pasta salads.

Tzatziki is also great with fried vegetables like eggplant and zucchini.

Tips for Freezing Tzatziki Sauce

Here are some tips for making tzatziki that is suitable for freezing if you plan to store it in cold storage.

These tips are designed to make condiments less watery. As we all know, thawing makes food watery. It is important to remove as much water from the sauce as possible.

Tip No:1

Greek yogurt is more watery than regular yogurt. Full-fat Greek yogurt is thicker.

Full-fat yogurt will not only make the defrosted Tzatziki sauce less liquidy, but it will also make the sauce richer and creamier.

You can strain plain Greek yogurt to thicken it if you don’t have full fat Greek yogurt.

Tip No: 2

For your tzatziki sauce, try Persian cucumbers. They are crispier and have less water.

There is a way to extract as much water from cucumbers as possible if you don’t know where they are. Although you can remove the seeds, it will cause the cucumbers to lose their texture and waste your product.

Instead of cutting out all the good parts, you can slice the cucumber and sprinkle salt on it. Salt will help extract water from cucumbers, so you’ll have less liquid in your Tzatziki sauce.

Tip No: 3

A good tip to make the cucumbers less watery is to grate them for half an hour before you prepare the sauce. Season the grated cucumber with salt by placing it in a strainer. This is another way to make the vegetables lose excess water.

After the cucumber has been in the strainer for 20-30 minutes, give it a good squeeze so that as much water is as possible.

If you plan to make a lot of cucumbers for the tzatziki, this is a great method.

Tip No: 4

Tzatziki sauce can become grainy once it has been frozen and thawed. You can thicken the sauce with heavy cream and mix well before placing it in the freezer.

The sauce’s flavor may change. If you don’t use high-fat Greek yogurt, heavy cream can be used to increase fat content and preserve the sauce’s texture.

Tip No: 5

Tzatziki, like most other foods that can be frozen, also changes in texture. It can be enjoyed as well as fresh tzatziki by some people, but not all.

You can freeze a small amount tzatziki sauce and then defrost it to taste the difference.

Wrapping up

Can You Freeze Tzatziki?

To conclude, tzatziki is a Greek dip that can also be used in Greek salads, souvlaki, or pastries. If the tzatziki is to be used within 4 days, it may not need to be frozen.

Tzatziki’s shelf life can be extended to 12 months by freezing.

It is crucial to make sure that your tzatziki stays safe from freezing burn.

How Long Does Ranch Last?

how long does ranch last

How Long Does Ranch Last?

How Long Does Ranch Last?

Think about eating potato chips and nachos with no dip. You can also make your salad without dressing. Many dressings and dips are available nowadays. Ranch is one of America’s most loved dressings. Ranch was voted the favorite dressing by 40% of Americans. Ranch is a delicious dish. Ranch is delicious, but how long does ranch last? This is an important question to answer.

Ranch is often made from buttermilk, garlic and herbs, along with some spices, mayo, or yogurt.

Ranch is loved for its creaminess and rich flavor. You might have questions if you are thinking of buying it or if you already own it.

Can Ranch Dressing Go Bad?

Ranch dressing and sauce can go bad but they can still be used for a very long time after being opened. Ranch sauce bought at the grocery store contains many shelf stabilizers and preservatives. It is made to last no matter how long it has been opened. Ranch dressing is a condiment that can be used in many different ways in the United States.

Most Americans have ranch sauce at home. It is safe to eat as long as the dressing doesn’t contain any chunks.

How long does ranch dressing last?

Store-bought ranch dressing: Due to the preservatives or stabilizers, store bought ranch dressing will last approximately 12-18 months in the fridge and cupboard. It will last about 6-12 months.

Freshly made dressing: There is nothing better than homemade ranch dressing. It doesn’t last very long. You only have four days to consume ranch dressing once you have made it.

How long does it last?

Time for Ranch Dressing

Unopened, store bought: 12-18 months

Store-bought opened: for 6 months after purchase

Fresh made: 4 days

How can you tell if ranch dressing is bad?

Mold: You may see mold growing around the bottle and in the opening of ranch sauce as it approaches its expiration date. You must throw away any mold that is visible on the bottle, but not in the dressing.

Avoid eating food with mold. Many people think that mold can be removed or moved easily and food is safe to eat. This is false. Scientists now know that mold spores can infect any item with even the smallest amount of mold.

Bad smell: You won’t have to wonder what ranch sauce smells like when you open it. You will notice a ranch-cool or vinegary smell. There will be no middle ground. It is dangerous to eat the vinegar smell.

Bloated bottles: No matter what kind of food you eat, a bloated container is a sign that the food has been spoilt. Bloated containers are a sign that foodborne pathogens have multiplied in the container and can cause food poisoning.

Inadequate storage: Most people store an open ranch dressing bottle in their cupboard until they are ready to use it. However, some people forget to put it in the fridge and instead stick it in the cupboard.

It is fine to place it in the fridge if it has been there overnight. If it’s been several weeks or months since the last time it was opened, throw it out and buy a new one. Most likely, the milk and dairy in your dressing will go bad.

Can you eat expired ranch dressing?

It is not a good idea to eat expired food. However, just because the date has passed does not mean the food is no longer valid. The shelf-life of ranch sauce will be extended if it is kept in the fridge right after being opened.

Ranch sauce can be eaten up to two months after expiration as long as it is still in the refrigerator and the smell and taste are good.

You can throw away your ranch dressing after making it. It’s not as stable than store-bought ranch dress.

Ranch dressing has gone bad: substitutes you can use

Ranch dressing is well-known for its creamy texture and cool flavor. It is best to look for other sauces that have the same characteristics. Cilantro dressing is a rare dressing that can be almost identical to ranch dressing. Cilantro dressing uses the same ingredients as ranch dressing but contains cilantro. You won’t find cilantro dressing at many restaurants or in limited stores.

Many people don’t like cilantro so a blue cheese dressing is a good choice. Blue cheese dressing is nearly as popular as ranch dressing. Many places that offer popular food like wings, pizzas, and finger foods will also feature blue cheese.

How to store ranch dressing

Keep it in the cupboard Place it in the fridge once you have opened it.

You can find your sauces and dressings in the fridge by placing them on the sides of the refrigerator. However, you should put the ranch dressing at its back so that it doesn’t get exposed to the warm air when you open the fridge doors.

Fresh: Keep your homemade ranch dressing fresh in a sealed container. It should be eaten within 4 days.

Shelf Life of Ranch

You’ve made ranch dressing, or bought it from a store and forgotten to use it. It’s possible that your ranch dressing has gone bad. What can you do to tell if ranch dressing is bad? Well, I have already discussed that in the earlier part of this article.

You only need to see and smell to tell if ranch dressing is bad. It’s not difficult.

Smelling a ranch that is deteriorating is the best way to tell if it’s rotten. It is likely that the ranch dressing has a foul odor.

If you don’t store it properly, this can happen. Ranch dressing should always be kept in tightly sealed jars and refrigerated.

If it is left out too long, heat can cause damage to ingredients such as yogurt and buttermilk. This causes the bad smell.

The development molds are another way to determine if your ranch is in trouble. Molds can develop in ranch dressings that have been spoiled over time.

.Ranch dressing should be used before its best before date.

Throw it out if your ranch isn’t oil-based or the contents of the jar separate. The ranch has gone bad and should not be eaten.

Similar Questions

Is ranch dressing made with mayonnaise?

Ranch dressing is a dressing for salads that’s made with garlic, salt, onions, mustard, herbs and buttermilk. They are mixed with mayonnaise or another oil-emulsifying agent.

Can you freeze ranch dressing?

It is possible, but not recommended to freeze ranch dressing. Buttermilk is one of the ingredients in this recipe. When it’s thawed, it will leave behind a bland, clumpy and bitter-tasting sauce.

Wrapping up

How long does ranch last?

These are the important points to remember:

Ranch dressing is a popular condiment all across the US. Ranch dressing bought in stores usually lasts 12-18 months in the cupboard. The dressing can be kept in the refrigerator for up to 6 months. Ranch dressing must be consumed within 4 days if it is made fresh.

But you must throw it out if your ranch sauce is dry or bloating.

There are two ranch dressing options: blue cheese dressing and cilantro dressing.

Ranch dressing is a healthier and more delicious option than any other. This is one of the healthiest dressings. You can either buy it or make your own and add flavor to your meals. This dressing is delicious and should not be wasted. These tips will help you make your ranch last for many weeks.

Remember that different ingredients have different health benefits and freshness. Please share this recipe with family and friends.