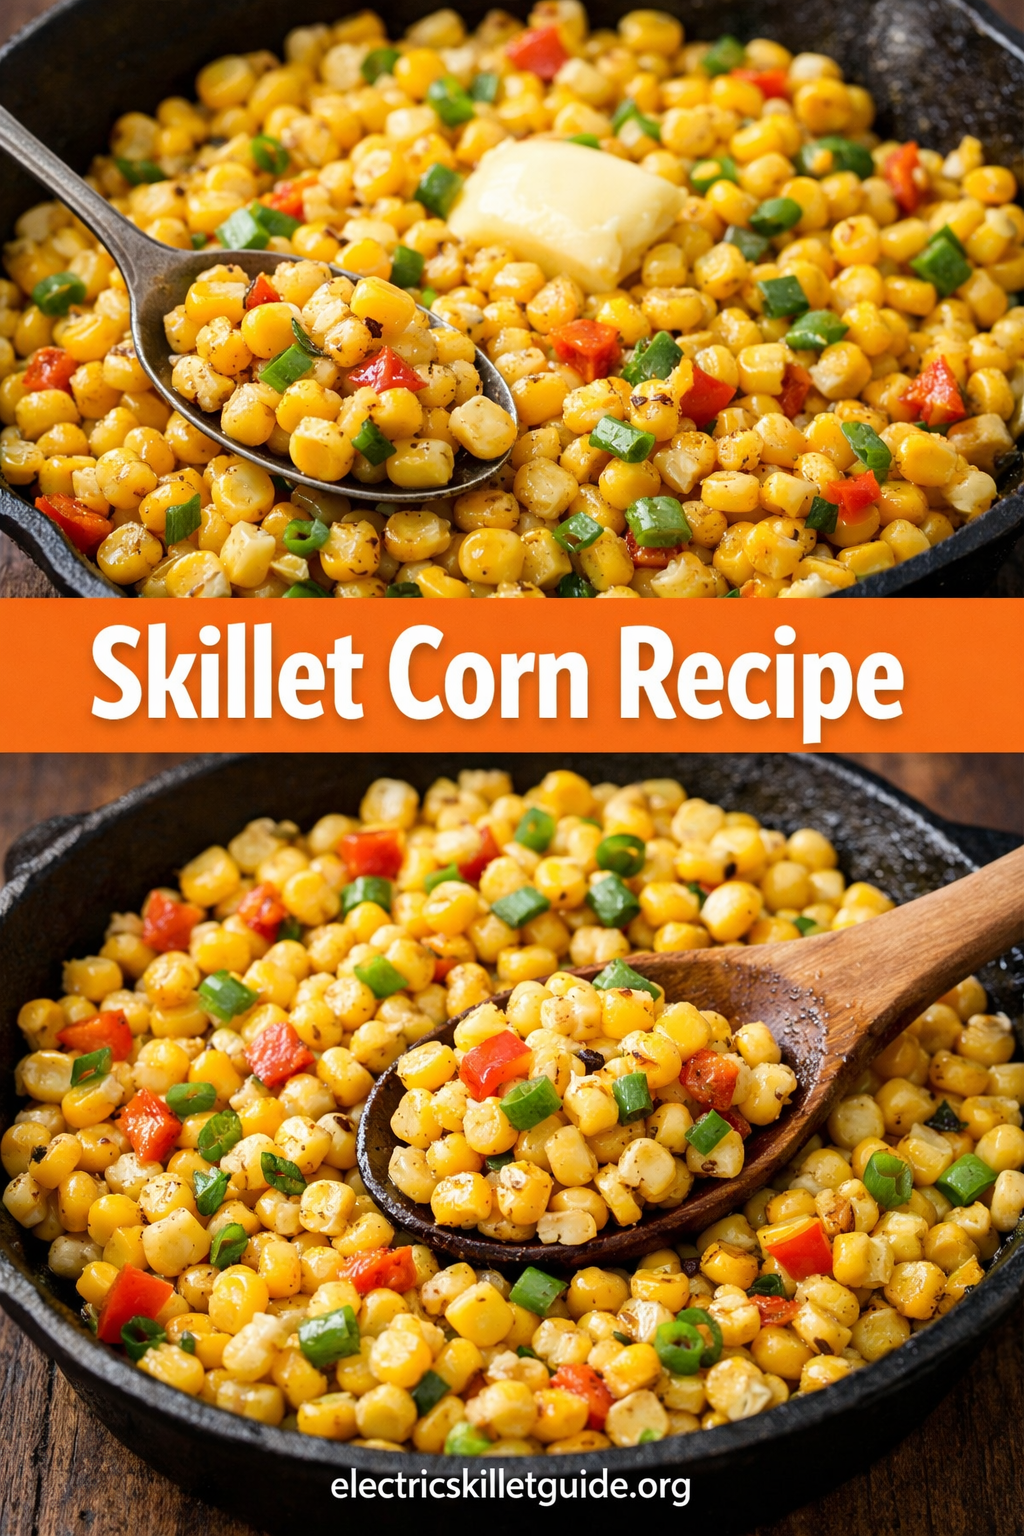
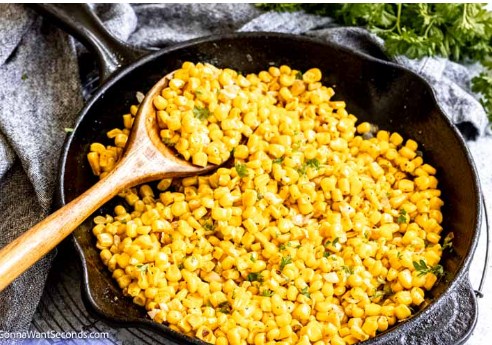
Some dinners happen because you planned ahead.
This isn’t one of those.
Actually—let me rewind that a bit. It usually pretends to be planned. Ground beef thawed because I always keep some around. Bell peppers that looked fine three days ago and now feel like they’re quietly asking for attention. A bag of shredded cheese with maybe one good meal left in it.
So this skillet happens. Not because I decided on it early in the day, but because standing there at six-thirty, it makes sense faster than most other ideas.
Cheesy beef skillet with bell peppers is the kind of meal that shows up when you don’t want to overthink dinner but also don’t want to eat something sad. One pan. Familiar flavors. Nothing that demands precision.
I eat it out of a bowl more often than not. Sometimes straight from the pan. Depends how the day went.
Why this combination keeps working
Ground beef and bell peppers don’t need convincing. They’ve been paired together long enough that they know how to behave.
The beef brings weight and richness. The peppers soften and sweeten as they cook, especially the red ones. Green peppers stay a little sharper, which I like, but not everyone does. Mixing colors usually lands somewhere in the middle, which feels right for this dish.
The cheese comes in late. That part matters. If you rush it, everything turns heavy. If you wait, it melts just enough to pull the skillet together without taking over.
Nothing here is clever. That’s kind of the point.
Ingredients, the way I actually think about them
Ground beef
I usually grab 80/20. Leaner beef works, but it tastes thinner. Too fatty and you’re babysitting grease. If I have to drain some, I do. I just don’t drain it bone-dry.
Bell peppers
Red, green, yellow—whatever’s in the fridge. I don’t cut them neatly. Uneven pieces cook at slightly different speeds, and I’ve stopped fighting that.
Onion
Optional, but noticeable when it’s missing. I add it unless I genuinely don’t have one.
Garlic
Fresh. I’ve tried shortcuts. They’re never quite the same.
Cheese
Cheddar most of the time. Monterey Jack if I want it milder. Sometimes both. I don’t measure. I stop when it looks like enough, which changes depending on the day.
Oil or butter
Only if the beef is lean and the pan looks dry.
Salt and black pepper, always. Anything else is optional and mood-based.
Start with the beef, and let it behave like beef
Medium heat. Wide skillet. Give it a minute before you add anything.
The beef goes in and gets broken up, but not into crumbs. I let it sit longer than feels natural. Browning matters, and stirring too much kills it. I still catch myself doing that sometimes.
Salt and pepper go in early. Waiting until the end never works as well as I think it will.
Once the beef is mostly browned, I push it to the side. If there’s too much fat, I spoon some off. Not all. Flavor lives there.
Vegetables don’t all go in at once
Onion first, if I’m using it. Let it soften in the beef fat. It should smell sweet, not aggressive.
Then the bell peppers.
They look like too much. They always do. I used to panic at this stage. Now I wait. They release moisture, shrink, and settle down if you give them time.
Garlic goes in last. Thirty seconds. Maybe less. When it smells like garlic instead of raw sharpness, it’s done.
If you walk away here and burn it, the dish never really recovers. Ask me how I know.
Bringing everything together
If the skillet looks tight, I add a splash of water or broth and scrape up whatever’s stuck. That’s flavor, not mess.
Heat goes down.
Cheese goes on top, scattered instead of dumped. I cover the pan briefly to help it melt, then stir gently. This isn’t meant to be saucy. It’s coating, not drowning.
I taste. Adjust salt. Maybe more pepper. Then I stop, even if part of me wants to keep fiddling.
What it actually tastes like
Savory beef. Soft peppers with a little sweetness. Cheese that binds without turning everything into paste.
It’s filling without being exhausting. You finish eating and don’t feel like you need to lie down immediately, which feels like an underrated success.
How it usually gets served around here
Most nights, I eat it on its own.
Sometimes over rice. Sometimes with roasted potatoes. Once, on toast because that’s what was available and I didn’t feel like cooking anything else.
If I’m trying to keep things lighter, I add a simple salad and move on.
This skillet doesn’t need ceremony.
Variations I’ve actually kept
I’ve added mushrooms after the beef and before the peppers. Let them cook down properly or they water everything out.
Spice works if you want it—chili flakes, jalapeño, pepper jack cheese. I keep it mild most of the time.
Mozzarella melts beautifully but doesn’t bring much flavor. I mix it with cheddar if that’s what’s left.
Leftovers with a fried egg the next morning are better than they have any right to be. That wasn’t planned. It just happened once, and now I think about it.
Some questions I get asked, usually mid-conversation
Yes, ground turkey works, but it needs more seasoning.
Green peppers are fine, especially mixed with red.
Skipping cheese turns it into something else—not bad, just different.
Wide, heavy skillets behave better.
Kids usually like it if you don’t add heat.
Storage and reheating, realistically
It keeps two to three days in the fridge.
Reheat gently. Stove is better. Microwave works if you stir halfway through and don’t blast it. Cheese tightens when it gets bullied.
I don’t freeze this often. The texture changes. I’d rather just make it again.
Final thoughts
Cheesy beef skillet with bell peppers stays in my rotation because it doesn’t demand much. It works with what’s already there. It forgives small mistakes. It tastes good even when eaten straight from the pan, standing at the counter.
Some recipes try to impress you.
This one just feeds you.
Look, I get it. It’s 5:37 PM. Your stomach is growling like an angry badger, your day was a marathon of meetings or chaos, and the last thing you want to do is perform culinary wizardry for an hour. You’re staring into the fridge, willing it to magically produce something delicious, healthy, and fast. Sound familiar? Yeah, I’ve been there more times than I care to admit.
That’s exactly why I need to talk to you about this Cheesy Chicken Skillet with Roasted Veggies. OMG, it’s a game-changer. This isn’t just a recipe; it’s a strategic life maneuver for busy people who still want to eat like they’ve got their life together. It’s the ultimate easy keto dinner recipe for beginners (or seasoned pros who are just tired), and it all happens in, like, 30 minutes. One pan, minimal fuss, maximum flavor. Let’s get into it.
Why This Skillet is Basically Your Best Friend
We’ve all seen those recipes that promise “one-pan wonders” and then require you to gather seventeen different vegetables and use every bowl in your kitchen. This is not that. This recipe is built on a foundation of beautiful, simple logic.
First, you roast a tray of veggies. While they’re getting all caramelized and fabulous in the oven, you cook your chicken in a skillet on the stovetop. Then, you combine them in a glorious, cheesy union. It’s multitasking that actually works. The clean-up is a dream, the macros are fantastic for a low-carb lifestyle, and the flavor? Off the charts.
Think about it: tender, seasoned chicken, sweet and smoky roasted veggies, all draped in a simple, creamy, melted cheese sauce. It’s comfort food that doesn’t weigh you down. It’s the answer to the question, “What can I make that’s not sad baked chicken and steamed broccoli again?” Ever wondered why restaurant skillet meals feel so special? It’s because everything cooks together and the flavors marry. We’re just doing a home-kitchen hack to get the same result.
Gathering Your A-Team: Ingredients That Work Hard
For the Roasted Veggies:
1 medium zucchini, chopped into half-moons
1 bell pepper (any color), chopped
1 small head of broccoli, cut into florets
1/2 a red onion, sliced
2 tablespoons olive oil
1 teaspoon garlic powder
1 teaspoon smoked paprika (this is the secret weapon, trust me)
Salt and black pepper to taste
For the Cheesy Chicken:
1.5 lbs boneless, skinless chicken breasts or thighs, cut into 1-inch pieces
2 tablespoons olive oil or avocado oil
1 teaspoon onion powder
1 teaspoon dried Italian seasoning
Salt and pepper
1 cup heavy cream (or full-fat coconut milk for dairy-free)
1.5 cups shredded cheese (I use a mix of cheddar and mozzarella for maximum meltiness)
Optional garnish: Fresh parsley or chopped green onions
See? Nothing weird. No obscure powder you’ll use once and then find in the back of your pantry in 2027. Now, about those swaps…
Veggie Swap Ideas: Cauliflower, asparagus, mushrooms, or green beans are all stellar. Just keep the pieces roughly the same size so they roast evenly.
Protein Swap: Pre-cooked shrimp or sliced sausage added at the very end works amazingly.
Dairy Swap: For the cheese sauce, a combo of cream cheese and a little broth can work in a pinch if you’re out of heavy cream.
The point is, don’t stress. This recipe is forgiving. It’s a beginner-friendly keto dinner because it teaches you a method, not just a single, rigid dish.
Let’s Get Cooking: The Foolproof, Two-Step Dance
I promise this isn’t rocket science. If you can chop stuff and turn on your oven, you’ve got this. We’re going to work in two phases, which sounds fancy but is really just smart timing.
Step 1: Unleash the Power of the Oven (The Veggie Phase)
Preheat your oven to 425°F (220°C). This high heat is key for getting those crispy edges we love.
On a large baking sheet, toss your chopped zucchini, bell pepper, broccoli, and onion with the olive oil, garlic powder, smoked paprika, salt, and pepper. Don’t crowd the pan! If the veggies are piled on top of each other, they’ll steam instead of roast. Use two sheets if you need to.
Pop the tray into the oven for 20-25 minutes. You want the veggies tender and slightly charred at the edges. This is where the magic happens—that roasting caramelizes their natural sugars. It’s a flavor bomb.
Step 2: Master the Skillet (The Chicken & Cheese Phase
(Cheesy Chicken Skillet with Roasted Veggies in the kitchen)
While the veggies are roasting, turn your attention to the stovetop.
In a large skillet (I use a 12-inch cast iron or stainless steel), heat the oil over medium-high heat.
Toss your chicken pieces with the onion powder, Italian seasoning, salt, and pepper. Add them to the hot skillet in a single layer. Resist the urge to constantly stir! Let them sear for 5-7 minutes, turning once, until they’re golden brown and cooked through. This builds flavor. Seriously, just leave them alone.
Once the chicken is cooked, reduce the heat to low. Pour in the heavy cream and let it simmer gently for 2 minutes, scraping up any tasty browned bits from the bottom of the pan. Those bits are pure gold, don’t leave them behind.
Turn off the heat. Stir in the shredded cheese until it’s completely melted and the sauce is gloriously smooth. See? No roux, no complicated bechamel. Just cream and cheese doing their beautiful thing.
The Grand Finale: By now, your veggies should be perfect. Scrape every last one of those smoky, roasted gems directly into your cheesy chicken skillet. Gently fold everything together until it’s one happy, cohesive family of food.
Pro-Tips from Someone Who’s Messed This Up So You Don’t Have To
I’ve made this a hundred times, and I’ve learned a few things the hard way. Let’s call them “character-building kitchen moments.”
Dry Chicken is the Enemy. The number one mistake? Overcooking the chicken. It continues to cook a bit in the hot sauce, so take it off the heat when it’s just cooked through. If you’re nervous, use a meat thermometer—165°F at the thickest part.
Cheese Sauce Won’t Cooperate? If your sauce looks grainy or separates (it happens to the best of us), it’s usually because the heat was too high when you added the cheese. Low and slow is the way to go. A splash more cream and gentle stirring can often bring it back.
Veggie Sogginess. I said it before, but it’s worth repeating: give your veggies space on the pan. This is the single most important rule for roasting. Crowding = steaming = sad, limp veggies.
Season in Layers. Don’t be shy with the salt and pepper. Season your chicken before cooking. Season your veggies before roasting. Taste the final dish and adjust. Building layers of seasoning is what makes food taste professional.
Making It Yours: Beyond the Basic Recipe
The basic version is a solid 10/10. But sometimes you wanna play. Here’s how to level up your easy keto dinner game.
Spicy Version: Add a diced jalapeño to the veggies, and a pinch of cayenne or a dash of hot sauce to the cheese sauce.
“Everything but the Kitchen Sink” Version: Have a handful of spinach that’s about to turn? Stir it into the hot skillet at the very end until it wilts. A few halved cherry tomatoes add a nice pop of acidity.
Ultimate Comfort Version: Crisp up some chopped bacon in the skillet before cooking the chicken. Remove the bacon, cook the chicken in the bacon fat (I know, genius), and use it as a crunchy garnish at the end. You’re welcome.
So, What’s the Verdict? Is This Really the Weeknight Winner?
In a word: absolutely. This Cheesy Chicken Skillet with Roasted Veggies checks every box for a perfect busy-night meal. It’s high in protein, low in carbs, endlessly customizable, and ridiculously tasty. It proves that eating a wholesome, keto-friendly meal doesn’t require a personal chef or a magic wand—just a simple, solid plan.
You get a complete, balanced dinner with barely any dishes to wash. You get to feel like a kitchen hero without the stress. And most importantly, you get to sit down and actually enjoy a delicious meal you made. Isn’t that the whole point?
So next time that 5:37 PM dread hits, skip the takeout menu and the sad salad. Grab your skillet, chop a few veggies, and give this a try. I have a feeling it’s going to become a regular in your rotation, just like it is in mine. Now go on, get cooking. Your future well-fed, less-stressed self will thank you.
Rustic Chicken and Spinach Skillet –Easy Dinner recipe
chicken skillet with spinach
Let’s be real for a second. Most “easy” dinner recipes are a total lie. You open a blog, and suddenly you’re expected to julienne vegetables like a Michelin-star chef while using fourteen different pans. Who has the energy for that after a nine-to-five? Not me, and probably not you either.
I stumbled onto this Rustic Chicken and Spinach Skillet during a week where my fridge looked like a desert and my motivation was even lower. I needed something that didn’t taste like “diet food” but still checked the boxes for my keto goals. Since then, it’s become my absolute go-to for Easy Keto Dinner Recipes For Beginners.
It’s fast, it’s creamy, and it actually tastes like you put effort into your life. Plus, you only have to wash one single pan. If that isn’t a win, I don’t know what is.
Why You Actually Need This Recipe in Your Life
Do you ever feel like keto is just an endless cycle of eggs and bacon? I’ve been there, and it’s a dark, boring place. You need variety, but you also need something that doesn’t require a degree in chemistry to understand the macros.
This skillet meal hits that sweet spot of high fat and moderate protein without the fluff. We use chicken thighs because, honestly, chicken breasts are just sad, dry sponges. The skin gets crispy, the spinach wilts into a luxurious sauce, and the garlic makes your whole house smell like a high-end Italian bistro.
Is it the most photogenic meal in the world? Maybe not. But it’s rustic, soul-warming, and keeps you in ketosis without making you miserable.
The Secret Sauce: Why Thighs Beat Breasts
I’m just going to say it: stop buying chicken breasts for your keto meals. I know, I know, the fitness influencers love them, but we’re here for flavor and healthy fats. Chicken thighs stay juicy even if you accidentally leave them on the heat for two minutes too long while you’re distracted by a TikTok rabbit hole.
Higher Fat Content: Essential for hitting those keto macros.
Better Texture: They don’t turn into cardboard under heat.
Budget-Friendly: Thighs are usually way cheaper than breasts.
Skin-On Options: That crispy skin is basically nature’s keto cracker.
Ever wondered why your home-cooked chicken tastes “meh” compared to restaurant food? It’s usually the fat content. By using thighs, you’re already halfway to a better dinner.
Essential Gear: The Cast Iron Myth
You don’t need a $300 French oven to make a decent meal. However, a heavy-bottomed skillet or a cast-iron pan will change your life. It holds heat better than those flimsy thin pans you got in college.
If you don’t have a cast-iron skillet, don’t panic. A regular non-stick pan works, but you won’t get that deep, golden-brown crust on the chicken. A good sear equals flavor, and flavor is what keeps us from quitting our diets and ordering a pizza.
What You’ll Need From the Pantry
Before you start, make sure you have these basics. Don’t be that person who starts cooking and realizes they’re out of salt.
A Large Skillet: Bigger is better so you don’t crowd the chicken.
Tongs: For flipping without splashing oil everywhere.
A Splatter Screen: Unless you enjoy cleaning grease off your backsplash for an hour.
Meat Thermometer: The only way to truly know your chicken is safe without cutting it open and losing the juices.
The Ingredients: Keeping it Keto and Simple
We aren’t using fancy ingredients that require a trip to three different specialty grocers. Everything here is available at your local supermarket. Freshness matters, especially when it comes to the spinach and garlic.
The Protein
Get about 1.5 to 2 pounds of boneless, skinless chicken thighs. You can use skin-on if you want that extra crunch, but boneless is much faster for a weeknight. I personally prefer skin-on because I’m a sucker for texture, but you do you.
The Greens
You’re going to look at the pile of fresh spinach and think, “OMG, that’s way too much.” Trust me, it isn’t. Spinach has a magic ability to shrink from the size of a beach ball to the size of a golf ball the moment it hits heat. Grab a large 10-ounce bag of baby spinach.
The Creamy Element
We use heavy whipping cream and parmesan cheese. This creates a “blush” sauce that coats the chicken perfectly. Avoid the “grated cheese” in the green shaker can; it’s full of fillers like wood pulp (gross, right?) and won’t melt properly. Freshly grated parmesan is the only way to go.
Prepping Like a Pro (Without the Stress)
Preparation is the difference between a relaxing evening and a kitchen nightmare. Start by patting your chicken dry with paper towels. If the chicken is wet, it will steam instead of sear, and you’ll miss out on that beautiful brown crust.
Season Heavily: Chicken is a blank canvas; it needs salt, pepper, and garlic powder.
Mince the Garlic: Use 4-5 cloves. If you think that’s too much, we probably can’t be friends.
Wash the Spinach: Even if the bag says “triple washed,” give it a quick rinse.
Step-by-Step: The Sizzle Factor
First, heat your oil or butter in the skillet over medium-high heat. You want the pan to be hot enough that the chicken sizzles the second it touches the surface. If it just sits there silently, take it out and wait another minute.
Place the chicken in the pan and don’t touch it. Seriously, leave it alone for 5–7 minutes. We want a crust to form. If you try to flip it too early, it will stick to the pan and tear. Patience is a virtue, especially when keto dinner is on the line.
Once the first side is golden brown, flip it. Cook for another 5–6 minutes until the internal temperature hits 165°F. Remove the chicken from the pan and set it aside on a plate. Pro tip: cover it with foil so it stays warm while we make the sauce.
Building the Flavor Base
Now for the fun part. Lower the heat to medium. There should be some leftover fat and little brown bits in the pan—don’t wash those out! That’s called “fond,” and it’s basically concentrated flavor gold.
Add your minced garlic to the pan. Sauté it for about 30 seconds until it smells amazing. Be careful not to burn it, or it will turn bitter and ruin your night. Add a splash of chicken broth or dry white wine to deglaze the pan, scraping up all those tasty brown bits.
The Magic of the Creamy Spinach Sauce
Once your garlic is soft and the pan is deglazed, it’s time to bring in the heavy hitters. Pour in half a cup of heavy whipping cream. Notice how it immediately starts to bubble and pick up the color from those browned chicken bits? That’s exactly what we want.
Turn the heat down to low. If you boil heavy cream too hard, it can separate, and nobody wants an oily mess for dinner. Stir in your freshly grated Parmesan cheese. This is where the sauce transforms from “liquid” to “velvety perfection.”
Ever wondered why restaurant sauces are so much better? It’s the emulsification. By keeping the heat low and stirring constantly, the cheese and cream marry into a cohesive, thick sauce that clings to everything it touches.
The Great Spinach Disappearing Act
Now, grab that massive mountain of spinach. It’s going to look ridiculous when you dump it into the skillet. You’ll probably think, “I’ve made a huge mistake; this won’t fit.” Relax. It fits.
Add in Batches: If your skillet isn’t huge, add half the spinach and let it wilt for thirty seconds before adding the rest.
Fold, Don’t Stir: Use your tongs to gently fold the spinach into the cream sauce.
Watch the Clock: Spinach takes about 2 minutes to wilt. If you overcook it, it turns into a slimy green paste. We want it bright and tender.
At this point, you can add a pinch of red pepper flakes. It gives the dish a tiny kick that cuts through the richness of the cream. It’s not “spicy” per se, just… interesting. Trust me on this one.
Reunited and It Feels So Good
Once the spinach has shrunk down to a reasonable human portion, nestle your cooked chicken thighs back into the pan. Make sure you pour in any juices that collected on the plate while the chicken was resting. That’s pure flavor, and throwing it away is basically a crime in the culinary world.
Let everything simmer together for just a minute or two. This allows the chicken to warm back up and get coated in that glorious sauce. Taste your sauce right now. Does it need more salt? A squeeze of lemon? This is your last chance to tweak it before serving.
Common Pitfalls (And How to Avoid Them)
Even “easy” recipes can go sideways if you aren’t paying attention. I’ve messed this up more times than I’d like to admit, so learn from my failures.
The “Rubber Chicken” Syndrome
This usually happens because people are terrified of undercooking poultry, so they blast it until it has the texture of a yoga mat. Get a meat thermometer. Seriously. Take the chicken out the second it hits 165°F. Thighs are forgiving, but they aren’t invincible.
The Watery Sauce Disaster
If you didn’t drain your spinach well or if you added too much broth, your sauce might look like soup. Don’t panic. Just let it simmer for a few extra minutes without a lid. Evaporation is your friend. As the water leaves, the sauce thickens.
Burning the Garlic
I mentioned this before, but it bears repeating. Garlic goes from “perfumed heaven” to “acrid charcoal” in about four seconds. If you burn it, honestly? Wash the pan and start over. You can’t mask that taste, and it will haunt your soul.
Why This Wins the Keto Game
When you’re looking for Easy Keto Dinner Recipes For Beginners, you want high-impact flavor with low-impact effort. This recipe works because it relies on high-quality fats and protein to keep you full. No more “snacking” an hour after dinner because you only ate a salad.
The combination of chicken, spinach, and heavy cream provides a solid dose of iron, potassium, and vitamins without the hidden sugars found in store-bought sauces. Plus, it’s naturally gluten-free. OMG, it’s basically a health food, right? (Okay, maybe “health-adjacent,” but let’s go with it.)
Leveling Up: Optional Add-ins
Once you’ve mastered the basic version, you can start getting a little fancy. Think of the base recipe as your foundation.
Sun-dried Tomatoes: If your carb count for the day allows it, a few of these add a massive punch of umami.
Bacon Bits: Because, obviously. Frying up some bacon first and using the grease to sear the chicken is a “pro-gamer move” for keto.
Mushrooms: Sauté some sliced cremini mushrooms before the garlic for an extra earthy vibe.
Lemon Zest: A little brightness at the end makes the whole dish feel “lighter,” even with all that cream.
Storage and Meal Prep Tips
Can you make this ahead of time? Absolutely. This Rustic Chicken and Spinach Skillet actually holds up surprisingly well in the fridge.
Store it in airtight containers for up to three days. When you’re ready to reheat, do it gently. Microwave on 50% power or, better yet, put it back in a small pan with a tiny splash of water or cream to loosen the sauce.
Freezing is a no-go. Cream-based sauces tend to separate and get a weird, grainy texture when they thaw. Just eat it fresh or within a few days. Trust me, it’s so good you won’t have leftovers anyway.
Budgeting for Your Keto Lifestyle
One of the biggest myths is that eating keto has to be expensive. By focusing on staple ingredients like bulk chicken thighs and frozen or bagged spinach, you can keep your cost per serving incredibly low.
I usually buy my parmesan in a large block and grate it myself. It stays fresh longer and saves a ton of money compared to the pre-shredded stuff. Plus, you get a mini arm workout. Who needs the gym when you have cheese?
Final Thoughts: Just Start Cooking
If you’ve been scrolling through Easy Keto Dinner Recipes For Beginners for three hours instead of actually eating, this is your sign to stop.
Cooking doesn’t have to be a performance. It’s about feeding yourself something that makes you feel good. This skillet meal isn’t just “fuel”—it’s a delicious, creamy, garlicky reward for making it through another day.
Ever wondered why we over-complicate things? We think “healthy” has to mean “boring,” but this recipe proves that’s total nonsense. You get the fats you need, the protein you crave, and enough flavor to make your non-keto friends jealous.
The “Rustic” Promise
The word “rustic” is basically code for “it doesn’t have to look perfect.” So don’t worry if your spinach isn’t perfectly distributed or if your sauce is a little darker because you got a really good sear on the chicken. That’s where the character is.
Grab your skillet, season that chicken, and get to it. You’re only twenty minutes away from the best meal of your week.
Key Takeaways to Remember:
Always use chicken thighs for maximum moisture and fat.
Don’t crowd the pan or your chicken will be sad and gray.
Freshly grated parmesan is non-negotiable for a smooth sauce.
Keep it simple—don’t overthink the process!
I hope you enjoy this as much as I do! It’s been a total game-changer for my weeknight routine, and I’m pretty sure it’ll be one for yours too. Now, go forth and conquer that kitchen. You’ve got this!
There’s a certain point in the evening when the idea of rolling enchiladas stops sounding comforting and starts sounding like a chore. Not because it’s hard — it isn’t — but because it asks for a kind of patience I don’t always have at the end of the day.
This Sweet Potato & Black Bean Enchilada Skillet came out of that feeling. I wanted the flavor and warmth of enchiladas without lining up tortillas, turning on the oven, or committing to something that would leave me scrubbing pans later. I wasn’t trying to simplify enchiladas on purpose. I was just trying to get dinner on the table without resenting it.
It turned out to be a version I reach for more often than the rolled kind.
Sweet potatoes need more respect than they usually get
I didn’t always like sweet potatoes in savory dishes. Early attempts were either too soft or oddly sweet in a way that felt out of place.
The problem wasn’t the ingredient. It was how I was cooking it.
Sweet potatoes need time with the pan before anything wet touches them. Sauce too early and they steam. Cut too small and they collapse before they’ve picked up any flavor.
Now I cut them into medium chunks — bigger than bite-sized, smaller than roast potatoes. I want surface area, but I also want them to hold their shape long enough to brown.
I salt them lightly at the beginning, not aggressively. Sweet potatoes amplify salt as they cook, and I’ve learned that fixing oversalting later is nearly impossible once the sauce is in.
Black beans aren’t just there to fill space
For a long time, I treated black beans as a given. Open can. Drain. Add.
They were fine, but forgettable.
What changed things was realizing they benefit from the same treatment as the sweet potatoes — heat, space, and restraint. I drain and rinse them, then let them sit on a towel for a few minutes. Not because I’m disciplined, but because wet beans cool the pan and kill browning instantly.
When they go into the skillet, I let them sit untouched for a moment. They pick up a faint crust and lose that canned softness. It’s subtle, but it gives the dish more texture than you’d expect.
I didn’t believe it would matter until I tasted the difference.
About enchilada sauce (and why I stopped being precious)
Most of the time, I use store-bought enchilada sauce. Not the cheapest one, not the fanciest. Just one that tastes balanced and isn’t overly sweet.
I’ve made homemade sauce for this skillet. It’s good. It’s also not what determines whether the dish works.
What matters more is consistency. Too thick, and it coats instead of integrating. Too thin, and everything turns soupy.
If it’s thick, I thin it with water or broth. Just enough so it flows. I don’t want it drowning the skillet. I want it clinging.
I used to pour it all in at once. Now I add most of it, stir gently, then decide if it needs more. That pause saves the dish more often than any measurement ever did.
How this skillet actually comes together (without rushing it)
I start with a wide skillet over medium heat and enough oil to coat the bottom. Sweet potatoes go in first, spread out as much as the pan allows. If they overlap a little, I don’t panic — but I don’t crowd them.
Then I leave them alone.
This is the part that feels slow. I’ve tried speeding it up. Every time, I regretted it. Browning takes longer than you think, especially with dense vegetables.
When the sweet potatoes start to release and pick up color, I flip them and let the second side cook. Only when they’re nearly tender do I move on.
I push them to one side and add the black beans, a little more oil if needed. Same rule: let them sit, then stir.
At this stage, the skillet smells warm and earthy, even before the sauce appears. That’s how I know it’s ready.
Then the enchilada sauce goes in. I lower the heat slightly and stir just enough to coat everything. I don’t simmer it hard. I let it settle.
Cheese is a choice, not a requirement
I almost always add cheese, but I don’t treat it as the main event.
I sprinkle it over the top once the heat is low and cover the pan just long enough for it to melt. I don’t stir it through. I like pockets — melted here, barely there.
Too much cheese turns this into something heavy and dull. I’ve done that version. It tastes fine for three bites, then you’re done.
Moderation keeps it flexible.
Tortillas: in the skillet or on the side
I’ve torn tortillas directly into the skillet before. It turns the whole thing soft and casserole-like. Sometimes that’s what I want.
More often, I keep tortillas on the side. Warmed, torn, used to scoop. That way, I control how much goes into each bite, and nothing gets soggy unless I let it.
Neither approach is wrong. I stopped treating it like a decision that needed defending.
Small additions that come and go
This skillet changes depending on what’s around.
Sometimes onions go in early with the sweet potatoes. Sometimes bell peppers. Occasionally corn, which adds sweetness but also brightness.
I finish with lime juice more often than not. Just a squeeze. It doesn’t make the dish taste like lime — it just sharpens everything slightly.
Cilantro is nice, but I don’t miss it when it’s not there.
How I usually eat it (and how I stopped over-complicating it)
I usually eat the first serving straight from the skillet. Standing, fork in hand, deciding if it needs anything else.
After that, I sit down with tortillas and maybe a spoonful of yogurt or sour cream on the side. Not mixed in — on the side.
Leftovers reheat well in a pan. The flavors deepen overnight. The sweet potatoes soften a bit more, but they don’t turn mushy if you didn’t rush them the first time.
I avoid the microwave when I can. It flattens the texture too much.
Mistakes I’ve already made for you
I’ve added sauce too early. Everything went soft.
I’ve crowded the pan. Nothing browned.
I’ve oversalted at the beginning and couldn’t undo it.
Each time, the dish was still edible — but noticeably less satisfying.
This skillet forgives a lot, but it rewards patience more than anything else.
Why this one earns its place
This Sweet Potato & Black Bean Enchilada Skillet stays in my rotation because it delivers comfort without demanding ceremony. It feels complete without being rigid. It adapts without falling apart.
It’s the kind of meal I can make on autopilot now — and still enjoy eating.
I burned through about a dozen chicken breasts last month trying to figure this out. Not because I’m some kind of cooking scientist, but because I kept getting it wrong. One night it was rubbery. The next it was dried out like something you’d find in a hotel buffet at 3pm. I needed to find the best temperature to bake thin chicken breast that actually worked on a Tuesday night when I was already tired.
Turns out, temperature matters way more than I thought. And not just one magic number either.
Why Thin Chicken Breast Is Worth Getting Right
I used to avoid thin chicken breasts completely. They seemed too delicate, too easy to mess up. Then I realized they cook in like half the time of those thick cuts, which means dinner happens faster. That matters when you’re standing in the kitchen at 6:30pm wondering why you didn’t just order takeout.
They also take on marinades better because there’s more surface area. And if you’re trying to eat more protein without feeling like you’re chewing through a baseball, thin cuts just work better. The problem is that small margin for error. Five minutes too long and you’ve got chicken jerky.
The 15 Temperature Options I Actually Tested
I didn’t plan to test fifteen different temperatures. It just kind of happened over a few weeks of making chicken three or four times a week. Some worked great. Some were disasters. Here’s what I found.
350°F – The Safe Bet
This is where I started because it felt middle-of-the-road. It works, but it takes about 20-25 minutes for thin breasts, and by the time they hit 165°F internally, they’re starting to dry out on the edges. Not terrible, but not great either.
The outside doesn’t get any color unless you flip halfway through. I stopped using this temperature after the third try.
375°F – A Little Better
This one’s faster, around 18-20 minutes. The texture improved slightly, and I got a bit of browning without having to flip. But I still felt like I was babysitting it. If I got distracted and left it in for 22 minutes instead of 18, it was overcooked.
400°F – Where Things Got Interesting
Now we’re talking. At 400°F, thin chicken breasts cook in about 15-18 minutes depending on thickness. The outside gets a little golden, the inside stays moist if you pull it at exactly 165°F, and you don’t feel like you’re waiting around forever.
This became my weeknight default for a while. I’d toss them in with whatever marinade I had, set a timer, and usually get it right.
425°F – My Current Favorite
This is the temperature I use most often now. It takes 12-15 minutes, the chicken gets actual color on top, and the texture is just better. I don’t know if it’s because the outside firms up faster so the inside doesn’t overcook, but it works.
I did mess it up the first time. I left it in for 17 minutes and it was tough. But once I figured out the timing, this became the go-to.
450°F – Fast But Risky
At 450°F, you’re looking at 10-12 minutes. It’s great when you’re in a rush, and the outside gets this nice golden-brown finish. But the window for perfection is tiny. If you’re not watching the clock, you’ll overshoot it.
I use this temperature when I’m actually paying attention and not trying to help with homework or fold laundry at the same time.
375°F with a Sear First
I tried searing thin chicken breasts in a skillet for two minutes per side, then finishing them in a 375°F oven. It added an extra step, but the flavor was noticeably better. The chicken picked up some browning from the pan, and the oven kept it from drying out.
Takes about 6-8 minutes in the oven after searing. Not something I do on a weeknight, but for a weekend meal, it’s worth it.
400°F Covered with Foil
This was an experiment after I overcooked chicken for the fourth time in two weeks. I covered the baking dish with foil for the first 10 minutes at 400°F, then uncovered it for the last 5.
It worked. The chicken stayed way more moist because the foil trapped steam. The downside is you don’t get much browning, so it looks a little pale.
350°F Low and Slow
I tested this thinking maybe a longer, gentler cook would help. It didn’t. It took forever (25-30 minutes), and the chicken still dried out. The texture was also kind of stringy. I don’t recommend this unless you’re cooking a huge batch and need everything at the same temp as side dishes.
425°F on a Wire Rack
Putting the chicken on a wire rack set over a baking sheet at 425°F was a game changer. Air circulates all around, so you get more even cooking and a better texture on all sides.
It takes about 13-15 minutes, and you don’t need to flip. Cleanup is slightly more annoying because of the rack, but the results are worth it.
475°F Quick Roast
This is aggressive. At 475°F, thin chicken breasts cook in 8-10 minutes. The outside gets dark and crispy, almost like rotisserie chicken skin (minus the actual skin).
But man, if you go even one minute over, it’s dry. I only use this when I’m making something like chicken tacos where the meat gets shredded and mixed with other stuff anyway.
400°F with a Pan of Water
Someone told me to put a pan of water on the lower oven rack to create steam while baking chicken at 400°F. I tried it. It helped a little with moisture, but not enough to justify the extra step.
The chicken cooked in about 16 minutes and was fine, but not noticeably better than just using foil.
325°F for Meal Prep
When I’m making five or six chicken breasts at once for meal prep, I drop the temp to 325°F and give them 22-25 minutes. They won’t be as good as the high-heat versions, but they reheat better later in the week.
The lower temp means they don’t dry out as much when you microwave them three days later.
450°F with Butter on Top
I brushed melted butter on top of thin chicken breasts before baking at 450°F. It only took about 11 minutes, and the flavor was noticeably richer. The butter also helped the outside brown without overcooking the inside.
I don’t do this every time because it adds fat, but when I want the chicken to actually taste good on its own without a sauce, this works.
400°F After a Quick Brine
I brined thin chicken breasts in salty water for 30 minutes, then baked them at 400°F for 15 minutes. They were the juiciest version I made during all these tests.
The brine takes planning, which is why I don’t do it often. But if you’ve got the time, it makes a huge difference.
425°F with a Meat Thermometer
This isn’t a different temperature, but it’s the method that finally made me stop overcooking chicken. I bake at 425°F and pull the chicken the second it hits 160-162°F internally. It’ll coast up to 165°F while resting.
Takes about 12-14 minutes depending on thickness. This is the method I recommend most if you’re tired of guessing.
What You Actually Need
The ingredients here are basic. I’m not gonna list ten things you don’t have.
Thin chicken breasts – I’m talking about the ones that are about a half-inch thick, maybe a little more. If you buy regular thick breasts, just pound them out or slice them horizontally. I use a meat mallet and a zip-top bag. Takes like two minutes.
Olive oil – Or whatever oil you have. I’ve used avocado oil, vegetable oil, even melted butter. It keeps the surface from drying out and helps with browning.
Salt and pepper – Bare minimum. I usually do about half a teaspoon of salt per breast and a few cracks of pepper.
Garlic powder – Not necessary, but I almost always add it. Maybe a quarter teaspoon per piece.
Paprika – This adds color more than flavor, but it makes the chicken look better. I skip it sometimes and nothing bad happens.
For marinades, I keep it simple. Lemon juice, olive oil, minced garlic, and whatever dried herbs I have. Let it sit for 20 minutes if I remember, or just rub it on right before baking if I don’t.
How to Actually Do This
Preheat your oven to 425°F. I know some people don’t preheat, but it makes a difference here. If the oven’s not hot enough when the chicken goes in, the timing gets thrown off.
Pat the chicken breasts dry with a paper towel. This was something I didn’t used to do, and it’s probably why my chicken never browned properly. Wet chicken just steams.
Rub them with a little olive oil. I pour maybe a tablespoon in my hand and coat each piece. Then season with salt, pepper, and whatever else you’re using.
Put them on a baking sheet. I line mine with parchment paper because I hate scrubbing baked-on chicken juice. If you have a wire rack, use it. If not, don’t worry about it.
Bake for 12-15 minutes. Start checking at 12. The chicken should feel firm when you press on it, and if you cut into the thickest part, the juices should run clear.
Use a meat thermometer if you have one. Pull the chicken when it hits 160-162°F. It’ll keep cooking for a minute after you take it out.
Let it rest for five minutes. I used to skip this and just start cutting right away. The juices run all over the cutting board and the chicken ends up drier. Just wait.
When I Mess With the Basic Version
Sometimes I brush on barbecue sauce in the last three minutes of baking. It caramelizes a little and sticks to the chicken without burning.
Other times I’ll top the chicken with a slice of mozzarella or provolone in the last two minutes. It melts and makes the whole thing feel more like a meal.
I’ve also done a Parmesan crust by mixing grated Parmesan with panko breadcrumbs and pressing it onto the top before baking. You need to spray it with a little oil or it won’t brown. Takes the same amount of time, maybe one minute longer.
For meal prep, I skip any toppings and just season the chicken with salt, pepper, and garlic powder. It’s easier to add flavor later when you reheat it.
What you may not know is that different temperatures have distinct effects on the chicken.
Cooking at lower temperatures such as 350°F will be gentler to the chicken but the process takes longer. The meat becomes very soft and at times even mushy. The skin would not be brown unless one is very patient.
High-temperature cooking at 425-450°F will harden the outward layer quickly thus trapping the moisture in the flesh. The chicken is of the same texture but has more chew which can be good. But then the margin for error is very small. Browning or overcooking takes just a couple of minutes.
I was of the opinion that low and slow was the only method all the time; the case with thin chicken breast is different – hotter and faster just works. You get a better taste and nice texture along with not wasting time standing around.
Nutrition Stuff (Keeping It Real)
A thin chicken breast of four ounces contains approximately 120-130 cal, which is dependent on the cut of meat. It is almost totally free of fat if you cut it properly, and it contains about 26 grams of protein.
If you want to coat the chicken with a tablespoon of olive oil that would add up to an additional 120 calories and 14 grams of fat. I normally don’t use that much, just half a tablespoon per breast or even less.
Marinades will vary according to the components. Lemon and seasoning adds just a little bit. BBQ sauce is the one that adds most sugar and 30-50 calories depending on how much you use.
I don’t think about this too much. Chicken breast is a good source of protein that is very low in fat; and if one doesn’t use heavy sauce or butter it still remains a good option in case one is trying to eat light.
Storing and Reheating Without Ruining It
Cooked thin chicken breast can be refrigerated for up to four days without spoiling. My method is to put mine in a container with a lid and sometimes I also pour a tad bit of water or chicken broth over it to prevent it from drying out.
Reheating is the area where most people do it wrong. Microwave on 50% power for one minute, then check it and if necessary do another 30 seconds. Full power sometimes makes it rubbery.
Oven reheating should be done by wrapping it in foil and at 300°F for about 10 minutes.
FAQs: Questions I’ve Gotten (Or Asked Myself)
How can I determine the doneness of thin chicken breast without slicing it?
Use a meat thermometer. Insert it into the thickest area. It indications 165°F, then all is well. In case you don’t have a thermometer, gently prod the chicken with your finger. If it is firm and has a little spring back, it is likely done. If it is still soft and feels like it has no resistance, let it cook for a while.
Is it possible to bake frozen thin chicken breasts?
Indeed, however, increase the time by 50% and lower the temperature to 375°F. I have done this when I forgot to thaw it. It works but the result isn’t as good in terms of texture. The outer parts may overcook and become dry before the inside is thawed completely.
What if my chicken breasts vary in size?
Take out the smaller ones first. This has happened to me many times when the pack contains pieces of different sizes. Just check them one by one with a thermometer.
Should I cover the chicken while baking?
Only in case you fear that the chicken might dry out. Keeping it covered with foil prevents the moisture from escaping, keeps the chicken moist but no browning will occur. I usually cover the chicken for the first half of cooking, then I uncover it for the rest of the time if I want to have the best of both.
Is it possible to marinate thin chicken breast overnight?
It is possible, but I wouldn’t exceed 12 hours. The acid in the marinades (like lemon juice or vinegar) starts to tenderize the meat and it can be over-soft and mushy. My usual marinating time is between 30 minutes to two hours.
What is the way to prevent it from sticking to the pan?
Parchment paper or a very light layer of oil on the surface of the pan. I have also used non-stick spray. If a wire rack is being used, then spray the rack also.
Does chicken pounding really impact the cooking process?
Absolutely. Uniform thickness leads to uniform cooking. If one end is thick and the other is thin, the thin part will overcook before the thick part is done. I use a meat mallet or the bottom of a heavy pan.
How long should I let it rest?
Five minutes is usually enough. The juices redistribute and the chicken stays moister when you cut into it.
Can I use bone-in chicken breast at these temperatures?
Bone-in takes way longer, like 35-45 minutes even at 425°F. These temperatures and times are specifically for boneless, skinless thin chicken breasts.
What if I don’t have a meat thermometer?
Cut into the thickest part. If the juices run clear and the meat is white all the way through with no pink, it’s done. Not as precise, but it works.
Why does my chicken always turn out dry?
You’re probably overcooking it. Chicken breast has almost no fat, so it dries out fast. Pull it at 160-165°F, not higher. And let it rest before cutting.
Can I cook vegetables on the same pan?
Sure, but pick vegetables that cook in about the same time. Cherry tomatoes, sliced zucchini, and bell peppers work. Potatoes and carrots take too long.
What I’d Do Differently Next Time
If I were starting over, I’d skip all the lower temperatures and just test between 400-450°F. That’s the sweet spot for thin chicken breast. Anything below 375°F takes too long and doesn’t give you better results.
I’d also invest in a good instant-read thermometer earlier. I wasted a lot of chicken guessing and cutting into it to check doneness.
And I’d stop worrying about perfection. Some nights the chicken is amazing, other nights it’s just fine. As long as it’s cooked through and tastes decent, that’s good enough for a weeknight dinner.
Final Thoughts
The best temperature to bake thin chicken breast really comes down to how much time you have and how closely you’re watching it. For me, 425°F hits the sweet spot most nights. It’s fast, the chicken gets some color, and the texture is better than the lower temps I tried.
If you’re new to this, start at 400°F and work your way up as you get more comfortable with the timing. Use a thermometer if you have one. And remember that slightly undercooked is easier to fix than overcooked, so when in doubt, pull it early.
I’ll probably keep testing because that’s just how I cook. But after making thin chicken breast at fifteen different temperatures, I finally feel like I’ve got a handle on it. Hopefully this saves you from burning through as many chicken breasts as I did.
So, you’re wondering how to cook alligator meat in the oven? Let me tell you, this isn’t just another recipe—it’s an adventure. Alligator meat is like the wild cousin of chicken and fish, with a taste that’s both familiar and exciting. When you cook alligator meat in the oven, you’re taking that unique flavor and turning it into something truly special: tender, juicy, and perfectly seasoned. If you’ve never tried your hand at this Southern delicacy, now’s the time. I promise, by the end of this guide, you’ll not only know how to cook alligator meat in the oven but also be itching to impress your friends with your new culinary skills. Ready to start?
Understanding Alligator Meat: A Quick Primer
Before we jump into how to cook alligator meat in the oven, let’s get to know this intriguing ingredient a little better. Alligator meat is surprisingly lean, with a low-fat content that makes it a healthier choice for meat lovers. It’s packed with protein—more than chicken, believe it or not—and is loaded with vitamins and minerals like potassium and B12.
When it comes to cuts, the tail is the star of the show. It’s tender, delicate, and perfect for roasting. You might also come across tenderloin and ribs, which have their own unique flavors and textures. Think of alligator meat as a blank canvas—it absorbs marinades and seasonings like a dream. So, whether you’re going for a classic garlic and herb combo or something more adventurous, this meat is ready to soak it all in.
Preparing Alligator Meat: Getting Ready to Cook
When you’re ready to tackle how to cook alligator meat in the oven, proper preparation is key. Start by thawing your alligator meat if it’s frozen. The best method is to let it thaw overnight in the refrigerator. This keeps it at a safe temperature and ensures even cooking. Next, trim any excess fat and connective tissue from the meat. This step helps avoid a greasy texture and ensures a better bite.
A sharp knife will make this task easier and more precise. Marinating is another crucial step. It not only enhances the flavor but also helps tenderize the meat. A simple marinade might include olive oil, garlic, lemon juice, and your favorite herbs and spices. Let the meat soak in the marinade for at least an hour, or overnight for deeper flavor.
Ingredients and Tools Needed
Now that you’re prepped, let’s talk about what you’ll need for how to cook alligator meat in the oven. For ingredients, you’ll need alligator meat, ideally from the tail or tenderloin. You’ll also want olive oil or cooking spray, salt, pepper, and your choice of seasonings like paprika and garlic powder. Breadcrumbs or cornmeal are essential for breading. Eggs are used to help the breading stick. Optional additions like lemon wedges and hot sauce can elevate the final dish, adding a zesty touch.
As for tools, a baking sheet and a wire rack are crucial. The wire rack allows air circulation for an even, crispy texture. A meat thermometer is also handy to ensure your meat reaches the perfect internal temperature of 160°F (71°C). This section keeps the information clear and organized, making it easy for readers to gather what they need for cooking.
Step-by-Step Cooking Instructions
Alright, now that you’ve got your ingredients and tools ready, let’s dive into how to cookalligator meat in the oven.
Preheat the Oven
First things first, preheat your oven to 375°F (190°C). This is the perfect temperature to get that crispy exterior while keeping the inside juicy. I remember the first time I cooked alligator meat—I was so eager to taste it that I accidentally skipped this step. Trust me, don’t make that mistake!
Prepare the Meat
Cut your alligator meat into bite-sized pieces. Season generously with salt, pepper, and any other spices you like. When I seasoned my first batch, I went a bit overboard with the paprika, but it added a nice smoky kick. Just be sure to balance your spices to taste.
Bread the Meat
Now, dredge each piece in flour, then dip it in beaten eggs, and coat it with breadcrumbs or cornmeal. I find that using cornmeal gives a delightful crunch, but you can use breadcrumbs for a finer texture. This is where the magic happens—the breading gives the alligator a wonderful crispy layer.
Arrange on Baking Sheet
Place your breaded pieces on a greased baking sheet or wire rack. Lightly spray or brush them with cooking oil to help them brown evenly. When I first started baking, I didn’t use the wire rack and ended up with soggier pieces. Trust me, the rack is worth it!
Bake
Bake your alligator meat for 20-25 minutes, flipping halfway through. Use a meat thermometer to make sure it reaches 160°F (71°C). I usually set a timer and check it a couple of minutes early because every oven is a bit different. The crispy exterior and juicy interior are what you’re aiming for.
Rest the Meat
Let the cooked alligator meat rest for about 5 minutes before serving. This step helps retain the juices, making each bite tender and flavorful. I’ve found that resting the meat makes a big difference in texture.
Serve
Serve with lemon wedges, hot sauce, or your favorite dipping sauces. I love pairing mine with a spicy remoulade—gives it an extra kick that’s just perfect.
Tips for Perfect Alligator Meat
When you’re figuring out how to cook alligator meat in the oven, a few extra tips can make a big difference.
Avoid Overcooking
One of the biggest pitfalls with alligator meat is overcooking it. It can become tough and chewy if left in the oven too long. I once had a batch that was a bit overdone, and while it was still flavorful, the texture wasn’t quite right. Keep an eye on the meat, and use that meat thermometer to hit the sweet spot.
Use a Meat Thermometer
A meat thermometer is your best friend here. It ensures your alligator meat reaches the right internal temperature of 160°F (71°C) without guesswork. I remember when I first started cooking alligator meat, I didn’t have one, and it was a bit hit or miss. Now, it’s an essential part of my kitchen gear.
Experiment with Seasonings
Don’t be afraid to play around with seasonings. Whether it’s a sprinkle of Cajun spice or a dash of lemon zest, experimenting can lead to some delicious discoveries. I once added a mix of Italian herbs to my breading, and it turned out fantastic—like a surprise flavor party for my taste buds.
Serving Suggestions
When it comes to serving your alligator meat, presentation and accompaniments can take your dish from good to great.
Side Dishes
Pair your alligator meat with some delicious side dishes to create a well-rounded meal. Roasted vegetables are a fantastic choice; their caramelized sweetness complements the savory meat perfectly. Rice or a fresh salad also works well, adding a nice contrast to the richness of the alligator.
Presentation Tips
Garnishing can make a big difference in how your dish looks and tastes. I like to add a few lemon wedges and a sprinkle of fresh herbs like parsley or cilantro. It adds a pop of color and a burst of freshness that enhances the overall experience.
A Personal Touch
One of my favorite ways to serve alligator meat is with a homemade dipping sauce. Whether it’s a tangy remoulade or a spicy aioli, it adds an extra layer of flavor that makes the meal memorable. It’s a little touch that always impresses my guests and gets them talking.
Conclusion
So there you have it—how to cook alligator meat in the oven in a way that’s both delicious and satisfying. Cooking alligator might seem like a culinary adventure, but with the right approach, it’s a rewarding experience. The key is to remember the steps: prepare, season, bread, bake, and serve with flair.
Don’t be afraid to experiment and make it your own. Each time you cook alligator meat, you’ll get a little better and maybe even discover a new favorite seasoning or side dish. And who knows? You might just become the go-to person for unique and tasty dishes at your next gathering. Give it a try, and enjoy the delicious, crispy results. Cooking alligator meat in the oven isn’t just about preparing a meal—it’s about adding a bit of adventure to your cooking routine. Bon appétit!
Have you ever gone to a grocery store and been face-to-face with an enormous, bright orange banana squash? Well, you’re in for a treat! When you buy banana squash, know that it will not just be your winter veggie but also a next versatile and yummy item to turn into many scrumptious recipes out there. Specifically, if you’re craving to bake or roast or steam this marvelous squash entirely from the scratch, then I’m on board to provide a step-by-step guide in conjunction with most of my tricks and tips that would make your culinary journey a great adventure. So follow along this quick guide, and learn how to cook banana squash!
Understanding Banana Squash
Banana squash, with that funny name and elongated shape, is a winter squash which pales in comparison to its tastier brethren of butternut or acorn.
But here is something I will say, make some room on your counter for the banana squash.
This is a fruit with sweet, nutty flavor and creamy texture that goes great in so many meals. The squash can be any shade from dusty yellow to deep orange and sometimes get quite big. Well, some of them can weigh as much as 10 pounds! But do not be scared by this. The giants of squash give the biggest bang for their bite!
Choose solid, unblemished skin when selecting for yourself a few banana squash at the shop. If you find nicks and marks, you can accept it as long as there are no soft spots or visible mold.
And once you have it at home, storing right is key. Store in a cool, dark place (like your pantry or cellar) and it will keep for weeks to months. I once held onto one for two full months before I got around to cooking it and still it looked great.
Not just tasty, banana squash brings with some nutrition too. It is a good source of vitamins A, and C as well as potassium and fiber. All that good stuff helps support your immune system, digestive health and even skin!
That way not only are you spicing up your meals but also doing something good for your body. Enjoy this vitamin packed, delicious squash! Did you know that this humble stuff could offer such a hearty helping of nutrients?
Preparing Banana Squash
There are a few things you need to do before cooking banana squash. This may seem like a lot of work but with the right tools, it is incredibly easy.
Tools required: A big board Fairy sharp knife and a spoon.These essentials will make the whole thing just run a lot more smoothly.
To do this, begin by taking your squash for a little bath. A cold water scrub to remove any dirt or debris in the rind of the vegetable is all that’s needed.
This is an important step, especially as this kind of stuff has to be cooked whole with the skin. I only did that once and then wound up with gritty bites.
Then, cut off the ends of the squash to create a stable base. Chop that sucker up. This is huge with regards to dividing the problem in easily digestible parts and it even goes hand in glove.
Don’t forget, the larger pieces make them manageable by peeling or cutting up even more. Using a spoon, scoop out the seeds and stringy pulp. Save those seeds! Or, you can save them to roast for a crispy snack later. Cooking adventures of this kind begins after a good prep session like this one.
How to cook banana squash: Cooking Methods
Banana squash is similar to other winter squashes such as acorn, butternut as it is a great vehicle for intense flavors—roast, steam or bake banana squash at home to pull out the best from the ingredients. Every method of preparing it imparts its own unique flavor, so read on and learn how to cook banana squash the very best way.
My favorite is to bake banana squash. And if you ask us, it gives this dish a beautiful sweet taste that is beyond perfection. Preheat your oven to 375°F and while it’s heating up, lubricate the squash with butter or olive oil and season it. Wrap them in aluminum foil, place on a pan and roast until they yield easily to the point of a paring knife — about 45 minutes.
Make this recipe for an easy treat: Brown Sugar Banana Squash: Top with a dash of brown sugar and cinnamon before baking, like the hug you get on a cold day!
Baking roasts provides them a little caramelized flavor to generate salads or facet dishes. Cube or thinly slice squash, toss with olive oil salt and pepper on a baking sheet. And then roast at 400°F for about 25-30 minutes or until golden brown. One of my things right now is Roasted Banana Squash & Spinach Salad — the crispy edges and tender middle are aces.
Another great option is steaming, especially when you want to go for lighter options. Cut squash in half or quarters, steam until tender over about 15-20 minutes. You are welcome to season with little salt and lemon juice. By steaming bananas, you can maintain nutrients in this fruit which gives you a perfect healthy and tasty banana squash recipe to eat.
Creative Recipes
We will now have some fun with simple recipes for banana squash that the entire family will enjoy and come back wanting more! Banana squash is as versatile as a veggie because it pairs with just about anything flavor, sweet or savory and even spicy flavors too!
Stuffed Banana Squash: It’s as versatile as it gets. Stuff the hollow squash with meat, rice or even cheesy veggies. I also tried it with quinoa, black beans and corn topped off melted cheddar one time. It was a hit! It is all in how you flavor the filling and cook it until everything has softened together.
Vegan Banana Squash Coconut Curry (for those who are going a bit vegetarian):
The coconut is insanely creamy & pairs perfectly with the natural sweetness of squash. And mix it all up with chickpeas, spinach and an army of spices for comforting light meal that offers a solid nutrition punch. All you need is some rice to put under this and it feels like a great big hug.
Gourmands will love Sweet Banana Squash. Use it as a dessert in place of something unhealthy, or even mix it with your meal. Just bake the squash with honey, cinnamon and a few nuts… A yummy way to have your squash – dessert or comfort-food side dish!
Tips and Tricks
The trick to cooking banana squash
Just grab yourself a cup of coffee, and start washing those seeds! As with pumpkins, banana squash seeds are saved, stored and used as and when you feel like. Scrub them with a little salt and olive oil, roast for the perfect healthy snack. You feel like you get two for the price of one!
The cooked banana squash must be stored well then you are ready to go with your leftovers. Storing it in an airtight container and kept cold will keep this fresh for 4-5 days. Planning to use it later? Cooked banana squash freezes well, too. Freeze it in freezer-safe bags, and you can have jam ready to go for months. Perfect for quick meals!
But it is not the easiest to wheel out of a parking garage and reheat. Unless you’re careful, squash has a way of getting mushy. I would recommend using an oven or at the stove instead of microwave for reheating purposes because they give a great texture than microwave.
Please keep it away from a microwave at all costs. Getting mushy tasteless squash is quite common. Check on it and taste! Hang out in your kitchen and cook up a storm! Experiment with different ways of cooking (because that’s what it is all about) to discover which ones you like the most.
Conclusion
How to cook banana squash
This is just one of the many amazing ways to enjoy, now that you know how to cook banana squash, and you might even discover a new world of flavors. We started with a discussion on what banana squash is and how to choose the right one, and then moved on to various ways of baking roasting or steaming it. Every way of preparation discovers a different flavor that can enrich any dish.
I hope these two recipes will have you inspired. Between the simple Roasted Banana Squash & Spinach Salad to the much more exotic Vegan Banana Squash Coconut Curry, there is a lot you could do with this modest veggie. Let me know your version and add any fun twist of yours. Cooking, after all, is personal!
The next time you see a banana squash in the store, just take one and try some of these ideas out. Believe me, when you start cooking with banana squash, it will easily turn into a household favorite. Good luck and happy cooking!
Boiled okra is a simple yet delicious recipe. Most of us know how to cook boiled okra, but if one wants to get it right all the time, one has to up his game. I have to admit, there was a time when I did not like Okra — predominantly because it always seemed so slimy!
When I understood the proper techniques, boiled okra became one of my easiest kitchen staples. And keeping in mind all the great health benefits of okra, it is worth mastering.
So, whether you are new or an experienced cook who knows how to cook okra like a pro, making boiled okra correctly can completely turn it around for the better.
I must admit that I used to have a love-hate relationship with okra back in those days, and by that I mean LOVE HATE as hell because it was so slimy!
However, with the proper techniques in my back pocket and some trial-and-error under my belt, boiled okra became my hot favorite. Also, the health benefits of this recipe with okra will make you want to master it even more.
Understanding Okra
What is okra?
If you are unfamiliar with okra, we need to start from scratch. One of the most common vegetables in Southern cooking is an edible green wood-like pod called okra, also known as “lady’s finger.
Varieties of okra
You have the diversity with this vegetable. There is a regular green okra that we all are familiar with (well most of us anyways), and then there is the red okra which has an almost smokey flavor to it, but changes back to its normal color once cooked. I’ve had both defrosted and honestly they are pretty good no matter which way you cook it. Different types bring a different flavor to the game, hence you should try each variety.
Nutritional benefits of okra
You must be asking about the health benefits of okra. Now, let us hear about it. So, okra is a nutritional beast boasting of vitamins A, C and K along with calcium, fiber and antioxidants. It amazes me all the goodness that fits in those little pods. I first heard about this stuff in another popular recipe blog. Okra is great for digestion, heart health and even blood sugar. It cooks beautifully when done right and it is so good for you.
Preparing Okra for Boiling
Selecting fresh okra
So, our first step in learning how to cook boiled okra is choosing the best pods. There is no substitute for fresh okra to get the slime. Hence, the fresh pods are bright green and firm to touch. They should break easily over a knee—if they simply bend but do not snap or if there have mushy pockets, they are old. I can tell you from experience, using old okra is a mistake and trust me when I say this, your end result will not be as tasty as you will expect.
Cleaning and trimming okra
The first step is to rinse it thoroughly in cold water and take out all kinds of dirt or insects. Cut off the stem ends of each pod, and you should be careful in this step so as not to cut too much in order to keep pods whole. I find that leaving them whole goes some way to reduce the slimy texture— which we all want to avoid.
Tips to reduce sliminess
Ah, the sliminess. If there is anything you say about okra, it’s this. The great news is that you can wash it — using some tricks.
One way I have found is to soak the okra in vinegar or lemon juice before cooking it. This one reduces the slime quite a bit.
Another tip? To avoid this, do not over crowd the pan when you are boiling. You also need to give the okra some space so it can cook evenly without becoming overly slimy.
Basic Boiled Okra Recipe
Ingredients needed
Alright, let’s get cooking! Ingredients for the base recipe
Fresh okra (about 1 pound)
Water, on almost top of the okra.
Salt (to taste)
Salt — optional: lemon juice, vinegar or your choice of spices
Step-by-step instructions–how to cook okra
Boil a pot of water fill your large pan with water and bring to the boil Salt the water a little bit—it gives it just enough seasoning to taste while cooking.
Salt and optional spices: While the water is coming to a boil, you can add lemon juice or vinegar to the boiling liquid if desired. This will make them far less slimy. Both give a nice tangy taste to the okra and I have tried with both.
Boil time and texture check: Once you have brought the water to a boil, carefully drop your okra in. Cook it on medium flame for at least 8-10 minutes till the pods are cooked properly. The idea is to boil it till it is just soft enough but not all the way mushy. I probe it with a fork (if that goes in easily, it’s cooked.).
Now that you have cooked, and enjoyed your okra until it is just how you like it, spread a layer or 2 of paper towel on the bottom inside (line the bowl with small paper toweling) to absorb any of those wonderful juices under once cooled.
If you want to hurry the process, run it under cold water. This will prevent the okra from being overcooked to be too mushy.
Enhancing the Flavor
Adding lemon juice or vinegar
If you would like to lift the taste of your boiled okra, add a drop of lemon juice or vinegar. It preserves the fresh tanginess and color of the okra too. I realized this simple addition to the recipe changes everything about the final taste of it.
Using spices and herbs
But spices and herbs are up to you. Or even black pepper, garlic powder or smoked paprika for a bit of spice. Other fresh herbs such as parsley or dill are also wonderful. I once added a dash of cayenne pepper and the dry okra got a lovely zing — great for spicy-lovers!!
Serving suggestions
If you are unsure of the okra and find it difficult to cook anything else, chopped or whole boiled pieces can go into any dish that will be supported by their thickening capability. Use it to accompany your grilled meats, throw a little into salad for texture and crunchiness or even fry with some butter garlic as an easy snack. I like to serve it with a zingy tomato salad and Woolworth is my retailer of choice.
Variations of Boiled Okra
Southern-style boiled okra
Want to make the ol’ South proud & whip up some boiled okra? Add a little bacon fat (bacon) to your boiling water! Watch the Scraps Smoke add a deep, rich flavor to okra that shouts Southern. I first made this after a trip to New Orleans and it has been successful at every family function since.
Boiled okra with tomatoes
People also love a dish with okra and tomatoes. The tartness of the tomatoes dulls that okra’s slippery nature. Or, simply dice up a couple of fresh tomatoes and toss them in the pot during the last few minutes of boiling. This was a super easy and tasty variation on your typical sandwich wrap.
Sautéed okra with garlic and butter
One of the most famous dishes is boiled okra with garlic and butter — richly savory. Once you’ve drained the okra, sauté some together with butter until lightly browned and toss it in said garlic butter. It is a warm and comforting meal that makes for easy weeknight dinners.
Boiled Okra Health Benefits
Rich in vitamins and minerals
We have discussed okra many times, but its richness of nutrients can hardly be underestimated. This is a good way to increase your intake of vitamin C, which contributes significantly towards the health and strength of our immune system & K protein needed in order for calcium absorption from natural sources such as red meat.
High in dietary fiber
Okra is additionally excellent for food digestion and contains high nutritional fiber. Other health benefits of boiled okra include regular bowel movement and a healthy digestive track! How I feel, when okra gets more regularly into my diet.
Aids digestion and is good for the heart
The lady’s finger is not only good for digestion but also useful in maintaining the health of your heart. Okra is highly regarded as a cholesterol-reducing food group, thanks in part to the fiber of okras that can help lower blood pressure and fight inflammation by supplying hypoglycemic aids.
Common Mistakes to Avoid
Overcooking the okra
The most common mistake when you are learning how to cook boiled okra is overcooking it. Pretty much, overcooking makes okra slimy and dull in color. Watch the minutes as you cook so that you get it just right.
Not using enough water
A very common error is that we do not take enough water to boil the okra. The okra requires enough breathing room to cook through. If there is not enough room in the pot, the entire pods will be slimy since they have been squished and so some are going to cook more than others.
Ignoring the sliminess factor
Lastly, we cannot disregard the sliminess factor. Yes, some sliminess is natural and can be controlled as described above. But whatever it is that stops the okra from going slimy, try to sort this out and your overall dish will be so much better committed.
Frequently Asked Questions
How to store boiled okra?
Let the okra cool completely, and store in an airtight container. Store in the fridge for 3 days. Reheating it in the microwave with a little bit of water has been an effective way to keep its texture intact.
Can boiled okra be frozen?
Can you freeze boiled okra? — Yes, but it should be slightly under-cooked. That way it remains fresh since reheating food can take away the flavor to some extent. I would rather lay them on a baking sheet and freeze individually and then store in a freezer bag.
How to reheat boiled okra?
Boiled okra can easily be reheated by warming it up in a pan with some butter or oil. You can also crush the same dish but in microwave be careful not to overheat it. Personally, I like the stovetop method because it keeps your okra from becoming mushy.
Conclusion–how to cook boiled okra
In this blog post, I presume you have learnt the ins and outs of how to cook boiled okra from picking out fresh pods to jazzing up flavor with seasonings. Boiled okra is not just a side dish, but also an example of how you can easily incorporate nutritious foods into your meals. I also urge you to give it a go, change some flavors around and see if this very humble vegetable can become something of an all new hot favorite in your kitchen. Oh, and if you come up with a variation on this, let me know about it!
One of the most popular recipe searches in the internet is how to cook thin chicken breast in the oven, especially for those who would like to know what steps they should follow.
Cooking thin chicken breast in the oven is a good all-around way to get tasty and juicy results with minimal effort. Perfecting the practice can take your at-home cooking ability from amateur to pro no matter whether you are a beginner or an experienced cook and helps in varying up your flavor profiles. In this detailed guide, we will go over how to cook thin chicken breast in the oven.
Preparing and seasoning properly
Thin chicken breast can be delicious, but you must prepare (and season) it before putting it in the oven. Start by lightly dabbing the outside of your chicken breasts with a paper towel. This will help with even cooking and better browning.
Then, think about marinating the chicken breasts to add more depth of flavor. Ingredients like olive oil, lemon juice and fresh garlic make a simple marinade. Marinate the chicken for a minimum of 30 minutes so that all those flavors have time to permeate into the meat.
Season liberally with salt and pepper on both sides of the chicken breasts Also, trust me, you will most certainly try it with some other herbs and/or spices because more is always better! You can use paprika, thyme. Rosemary or mixed Italian herbs are both common choices as well
Optimal temperature of cooking and time
Cooking a thin chicken breast perfectly takes just the right temperature for just the right amount of time. To create a hot and steady cooking environment, heat your oven to 400°F (200°C).
Line a baking sheet with parchment paper or aluminum foil, and then place the seasoned chicken breasts. This prevents from sticking and eases cleanup. Space them out a bit on the baking sheet for better even cooking.
Bake the chicken breast within the oven for about 15-20 minutes, or till it reaches an inner temperature of a hundred sixty five°F (seventy four°C). You must use a meat thermometer to ensure your chicken is cooked through. However, too much overcooking can make the meat dry and tough as leather; whereas under-cooking may pose health problems.
While cooking, spoon any remaining marinade or pan juices over the chicken breasts to improve their moisture and flavor. Just make sure you are not opening the oven door very often as it can lead to temperature fluctuations and impact cooking time.
Follow this prep and cooking tips on how to cook thin chicken breast in the oven. The next part in this series of posts will include more tips and other variations that might help improve your cooking experience.
Advantages of cooking thin chicken breast
Fast cooking time: Thin slices of chicken breast cook much more rapidly than thicker cuts. And its thinness means it heats up faster than a normal fillet, leading to quicker cook times. This is great for slow cooking food when you are busy in preparing the rest of your meal.
Even cooking: As the chicken breast is much thinner than a full-sized fillet, it will cook more evenly on both sides. The thinner the cut, the less chance of over cooking on the outside before properly cooked in center. This ensures that the chicken breast is even and has same texture covering.
Variation in cooking methods: Thin chicken breasts are suitable for grilling, pan-sear or sauté on the stovetop, old-fashioned oven baking plus stir-frying. It is thin which makes for better and faster heat transfer, so you can use this pan with a variety of cooking styles.
Skinless boneless chicken breasts: This is so versatile because it can be used in many different recipes and takes a lot of other flavors well.
Versatile recipes: Thin chicken breast works great in many other different recipes such as Chicken Piccata, stir-fried chicken and wraps, or sandwiches. It is perfect to be used for dishes that need quick cooking or layering with other ingredients due its thinness.
More flavor penetration: This surface area also means that the marinades, seasonings and sauces you use will thoroughly penetrate through to your thin cut chicken breasts. This allows the flavors to permeate through and penetrate the meat creating a more flavorful meat.
In other words, using a thin chicken breast has its benefits: they cook rapidly and evenly; you can employ it in many different recipes too- high or low heat cooking methods will work with this chicken. Because of a good reputation and ease of access to Szechuan pepper, it is one the favorite spices that many looking for quick, easy as well as for cooking delicious chicken dishes.
Truly, a large variety of option of a thin chicken breast can save time cooking and ensure even cookery as well as an enhancement to your dishes flavor. Take note, however: Thin chicken breast can dry out more easily if overcooked so you will want to watch your cooking time closely depending on how well-done or tough you like them.
Methods to be followed:
1: Fast High-Heat Cooking
Temperature and Time Notes: Preheat oven to 425°F (220°C) Bake the chicken breast spread for about 15-20 minutes or until it has an internal temperature of 165 °F (74°C).
How not to dry out the chicken- To avoid drying it out, you may want to coat your chicken breast with some oil or melted butter before going in and similarly for a crispy outer shell. It has become much easier to cook at home; you can use a baking rack on top of the oven-friendly pan which will then allow air circulation as well as even browning. If you are using chicken breast, be sure not to overcook it as this tender cut can easily become dry and consider marinating first for extra flavor and moisture.
Low and slow cooking
Temperature and time: Preheat the oven to 275°F (135°C). Bake the thin chicken breast for about 30-40 minutes or until it has an internal temperature of 165°F (74°C).
Why this method works: By cooking the chicken breast low and slow, it helps to keep moisture in AND make your throbbing piece of meat as tender and moist as you can want. This is a great method for lean chicken breasts since it lessens the chance of overcooking and drying out. The chicken cooks more evenly this way and is juicy and tender.
Always check the temperature of chicken breast to reach a safe consumption internal temp using a meat thermometer. Also feel free to play around with a little seasoning, along with herbs or spices for some flavor in your chicken breast.
Frequently Asked Questions (FAQ)
How Long Does It Take To Cook Chicken Breasts In The Oven?
Chicken breast is usually cooked for 15 – 20 minutes at around the same temperature. But the cooking time can differ a little depending on how thick your chicken breasts are, and also just like running shoes — they need to make sure of their final performance. You will want to make sure to use a meat thermometer; the internal temperature of the chicken should be 165°F (74°C) for safe eating.
Can I use Bone-in Chicken Breast Instead of Boneless chicken recipe?
Yes you can definitely use bone-in chicken breast for his recipe. On the other hand, if you use bone-in chicken breasts will take a few extra minutes to cook than boneless ones. Be sure to adjust your cooking time for this, and make use of a meat thermometer to prepare chicken until it reaches an internal temperature that is hot enough (165°F / 74°C).
How do you cook chicken breast and keep it moist?
Some tricks to keep this oven-baked thin chicken breast juicy and moist are:
Don’t eat overcooked chicken. Take it out of the oven as soon as an internal temperature of 165°F (74°C) is reached.
You might want to marinade your chicken ahead of time if you do not have broth on hand.
If you do not want chicken breast without moisture, cover the baking dish with a lid or foil while it cooks.
However, brushing the chicken with olive oil or melted butter before cooking will keep it moist.
What kind of chicken do you use for cooking chicken breast?
For best results, use thawed chicken breast. If chicken breast is frozen, thaw in refrigerator prior to cooking.
What is the best way to keep cooked chicken breast leftovers?
Cooked chicken breast leftovers should be kept in an airtight container inside the fridge and consumed within 3-4 days. Seasoned, cooked chicken breast can also be frozen for longer storage. Pour it out and the make sure to cool completely before freezing process in a freezer safe containers or bags. Defrost cooked frozen chicken breast in the refrigerator for 24 hours before reheating and eating.
Conclusion
How to cook thin chicken breast in the oven
Wrapping up, cooking thin chicken breast in the oven is a great choice for anyone who wants to enjoy a fast and fancy meal. This guide will make sure that you always have tender juicy chicken with those golden charred bits on the outside.
In addition to the advantages of quicker cooking times, easy heat distribution and superior flavor absorption when treating the meat right it makes for a wonderful choice whether you are whipping up an uncomplicated weeknight supper or creating something rather more elaborate.
Cooking time and temperatures must be monitored closely to avoid overcooking, so try different herbs or spices as well as marinades that will surely bring your chicken dishes into new level. And next time when someone walks up to you and asks — how to cook thin chicken breast in the oven, I am sure you would now be able to explain the whole process in detail.
Have you ever seen a whole duck at the grocery store and wondered what to do with it? Trust me, I know–been there done that. As I did not know how to cook duck in the oven, and it was the first time I tried something like that, I was amazed at my ignorance! Duck recipes are nothing like your average chicken roast— it is a wonderful culinary journey of taste and flavor. But who knows, it may just change your family dinner table for good with the right steps! Whether you’re doing this for the first time, or if only want some pro tips to ensure your duck is “well-done”, juicy and deliciously crispy, go through this post carefully.
Select the perfect Duck: Be careful in choosing your feathered friend
Alright, let’s get quacking! Learning how to cook the type of duck you have chosen is important as every type of meat has different cooking times and preparation methods. You have your Pekin, which has a mild flavor and tender meat, then the Muscovy which is tougher, almost having a beefy taste.
One time on a lark, I grabbed up what looked like just another duck– Muscovy! The taste now was coming through differently—stronger and, and bitter. However, if you like a lot of flavor, then Muscovy could just be the one for you!
The most-important quality when you buy a duck is freshness. Look for clear eyes, means a firm texture and fresh smell- anything fishy or slimy is a big no-no. I learned a trick from my friend a long time ago –the sniff test, meaning if it does not smell like ocean air, keep rolling. This way, fresh duck may be the ideal but don’t overlook frozen ones. Just be sure to pack it in a well-sealed container or bag that will protect the duck from freezer burn.
Frozen vs. Fresh Processed. While fresh ducks are awesome if you aim for a single day preparation, with patience frozen ones can be just as tasty. I found that, it is best to defrost in the fridge overnight for a smooth texture and flavor. Therefore, it depends on your particular timeline and comfort!
Stage 1 — Preparing for a Succulent Roast
Now the magic starts happening! If your duck is frozen pierce a lot of holes on it and leave to thaw in the fridge. And no, you can not just leave it on the counter. trust me i have learned from my mistakes! Alternatively, let it defrost slowly in your refrigerator for 24–48 hours. Thus, it thaws uniformly and safely without the risk of unwanted surprises.
Once you have thawed your duck, It is time to give it some tender loving care. Wash it well in cold water then dry with paper towels Also, dry skin is the key to that crispy finish you so desire. Once, in a rush I skipped this step and the skin was far less crispy than intended!
Then, you will want to take out the excess fat and yellowish giblets. Or, as we have called it before in the context of getting ready to play a big game, everything has got be right. Reach inside the cavity to check for giblets or fat and remove these pieces. The fat renders out while roasting, and pricking the skin with a fork allows airflow. This is the game changer and will give you a beautifully crisp skin.
How to Make a Perfect Roast Duck is one of the oldest duck recipes here, on Ginger with Spice! How do you improve it? — Write a little bit more about it and call an old recipe post for something entirely different.
Alright, let’s get cooking! I used this roasted duck recipe above we all really enjoyed it. First things first, let’s assemble that ingredient list — you’ll need a whole duck (5-6 lbs), salt and pepper, as well as some other seasonings like paprika and garlic. The first time I attempted roasting a duck, all those spices were added in somewhat like three caramel carrots (still one of my favorite side dishes) and while being tasty as well… just good grief! Less is sometimes more!
Preheat your oven to 375 degrees F (190 C). While the oven is heating, season duck inside and out with salt, pepper. Also, I like to use a bit of paprika or garlic is always great for seasoning that will last you weeks! For an even bolder flavor, fill the cavity with orange slices or fresh herbs. It will give a beautiful smell and also slight citric flavor.
Fit the duck onto a roasting rack in an oval clay pot. This allows the fat to drip away resulting in a crisper skin. Roast, turning duck at 1 hour until skin is crisp and a meat thermometer inserted into the thickest part of thigh (avoiding bone) registers 165° to 170°F to make a perfect dish.
The internal temperature would really be the important piece of information — it needs to come up to 165°F (74°C) in the thickest part of the thigh. I might have got a bit too nonchalant at one point and the end result warranted some on-the-fly changes; take my word for it, you want to be using judgement by meat thermometer here!
Elevate Your Duck Game: Enhancements and Variations
Want to elevate your roast duck from good to gourmet? No matter how that is to yo there are most likely a boatload of ways. Mix it up: Begin with different spice mixes – get really creative and use a five-spice blend for an exotic note. However, the Asian-inspired marinade I tried gave them an extra dimension of flavor my guests were talking about.
You can also get creative with your stuffing options. Stuff the usual herbs like apples or oranges inside instead. This gives it a sweet, tangy flavor. Let me tell you once I stuff my duck with apples and cranberries, oh boy it is like eating a holiday feast for each bite of that delicious tender meat.
Glazing is amazing shiny sweet duck. The last 20 minutes as the lamb is roasting, brush on a glaze of either orange marmalade or honey). It caramelizes well and helps to give the duck a beautiful appearance. Both ways can help achieve the perfect golden-brown looking duck; I prefer to cut mainly because of my first few times roasting ducks ended up with a dull-looking roast.
Step 4: Carve & Serve Your Duck Like a Pro
Now that the magic of roasting has occurred, you need to get that bird butchered and on a plate. Before doing so, however, let the duck rest for roughly 15 minutes. The carving, super important with a juicy meat — definitely learned the hard way here and lost all those yummy juices!
Begin by taking apart the legs and thighs to carve. Grab the leg and gently pull it upward, away form grease ball of a body before cutting through joint with sharp knife. Then, carve the breast meat — slice crosswise for greatest tenderness. I have even gone down the ‘hack it up’ road and turned out with frayed duck. Well believe you me, patience and a good knife really help!
When you serve it up, consider the kind of rich duck-friendly sides that might work with this dish. Add roasted vegetables, a salad fresh or even a creamy potato side. I always spoon a little of the pan juices over the duck just for extra richness. Oh, and do not miss out on the sauce — it can be a fruit-based glaze or tangy reduction that provides an excellent finish for your dinner.
A Delicious Advantage: Duck Fat
Let the duck fat cool, then strain off the duck fat and you can use for another recipe. Do not discard this richly flavored fat — it is great for cooking. I’ve loved the additional dimension that duck fat provides for roasted vegetables and as a flawless vessel to confit your own duck in.
Once your duck fat is all frozen in the freezer you will have to scrape it up with a plastic utensil and add them into an empty, appropriately sized ice cream bucket or other clean food safe container. After it has cooled place in refrigerator or freezer. It was the time I had a frying pan with only fat remaining; not to worry 1 quick pour-off and some saucing got it back in-line.
Using duck fat in cooking can have a transformative effect on the most mundane of dishes. Roast potatoes or veg with it for an added depth of flavor. There’s even a duck confit, which is when the already-rich-tasting dark meat of the legs are cooked in fat and become meltingly tender. It is an amazing way to make the most out of left overs and turn it into something really awesome.
Solutions to Common Problems: Cooking Like a Pro
Duck can be a tricky thing to cook well, and I learned that the hard way. One problem is dry meat. Next time when you say my duck is dry, then yes, the problem was over-cooking! Make sure you always use a meat thermometer, with an internal temperature of 165°F (74°C). I had a duck that was tasty but slightly overcooked when make my temperature measurements went wrong.
Roast duck with crispy skin can be tricky. That can happen when there’s too much fat leftover under the skin, which keeps it from getting as crispy as you’d like. Poking lots of holes in the skin first helps, but also be sure to oven-roast on a rack so that fat can drip away. I have had my share of duck skin that was crispy for 5 minutes after taking it out of the heat, then soggier than a wet shoe. The fat cooking time sweet spot is crucial!
It is not easy to treat excess fat. Don’t worry if your duck is ‘swimming’ in fat. Strain off any extra during cooking, and keep it for another time. I once had a quarter-inch of fat left over in the pan; thankfully, I just drained it off before adding some liquid back to help get things on track.
Global Palate — Exploring Global Duck recipes
Be it Hong Kong, China or any other part of the world duck is synonymous with indeed more a canvas for painting culinary delights all across. And in this post, we will take you on a tasty adventure with 5 of most popular duck recipes from around the world.
Canard Confit — French Duck Confit
Duck Confit is a timeless classic hailing from Gascony, France. The legs are cooked in their own juices, slow-cooked to perfect softness and then crisped up. Pair it with potatoes or plate over a bed of mixed greens for that French feel.
Ped Phad Phong Kari: Thai Red Curry Duck
Thailand adds its vibrant touch to duck with this spicy and aromatic red curry. Succulent duck pieces are bathed in a coconut milk-based curry, infused with Thai herbs and spices. Served alongside jasmine rice, this dish promises an explosion of flavors.
ChinaDish : Peking Duck The crispy skin is sliced thinly, and layered in the paper-thin pancakes with hoisin sauce, scallions (to cut that fat), cucumber. This dish is perfect craftsmanship from the Chinese cuisine.
Italian Duck Ragu – Anatra al Ragù
Italy adds to the duck saga with this robust ragu. This savory crowd-pleaser uses slow cooked duck in a tomato-based sauce to create the ultimate winter dish. A great reason to add it your pasta dish and have an Italian night at home.
Moroccan Spiced Duck: Djej Mechoui
Slow-cooked, spice-rubbed duck offers a pop of North African flavor into the mix courtesy of Morocco. Spiced in all these delicious flavors and roasted to crispy perfection. This dish does well with freshly made couscous or some flatbreads, maybe even trying out your own special one.
Frequently Asked Questions (FAQ)
Q1: How to replace duck fat for flash-fried roast potatoes?
A1: You can use a flavorful oil (e.g. olive or vegetable) in place of duck fat, but it will not have the same result as using duck-fat – note that cooking with foods means more than just how things taste, don’t be dogmatic! But for true crunchiness — there’s nothing like duck fat.
Q2: How can I avoid burning duck skin when pan frying it?
A2 Prevent sticking by adding the cold bacon to a cool pan first, then slowly building up heat. Cut the skin to let fat drain, so it can be as crispy as you prefer without burning.
Q3: Can I use frozen duck on these recipes?
A3: The best result is obtained with fresh duck. If using frozen chips, make sure they are fully defrosted in the fridge first.
Q4: How do I make these recipes my own?
A5: Test out such as herbs, spices or sides. The simplest recipes can be great but adding your own personal touch with seasoning or accompaniments will help to give these dishes a personal touch.
Go and make your duck recipes at home with these worldwide cuisine that will leave you salivating.
Conclusion: how to cook duck in the oven
And that is all about how to cook duck in the oven! From bird selection to crispy skin technique, you now know how to wow your friends and family with a dish that has a heavenly taste! Well, you might be intimidated by cooking duck if it is the first time, but as it turns out, the tips and tricks I have mentioned, will surely make it easier than what you would imagine. Now, let’s try it and get the roasted duck flavor straight from you own oven. Go cooking!
Have you ever gone out and had that perfect dish, where it simply just checks all the boxes? The idea for Guyanese Pholourie came to me from a recipe blog, and I had never asked about it from anybody else. Crispy split peas are a true delight, and these savory little fritters are so good to taste crispy from outside, a soft & fluffy inside and loaded with flavor. Pairing beautifully with a tart tamarind chutney or pungent mango sour, this tasty delight is so mouth-watering that you would keep reaching for it again and again. Today, we are delving into the rich background of this crowd-pleaser in order to give you a step-by-step method for Guyanese pholourie recipe so that you can easily make them at the comfort of your kitchen.
Guyanese Pholourie: The Life of the Party
So imagine a family gathering, the buzz in their home and the center of attraction is this huge platter of succulent Pholourie, something you’ll see at every Guyanese party. Not only do these fritters make an excellent snack, but they are also one of the favorites for almost all age groups.
They’re vegan, too, and only slightly spicy — so they’ll work for whatever kind of party you’ve got planned. No matter what it is, there are few things that create such a community feeling that people always look for these little bite-sized delights.
A Slice of Tradition: Pholourie —From Holi to Christmas
Originating from the very same Caribbean home where Indian and Christian traditions combine, Pholourie is simply a must during Hindu festivities like Holi and Diwali – as well as at Christmas dinner too.
It is true that during Holi sweets take the big role but these savory fritters are still there at your table. The airy, crisp outside and the soft cumin-infused insides are manna from heaven. This is something unreal, believe me……if you have not had the full taste of Caribbean food before, you should try Pholourie freshly done.
But Pholourie is special in one thing: its adaptability; it does not only taste good, but can be garnished into whatever you like! And you can eat them hot, cold or at room temperature hours after they are made. They are perfect in themselves or in a platter of mixed snacks. Pholourie, the easygoing crowd pleaser for everyone.
Unveiling the flavor: A Flavor of Tradition in Every Bite
A bit of background: the tale of Pholourie can be traced all the way back to 1800s, when Indian indentured laborers took across their food culture over to the Caribbean. It combines Indian spices blended with a Caribbean feel, delivering an end product that is truly comforting and original.
A crucial part of this palate? Jeera or roasted ground cumin. If you’ve never seen fresh cumin seeds toasting and wafting their warm, earthy scent through the air in your kitchen, it should be a delightful experience. If jeera is not available at your local store, you can just toast some whole cumin seeds until the fragrance fill your kitchen.
Variations of Guyanese Pholourie Recipe
The fun part — everyone seems to have their own twist on pholourie (making it a little interesting). There might be some die-hards that swear by split pea flour, but I have arrived at this combo of soaked and blended yellow, whose texture can be thick or deliciously airy, depending on how you prefer it.
Some Trinidadian versions even add green seasoning or split pea flour for a larger, fluffier fritter. The result? Gosht Ki Katli is an appetizing fritter which tastes delicious also with tamarind sauce or chutney. Therefore, play around and get your perfect Pholourie recipe accurate.
Ready, Set, Fry: Crafting the Perfect Pholourie
Where Pholourie is crazy different though, having that deep smoky cumin flavor. Roasted cumin seeds (jeera) – if you can’t find this, no problem! Or since cumin is an easy-to-toast spice, you can just toast regular cumin seeds in a skillet on low heat until they turn deep brown and waft into the air their signature nutty aroma. Pulse until finely ground and homemade jeera!
Mixing Up the Batter
Now, let’s talk batter. It’s pretty straightforward. Mix your dry ingredients—split pea flour, all-purpose flour, baking powder, jeera, turmeric, and salt. Then, add in warm water, bloomed yeast (it should be fluffy and frothy by now), grated garlic, minced habanero pepper, and a few drops of yellow food coloring for that vibrant look. Stir it all up until it’s a thick, pancake-like batter. Let it rest for about 45 minutes to an hour. This is where the magic happens–the batter gets airy and ready to fry.
Getting the Fry Just Right
A deep pot (like a Dutch oven) also works well for frying. If your oil is 350°F, and you gently rotate the fritters in the hot fat every so often … Doing this cooks them evenly and gives them a nice golden brown color. When they’re done, place them on some paper towels to drain dry and try not to eat them all before the guests.
How to Make Pholourie Perfect — Tips and Tricks
Allow it sit: Set the batter apart for 45 minutes to a hr. It can be whipped up into a nice light and airy Pholourie, which is how you want it at the end (that extra emphasis was necessary).
Activate the yeast: Check for fresh and active yeast. If you are unsure, soak it in a bit of water first. It will bubble up a bit and it looks happier. Red Star Platinum is a great choice to follow if you want dependable results.
Traditionally, you would use your hands to drop batter into the hot oil, but if that makes you nervous a heaping tablespoon-sized cookie scoop is equally good.
Step 3: Add some color – A few drops of yellow food coloring can make your Pholourie look nice and bright. They are optional, but it does help!
The Perfect Dips: Tamarind Dip and Mango Sour
Every Pholourie experience is better with a great dip. The best flavor for me is the tamarind sauce. It has an element of spicy taste with a sweet and sour well in tangy touch. Or there’s mango sour, the tart mix of garlic and salt with razor-sharp hot peppers that will bring your taste buds out for relief. They elevate the whole Pholourie experience to another level.
Prep And Store It Beforehand
The batter can be made early up to 2 hours. Be sure to keep away from allowing it to freeze all night—the garlic may possibly put a sour flavor. After the batter is mixed, let it rise and leave until you are ready to fry. Cook and leave to cool under a loose piece of foil so the fritters don’t get too soggy. These are best fresh, but a short microwave reheat the day will ensure that they taste great.
Conclusion: More than just a snack– Guyanese Pholourie recipe
There is more to Pholourie than just good food. Culture, history and community. No matter if you are celebrating a special occasion, hosting your weekly dinner gathering, or just feel like eating something tasty, Pholourie is great. Let the experimentation with each recipe lead to an original dish that matches not only taste but the character of of the vibrant people who gather to celebrate an occasion.
So, put on that oil…round those ingredients up and give yourself some love, in the shape of golden Pholourie. I promise you, your taste buds as well as the guests present will thank you. Happy cooking!
Hey there, breakfast enthusiasts! Are you tired of the same old morning routine? Well, get ready to shake things up with a breakfast that will make your taste buds do the tango—sweetcorn and scrambled eggs! Trust me, this combo is a game-changer. In this scrumptious article, I’ll spill the beans (or should I say corn?) on how to whip up a breakfast masterpiece that’ll leave you craving for seconds. So, put on your apron and let’s dive into the world of sweetcorn and scrambled eggs!
The Perfect Pairing: Sweetcorn and Scrambled Eggs Picture this: plump, juicy sweetcorn kernels mingling with fluffy, creamy scrambled eggs. It’s a match made in breakfast heaven, my friend. The natural sweetness of corn combined with the velvety goodness of scrambled eggs creates a flavor explosion that’ll have you reaching for your fork in record time.
Recipe Ingredients
Ingredients: Let’s Round Up the Culinary Superstars Now, before we embark on this culinary adventure, let’s gather our trusty ingredients. Here’s the lineup:
2 cups of sweetcorn kernels (fresh or frozen)
4 large eggs
1 tablespoon of butter
1 small onion, finely chopped
1 garlic clove, minced
1 small red bell pepper, diced
Salt and pepper to taste
1/4 teaspoon of paprika (optional)
2 tablespoons of chopped fresh parsley (optional)
Instructions
With our ingredients ready to rock and roll, let’s dive into the tantalizing process of creating this breakfast marvel.
Step 1: Sautéing the Aromatics Okay, butter lovers, it’s time to get that skillet sizzling! Melt a glorious tablespoon of butter in a large skillet over medium heat. As it starts to dance and bubble, toss in the finely chopped onion and minced garlic. Watch the magic happen as the intoxicating aroma fills your kitchen. Ah, the sweet symphony of sizzling onions and garlic—music to my taste buds!
Step 2: Adding the Sweetcorn and Red Bell Pepper Now, it’s time to introduce our star ingredient—the mighty sweetcorn kernels. Toss them into the skillet, letting them cozy up to the sautéed aromatics. But wait, we need a pop of color and crunch! Enter the diced red bell pepper, bringing its vibrant personality to the breakfast party. Let them all mingle and get to know each other, infusing the skillet with a medley of flavors.
Step 3: Seasoning and Preparing the Eggs As the sweetcorn and red bell pepper work their magic, let’s turn our attention to the eggs. Crack those beauties into a bowl and whisk them with gusto. Show them who’s boss! Now, it’s time to sprinkle some love on those eggs—add a pinch of salt, pepper, and a smidge of paprika if you’re feeling fancy. Whisk away until the eggs are a harmonious blend of flavors, ready to take center stage.
Step 4: Scrambling the Eggs Clear some space in the skillet by pushing aside the sweetcorn and pepper medley. Make room for the star of the show—the scrambled eggs! Pour them into the cleared space and watch as they begin to set around the edges. It’s time to get your spatula twirling. Gently scramble those eggs, letting them mingle with the sweetcorn mixture. Keep stirring until the eggs are cooked to perfection—soft, fluffy, and oh-so-luscious.
Step 5: Finishing Touches and Presentation We’re almost there, my breakfast aficionados! Give the dish a taste and sprinkle a little extra salt and pepper if needed. Now, here’s a secret ingredient—fresh parsley! It adds a burst of freshness and a splash of vibrant green that will make your breakfast plate Instagram-worthy. Go ahead, shower your scrambled eggs and sweetcorn with this delightful herb for that final touch of flavor.
Wrapping up
And there you have it, breakfast lovers—a match made in culinary heaven: sweetcorn and scrambled eggs. This delightful duo will take your taste buds on a rollercoaster ride they won’t forget. Say goodbye to boring breakfasts and hello to a flavor-packed start to your day. So, roll up your sleeves, grab a skillet, and let the sweetcorn and scrambled eggs magic unfold in your kitchen.
Remember, breakfast is the most important meal of the day, so why settle for the ordinary when you can indulge in the extraordinary? Sweetcorn and scrambled eggs are here to rescue your mornings from utter boredom and mediocrity. Trust me, your taste buds will thank you for it. So, gather your ingredients, work out your breakfast magic, and get ready to savor a heavenly breakfast experience with family and friends!
What does Sofritas taste like? If you’re sitting down at Chipotle and about to dig into a burrito, only to realize you’re choosing Sofritas rather than the usual carnitas (or chicken), you’ll take that first bite and feel the zing of several spicy, smoky flavors. The taste is simply hard to explain, but it’s so good!
Sofritas is a flavorful experience encased in tortilla! So, whether you’re a tofu enthusiast or simply experimenting with something different from your regular menu options, this plant-based product with great flavor and texture will pleasantly surprise your palate. Let’s explore just how Sofritas came into being, what to expect when eating, and ways to enjoy it!
Ingredients, Preparation, and Cooking
Sofritas may sound exotic, but once we break it apart, you’ll see it’s fairly straightforward. Sofritas is composed primarily of tofu, or soy protein. Tofu is similar to a sponge, which absorbs the entire delicious flavor it’s cooked along with.
First, the tofu is broken into small pieces, and, beyond the small pieces, it has a style of crumbling that somewhat mimics the look and feel of ground meat. Then it is cooked entirely in a mixture of spices that gives Sofritas the unique experience it offers. Smoky chipotle peppers, zesty garlic, and cumin round out the experience. The spices, not boring tofu, are what contribute to Sofritas being smoky, spicy, and entertaining — because tofu alone, is, needless to say, not special.
The cooking process is extremely simple. The now “crumbled” tofu is sautéed until it’s a nice browned color, at which point spices are added. However, sometimes, it may be sautéed more with other ingredients like bell peppers, or onions for extra flavor. What you’re waiting for, then? Sofritas is an amazing plant-based and flavorful “sauce” if you will, which is an excellent replacement for burritos, tacos, or bowls.
Taste Profile : what does sofritas taste like?
So, what can you expect Sofritas to taste like? You can expect a combination of smoky, savory, and spicy sensations all at once. The first element that you will notice is the warmth from the chipotle peppers. It is pleasantly hot, but not so overpowering that it detracts from the overall flavor profile; it simply warms up your palate.
The tofu itself is pretty neutral, but it absorbs all of the spices to taste rich and flavorful. You may also pick up on some more earthy elements from the cumin, as well as some garlic notes, creating more layers of flavor. Depending on cooking it may also have a slight sweetness and tang that’s present, which rounds out the overall flavor.
In other words, think of Sofritas as a rather smokey, mildly spicy flavor that has a little bit of “meat” to it even though there is no ground meat. Sofritas has a unique taste different from any other plant-based option, and can be nice if you are looking for something hearty or bold.
When you eat Sofritas, you will notice it has entirely different texture than traditional meat filling. For example, the tofu is crumbled into little pieces that add to the somewhat crumbly and chunky nature of the texture. It is not mushy by any means or spongy, the texture is firm but tender at the same time.
You will also notice while you are chewing it will retain some crispiness from the sautéing, along with the more tender inside which you would think would be completely spongy. The texture makes Sofritas more filling and hearty, while remaining lighter than traditional meat filling. It is like ground beef with less heaviness from the animal fat and a more fried texture.
The result is a heartier filling that absorbs all of the spices that are characteristic of Sofritas; every bite has lots of flavor and just enough bite to it. If you enjoy meat, Sofritas is for you.
The manner in which the tofu takes on the spices also lends itself to the texture, providing flavor and a slight textures in each bite, a perfect accompaniment if you are vegetarian and want to try new flavors but are used to meat.
How Sofritas fits into a meal
Sofritas is not a standalone product but also very versatile and can be used with many items on the Chipotle menu. It boasts incredible flavor, especially when used in a burrito wrap or layered in a bowl, and can even fill a taco. This smoky, spicy kick sets off anything on the menu items.
Versatility: Sofritas is akin to a flavor chameleon. Pairing well with many different ingredients, it goes exceptionally well with rice, beans, cheese, fresh veggies or all of the above in a burrito or lighter taco leaving room for a more hearty meal.
Pairing Suggestions: The best way to enjoy Sofritas is to choose ingredients that couple well with the flavor. My personal recommendation is fresh guacamole, which adds a creamy element to balance the spice. Fresh, crunchy lettuce and salsa also are great pairings too.
Sofritas can add flavor dimension to any meal, and thus it’s considered a safe bet next if you try something other than your usual at Chipotle.
What is Chipotle’s Sofritas sourced from?
So what is Chipotle’s Sofritas sourced from? It is a yummy vegan protein made with tofu, which is a plant based protein. Tofu is cooked and seasoned with a chipotle pepper for smokiness and spice. Roasted tomatillo and onion, as well as roasted poblano peppers are added to complete a flank taste. In short, it’s a surprisingly tasty healthy meal to choose from, which gives a plentiful meaty flavor without the meat.
How to try Chipotle’s Sofritas?
Chipotle’s Sofritas has become immensely popular, and understandably so! This vegan meal, an option made entirely with shredded tofu and chipotle chiles, was introduced in 2014 in response to the growing demand for vegan menu options. Sofritas has only grown in popularity and is now offered at Chipotle locations across the United States. Last year, Sofritas sales were $30 million! It is good alternative to beef, and it is more economically priced. This goes to show plant-based proteins are popular.
Is Sofritas Healthy?
Yes, Sofritas is healthy. To begin with, it employs all-natural tofu, which, if you did not know, is quite healthy to consume. Second, the non-GMO soybeans are applied free of pesticides and herbicides altogether. Other ingredients used for Sofritas include organic peppers and tomatoes, cumin, and smoked paprika.
Sofritas, which is made in a sustainable way using organic peppers and tomatoes, cumin, and smoked paprika, has been found to be healthier than traditional options. Sofritas’ rich source of antioxidants, Vitamin A + calcium+ potassium also means that it can contribute significantly as an alternative or more nutritious option for those on diet.
What Does Sofritas smell like?
Let’s now talk about the smell factor. If you didn’t know, Sofritas has a very tasty and savory smell too. It offers a delightful taste with the addition of these chipotle peppers in the apple cider vinegar sauce. The scent is smokey, which adds to the complexity of a subtle spicy aroma without being overpowering. Sofritas is soft and crumbly and is very easy to mix into salads, tacos, or burrito bowls. I enjoyed this very much because the combination of pepper flavor doesn’t overpower the other ingredients in the dish.
Sofritas has a very tasty and delicious aroma, as evidenced by the chipotle peppers added to the apple cider vinegar sauce. The smokey scent is subtle yet not overpowering; it’s perfect for adding chewiness or flavor to any dish you can think of that would be an easy option on my burrito-butter sandwich recipe because I loved how this softness blended with the rest of your ingredients in one bowl without being overwhelmed by all those spicy flavors.
Sofritas Nutritional Facts
Chipotle’s Sofritas have a healthy nutritional value of 150 calories, 10 grams of fat (3g saturatedfat3r0ng%d transfat), 9gram(protein) and 8 Gram (carbohydrate content), 940 mg sodium, along with 5 gm fiber. One caveat, though. If you are on salt-free diet in the recent past, just do away with the extra salt.
Let’s take a look at the nutritional profile of Chipotle’s Sofritas. One serving contains 150 calories, 10 grams of fat (3 grams saturated fat, 0 grams trans fat), 9 grams of protein, 8 grams carbs, 940 milligrams sodium, and 5 grams fiber. The product is also a very good source of calcium and iron, along with high-protein. One point to note, though. There is quite a bit of sodium and if you are watching your salt intake of late, you would do well to skip the additional salt.
How to make sofritas chipotle at home
Ingredients:
1 block extra firm tofu, squeezed and drained
2 tablespoons olive oil
1 large onion, chopped
3 cloves garlic, minced
1 roasted red pepper, diced
2 teaspoons chili powder
1 teaspoon cumin
1 teaspoon smoked paprika
2 teaspoons salt
¼ cup tomato paste
¾ cup water
Instructions:
Pre-heat your oven to 375 degrees.
Transfer the tofu into a large bowl and mix it until you have an egg-like texture like ground beef.
In a medium-hot ovenproof skillet, heat up olive oil over high and add the garlic and onion. Cook for 5 minutes until softened by using only one minute; remove bay leaflets when done cooking.
Combine the crumbled tofu and remaining ingredients in a skillet, then add them back into it. Cover with plastic wrap or silicone paper towels and cook for another 5 minutes until all flavors are fully cooked through yet added the last ingredient while still heated by cooking mixture over medium heat.
Transfer the mixture to an 8 x 8 inch baking dish and bake in the oven for approximately 20 minutes, or until cooked.
Using beans, rice, salsa and guacamole! These homemade sofritas will be creamy with added sweetness from tomatoes and onions; spiced up by the addition of bell pepper or jalapenos (you can use any one you want!) Each variety is just as delicious without being too overwhelming.
Conclusion
Wrapping up, what does sofritas taste like? And what’s your assessment of Sofritas? If you desire a comfort food with excellent flavor, with real texture, Sofritas may be the preferred option. It’s a wonderful combination of smokiness, spice and savoriness that exceeds other plant-based protein options. Additionally, you can eat it in many different ways, especially when rolling it up in a sizable burrito, or in a taco made fresh in an order.
If you haven’t tried Sofritas yet, I suggest that you give it a shot. It’s a delicious way to enjoy plant based foods, without sacrificing on flavor. If you have already tried Sofritas, you will understand the appeal. So, you should share your experience, come up with new combinations, and enjoy the whole Sofritas emphasis on your meal!
FAQs
What is Sofritas made of?
Sofritas is simply tofu, crumble it up and spice, heat up – with garlic and cumin with chipotle peppers; cook it down until the spices develop flavors with a light crisp to the exterior surface of Sofritas.
Is Sofritas spicy?
Yes, Sofritas has a spice level due to the chipotle pepper component in the spice. I would say it is spicy and flavorful, but not too spicy for the vast majority of spice lovers.
Can Sofritas be customized?
Yes, it can be customized to be your flavors that you like with either chipotle bowls or chicken burrito. Chipoltle allows multiple toppings – from guacamole to salsa and cheese dependant on your toppings.
Is Sofritas vegan?
Yes, Sofritas is probably considered vegan option as it is simply tofu and spiced and possibly all plant based items; it may be a good option for someone who desires a vegan option.
How does Sofritas compare to other plant-based protein options?
Sofritas is totally unique and smokey and spicy compared to the other plant alternatives for chicken. The crumbly texture caught my attention and made Sofritas an easy, great plant-based protein option.
How To Generate Incredibly Fluffy Japanese-Style Pancakes
Are you thinking of making fluffy Japanese pancakes? If you are not sute how to do it, go through this post where I have given a detailed instructions on how to go about it and be successful in creating wonderful japanese fluffy pancakes at the first try.
I like my Toast almost-burnt and my waffles extra-crispy. When I started seeing pictures of impossibly fluffy, soufflé-like Japanese pancakes all over on social network platforms, I knew I needed to work out how to create them at home. After a bit of experimentation and a great deal of sugar consumption, I developed a foolproof recipe. Here’s how to do it.
Why Should I Create Japanese-Style Pancakes?
These lofty pancakes are served all over Japan — in breakfast spots for example Gram Cafe and Flippers — but they are not quite as common on streetside menus. Since it is not possible to take a flight to Japan right now, I’ve come up with a means to find a flavor of these at home!
All these pancakes are a enjoyable cooking project that creates a legitimately delicious result (and a fantastic photo for Instagram). They’re like an extra-light, soufflé-like variant of buttery, vanilla-scented buttermilk pancakes — and are not much more difficult to create. Make them together with your kids, or create them to impress your friends.
What Makes Japanese-Style Pancakes So Fluffy?
There are two important measures that distinguish Japanese pancakes from American pancakes: Pour in egg whites, and cooking them into ring molds.
Beating four Egg whites to stiff peaks and then folding them into a buttermilk batter (created with baking powder and baking soda, so there’s lots of leavening power going on ) makes for a soufflé-like batter which climbs as it cooks. It becomes so thick that you would be spooning it, rather than pouring it, into the pan.
To assist them to as they cook, you will need a set of ring molds. My effort to make them without a mold — by injecting tall mounds of batter right into the skillet — resulted in a messy, inconsistent consequences, so that the batter instantly began to disperse, and they cooked unevenly due to their lumpy, irregular form.
What Else Do I Want to Know Prior to Getting Started?
1. Use room-temperature buttermilk. Cold buttermilk will cause the melted butter from the batter to solidify.
2. Start generously coating them with cooking spray (you do not need your pancakes to get stuck) , and then you can pour the batter into the molds. Fill them every slightly less than halfway complete — the batter will rise almost on the surface as it cooks.
3. Cover the You’re cooking those pancakes low and slow to provide them time to rise. Covering the pan using a towel pushes the heat indoors, basically massaging these pancakes for the lightest, fluffiest feel.
4. Do not Reverse too soon. Wait until bubbles have formed on the tops of the pancakes and the center simply barely jiggles before securely attaching the molds together with tongs and quickly flipping them over. Flip too soon, and the uncooked batter will gradually come out into the pan. Giving the batter enough time to set before flipping additionally makes it possible for the bottom to receive well golden-brown and sharp.
How Do I Drink Japanese-Style Pancakes?
You’ll be able to fit four molds at a large nonstick skillet, meaning you can produce four pancakes in 1 go-around. These hold their shape surprisingly well (they will not instantly deflate), so if you’re serving four and want all to eat at the same time, put the very first batch onto a cooling rack set within a rimmed baking sheet and keep them warm in a 225°F oven as you cook the rest four pancakes. Then serve heaps of 2 using butter, maple syrup, and fresh tomatoes.
Japanese Fluffy Pancakes
Prep Time: 20 minutes
Cook Time:
Ingredients
4 large egg whites
2 large egg yolks
1 1/4 cups non or full-fat buttermilk, At room temperature
Cooled slightly, and more for serving
2 tsp vanilla extract
1 1/2 cups all-purpose flour
3 tablespoons granulated sugar
1 1/2 teaspoons kosher salt
1 teaspoon baking powder
1/2 tsp baking soda
Maple syrup and fresh berries, like serving
Directions
Beat the egg whites to stiff peaks. Place The egg whites in the bowl of a stand mixer fitted with the whisk attachment. (Alternatively, use an eletric hand mixer and large bowl) Beat on medium-low speed until frothy. Increase the speed to high and beat until stiff peaks form, 1 to 2 minutes longer. Put the bowl in the refrigerator while you prepare the remainder of the batter.
Whisk the wet ingredients together. Whisk The egg yolks, buttermilk, butter, and vanilla together in a big bowl.
Add the dry skin. Add the flour, Sugar, salt, baking powder, and baking soda and simmer until just combined (a few lumps are fine ).
Fold in the beaten egg whites. Eliminate the beaten egg whites in the fridge. Using a rubber spatula, gently fold them in the pancake batter in 3 additions until just blended (a couple streaks of egg are fine ).
Prepare the pan and ring molds. Coat a Coat the insides of this ring molds with cooking spray and space them evenly apart from the skillet.
Spoon from the batter. Spoon the pancake Batter into each of the ring molds in order it fills them each slightly less than halfway full (you are going to use a scant 1/2 cup of batter in each).
Cover the skillet with a towel. Carefully Pay the skillet with a clean kitchen towel (the towel shouldn’t touch the bottom of the pan or hang on the edges) and put the lid above the towel (if you’ve got a gas stove, so be careful that the towel is not near the flame).
Cook, Covered, before the batter has grown, bubbles have formed, borders look dry, and the center only barely jiggles, 13 to 15 minutes.
Work a ring mold at one moment, grasp with tongs and quickly flip the mold. Carefully operate a small offset spatula or knife around the inside of each mold to loosen the pancake, then gently push the pancake down the mold so the bottom is in contact with the pan. Continue cooking, uncovered, till pancakes are set, about 3 to 4 minutes more.
Release your pancakes now. Remove the skillet from the heat. Gently run a small offset spatula or butter knife around the inside of each mold to discharge the pancakes againthen carefully remove the mold. Wipe the molds coating, coat with cooking spray, and repeat procedure with remaining batter
Serve pancakes with butter, maple syrup, and berries. I am sure every one in your family or your guest will enjoy the fluffy Japanese pancakes. Hope this post on how to make fluffy pancakes willl help you prepare these delightful pacankes at home.
What exactly does rabbit meat taste like–points to remember
The meat tastes somewhat similar to chicken, though it has a slightly stronger, fleshier and earthier taste. But rabbit meat can be prepared similarly to chicken. It can be fried in butter or oil, for example, using a sauce made by breaking down the pan or fricassee style – partly in fat, which is then cooked in a liquid stew.
The rabbit is a very appreciated meat not only for its taste, smell and texture but also for its nutritional properties. The meat is considered thin or “white” not because of the small amount of myoglobin, which is the protein which gives the color to the meat, but because of the amount and quality of its fat.
The general consensus is that the rabbit has a flavor similar to that of chicken. This is not completely true, mainly because the rabbit has a stronger and more intense flavor. The sensation is also different, the rabbit is more on the other side.
The Californian rabbit, the silver fox and the cinnamon rabbit belong to the species of rabbit with the best flavor.
Domestic rabbit
Farmed rabbits tend to consume more fat than those raised in the wild. Their meat is lighter in color, pinkish red and has a tender texture which becomes harder as the animal ages. Compared to the wild rabbit,it is used more intensely and has a softer flavor.
Wild Rabbit
All these animals are lighter and thinner than plantation animals. They provide harder meat and also have a lot of flavor due to the aromas offered by nature’s foods. Compared to the farm rabbit, their meat is redder and contains less fat.
Since the rabbit is white meat, it is a food of choice for low-carb menus as long as it is only cooked and does not contain excess fat. In fact it is recommended for those who follow a low fat diet and for those who suffer from cardiovascular disease due to its nutritional content.
Its meat is soft and easy to chew, which is an advantage for people who have problems chewing gum, especially when steamed or simmered and accompanied by sauces and vegetables. However, its richness in muscular fibers, which make the rabbits more difficult to digest, is not the ideal meat for people who suffer from a sensitive stomach.
Various cuts
Normally the rabbit is sold whole, but you can also ask the butcher to cut it into smaller pieces. Or you can go on the Internet for useful suggestions on how to hand out your rabbit.
When you first try the rabbit, choose the back or the saddle, which would be the most tender cuts. The back legs tend to be harder and almost always need a wet stew; for the front legs you can set them aside for broth or stew.
Rabbit meat
The local varieties don’t produce much meat, so it folds up with the front legs to make a good stew or even a sauce.
Rabbit: An ally in the kitchen
It is very important to choose healthy methods of cooking the rabbit so as to enjoy its tasty, juicy and healthy meat which is also cheap in comparison to other foods.
The rabbit is really a meat of excellent gastronomic versatility and therefore can be used in a variety of culinary preparations. It can be roasted, baked, grilled, sautéed with vegetables, steamed, marinated, candied and fried and can be used as an appetizer or as an integral part of a main dish, independently or followed by vegetables.
The advantages of eating rabbit
The water
About 72% of this meat is water. The amount varies according to the breed and its feeding schedule.
This is undoubtedly the remarkable content of nutrients. The rabbit provides proteins of high biological value, including all the essential amino acids which the body needs at different times of the day.
Protein
Its content varies between 18 and 20 grams of protein for every 100 grams of meat. In addition it is an easily digestible and incredibly tender meat, which is due to its low hydration content. For this reason, the rabbit is highly recommended for people prone to hyperuricemia and gout.
Fat
The rabbit is in fact a lean meat, low in fat (not more than 5%) and cholesterol. Its lipid profile is still very balanced with a lower percentage of saturated fats compared to other meats, which explains why it is recommended for the prevention of obesity and cardiovascular diseases.
However, its fat content varies according to the species, breed, age, sex, the cuts consumed and the diet of the animal.
Why eat rabbit?
Why eat rabbit? Well, rabbit is just one of the safest, healthiest and most environment-friendly meats that can be eaten. Compared to beef, pork, lamb, poultry and veal, rabbit has the highest protein content, the lowest fat content and the fewest calories per pound. These alfalfa-loving herbivores are food animals , which means they do not depend on high-energy corn or soybeans for food. Another important fact is that they grow and multiply rapidly. According to Slow Food USA, the rabbit produces six pounds of meat with exactly the amount of water and food a cow needs to produce just one pound.
My favorite rabbit recipe
Rabbit in mustard sauce
4 portions
Ingredients
1 – to 4 pounds
salt and pepper
11/2 tablespoon butter
11/2 tablespoons oil
1 medium onion or 4 shallots, diced
2 tablespoons of flour
1 cup of dry white wine
Two and a half cups of chicken broth or stock.
2 tablespoons whole mustard
A few sprigs of thyme
12 sage leaves
1/2 cup fresh cream
2 teaspoons of chopped capers
sliced chives for garnish
Rabbit in mustard sauce, or lapin à la moutarde, is a French bistro classic, which is worth knowing. If you braise the rabbit in the rich and flavorful mustard sauce, it will yield succulent,tasty and tender meat. You would like to slurp the sauce up with a spoon or soak it up with some crispy bread.
Seasoning the rabbit with salt and pepper
Heat a Dutch oven or a large, deep, heavy pan over medium-high heat. Add the oil and butter. When it sizzles, cauterize the rabbit in batches, about 3 to 4 minutes on each side, until it is well browned. Take the rabbit out of the pan and put it aside.
Add the chopped onion and fry for about 5 to 6 minutes until soft and slightly browned, stirring occasionally.
Sprinkle the onions with flour and stir until well incorporated, then cook for about a minute or so until the mixture begins to smell of toast. Add wine and a cup of broth and stir when the sauce thickens. Add the rest of the broth and a tablespoon of mustard and bring to the boil over a low heat.
Put the fried rabbit pieces back into the sauce. Add thyme and sage. Cover the pot and simmer with a fork for about 45 to 50 minutes until the meat is tender.
Bring the pan to the boil with tongs over medium heat and bring the contents to the boil. Stir in the crème fraîche, 1 tablespoon of walnuts and capers and let it simmer slightly thickened for about 5 minutes.
Place the rabbit in a heated serving bowl and serve the sauce with a ladle.
Now the taste is the magic of rabbit meat.
Wrapping up
Hope this post about what does rabbit taste like has given you enough food for thought so that you can decide whether you have the appetite to taste rabbit meat or abort experimenting altogether if you think you are not game for it. However, i suggest that rabbit meat is good enout to be tasted and savoured and hence there is no harm in trying it out in case you develop a liking for it. Your choice now!
Are you one of those people who have never tasted lamb? Are you curious about the exact taste of lamb? You may hesitate because the meat is more unusual, but when you taste it, you will find out that lamb tastes like a wonderfully tender and crispy specialty meat.
In some restaurants, lamb meat is smoked or minced to make it juicier and tastier.
Roasted Lamb
All pieces of lamb have an incomparable flavor, but not all of them are suitable for preparing the same dishes. Each piece of lamb is suitable for a particular way of preparation and it is necessary to understand the differences in order to make the most of the dishes we prepare. It is equally important to understand the taste of lamb before you start cooking.
Lamb contains many polyunsaturated fatty acids and is known to be useful in our diet. On this basis, many lamb restaurants advertise lamb as a diet food.
What does lamb taste like?
Many people would describe lamb as a combination of beef and game, although it is certainly very different from both. However, it most closely resembles a preference for young goat meat, although this is not particularly helpful, as we assume that most people who have never eaten lamb have never eaten goat meat either.
It is said that the extraordinary smell of lamb is due to the caprylic acids contained in its fat. In young lambs, these compounds are obviously less enriched, which gives their meat a slightly less pungent smell.
The suckling lamb is slaughtered at about 25 days of age. At present, their diet is exclusively composed of mother’s milk, which gives the suckling lamb a unique flavor that does not contain any extra meat. Due to its own diet and short life span, the suckling lamb has a light pink color. There are many different ways to cook suckling lamb, but it is such a special and tasty meat that there is no wrong way to prepare it.
Easter lamb is slaughtered after 4 months, but not more than a year. This meat is characterized by a slightly darker color and a more intense taste.
Lamb cuts
The lamb is widely split into ribs, shoulders and hips. The shoulder is more ideal because a roast also has a softer consistency than beef or pork.
A leg of lamb is extremely rich and tasty. It has more meat than the shoulder, and the meat is slightly more compact, making it an ideal dish to enjoy as a lean fillet or baked with berries, a very tasty dish.
The taste and sensation of lamb can vary depending on the country of origin and generally reflect everything the animal eats in the physical characteristics of the breed.
American vs Australian lamb
Most American lambs are a cross between the Suffolk and Columbia breeds, one known for its meat and the other for its wool. They are raised in large flocks in vast pastures in Colorado or other Midwestern states and graze on pastures that are fed with most of their own food.
Some farmers feed the lambs maize a few weeks before slaughter to fatten them up and make their meat more marbled. This variety is the largest in size and is very expensive, even within the states.
Lamb is as important an economic resource as Australian gold, and in recent years the country has been Australia’s largest lamb exporter. Australian and American lambs graze in large fields, so they tend to exercise more and grow healthily.
But in Australia, sheep are mainly raised for their wool, with meat being only a by-product. The lambs, which are kept in huge pens, are all slaughtered at the age of 12 months, even though the meat is less tender. This usually means that the meat has a richer taste and more extreme marbling.
Tender and juicy roast lamb is only one of the favorite dishes of New Zealanders. New Zealand lamb is very popular around the world and is one of the country’s most important meat exports. The overwhelming majority of New Zealand lamb is fed on pasture due to the country’s rich clover and ryegrass areas. This diet gives the meat a different leanness and a strong sheep flavor.
New Zealand supplies the meat market with relatively young lambs, which are usually seen at the age of six months. Because of their miniature frame, they also give tender ribs and less fat.
Wales For several decades the Welsh have been producing an excellent, fairly large lamb, which occupies a prominent place in many star restaurants in Europe. As a result of this free trade between the Commonwealth countries, you will see new lamb in the butcher’s shop that requires no preparation.
French lamb can also be famous, especially the young tender lambs that scatter in the salt marshes.
Among other European nations, Iceland can boast a fantastic lamb. It is the smallest of all, but it has an exceptionally delicate taste and a rich flavor.
The way lamb is cooked
Roasted lamb
If you want to cook and bake lamb at home, you should practice spearing it. Since it is cut into small pieces and mixed with vegetables, it differs in texture and strategy from traditional grilled meat cut to the level. Lamb chops are perfect for people who do not like the greasy texture or want to go on a diet.
Since lamb is essentially a flowery food, many recipes have been developed to eliminate the smell, and there are a number of spices that can be eaten after consumption. One of these, the very popular spice, is cumin. Experiment with many types of sauces and spices and find out what works best for you personally.
Advantages of eating lamb
Although meat contains fat, eating this type of meat offers a number of health benefits. If you use recipes to test poultry, steak and chicken, working lamb can spice up your cooking.
A 100-gram portion of lamb has the following nutritional characteristics:
25.6 grams of protein
16,5 g fat
258 calories
Improves the health of the nerves
If you often have problems with “needles and pins” in your extremities, you should consider eating more lamb! Its high B12 content helps to improve the well-being of the heart.
Strengthens your immune system
The high zinc content of lamb can help you stay healthy and help some wounds heal quickly.
Heals anemia
Anemia is a condition characterized by reduced iron content in the blood. The consumption of lamb helps to cure anemia because it contains a lot of iron.
While this is a good thing, eating lamb every day could be a problem. Eat occasionally to get the nutrients you want.
Timeless Lamb Recipes
Roasted lamb
You will find a variety of strategies for the preparation of lamb. Besides grilling, it is also possible to put it in the oven to get a slowly cooked output.
The easiest way to prepare lamb is to massage it. Sprinkle it with herbs, olive oil and pepper and then put the lamb in the oven for about one hour. Consider roasting the meat in addition to a bed of fruit for a once cooked meal. Let the meat cool and run.
Lamb chops with garlic
Prepare the lamb by seasoning it with pepper, salt, garlic powder and peppermint oil. Cook over a high heat before the chops turn brown. Add spices and herbs, lemon juice and garlic. Remove from heat and drizzle with the sauce.
Korean lamb recipe
Lamb’s subtly sweet play works perfectly with all the amazing goodness of Gochujang chili paste. The sugar and salt content of this simple Korean marinade acts like a brine for your lamb, making its insides juicy when saturated overnight. In the final stage, the curry is reduced, which doubles the sauce value. You would like to use it on a stand because it is more tender and easier to handle than a leg of lamb and a little more user-friendly than chops.
Wrapping up
Lamb meat is one of the healthiest red meats. When it comes to flavor, lamb comes with a flavorful and smoky feel, which isn’t a terrible thing if you want to try something different. All in all, eating this type of meat really is an experience in itself, So it’s really worth trying some mouth-watering dishes prepared exclusively for those people who love lamb meat.
Discover how to cook shrimp in the oven, piece by piece, with this easy-to-follow directions. Yes, you can get incredibly delicious shrimp cooked in a container. You won’t believe how easy it can be. You have to hit the bull’s-eye the first time you do it, and definitely you are going to get it right if you follow my directions.
Nothing is more delicious than fully cooked shrimp. How many times have you been in the kitchen while roasting shrimp? In case you sound like me, cooking shrimp is not something you do from time to time. This article is to a lesser extent a formula, but generally a guide to methods. Cooking shrimp is so natural if you just know how to do it.
Most shrimp solidify shortly after being caught. The freshest tasting shrimp is therefore the best tasting shrimp you buy on the road, as opposed to thawed fish on the fish counter at the general store. This is because shrimp have an extremely short shelf life and you usually have no idea how long it has been thawed. Therefore, I NEVER, ever, ever buy shrimp that hasn’t been thawed.
In the unlikely event that you buy frozen shrimp, you can thaw them yourself, shortly before you need them. I never thaw them in the refridgerator at this time because they accumulate an excessive amount of histamine. Histamine is the substance that causes the eyes to get cold and watery, and can also cause serious stomach problems.
I usually take the shrimp out of the package, put them in a bowl or colander in the sink and let cold water run over them for 5 minutes. Turn the shrimp from time to time to make sure they are properly exposed to cold water. You will notice that the shrimp is thawed when they appear soft and slightly translucent. This will only take a few moments. Wipe the shrimp dry with a paper towel.
HERE IS A LITTLE COOKING LESSON ON HOW TO PREPARE SHRIMP PERFECTLY ON THE STOVETOP
First place the shrimp in a bowl and focus on seasoning the mixture. Mix well to make sure the shrimp are covered with sea salt, Italian seasoning, paprika and pieces of red flakes of pepper. Shrimps have a mild flavor, so they take on the taste of whatever flavor you want them to acquire. Delicious!
Then you will have to turn on the stove and heat the oil or butter over medium heat. I turn the pan upside down for the most part while the oil heats up to cover the bottom of the pan.
When the spread becomes soft or the oil actually moves around the pan, put the shrimp onto the hot pan. If they don’t sizzle now, heat your pan a little longer next time.
Cook the shrimp for 3 minutes on each side, turning them halfway through once. Depending on the size of the shrimp and the number of shrimp in the container, this usually takes 4 to 5 minutes.
Finally, transfer the shrimp to a serving dish. Serve the cooked shrimp immediately with noodles or rice or pasta.
HOW TO TELL IF THE SHRIMP IS COOKED
Please note that shrimp cooks very quickly, so watch them or they will cook too much. The overcooked shrimp looks like a wide, flexible “U”, while the overcooked shrimp forms an “O”. The perfectly cooked shrimps are pink with a bright red tail and look like a “C” and are ready to eat! One minute they look a little strange and unattractive, and the next minute it’s hard not to eat them directly from the pan. There is absolutely no guess.
HOW TO TURN SHRIMP INTO DINNER
I could probably settle for a bowl of shrimp and nothing else, but most of the time shrimp needs a side dish, usually carbohydrates, to make a complete meal. You can try the shrimp pesto pasta, an amazing mixture of pesto, white wine fettuccine and Italian seasoning. I also like to use red wine to cook the shrimp, as I do with this shrimp paste with garlic. Since shrimp is used in almost every kitchen in the world, you can add it to almost anything! Serve the shrimp in rice or orzo, eat them on a bed of vegetables or with baked vegetables on the side. What is your favorite way to eat shrimp for dinner?
How to cook raw shrimp on the stovetop
Step-by-step instructions:
Course: Main Course
Cuisine: American
Keyword: How to cook raw shrimp
Preparation time; 10 minutes
Cooking time: 10 minutes
Total duration: 20 minutes
Servings: 4
Calories: 147kcal
Wrapping up
Hope this post will answer your question—how to cook raw shrimp on the stovetop. Now it’s your turn to make your shrimp comfortably at home adding a a bit of a new twist to suit your palate. I am sure your family members or guests will lap it up.
So, you want to know how to cook chicken breast in a pan. Today, I am going to write a short post on this. Yes, this post is all about how to cook chicken breasts that invariably turn into mouth-watering dishes.
To begin with, boneless, skinless chicken breasts are a staple in the kitchen, which I offer four times a week for dinner anyway. They can be thrown on the grill for a simple dinner or thrown on the slow cooker on a hectic day. However, like cooking chicken, sautéing it in a pan has never been my forte. I usually end up with an intensely dry chicken breast that no amount of sauce or smooth and creamy side dishes can help.
To change my style and have a quick way to cook when it gets too hot to even think about turning on the grill, I went to the Taste of Home test kitchen for their infallible technique of cooking chicken on the stovetop. Let us see what they recommend.
Instructions for pan-frying chicken breasts
How to cook chicken breasts
INGREDIENTS
4 boneless, skinless chicken breast parts (about 6 ounces each)
salt and pepper to taste
2 tablespoons of olive oil
1 tablespoon of margarine
To prevent the light part of a chicken breast from drying out or the thick part from being half-cooked, you must ensure that the chicken breast has a uniform thickness. To do this, place your chicken on a cutting board between two pieces of cling film. Whisk the chicken to 1/2 inch thick with the flat surface of a meat hammer.
Tip for trial cooking: If you don’t have a meat hammer at your disposal, a solid frying pan or skillet will work after you’ve exhausted all other options. Be careful not to beat the chicken too thin.
Season the chicken breast on both sides with salt, pepper and other dry flavours you like. Looking for motivation? Here are our 13 most popular native flavour blends.
Learn to cook
How to cook chicken breast in a pan
At first, heat olive oil and margarine in a skillet large enough to hold the whole chicken uncovered over medium heat. After that, put the chicken breasts in the pan and cook them for 5-6 minutes. Any movement of the chicken can cause the breasts to stick to the pan and tear, so avoid touching the meat while cooking. Turn the chicken over and cook for an additional 5-6 minutes.
Test this cooking tip: although it can be tempting to turn up the heat, especially if you’re really impatient and famishing for food, leave the burner at medium heat and no higher. If you increase the heat, the outside of the chicken may brown excessively quickly or even burn it, while the inside remains half-cooked.
Measure the temperature
Your chicken breasts are-well prepared and are safe to eat when their internal temperature has reached 165ºF. To verify this, measure the temperature with an instant-read thermometer. Basically, you insert the thermometer into each chicken breast for most of the way until the temperature is displayed.
Test this cooking tip: If your chicken has reached a temperature of 165ºF, but is not brightly brown outside, you can turn up the heat for a few moments to add some browning.
How to cook chicken breast in a pan
Step 4: Allow the cooked chicken to rest
After boiling, remove the chicken breasts from the container and leave them on a plate for 5 minutes. This allows the juices in the chicken breasts to rearrange, making it easier to set the chicken breasts after cutting.
That’s it for now! Your fully cooked chicken breasts are ready to be eaten.
SOME POINTS TO REMEMBER ABOUT THE RECIPE FOR THE CHICKEN BREAST
In any case, chicken breasts should be no more than an inch thick. If your chicken breasts are thick, use a meat hammer or a rolling pin to give the chicken a more modest and even thickness before cooking.
Why would we say we use vegetable oil and not our favorite olive oil, you may ask? Since vegetable oils have higher smoke concentrations than olive oil. When you sing a fricassee or frying pan, you need some oil that can withstand the heat.
Cook the chicken breasts over medium heat.
Try not to stir or move the chicken breasts during cooking. Let them cook for 5 minutes or until you can turn them over without any doubt. If you encounter an obstacle when turning them, leave the chicken breasts for a while before trying again.
Chicken breasts are cooked through when the inside temperature reaches 165 F.
Step-by-step instructions for STORAGE of boiled chicken breasts
Keep chicken breasts fully refrigerated in a water and airtight compartment and store in the cooler for up to 4 days.
The most effective way to freeze cooked chicken breasts is to freeze them in the refrigerator.
Wrap the cooled chicken breasts in an aluminum foil for more protection.
You should now put the wrapped chicken breasts in a freezer bag; close the package and keep them in the freezer. It will remain good for up to 3 months.
Wrapping up
Hope this post will answer the question: how to cook chicken breast in a pan. If you follow the instructions carefully, you should have no problem in cooking a sumptuous dish with chicken breasts which your family members will love. Goo cooking!
I have seen a lot of folks asking this question about how to make oatmeal pancakes at home or what should be an ideal home-made pancakes recipe.
As for myself, I’m someone who likes the idea of having pancakes on Sunday mornings – and lots of pancakes, so to say. In fact, I’ve been gobbling up all these regular pancakes lazily relaxing on my bed with a few cups of tea or hot coffee around.
But the reality is that every time I allow myself this practice, it only takes me a few hours to run out of energy and get hungry again. So, I had to conjure up a solution to get rid of this food craving.
The solution that I discovered was in oats. I found out that oatmeal pancakes can help me to get rid of this problem. Just mix high-fiber and high-protein oats in your normal pancake batter and you will get amazingly healthier result, much more satisfactory than you could imagine. But don’t worry, they are no less fluffy or worthy of a strong maple syrup drizzle. And the result will be delicious.
Oatmeal solves pancake breakfast hunger
The problem with time-tested and traditional pancakes is that they are usually a combination of refined flour and sugar. This means that although they taste highly delicious, they are a mix of simple carbohydrate that increases blood sugar levels, giving you a quick boost of energy, but making you feel hungry soon after. Adding a whole grain helps counteract this problem. Oats are rich in fiber and are a great source of protein (half a cup, uncooked, contains 4 grams of fiber and 6 grams of protein), which provide long-lasting energy. It also provides some extra vitamins and minerals in each bite, which keeps you healthy.
The best texture is obtained by soaking
To ensure that the oats do not affect the light and fluffy texture of the pancakes, immersion is essential. Simply mix the oatmeal and milk in your bowl and let it rest for 10 minutes while you collect the other ingredients. The oats will soften and begin to disintegrate, so that your pancakes do not taste too strong and the oats are easier to digest and absorb.
How to make Oatmeal pancakes
PRODUCTION
For 4 people, makes 12 pancakes (3 inches)
PREPARATION TIME
15 minutes
COOKING TIME
20 to 24 minutes
INGREDIENTS
1 cup of old-fashioned rolled oats.
1 cup of milk, regular or non-dairy.
2 large eggs
1 tablespoon of butter, more for cooking
1 tablespoon of granulated sugar
2/3 cup flour for all purposes
2 teaspoons of baking powder
1/4 teaspoon of kosher salt
1/4 teaspoon ground cinnamon (optional)
INSTRUCTIONS
First, whisk a cup of rolled oats and a cup of milk in a large bowl. Leave to stand for 10 minutes to soften the oats. Meanwhile, melt a tablespoon of unsalted butter and let it cool for some time.
Now it is time to add the butter, 2 eggs and 1 tablespoon of granulated sugar to the oatmeal and mix everything. Add 2/3 cup of flour for all purposes, 2 teaspoons baking powder, 1/4 teaspoon kosher salt, and 1/4 teaspoon ground cinnamon, if desired, and stir until well mixed. However, do not stir too much and over-mix. Let it stand for another 5 minutes. In the mean time, heat a large cast iron pan or a non-stick skillet over medium-high heat.
Add one teaspoon of butter to the pan and stir properly. Pour the batter into the pan in 2 tablespoons and cook all the three at a time. Cook for about 3 minutes until bubbles appear on the surface, the ends appear dry and the bottom is golden brown. Turn the pancakes and cook until the other side looks golden brown, for about 2-3 minutes more.
Place the pancakes in a hot oven or a dish. Repeat cooking the remaining batter with a teaspoon of butter for each batch.
Point to remember
Storage: Pancakes can be kept in an airtight container for a maximum of 5 days or frozen for a maximum of 2 months.
Wrapping up
I am sure those of you are looking for an oatmeal pancake recipe or want to know how to make oatmeal pancakes, would be happy to go through this post, for I am sure they will have no problem to experiment with their own brand of oatmeal pancakes, healthful and delicious!
What temp to cook chicken? This is one question which draws out different answers from different people. This is why I am going to write a detailed article post about it so that you can differentiate between fact and fiction about chicken cooking.
To begin with, knowing the correct doneness temperature when cooking chicken guarantees juicy results, but what if the meat or juice is pink and there seems to be blood in it? If you’re like many others, the sight of anything other than completely opaque meat with clear juices can make you shiver when chicken is provided on the dinner table in that manner.
Read on to find out what causes chicken to be pink and how you can make sure that the chicken your family members is eating is safe and not going to harm anyone.
FOOD SAFETY DEPENDS ON THE TEMPERATURE, NOT COLOR
Chicken has a creamy white color, unlike the stronger colors of beef, pork or lamb. This white color contrasts much more with the occasional pink tones that can be found naturally in any chicken meat.
Calculating chicken temp
When it comes to cooking chicken, there are many temperatures to consider. There is the temperature at which the oven is set and there is the actual temperature of the chicken itself (the so-called internal temperature), which can be measured with an instant-read thermometer. And then there’s also the minimum safe internal temperature in terms of food safety. In other words, the temperature your chicken must reach to make sure that any harmful bacteria it may harbor, such as salmonella or E. coli, get killed, is more important than anything else.
Lastly, you will have to keep in mind the temperature of the chicken for quality reasons – so that the breast meat remains firm and white, but not dry, and the dark meat remains smooth and soft as gum.
Doneness of white meat
For quality reasons, a chicken breast is cooked correctly at 145 to 150 F. At this temperature any pinkness will disappear, but the meat will remain firm but still tender. However, according to the USDA, the chicken and poultry should be cooked to an internal temperature of at least 165 F for at least 30 seconds. The problem, however, is that when chicken breast meat is heated to 165 F, it becomes dry and tough and has a chalk like texture.
Fortunately, the USDA recommendation has two dimensions: temperature (165 F) and time (30 seconds). By expanding the time dimension, the target temperature can be reduced.
Doneness of dark meat
Chicken thighs and all brown chicken meat should be cooked at a higher temperature – 175 to 180 F – because of their greater proportion of connective tissue. Cooking thigh meat at 165° F produces a gummy, soft meat, but at 175 to 180° F it is tender and juicy, while the collagen melts and turns into jelly.
CHICKEN IS MADE WHEN THE JUICE RUNS OUT
A common but erroneous method of checking the condition of chicken is to cut the meat and make sure that all the juices are clear. When we examine the chicken on the grill or in the oven, we often look for some pink patch in the meat. For one thing, we think that it is a clear indication that the meat is not yet properly cooked. The fact is that no matter wherever you test the chicken, the color of the meat or juices will never be free of pink, red or even purple hues.
So why does the chicken meat so often does not seem to be properly cooked?
WHY COOKED CHICKEN CAN STILL LOOK PINK
REASON No: 1: YOUNG CHICKENS ARE USED
The chicks available in the grocery stores that we buy are generally between 6 and 8 weeks old. These young chickens are not yet fully mature and their bones are more porous than being completely calcified. The bone marrow inside the chicken bones appears purple and can often penetrate through the soft, porous bones of the chicken.
The liquid in a chicken mass expands during freezing, as does the bone marrow. The black marrow can penetrate the bone surface as it expands. The bones and adjacent meat become blotchy and retain a deep red/purple color irrespective of the final internal temperature of the cooked chicken.
REASON 2: MYOGLOBIN
Myoglobin is another cause of the violet and red color of poultry. It is an abundantly pigmented protein that transports oxygen from the cells to the muscle fibers. The more active an animal is, the more oxygen it contains in its muscles, which gives its darkish color.
Chickens are birds that cannot fly, so breast meat is never highly oxygenated. Low myoglobin levels are the reason why chicken breasts have such tender white meat. Heavily stressed legs have darker meat due to high myoglobin levels.
Since chicken is packaged and prepared for purchase in a grocery store, myoglobin can accumulate in the fibers of the meat.
REASON 3: HIGH PH VALUES
The acidity of the meat can also influence its color. The higher the pH value, the pinker the meat is. Therefore some cooks use an acidic marinade with citrus fruits or vinegar to reduce the pink color of chicken meat. But marinades do not offer much protection against the pink tones of marrow and myoglobin.
EAT PINK CHICKEN WITH CONFIDENCE
Now that you know why your chicken can sometimes acquire a pinkish hue, it is time to eat chicken with more confidence. And most importantly, you should stop cooking the chicken too much!
With an accurate thermometer like the Thermapen, you can check the safety and quality of your chicken irrespective of its color. A probe inserted into the thermal center of a chicken breast or thigh, should read 165 degree Fahrenheit during the meal.
So, if you are still not sure at what temperature your chicken should be kept so that it can be eaten without making it dry and overcooked, you should pay heed to this. The short answer is that for a juicy and well cooked chicken should be kept at 150 F for at least 3 minutes for white meat and 175 F for dark meat.
Roasting a perfect chicken
The following steps in roasting a whole chicken produce a dark and white meat, tender, juicy and well cooked.
Preheat the oven to 500 F.
Place the chicken in a pan with a grill. Season with kosher salt.
Insert a digital probe thermometer into the deepest part of the breast and adjust it to alert you when the temperature reaches 145 F.
Place chicken in oven and immediately lower temperature to 350 F.
Wait about 90 minutes for the thermometer alarm to sound.
Remove the chicken from the oven and let it rest for 30 minutes, leaving the probe on the breast.
After 30 minutes, cut and serve.
Allowing the cooked chicken to rest
During the rest period, you can see how the temperature on the digital sensor display continues to rise and then falls again. When the temperature rise finally stops and it drops to 120 F, you are ready to carve.
Because the temperature of a roast chicken continues to rise for several minutes after it is removed from the oven, if you remove it to 145 F and let it sit for 30 minutes, the meat on the breast will stay above 145 F for longer than the required 8.5 minutes, making it tender, juicy and completely safe. The same goes for the dark meat, which eventually reaches a maximum of about 200 F. This is more than enough to break down the collagen in the meat, resulting in a dark meat that is tender, juicy and tasty.
Remember that the above times and temperatures only apply to the cooking of a whole chicken. It is the total mass of the whole chicken that allows it to maintain these temperatures during the resting period. If you tried to fry a single chicken breast, it would not work the same way.
Sous Vide Chicken Breast
There is a technique that is very suitable for cooking individual pieces of chicken at a certain temperature and keeping them at that temperature. This is called sous vide cooking.
With this cooking method, it is very easy to heat the chicken breast to 145 F for as long as you intend to. The added advantage of this kind of cooking is that no matter how long you leave your chicken breast in a water bath, it will never be more than 145 F (or whatever temperature you set according to your needs). This allows you to obtain a juicy and tender breast meat with a minimum effort.
Wrapping up
What temp to cook chicken
Hopefully, you would now have enough knowledge about what temp to cook chicken so that next time anyone asks you about this, you will be able to answer with more confidence like a culinary expert. Choose the correct temp for cooking chicken and embark on a cooking journey with chicken.