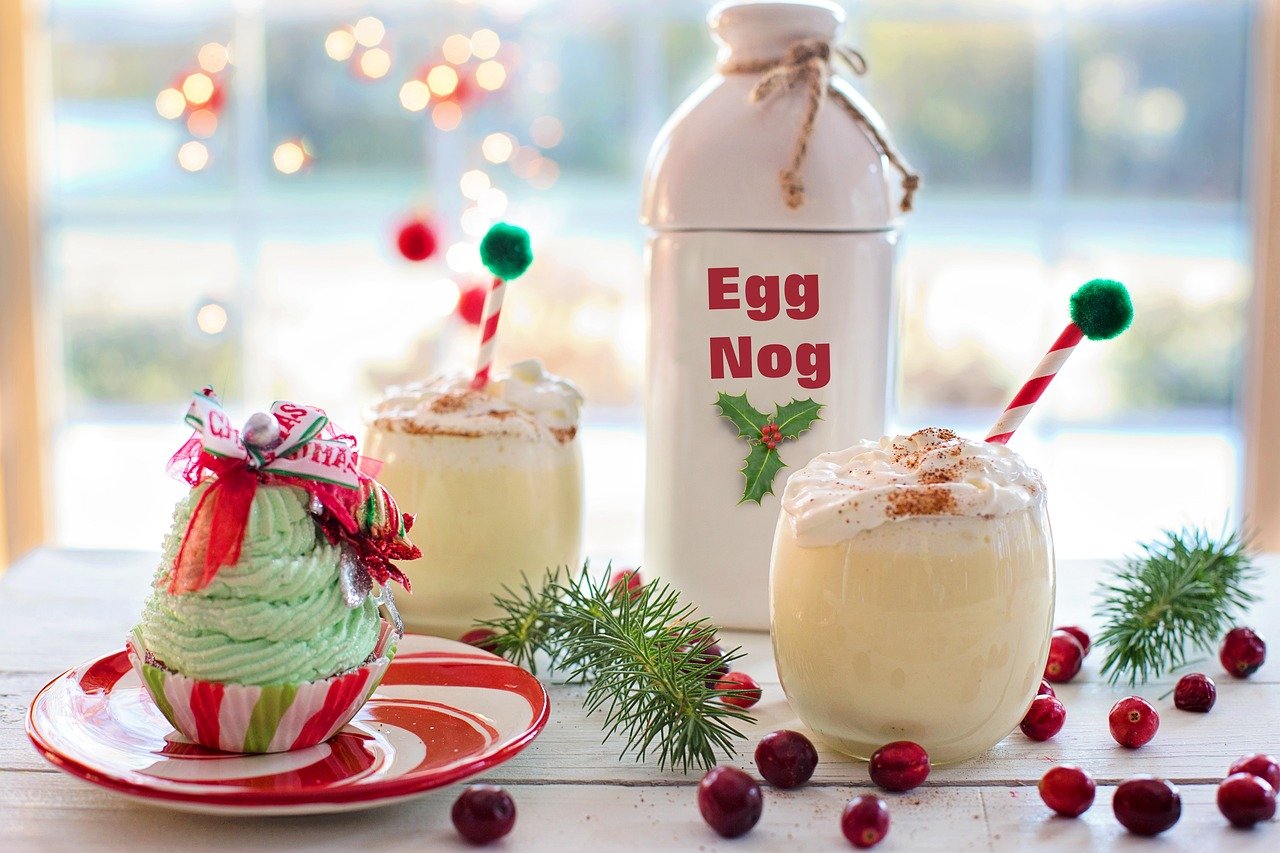
What Do Figs Taste Like?

What Do Figs Ta ste Like?

What Do Figs Taste Like?

What do figs taste like? If this is what you want to know and have been searching the internet for an authentic answer, you should go through this post right now as it has all the details about it. Read on if you are interested.

To begin with, figs were cultivated from the beginning of time in warmer climates.

Sometimes referred to as the ‘poor man’s food In Mediterranean regions, these fruits are increasingly sought-after across the globe.

This article will explain the flavor of figs as well as the most frequently asked questions about the taste.

What Do Figs Taste Like?

Like most foods, the most effective way to comprehend the taste of figs is to try one.

They have a fantastic texture and shape similar to apples with a good amount of seeds. The flesh is typically dark or purplish. Their skin is soft and easy to chew into.

The flavor of this unique fruit is dependent upon the variety you’re eating. In addition, it is dependent on what you’re serving it with.

This is because figs can be added to any variety of dishes by chefs to serve different purposes particularly desserts. Naturally, not everyone will enjoy figs due to personal preferences that are often at play.

However, those who enjoy it have said it has an underlying sweetness that is as honey. Additionally, figs possess a slight hint of the taste of berries.

As per all evidence that figs are an amazing fruit. In fact, some prefer eating it on its own rather than incorporate it in any dish.

Dried vs Fresh Figs Taste

It is commonplace to compare dried figs with fresh ones to see if there are different reasons. However, the two types of figs are quite different.

But the variations between them aren’t as obvious as you believe.

The first, and the most evident is in their texture. Fresh figs are juicy and soft flesh that gives sweetness and honey-like syrup of a kind.

Dry figs however aren’t as lavish with their liquids or as soft. The honey-like syrup was fully absorbed by the flesh of the fig.

The dried figs taste similar to their fresh counterpart. However, they don’t provide the same sweet sweetness as fresh figs.

For those who are attracted by juicy fruits, it could be a huge turn-off. Many have described dried figs as sour and sweet.

However, regardless of the opinions of other people, dried figs, just like fresh ones offer numerous health advantages. They’re excellent sources of soluble fibers as well as natural sugar.

How to Store Fresh Figs

Fresh figs can be quite delicate and can spoil quickly.

If you want to preserve the items for a longer period, they are stored in a variety of ways. A commonly used way is freezing.

You can freeze figs in the same way as you freeze other food items. Simply put the figs into the refrigerator. This extends the life for the fruit for a few weeks.

If refrigeration isn’t an option there are other options. One of them is drying.

A majority of people purchase dried figs rather than drying them on their own. With a relatively low cost, the figs last for a longer time.

Another storage option is to can. It’s not typical for people to make this by themselves.

Therefore, we’ll suggest you also purchase this at any local supermarket near you. The process of canning can increase the fig’s shelf life by about 10 months.

Although these storage options are useful, it’s an excellent option to think of another route.

It is easy to buy fruit when you are ready to cook or eat them and then make use of it within the same day. The best fruits are fresh.

How to Tell When Figs Are Ripe

Finding out if the fruit is ready to eat is easy and can be accomplished by three methods.

The first one is in appearance. There are a variety of figs, and in most cases the unripe ones, are green.

When the fruit is ripe The hue of the fig becomes darker to a dark brown/purplish shade.

But, don’t limit your color choices to just one. It is because some varieties of figs like Kadota are green even when they are ripe.

Therefore, instead of taking a look at the color, examine how the fruit hangs on the tree. Ripe fruits can be quite large.

As a result of that, they hang low from the tree. So much so that they appear to be drooping.

You can also tell if a fruit is ripe by touching it. The mature and ripe figs tend to be softer to the touching. Unripe ones are more difficult to hold because the juices aren’t yet present.

The third way to judge the ripeness is to taste it. It is not recommended to consume figs that aren’t ripe.

But, you must be aware that ripe figs are known to have a smooth and sweet taste as we have mentioned previously.

How to Freeze Figs

In just a couple of steps, you’ll be able to make your figs freeze-ready for storage for longer periods.

Clean all the figs you own with running water. This removes dust and other dirt.

After washing your figs, it’s time to cut them in half. Take out those that are too soft or are just too ripe. If you don’t cut them, you may face issues later, as they’re not very freeze-able.

After separation, wipe clean your wash the figs clean with a dry cloth. Be sure to take care to do this with a gentle touch so you don’t break their delicate skin.

Place the figs in a row on a tray, a millimeter or two from one another. This arrangement, naturally will not include the ripe and tender figs.

In order to freeze the figs, put your tray filled with figs into your freezer for approximately four hours. After the figs have been frozen you can place them into plastic baggies to keep them in the refrigerator. They should last three months in the refrigerator.

How to Dry Figs

There are two primary techniques you can employ when drying your fruit. The first uses sunlight from the sun while the other is made possible by technology, namely a dehydrator.

To dry your figs using sunlight, it is necessary to begin by washing and drying your figs first. This is due to the same reason as we mentioned earlier: to eliminate the impurities.

After washing the figs clean, cut the figs in two and put them on an edging. The rack could be made of wood or comprised out of wires.

Whatever their material regardless of their material, they’re still superior to solid trays which do not allow airflow.

When the fruits are placed set on a rack, you need to transfer them from one side to the next. This will ensure that every side is dried equally.

Be sure to not place your figs in the shade as this could cause them to spoil.

If you get enough sunlight and plenty of movement, you can expect fully dried figs in just 24 hours.

The alternative to natural sunlight is using technology. This technique is better and more efficient.

All you need to do is switch on the dehydrator for 8-24 hours and then turn the figs in the manner you want. After that, you’ll have fantastically dried figs that can remain for months.

How to Eat Dry Figs

There is no set rule regarding eating dried figs. They’re delicious by nature and your choice of how much you consume is entirely yours.

There is a way to enjoy dried figs in their natural state. Just pop one into your mouth and enjoy a delicious sweet and delicious snack.

To the contrary, you can soak dried figs in water. This makes them plumpier, and they will look like the ones that are fresh. But, they aren’t as fresh and juicy.

So long as you don’t soak it too long, you’ll still enjoy the great flavor.

Another method of eating dried figs is to include them in a meal or as in a snack. You can, for instance, make toppings for your Ice cream.

How to Tell When Figs are Bad

The most effective way to determine whether a fig is rotten is to smell it. Place it in front of your nose, and then sniff it for odd scents.

If the fig releases an unpleasant smell If it smells bad, it’s in bad shape.

Also, you can look at its appearance and texture. If it’s extremely soft, it’s going to be deteriorating rapidly and will soon be totally negative.

If you notice mold growing on the surface It’s probably a sign of a problem.

Wrapping up

What Do Figs Taste Like?

You should now know the answer to what you wanted to ask– “what do figs taste like?”. They’re sweet and make an excellent snack, even if eaten on their own. Just make sure that they don’t become rotten, as they’re extremely delicate. You should use figs for pies and desserts to try different flavors. And I am sure you would be able to come up with your favorite dish which every one of your family will enjoy!

How To Cut Onions For Fajitas

How To Cut Onions for Fajitas

How To Cut Onions for Fajitas

How To Cut Onions for Fajitas

How to cut onions for fajitas? Well, if this is what you are looking for, you should take a close look at this post which has all the details about it.

To begin with, it’s easy to cut an onion into thin slices for delicious fajitas. But it is important to do so in a consistent manner. It is simple to cut an onion in half and then make horizontal slices.

However, this can result in very different sizes. To prevent slices from burning faster when you cook onion slices like fajitas or other dishes, you need them to be the same size. Radial cuts require a little more skill, but you will get slices that are nearly perfectly uniform.

Step 1

Peel the onion, and then cut it in half from the stem to root on a cutting board.

Step 2

Place one-half of the onion flat on the cutting board. The stem and root ends of the onion should be cut. The onion should be turned so that one side faces you. This position will allow you to make radial cuts from the root to stem end.

Step 3

Place the knife on the one side of the onion closest to the cutting board. At an angle, make sure you follow the lines on the onion. The first radial cut should be made into the onion. This will release slices with equal length. Place the knife again on an onion line. You should space your slices so that the cut width is equal.

Step 4

Continue to make radial cuts in the onion until you reach its center. At this point, the remaining onion will start to wobble. You can keep the remaining onion sturdy by placing it on its side. Then, make the same radial cuts in the onion until you have it completely sliced.

Things you’ll need

  1. Cutting board
  2. Sharp chef’s knife

Tip

Basic chicken fajitas can be made by cooking sliced chicken breasts in an oiled skillet. Meanwhile, sauté bell peppers and onions in another oil skillet. Layer the chicken and vegetables in a flour tortilla. Top it with shredded cheese and guacamole, pico de gallo, sour cream, and lettuce.

3 ways to cut an onion

Although onions add great flavor to many dishes and textures, they can be difficult to cut if the right technique is not used. We’re going to show 3 ways to slice an onion in three different ways so you don’t have to be mad at chopped onions.

STYLE 1 – SLICES/RINGS

Slices of onion are great on burgers, sandwiches, and tossed on the grill. You can also make your onion rings.

Use a chef’s or kitchen knife to cut off the top of the onion. Leave the root end.

Take off the onion skin’s papery layers and throw them away.

Cut a small piece of one side of an onion. Place the onion on its cut side. This will give the onion a place to rest on and prevent it from rolling around as you cut.

Start at the root end and slice the onion evenly. Then, work your way back to the root. For onion rings, cut thicker slices and burgers thinner slices.

STYLE 2 – STRIPS

You can use onion strips in kabobs and fajitas as well as crockpot recipes and stir-fries.

Use a chef’s or kitchen knife to cut off the top of the onion. Leave the root end.

Take off the onion skin’s papery layers and throw them away.

Cut the onion in half along its length. Place one-half of the onion flat side down.  Place one-half of the onion flat side down. Depending on the purpose of the strips, you can choose how wide you want to cut them. For thin strips, such as fajitas or kebabs, you can make several cuts. However, for thicker pieces like kebabs, there are only two to three cuts.

Take off the root end and discard it. Now you have your pile of onion strips. If desired, repeat the process with the other half.

STYLE 3 – CHOPPED/DICED

You can use chopped onions in many recipes, including casseroles, sauces and salads. Or, you can mix them in with ground beef to make tacos. Taco Tuesday is my favorite!

Use a chef’s or kitchen knife to cut off the top of the onion. Leave the root end.

Take off the onion skin’s papery layers and throw them away.

Cut the onion in half along its length. Place one-half of the onion flat side down. Place one-half of the onion flat side down. For larger chunks, space your cuts approximately 1/2 inch apart.

To cut small pieces of your onion into smaller pieces, hold the root end of the onions. The root end should be thrown out.

The onion can be placed flat or upside down. Remember, safety is the first priority!

That’s the way to go!

Wrapping up

How To Cut Onions for Fajitas

I am sure now you will have a better understanding of how to go about slicing onions for fajitas and you should be able to tackle any problem that comes your way while you get down to cooking. Now do it like a professional chef!

Substitute For Capers – Top 10 Alternatives!

Substitute For Capers

Substitute For Capers 

Substitute For Capers

You’re making a dish that calls for capers, all the guests you have invited are waiting, but you don’t have capers at home! Do you have to rush out of home to get into the closest grocery stores for capers, which you need for your favorite dish? Well, no, not at all. For, there are a lot of alternatives or substitutes for capers which can replace them. Read on if you are interested.

So, what are capers anyway?

Capers are fruits of the caper plants that are found in the Mediterranean. They are often used in Mediterranean-style recipes, and most famously in the chicken piccata. Served in pickles, you can find them in jars close to olives. They’re round, dark green-gray, roughly the size of the peppercorn.

More details about capers

What is the flavor of capers? They’re lemony and briny and they add a tart flavor to dishes. They’re essential in Pasta Puttanesca. Since the taste of capers is unique we suggest you visit the grocery store and purchase some as soon as you can!

What are berries of capers vs. non-pareil capers? “Non-pareil” refers to the smaller dimensions of capers. Translated from French”non-pareil”, it means “has no equal” So, they are of the finest quality and size when picked for recipes.

Caper berries are around the size of olives and are accompanied by the stem that is attached. They are the ripened fruits that come from caper plants unlike non-pareil capers, which comprise buds. Caper berries tend to be tougher and starchier, and do not offer the same flavor as non-pareil capers. Therefore, they’re generally not recommended for use as a replacement for capers in cooking.

Substitute for capers

Capers add a splash of salty, tangy taste to food items. Pasta puttanesca, sauces chicken piccata, salmon and bagels can all be paired with capers. There are two reasons why you might be looking to substitute capers for your next meal:

  • The flavor doesn’t grab your attention.
  • There are no capers available.

We’ll offer options for capers that will help you finish the recipe. You’ll have to be open when considering these alternatives as they’re a distinctive taste and flavoring ingredient that you can never substitute for 100%.

Find an alternative solution.

10 substitutes for capers

It is a great choice if you like capers, but don’t have

  1. Green olives

them in the kitchen.

Green olives are a great alternative to capers since they have similar salty and bitter flavors. They can be used for chicken piccata, stews salads, sauces, and other dishes.

They also have a similar color. Cut the olives into smaller pieces. They could be used in place of capers for garnishing salmon or as a component in tartare made of beef.

  1. Black Olives

It is a good choice if you love capers but don’t have green capers.

The black olives are hung in the tree prior to being picked, which results in a softer, less strong tasteful fruit. They can provide your meal with a lesser taste. They are salty and bitter. flavor. For the most delicious taste, purchase olives from a local delicatessen to ensure a high-quality product.

  1. Nasturtium Buds

This is an ideal choice for the creative home cook.

The nasturtium is an edible flower that is a good choice to provide a backup plan if capers aren’t your style. Instead of opting for a bitter flavor opt for nasturtium because of its strong peppery taste.

It is available at gardening stores and some specialty food stores also carry it. An alternative is to plant nasturtium seeds in your home. You’ll be able to access buds at any time they’re in bloom.

The trick to making use of nasturtium is picking the buds when they’re fresh and green. Put them in the container of vinegar and onions, as well as dill and garlic until you are ready to make use of the flowers. When it’s time to cook, keep in mind that the nasturtium flower is an attractive garnish.

If you’re looking for lots of ways to make edible flower arrangements, make sure to read this guide to the top edible flowers.

  1. Fresh Thyme

It is an excellent choice for those who love herbs.

Fresh thyme is an astringent herb with a distinct bitter and lemony taste like capers. If cooked slowly in a sauce or casserole it will give the same taste. Fresh thyme isn’t suitable for recipes in which capers play an integral part in the recipe. Beef tartare is an illustration.

  1. Green peppercorns

The best option is to reduce visual impact.

The green peppercorns can be described as the unripe form of the black peppercorn. Since they’ve been picked earlier and aren’t ripe, you’ll be able to avoid the extreme spice that black peppercorns have.

Caper alternatives to salmon

Green olives cut into pieces are great as a garnish with salmon.

Green peppercorns, as a substitute for capers, is an excellent option for those trying to recreate the look of capers. They’re both similar in appearance and taste similar. And the mild peppercorns won’t cause your food out of equilibrium.

  1. Pickles with dill

The best option is to use tartar sauce for salads and other antipasto platters.

Dill pickles, also called cornichons, provide a mix of sweet and tart flavors in one bite of crunch. They’re a delicious addition when cut into pieces and included in pasta salads, tartar sauce, and an antipasto platter. Dill pickles have a distinct flavor and they are different from capers because their texture is crisper, and they don’t have the strong bitter taste of capers.

  1. Anchovies

It is the best option for adding salty flavor to slow-cooked meals.

The flavor of the caper and anchovy is distinct. But that doesn’t mean that you should not use anchovies to give an extra boost of saltiness and umami in your next meal. If you don’t like an edgy taste be careful not to add more than one. You can experiment with the ratios, but generally, one anchovy is sufficient. They also make a great supplement to Italian spaghetti sauces.

  1. Caperberries

It is a good option for those who prefer a less sour flavor.

The berries of pickled caper berries are larger than capers and have seeds. They offer a more subtle flavor that is why they are a good alternative for those who don’t want strong ingredients.

  1. Artichoke hearts

You can make use of marinated or pickled artichoke hearts. They’re ideal for dishes that are based on chicken or fish as well as pasta dishes. You can begin by using half the amount of capers that you’re looking in your recipe. You can include more to alter the flavor.

  1. Mustard Greens

Even if pickled food isn’t your style, you’re still able to relish classic dishes with an added twist. If cooked mustard greens are introduced, they can impart the flavor of spicy pepper.

Saute mustard greens for an accompaniment or cut them into salads with an extra pinch of salt to substitute capers used in this recipe.

Recipes that are popular using capers and their alternative

Salmon garnish: chopped olives or green peppercorns

Piccata Fresh Thyme, or olives with green sides

Tartar sauce Dill pickle

Beef tartare: chopped olives or Dill pickle

Wrapping up

Substitute For Capers

Hope these substitutes for capers will serve your purpose. It’s indeed quite a challenge to make an ingredient replicate the taste of another. This is a most significant risk you can take, particularly with regard to capers. Sometimes, it’s completely unavoidable. When you’re cooking some delicious food for your family members, try using any of these items instead of capers. It’s possible that you won’t be having the same taste as capers. However, you’ll get pretty close to that and that should bring a smile in your face!


How To Peel Tomatoes In The Microwave?

How To Peel Tomatoes In The Microwave?

How To Peel Tomatoes In The Microwave?

How To Peel Tomatoes In The Microwave?

How to peel tomatoes in the microwave? If this is the question hovering in your mind right now, you should go through this short post which will give you all the information about doing it the right way.

Truly, off all the tasks a microwave is capable of doing, the peeling of tomatoes quickly stands out as you don’t have to leave with burnt fingers. Yes, who would like to get involved in tedious kitchen chores? Truly, everyone would like to peel the tomatoes in a short period of time in case you need to instead of burning it crisp and then heating it up more than what you planned. Nobody wants a mess, isn’t it?

Step 1: Clean the Tomato

Wash the tomato in cold water, and then wash away dust particles, along with the stem.

Step 2: Make an Incision

Prick at the base of the tomatoes by making an X on the bottom using the edge of a paring knife that is sharp and then make a few tiny cut-outs in the stalk as well. Because microwaving the tomato quickly increases the pressure inside as the water changes to steam, it’s important to create a channel for the steam to be able to escape.

Step 3: Zap Quickly

Place the tomato in the microwave-able dish. Cook it at full power for about 30 seconds, and then let it cool before touching the skin which will be very hot.

Based upon the dimensions of your tomato as well as the power of your appliance, you might be required to repeat the process for another 30 seconds.

Red tomatoes that are ripe are more likely to split as compared to green tomatoes for instance. Be aware, however, when you cook the tomatoes for too long, you could end in cooking the tomato, instead of just loosening the skin.

Step 4: Allow It to Rest

Take the tomatoes out of the microwave, and carefully remove the skin that should appear stretched and split, using the help of a fork. Keep your mind that tomato’s flesh will be hot to contact.

Tips to remember

Place the hot tomato in the bowl of cold water first, to help disperse its heat, and that would make  the tomato easier to work with.

Step 5: Peeling a Batch

For tomatoes that are larger, or if you’re making a large batch, cut the tomatoes into half, then place them in a microwave-safe heatproof dish and then microwave them for one moment or two until the skin has wrinkled. It is possible to move the tomatoes during each session so that each enjoys an extended time both at the edges and towards the middle.

In addition to peeling off the exterior, microwaves do not let the best out of tomatoes. For instance, tomato sauce will likely explode when you microwave it, splashing the walls with scorching chunks.

However, blanching tomatoes in boiling water in order to make sauces can be a lengthy process and typically result in scalding fingers. Cutting up tomatoes without skins to create the sauce is not recommended since the indigestible skin affects its smoothness.

Then, you can zap the tomatoes to remove the skin, leave any cooking to be done on the stovetop and a low, slow simmer will release the sweetness of the tomatoes and create the silky texture.

You should always store uncooked, unpeeled tomatoes inside the fridge in order to extend their shelf-life. Although tomatoes, considered a fruit, are fragile, they will remain fresh for 2 weeks when stored in the fridge. But once the skin that protects them is removed, the storage time is reduced significantly.

Wrapping up

How To Peel Tomatoes In The Microwave?

Peeling tomatoes takes a bit of effort, but once you get a  taste of the fruit in tomato soups and sauces, you’ll see that the benefits are worth it. The peeling process will give sauces a sweeter and smother taste. I am sure after going through this post, you have understood how simple it is to peel the tomatoes with the help of the microwave.


How Many ML In a Shot Glass? Know Your Facts!

How Many ML In a Shot Glass?

How Many ML In a Shot Glass?

How Many ML In a Shot Glass?

How many ml in a shot glass? If you are confronted with this question in a booze party, and you don’t know the actual answer, it may be a source of embarrassment for you. So, get your facts right!

So, do you plan to have an occasional drink? How about organizing a cocktail connoisseur? In that case, you must use shot glasses. In the kitchen, shot glasses might be considered if you are required to make sure you have a specific amount of liquid. Sometimes, it can be difficult to determine which one is most suitable and what many milliliters of liquid in the shot.

It is recommended to utilize both fluid ml as well as ounces. It is also crucial that you know the proper use of a shot glass when cooking. Read on to find out more.

What Is A Shot Glass?

A shot glass can be described as a glass that is intended for measuring or holding alcohol and other liquids. Shot glasses may be decorated with toasts of different types humorous images, advertisements. They are excellent as souvenirs and collectibles. A typical shot glass is constructed of the finest glass that allows it to not break once one hits the glass.

Small shot glasses are made for use in kitchens. It can be divided into units like half-teaspoon, an ounce or tablespoons and milliliters. They can be useful for recipes that require a number of pieces of the same amount which allows you to make use of all of the ingredients in one measurement.

So How Many ml in a Shot?

It is important to know that the typical shot glass will differ based on the country, and in the US the sizes are as follows:

Larger Shot is 89ml or 3 pounds

Medium Shot is 44 milliliters or 1.5 1 ounces

Small Shot is 30ml or 1 Ounce

However, there is an important need to be aware that there is an actual standard size for when it comes to shot glasses. The typical size is thought to be anywhere between 1.25 an ounce and 1.5 ounces.

Other examples of shot glasses include the following:

In Canada a pony shot in Canada is 28.41 milliliters, or 1 inch, a shot is 1.5 pounds (or 42.61ml) and a larger shot is 71ml or 2.5 ounces

In Australia Shot glasses are 30 milliliters or 60 milliliters.

In the UK there is a single shots of 25 or 30 milliliters and double shots for 50 or 70 ml shot glasses.

Becoming familiar with shot glasses will aid you greatly in terms of how to use these glasses. How many milliliters in the shot? In reality, the average shot glass contains 44 milliliters or 1.5 ounces, while the pony shot is just 30 ml , or one in ounce.

Why Use A Shot Glass?

Additionally, there are several reasons why it is necessary for you to utilize shot glasses. For novices shot glasses are considered to be essential if you’re looking to make cocktails that are delicious. Shot glasses can be utilized for a variety of things when cooking and making drinks. They’re certainly useful when making an effort to amaze your visitors with your culinary abilities or when you want to throw a celebration.

Shot glasses are now used for various functions. There are a few people who might use a shot glass for wedding favors as well as barware at events, as a gift or an element of a board game.

If you own a few shot glasses in your home that you own, they’ll never left unattended since there are plenty of different things you can utilize these glasses. You could try glasses to measure items such as vinegar, water or oil. You could also use them to measure wine when you cook.

Uses Of Shot Glasses

There are a variety of options to use shot glasses. One of them is the following:

  1. You could make use of shot glasses to keep cool desserts in and chilled soups.

2 .Dips made from homemade can be placed into a shot glasses to allow you to eat your food.

  1. Shot glasses are also an ideal option as a condiment bottle for your own.

4. Shot glasses are excellent options for your salt shakers and pepper shakers.

5 . You may be tempted to drink your coffee in shot glasses. Enjoy your coffee with twist.

6.  For tea drinkers, why don’t you think about enjoying tea in small portions to make it a relaxing way to end an evening dinner.

There are other methods of using shot glasses depending on your preferences or choices.

Make The Best Use Of Shot Glasses

The first thing to occur to us when we imagine shot glasses is that they will be a grotesque and raucous gathering. However, there may be specific ways to make shot glasses more attractive and classy.

In certain situations shots are often employed when drinking whiskey or vodka that has been aged. It is also possible to utilize shot glasses when making drinks like Gin and tonic or an Moscow Mule. An alcoholic drink during the Christmas season could also be served as shot glasses. In fact, shot glasses can be used to their maximum according to the method you plan to use them.

Cooking Using Shot Glasses

As we mentioned previously Shot glasses can be as useful in the kitchen, particularly when you’re cooking. So, why not utilize them to make the next meal? You’ll surely appreciate the new twist they will bring to your desserts. Shot glasses are sure to provide the an adequate amount and let you serve your food with a variety of different ways.

In addition, the recipes that shot glasses are used include:

Brownie Sundaes

Who wouldn’t like sundaes would you? So next time you’ll serve this type of dessert, make sure you have shot glasses as well.

Who wouldn’t like a sundae, isn’t it? So next time you serve this type of dessert, make sure you have shot glasses, too.

The ingredients for a shot glass include:

  • Coconut flakes for garnish
  • One brownie
  • Handful cherries
  • A teaspoon of whip cream

Now you will have to follow these steps:

Place half of the brownie in the bottom of the big shot glass. Add the whip cream to the plastic bag, then cut off a little bit on the corner, and then squeeze it onto your shot glass.

Include the cherry. You can chop them up in case they’re too large or you could mix them to create a compote-like mixture.

Place the second half of the brownie on top and garnish it with the whip cream. Garnish with the coconut flake.

This is an excellent dessert to enjoy during the holidays!

Mini-Strawberry Shortcake Shots

This is indeed a great dessert that everybody will be able to enjoy at home. Make sure to make the following ingredients:

  • The strawberry cup
  • Half cup of vanilla frozen
  • 1/2 cup of cake from a pound in pieces
  • 2 teaspoons of the agave syrup, or honey
  • 1/4 cup of crushed Graham crackers
  • Whip cream until it is topped off.

The procedure to make this delicious pudding in the shot glass goes as follows:

Place the agave syrup or honey on the plate , and then cover your shot glass with the syrup. After that, you add the crushed Graham crackers on the rim.

Then, combine the cake with the strawberries and ice cream and blend them until they are smooth.

Last but not least, fill your glasses up with mix, and place the whip cream to top it off.

It’s really simple, isn’t it?  Now you can enjoy your delicious dessert in a shot glass!

White Chocolate Peppermint Mousse

This is another choice when you’re craving an excellent dessert, and the usage of shot glasses. The ingredients you need are:

  • A teaspoon of peppermint candy that has been crushed
  • The whip cream in a cup
  • 1/4 peppermint extract
  • 3/4 cup white chocolate

Follow these steps:

On a medium-low heat in an oven, cook half a cup of whip cream until it is hot, then mix in the chopped white chocolate and add the peppermint extract.

Cool it down by and then place it inside the fridge for approximately 10 minutes. Then whisk it every now and then, allowing it become much thicker.

Beat the other half cup of whip cream until it is thick. Then put the chocolate mixture into it. Use shot glasses to serve the dessert.

You should keep them in the fridge and serve them cold. Sprinkle the pieces of peppermint candy after they are ready for eating.

You’ll surely enjoy such an exquisite dessert particularly when served in shot glasses.

Wrapping up

How Many ML In a Shot Glass?

Remember that there isn’t a common measure that applies to the shot glass. If you’re still uncertain about the ml count in a shot, it is 44 milliliters or 1.5 oz. In addition, you should also keep in mind that shot glasses can be used for a variety of purposes and helping you create a distinctive dessert is only one. In fact, a shot glass is an item you should never overlook.

Penne Vs Ziti: What’s the Difference?

Penne Vs Ziti

Penne Vs Ziti: What’s the Difference?

Penne Vs Ziti

Penne Vs Ziti–it’s time to discover the penne vs ziti similarities and differences. Because pasta is among the tastiest and comforting food items that you can eat, it’s worth knowing the basics about. This will help you make your favorite Italian dishes the authentic way, unless, of course, you use your own imagination to add a personal touch to each of the recipes.

Over time I’ve honed my pasta-making skills. So, I’m eager to share my expertise to assist you in becoming a master yourself.

There are many kinds of pasta. They are over 100 when you consider the variations in length. Ziti, as well as penne, can be readily available, and appear similar on the surface.

But, a deeper review will reveal the differentiators that experienced chefs use to maximize the value of their dinners.

Ziti and Penne are two basic pasta shapes. You can purchase them in any grocery store, and cook these at home, too. They aren’t just different in length and shape but there are many other distinctions worth to be noted.

Before we get to the differences and top recipes for ziti or penne Let’s find out more about their background. So, you’ll be able to give some historical facts when you cook dinner to feed your children!

Origin Of Pasta

Today, everyone associates pasta with traditional Italian food, however, there is another country we must be thankful to for this amazing food.

Many historians are of the opinion with the fact that pasta, as we eat today, is a result of traditional Chinese noodles. Today, pasta and noodles are two different foods, regardless of their commonality.

The term pasta is a reference to food products made from durum wheat flour, eggs and water. It is cut into different shapes. Traditional Chinese noodles do not use durum wheat, but dried gluten.

The process involves making dough from the primary ingredients pressing it, cutting into the desired shape and then cooking it with various sauces.

But, we must be grateful to Marco Polo, who is believed to have introduced pasta to Italy sometime in the past. Some historians have disproved Marco Polo’s role in pasta’s popularity in Italy. The person who brought pasta to Italy is a person who many people appreciate to this day.

Italians created and perfected their food and developed delicious recipes for cooking it. In the past, Americans have developed a fascination and love for the three-ingredient meal.

Types Of Pasta

Pasta is available in a variety of shapes and lengths, which include basic shapes like ziti and Penne. However, the shapes were invented to make them look more appealing.

Chefs have noticed that certain shapes are better at holding certain sauces than others, and they developed recipes to suit these shapes. For instance, long flat pasta works the best choice for sauces that are creamy and pasta made with ridges or the holes works well with recipes that use meat and vegetables.

Certain varieties are best cooked in boiling water and others are ideal to bake or filling.

Ziti and penne are great for a wide range of sauces. However, it is important to discover their functions and characteristics in traditional Italian dishes.

Italian Penne Pasta

Fresh Or Dried Pasta

Moving onto some tips for the newbie chefs and  also some important facts about pasta. The pasta you purchase at the grocery store, packaged and ready to cook is dried pasta that has been prepared in factories and has a very low level of moisture. This allows it to stay in its shape for a longer time and keep it fresh when properly packed.

Additionally, dried pasta typically isn’t made from eggs, but instead with different flour varieties.

Contrary to what you might think, fresh pasta is extremely soft, and contains eggs, and is more fluidity than pasta that has been dried, which means it takes lesser time for cooking.

While you can keep dried pasta indefinitely at room temperature fresh pasta must be kept in a refrigerator.

Fresh pasta tastes better and if you’ve ever been on a culinary show you’ve probably observed that professional chefs create fresh pasta. But, if you don’t have the expertise or time, or even the right tools dried pasta is ideal.

Ziti as well as penne is usually dried due to its unique shape. Pappardelle, oreccihette , and ravioli taste best when cooked fresh.

Penne Vs. Ziti Noodles – The Primary Differences

Ziti and Penne are both hollow and cylindrical pasta varieties. They are both moderately big and are great to make sauces for meats and vegetables. Both are delicious. But, how do ziti and Penne differ? Let’s see!

Origin

While pasta originated in China, Italians developed the art of pasta to unimaginable dimensions. Ziti pasta developed  in Italy and, in particular, in the Sicilian region.

The most well-known dish in the world, ziti is extremely loved within United States, especially US baked ziti made with cheese and tomato sauce.

On the other hand, there are more details about the person who invented the penne. An Italian pasta-maker who was from Genoa, Giovanni Battista Capurro developed penne in 1865 after having built his diagonal-cutting machine.

The machine he invented could cut penne into sizes of 1 to 2 inches. Penne that was 1 inch in size was referred to as mezze penne, or half pens and the larger, more popular 2-inch pens were referred to as simply pen.

The most well-known dish made by Penne is Penne with vodka. It is at this point that it becomes interesting. Some experts believe it was an American student from Columbia University who has developed this delicious dish made of penne and cream, and penne. So it’s the Americans are responsible for the popularity of the Italian-derived pasta Penne.

Detail of Ziti Pasta

Ziti – Long and smooth and tubular pasta cut at a straight line

The shape is most likely the most obvious way to differentiate the two types of pasta.

Ziti and Penne are pulled through tubular shapes during the process of making in the pasta machine. They have therefore hollow, circular forms. Thus, ziti and penne have a similar diameter, and also have the same lengths.

The length of Penne is 2.12 inches and ziti is a bit shorter at 2 inches in length. The width is 0.4 inches, and the thickness of the walls also differs. Ziti tends to be a bit thicker, with 1.25 millimeters, when compared with the 1-millimeter thick wall of Penne.

These differences aren’t apparent to the majority of people. The most noticeable distinction is the cut shape and texture.

Ziti pasta is made of straight angles, making them appear longer and more rounded.

Penne pasta is cut at an angle, which makes them appear different.

In addition, penne can have an outer surface that is ridged typically, but it is possible to get smooth penne at specialized shops.

Ziti consistently has a silky texture, making it soft and creamy once cooked. Due to the ridges, the pasta maintains its hard shape even after being cooked.

Variations

The word” penne” is derived from the Italian word that means quill. The name of the pasta was derived because of its appearance. The shape of the tubular structure allows it to pull the sauce into it.

The two variations available of penne differ in their structure.

The smooth penne is referred to as lisce, while those with ridges, which are more accessible and common, are called rigate.

Penne rigate is durable, while the lisce version is soft.

Ziti, however, on contrary is made with the same size and shape There are no real variations in this type of pasta.

Cooking

Ziti and penne both have distinct applications in cooking. Ziti is most often utilized in bake dishes that require them to be cooked undercooked so as to avoid mushy pasta. When you boil ziti through and later bake it in a cheese sauce and along with other ingredients, ziti pasta will lose a lot of its texture and will end up too soft, and almost muddy.

For baked ziti dishes boil them in water for 5 minutes is sufficient. They’ll be cooked completely by baking them in the oven. Be sure to rinse ziti properly and then toss them in hot sauce as well as in the oven preheated to get the most optimal outcomes.

Since ziti cooks to a half-cooked state in hot water, when you add them to hot sauce, the pasta will remain cooking in a continuous cycle until you achieve an ideal creamy texture. If you mix them with cold sauce and cook them, the process will cease and you’ll be left with spongy pasta.

Penne needs a little bit longer to cook until you achieve the right texture, which is about 13-14 mins in water that is boiling. Be sure to add the proper salt and then take the lid off once the water is beginning to simmer.

Use In Recipes

Ziti is smooth pasta, and therefore, you’d think it becomes more enriched when paired with rich sauces. This is where the true magic of pasta comes out. Ziti is best cooked in the oven, accompanied by thick sauces as baking adds the desired punch in flavor and texture.

If you combine mitzvah with creams you’ll be left with an ice cream dish. The flavor would be tasty, but the appearance and presentation won’t be as appealing. So, it’s a good idea to have different pasta varieties to try out until you find the most delicious recipes for yourself.

Ziti pasta is also excellent for stir-fries or in addition to salads that are fresh with large and chunks of crunchy vegetables.

However, Penne is great for cream sauces due to its smooth texture. They go well with cream sauces, vegetables, and meat dishes.

It is not recommended to pair ziti with cheese shaved due to its delicate texture. However, penne pasta that is sturdy is ideal for this. Also, the cheese stays better than pasta.

Carbonara, a thinner sauce pesto, carbonara, and Ragu are excellent for pasta. If you’re planning to serve your ziti with sauce rather than baking, I would suggest using sauces with a thinner consistency and other vegetables, like carrots, celery, and onions.

The reason is that the silky texture of ziti makes the thickest sauces slide off  the pasta. The angled ends of penne capture the sauce better. However, you can also bake penne in place of ziti.

In general case, penne is a more adaptable pasta than ziti. Additionally, the majority of chefs will serve it al dente, which means firm enough to bite.

My favorite way to use ziti for ziti is baking dishes that have melty cheese

Can You Make Ziti And Penne Fresh?

Ziti and Penne are two kinds of pasta that are extruded using an extruder to create their tubular form. Both can be made by making the pastas at home however you’ll need the right machine and dyes to get the form and texture you desire.

The base recipe for both recipes is eggs, flour as well as oil. It is not recommended to add water as the dough must be firm enough to ensure that the pasta can hold its shape but be soft enough to be used with an extruder. It takes some expertise and time to master your dough. Also, it’s more complex than making fresh flat pasta.

The recipe that I have found to work for me is made up of 3 1/2 cups of all-purpose flour with no soy-based additives with five eggs, and two tablespoons of olive oil. But, it’s important to add only one egg at a time and gradually make the dough. If you feel it is too dry, make it a little more oily.

Once you’ve made the dough, put it in the extruder, and then make your pasta with ziti or a penne attachment.

Remember that practice is the best way to improve, so once you’ve cooked fresh ziti, or penne a few times, you’ll know which type of texture works best. If you don’t own an extruder for pasta or a pasta maker, you can make use of dried pasta that is available in stores in any recipe.

Don’t Confuse Ziti And Penne With Rigatoni

Pasta Grape Tomatoes

Delicious, short and rigged Rigatoni pasta is like ziti and penne

Rigatoni is another tubular extruded pasta variety that is similar to ziti as well as Penne. Rigatoni pasta is considerably longer but also more wide than ziti or the penne. It is cut straight or curly with the ends being cut in squares. Rigatoni is best served shredded cheese and is also served in baked dishes in place of ziti.

Best Penne Recipe

Creamy Italian Penne Pasta

Garlic sauce and Penne is simple to prepare and a delicious dish

I’ll be sharing with you my top recipe using Penne. I’m speaking about the creamy flavor of garlic Penne pasta. The recipe is easy to make, cheap, and does not require skilled cook abilities. I’ve made it several thousand times and it always tastes great.

Here’s what you need:

  • Penne – 1 box
  • Butter 2 tablespoons
  • Garlic cloves 3
  • Flour – 2 teaspoons
  • Chicken broth – 1/2 cup
  • Milk – 1/2 cup
  • Spices include salt, pepper Parsley, salt
  • Cheese – parmesan, 1/2 half cup

Cut your garlic cloves into pieces before adding them to melt butter in the pan. The butter and garlic will cook for two minutes, then add the flour. Stir the mixture continuously all through, and then include chicken broth along with milk. Reduce the temperature and let the sauce thicken by itself. Make sure you stir it regularly.

In the meantime, it is recommended to cook the penne in accordance with the instructions on the packet. Add your cheese and spice to the pan and take the pasta out.

In the sauce, toss the pasta and then turn off the heat and stir it until cheese melts.

Serve hot and top with grated Parmesan cheese, and freshly chopped parsley!

Best Ziti Recipe

Here’s my most warm-baked ziti recipe. It takes around an hour to cook all the way through and the prep requires about 10 minutes.

You are able to substitute any of the ingredients with whatever you like. However, this is the recipe I prepare it.

You’ll require:

  • One box of Ziti Pasta
  • Ground beef 1 pound
  • Onion – 1 chopped
  • Garlic: 2 cloves minced
  • Rosemary – 1 cup, fresh minced
  • Red pepper flake 1 teaspoon
  • Tomato sauce – 1 jar – 32 ounces
  • Salt, pepper, olive oil
  • Oregano 1 teaspoon
  • Basil 1 teaspoon
  • Thyme 1/2 teaspoon
  • Cheese mozzarella, ricotta, and pecorino – 2 1/2 cups total

Begin by cooking your meat and onions along with garlic, on a huge pot. Cook the ziti pasta for 5 minutes, then drain it in a colander and then drizzle it with olive oil it to prevent that it gets stuck. When the meat is cooked,  add salt and pepper along with any other spices.

Reduce the heat, and cook for 5 minutes. Stir frequently. The oven should be set to 350 degrees F. You can prepare your casserole, spreading olive oil on the bottom.

The tomato sauce should be added into the pan along with meat and spices, and let it simmer for about a couple of minutes.

Here’s how you arrange the dish:

Then, place the sauce on top then sprinkle ricotta cheese on top. a few pieces of pasta on top. Repeat the process with the remaining ingredients. Finally, add the fresh mozzarella cheese as well as pecorino cheese.

Bake for 20-25 minutes. It should be enough time for melting the cheese, and the pasta to be cooked completely.

It is possible melting cheddar cheese to make your baked ziti recipe if you overcook the pasta prior to putting it into the oven. It’ll take less time to bake, but the cheese will melt faster than other cheeses.

Allow it to cool for a few minutes, then serve hot!

Casserole Ziti Pasta

It is possible to garnish baked ziti noodles with minced beef and tomato sauce. You can also garnish it with fresh herbs and cheese.

Wrapping up

Penne Vs Ziti

If you’ve been wondering about the differences of penne vs ziti and whether you could use them interchangeably, this post, I presume, has served your purpose. However, if you wish to cook pasta in the style of authentic Italian way, you should remember that ziti should be used for baking and penne for  cream sauces.

There are a lot of recipes available online for both pasta varieties. I suggest you try some of them and try them until you’re completely satisfied with the flavor and texture. Go cooking now!


How Long Does Pancake Batter Last In The Fridge?

How long does pancake batter last in the freeze?

How Long Does Pancake Batter Last In The Fridge?

How long does pancake batter last in the freeze?

In this post, we’ll address the question of how long does pancake batter last in the fridge? And the second question is also equally important, and that is, how do you make perfect pancakes? Both of these questions are crucial because if you have no clue about this, it’s very likely that you will not be able to preserve your food for a long time and the chances are high that it will spoil.

Can you freeze pancake batter?

Absolutely! To ensure the best results, pour the batter for pancakes into an airtight bag. Make sure you remove the most air possible before sealing and make the bag flat. The thinner and flatter the liquid is the faster it will melt when you’re ready to make use of it again.

To let it thaw, put the bag in the bowl of warm water or if you’re comfortable waiting around, put the bag in an empty bowl and put it in the refrigerator for a night to defrost. What’s the greatest thing about being able to store it in an airtight bag? You can slice off the portion of the bag, and put your pancakes right into the pan. That’s an awesome freezer trick!

How do I preserve pancake batter?

The key lies in the container

It’s essential to keep your pancake mix in proper storage to ensure it’s as fresh as you can. It is recommended to transfer the batter of your pancakes to an airtight container in order to preserve its freshness. If you don’t own one, you could cover the bowl with Clingfilm, but ensure that you have a tight seal to the bowl.

If you do not seal your mix correctly and seal it properly, you will not only struggle to keep it fresh, but bacteria that are in your fridge (from items like meat and vegetables) could be able to transfer into the batter for your pancakes. Be sure to mark your pancake batter with the date that it was prepared as well as the expiry date. A well-organized fridge is vital!

If you’re keeping pancake batter at room temperature for an extended amount of time it’s best to also store it in a sealed airtight container. It is also recommended to place the container inside an ice bowl in order to keep it as cool as you can.

 Top Tip: You should save your squeezy, bottle of ketchup to use to store the pancake mix. It will keep it nice and fresh and make it easier to pour into your pan. This is a fantastic baking trick!

Q&A

Why is it that pancake batter needs to rest?

If you are cooking pancakes may be aware that your recipe suggests leaving the pancake batter to rest. What’s the reason? If you allow your mix to rest it will allow the gluten to relax and you’ll have well-textured fluffy pancakes.

You may be wondering what is the consequence if you don’t let the batter for your pancakes to rest? If you do not allow your batter for a while, do not be worried. The pancakes you make will still be tasty. There is no need to let your batter rest if you’ve mixed it up quite a bit as you try to take the lumps out of the mix. This will cause the gluten to be activated in the flour and make pancakes that are more difficult to cook.

Will my pancake batter remain as good the next morning?

While it’s suitable to preserve and utilize pancake batter (if it’s done properly) However, you may discover that the result is less fluffy than on the day that the batter is created. Baking soda that is present in the batter for your pancakes is likely to lose half its strength. The remaining portion is activated by the heat of the pan.

How long will the batter for pancakes last at room temperature?

In accordance with the FDA, it is not recommended to leave refrigerated food items outside of refrigerators at room temperature for longer than two hours.

The batter for pancakes contains eggs and milk, which is why I don’t recommend leaving it at the temperature of a room for longer than a couple of hours, at most. Anything longer than that will get you into trouble.

It is possible to ask if it matters if the batter for pancakes is made with dairy-free or UHT milk. It is important to verify the labeling of the ingredients insofar storage stability, as well as shelf-life, is concerned.

As with regular milk, other kinds of milk must be chilled as soon as the milk has been opened. This same rule applies to pancake batter mixes as well.

How do you think the batter for pancakes will keep in the refrigerator?

A normal pancake batter made from flour and milk as well as eggs is safe to store for 2-5 days in the refrigerator. It will, however, have to be based on the expiry date printed on the package of the product.

If the egg and milk expiry date goes over the expiry date, I’d suggest you use the batter within the expiry dates of the products.

Can you freeze pancake batter?

Indeed you can! For the most effective results from making pancakes, advise pouring it into the Ziploc bag. It is essential that you remove as much air as you can from the bag prior to sealing it.

It’s recommended to flatten your bagged mix because the smaller it gets and the more quickly it will defrost once you utilize it again.

If you’re not sure how much time The best method of defrosting your batter for pancakes is to soak it in warm water. If time isn’t a problem I would suggest placing the frozen mix in the fridge and allowing it to defrost overnight.

It is not just that Ziploc bags are useful to get the air before you seal them, but once your pancake batter is defrosted, cut the corner from the Ziploc bag and then pour the batter directly into the frying pan. No-fuss, simple, and easy.

What Happens When You Refrigerate Pancake Batter Overnight?

There’s an astonishing number of ways to make the perfect pancake. And every one of them contains ingredients that can be stored in a unique way and can alter the texture of your final product.

The most important issue is the growth in the batter.

If you like the fluffy American-type pancakes before you decide if your batter can be kept in a safe place for a long time, look over recipes for ingredients we’ll cover in the next section.

Also, the photo is in the picture because they are my very favorite pancakes. You can purchase them on Amazon!

And, no matter what kind of pancakes you’re planning to freeze, you’ll need an airtight container that is food-safe (I am a fan of the ones from Amazon) Or you could even keep it in a batter-dispenser with a lid similar to this model from Amazon.

Refrigerating Pancake Batter: Thin Pancakes or Crepes

If you’re looking to make thin pancakes that are flat or crepes for breakfast the preparation of your batter before time is ideal.

If you mix with the dry and liquid ingredients in the batter, it airs and produces bubbles. Air bubbles allow pancakes to puff up and rise. That’s not what you want from crepes. To make truly flat pancakes all bubbles need to break down.

These cakes are ideal to roll up in the car with jam and peanut butter, or other fillings or topping them with a dollop of whipped cream to create an extravagant meal in only two minutes.

Refrigerating Pancake Batter that Contains Baking Soda

Baking soda acts as a leavening ingredient, which means it will help raise the level of your batter to make your pancakes come out fluffy and light.

However, baking soda begins to function when it’s mixed into the batter, and it can become a flat mess if not cooked in a short time. If your recipe requires baking soda as your sole method of obtaining some rise from the batter, it’s not an ideal recipe to cook ahead of time.

Refrigerating Pancake Batter That Contains Baking Powder

Baking powder, however, will typically store well. A majority of baking powder is “double acting” which means it will begin to activate at the moment it is in contact with the wet ingredients. However, it will activate again when it comes in contact with the heat.

The pancakes may not be the same height as they would when you cooked them right away and if the first pancake you cooked appears somewhat flat to your tastes, add a little baking soda to the batter the next morning to help it re-fluff.

Be sure to keep it within 25% to 50percent of your initial amount required.

Refrigerating Pancake Batter That Contains Yeast

Making pancakes with yeast is a popular option to prepare ahead. The yeast is active, meaning that your pancakes will be cooked to the amount you enjoy even if they are cooked the following morning. Many people believe that waiting for the yeast to rest and prove overnight can add to the taste.

It is even possible to prepare waffles and pancakes with the sourdough starter, which is usually made several weeks prior to baking.

In both cases, you should remove the batter from your refrigerator about an hour before you cook it so that it can come back to the temperature of the room.

Refrigerating Buttermilk Pancake Batter Overnight

If pancakes made with buttermilk are your preferred breakfast option making your pancakes in advance can be a bit challenging but it’s not impossible.

Buttermilk can deflate if it is left to sit for too long, therefore the solution, in this instance is to combine all the dry ingredients before the time and then fold in the wet ingredients right before you’re ready to fry the batter.

Dry ingredients don’t require refrigeration, and wet ingredients can be mixed together in a single bowl, and then placed within an airtight container for the night however, it is recommended to combine them only before you add them to all of your dry items in the early morning.

This isn’t the best of methods to reduce time however it’s not the worst-case scenario either. Most of the time it won’t take much longer mixing the ingredients than it would take to heat up your griddle or pan.

If you’re planning to mix all the batter in advance and then refrigerate it overnight just look for a recipe that makes use of yeast, and you’ll be fine mixing everything before time.

Refrigerating Pancake Batter That Contains Egg Whites

Certain recipes call for egg whites whipped for use to bring more taste to the recipe, in place of baking soda.

If this is your favorite recipe, the best option is to make your pancake batter in the evening before however, save the egg whites for whipping and incorporate them into the batter before making the pancakes.

This gives you the convenience of pancakes that you can make overnight and the fluffy, light effect of making them on the very next day.

How to Store Pancake Batter Overnight

If you’re planning on storing pancake batter overnight the most important thing to be aware of is the absence of air exposure.

To get the best results here is how to chill pancake batter overnight:

Pour the batter into the Tupperware container that is sealed with an airtight seal.

When you close the lid, you should cover the entire surface of your batter using plastic wrap. This will provide the best protection against the air.

Another method of making pancake batter that can be refrigerated overnight:

Place the batter inside a safe liquid Ziploc bag.

Make sure to squeeze out as the air as you can before closing it

Once you’re ready to use it, just take a small corner of your bag to squeeze it like you would with a piping bag.

It is also possible to keep it in a dispenser for pancakes such as this from Amazon.

Certain people love eating pancakes every day And to those, I can only say, “why not?”

If you’re in this situation then you might find it easy to cook an enormous amount of pancake batter during your days off and then save it for later use during the week.

The most efficient method I’ve found is to store large quantities of pancake batter to store them in an old, big, empty ketchup bottle, or another kind of squeeze bottle with a good seal.

It’s nice and simple to pour pancake batter straight onto the pan or griddle for almost instant pancakes.

If you plan to keep pancake batter in storage for prolonged periods of time, the best choice is to choose pancake batter with yeast instead of baking soda or eggs.

The taste and the rise will only improve with time, and you don’t need to fuss about mixing more ingredients whenever you’re in necessity of your breakfast.

The only exception, of course, is when you like flat, Scandinavian crepes or pancakes. In that case, it’s not a matter of concern that the baking soda or the powder you use to make them loses its lifting ability with time.

The last ingredient to look out for is milk. If the recipe you’re making requires milk, it’s not advisable to keep the batter for your pancakes for more than one week at a time, to make sure that it doesn’t go spoil on you.

Why is it that my pancake recipe calls for the resting time?

It’s unusual, but not uncommon for pancake recipes to have the necessary resting time. When you’re mixing flour, lots of mixing can cause the gluten to harden and resting your dough or batter can loosen the gluten and prevent a pancake from becoming rubbery.

The key to making a good pancake is not to overmix the batter. The lumps are acceptable. However, an overmixed batter is thin and, as this inquiry suggests, could be hard to handle.

Can I freeze cooked pancakes?

Yes, you can! Many people prefer to cook a large number of pancakes, then freeze them for quick consumption later instead of making pancake batter in advance. When your pancakes are done cooking and cooling, allow them to be cool before wrapping them with plastic wrap.

To ensure they are protected You can put each cake individually wrapped inside one safe freezer Ziploc bag or Tupperware container. The container should be labeled with the day the cake was of freezing and then try eating your pancakes within three months.

For eating, you can put the pancakes frozen in your toaster oven or your toaster or oven, or allow them to thaw on your counter, and then reheat in a frying pan or in the oven in larger quantities.

How do you create your perfect pancakes?

Ingredients

2 cups all-purpose | plain flour, (290 g | 10 oz)

1/4 cup of granulated sugar, or sweetener (60g | 2 1 oz)

4 Tsp baking soda

1/4 tsp baking soda

1/2 teaspoon salt

1 3/4 cups milk, (440ml)

1/4 cup butter (60g | 2 1 oz)

2 tsp pure vanilla extract

1 large egg

Instructions

Mix the wet and dry ingredients in separate bowls.

Mix the dry ingredients with those of the moist components.

Put 1/4 cup batter for pancakes on a hot, greased non-stick pan.

The top of the pancake begins to bubble, the bottom becomes golden. Turn it over and cook the other side.

Make sure to serve it with maple syrup.

Wrapping up

How Long Does Pancake Batter Last In The Fridge?

In this article, we’ve provided the answer to these questions “How long does pancake batter last in the fridge?” as well as “how to make perfect pancakes?”I hope I’ve been able to provide information about other queries you may have. After you have a good understanding of this, you’ll have no trouble making the perfect pancake. Now, go cooking!

Does Cheesecake Go Bad? How Long Does Cheesecake Last?

Does Cheesecake Go Bad? 

Does Cheesecake Go Bad? 

Does Cheesecake Go Bad? 

How long does cheesecake last in the fridge? This is an important question indeed. More so, if you have got more cheesecake than you can manage to consume in a single sitting. You might be wondering as well, “does cheesecake go bad?’ Somewhat confused, you might try to figure out how you can maximize your delicious dessert or avoid the possibility of throwing it away. What should you do now?

So, before you make that decision to purchase cheesecake, you should take a close look at this article to find out how to store cheesecakes and the best storage techniques available to you.

What exactly is Cheesecake in the first place?

Cheesecakes are recipes that have been available to us for the last 100 years. The earliest recipes, in fact, date back to the 18 century.

It was in the late 19 century that this dessert was popularized in the USA. The recipe did not contain cream cheese but rather thick milk instead.

The recipe for a delicious cheesecake has a base layer that consists of crushed cookies, pastry, or sponge cake. There are two kinds of cake: baking or non-baked (refrigerated).

So, after you make layers of cheesecake using cream cheese, and then add fruit or whipping chocolate syrup, cream, and so on,  the cheesecake is ready to be eaten.

The flavors offered are delicious, ranging from pumpkin to strawberry,  lime, chocolate and toffee. There are also chestnuts and other nutty flavors.

Cheesecakes can be enjoyed with a smile any time of the day, for breakfast or dinner, snacks at the end of dinner, or for any special occasion.

Cheesecakes are among the exotic meals that are easy to prepare and they are well-presented and taste fantastically delicious.

How to Preserve Cheesecake Properly?

The best method to store cheesecake is by cutting the slices in half and then storing them separately.

The more occasions you take the entire cheesecake platter and cut them into smaller pieces, the greater is the chance of your cheesecakes becoming spoiled.

So, once the dessert is finished and it is time to store break it into pieces that can be consumed in one sitting.

If you are planning to eat it the next day, it’s a good idea to store it in the refrigerator.

If you’re not a lover of sweets and believe it’s only on weekends when you indulge in the sweets such as Storing Eli’s Cheesecake suggests that you put food items in freezers. However, it should be stored in separate sealed plastic containers.

Don’t try freezing cheesecakes that are baked without baking. They are not good for freezing.

Unless otherwise stated by the recipes, cheesecakes baked may be stored in the freezer.

It is not recommended to add any garnish or topping prior to freezing.

Make sure you know the temperature at which you’ve been storing your cheesecake at. A rise of 10.8 degrees could be detrimental to the shelf-life of this dessert. So, it is best to store the cheesecake at an even temperature.

When storing them in containers, ensure that they are kept in glass or plastic airtight containers to avoid reactions to the containers made of metal. Hermetic seals are the best choice, therefore.

When shopping for cheesecakes it is the last item on your shopping list to purchase at the end. It will be kept at a cold temperature for a longer time. This means that when you arrive home and put it in the refrigerator, it remains fresh and smelt delicious for a longer period of time.

How Long Does Cheesecake Last? Does Cheesecake Go Bad?

Cheesecakes can fail when not properly stored or stored at an appropriate temperature. The main reason for cheesecakes to fail is the eggs that are contained in them.

Because of the eggs, the lifespan decreases from 7 to 4 days. The cheesecake will last for a long time if it is kept in the original container.

It is best to keep it between 35 and 45 degrees Fahrenheit. Its shelf-life of the tasty is dependent on the preservatives that are employed, the time of travel as well as the humidity to which that it has been exposed to and more.

Unfortunately, the shelf life of cheesecake is very short. It is essential to be attentive to its freshness as well as its storage.

The Department of Agriculture’s Food Marketing Institute is of the opinion that cheesecakes that are sold in stores may have a maximum refrigerating time of seven days.

This will be a part of the packaging design as well as the specifications for the timeframe.

We suggest that it is securely wrapped in a container of plastic. Actually, it can be kept in the freezer, but not if you intend to consume it on that same evening.

If you’re planning to eat it later in the evening take it out at least two hours before to begin digging into the desert.

If you are worried that you will not be enough to finish the whole task in one go it’s a good idea to slice the cheesecakes in portions and store them in the freezer for the future.

How Long Does Cheesecake Last In The Fridge?

The typical Cheesecake that is opened can last as long as seven days if it is stored properly.

But, cheesecakes that are not opened and are fresh made, frozen, or homemade can be stored in the fridge for 6 to 8 days following the date of last printing. It is also possible to freeze them too and remain fresh for 6 to 8 months.

A variety of factors must be considered when storing items in refrigerators. For example, how long was the cheesecake in the fridge, and how long did it take to get between the store and your house.

Was it hot to make it to your home from the grocery store, or did you leave it in the sun for too long?

It’s a little-known fact that even a speed that is unsettling could ruin the cheesecake. Cheesecakes left at a temperature of a room for more than two hours will give off a bad smell, brown color, and a sour taste.

To prevent the growth of bacterial, you should take the cheesecake out of the refrigerator before it is ready to be served. It stays firm, and the flavor is robust and it tastes delicious.

In the event that the cheesecake is frozen, it’s ideal to store it at least 4 hours prior to serving it so that the cheesecake can be at room temperature. It will not be frozen, but it will be fresh.

How To Tell If The Cheesecake Is Bad?

Cheesecake is loaded with cream, eggs, flavors, cheese and other ingredients and all have limited shelf time. It is inevitable that cheesecake goes bad, and it will soon turn into a flood hazard when left at room temperatures.

The high content of moisture, combined with the non-perishable ingredients makes cheesecake a perfect food for visible mold and invisibly spores bacteria, such as salmonella and listeria, which can’t be seen with the naked eye but are nevertheless risky.

Unfortunately, it doesn’t take time for the cheesecake to spoil. The simple act of leaving it at the counter over a couple of hours can turn your delicious dessert into a place for dangerous bacteria.

Let’s go deep into how long cheesecakes can last.

4 Tips To Tell If Cheesecake Has Gone Bad

Because of its limited shelf-life, it’s easy to determine if cheesecake is degraded. The signs of a decaying cheesecake can be seen within several hours.

Here’s what you need to be watching when examining the cake for freshness:

  1. Aging

Fresh cheesecakes usually have even and smooth edges. The cheese itself is soft and smooth. Cakes that are stale on the contrary side will have cracked and separated edges. The cheese may appear and taste rubbery and the toppings may be sour too.

  1. Discoloration

A cheesecake that is no longer fresh can turn a dull yellow color and may also show gray spots. Be careful not to take the discolored pieces and eat the rest of the cake. The color change is usually a sign of bacterial activity. You could get sick after eating this cake.

  1. Foul Smell

A glance is often enough to tell that the cheesecake has gone off. However, to ensure that you are 100% certain, take a thorough sniff to ensure freshness.

The cake’s smell is of aged dairy products, then you must eliminate it. It could also be leaking the liquid that is a further indication of bacteria activity.

  1. Mold

The presence of mildew is an obvious indication of the possibility of spoilage. The spores of mold usually develop after the cake has been laid in a room at room temp for longer than the two-hour minimum. The cake left unattended in the fridge may result in the growth of mold because of the exposure to moisture.

If you can’t detect mold spores doesn’t mean the cake is safe to take a bite of. Cheesecake that is not refrigerated will be a magnet for bacteria and it is best to keep it in check and throw it away.

Keep an eye on the cake’s creation date as well as the amount of time it is left outside the refrigerator. Remove cheesecakes that have been sitting at the counter longer than two hours.

4 Tips to Store Cheesecake safely

A proper storage method will ensure that cheesecake remains delicious and safe to eat. Here are some suggestions to store store-bought as well as homemade cheesecakes:

  1. Tightly Wrap With Plastic Film

When it comes to the storage of cheesecakes, the goal is to limit contact with moisture as well as to ensure that the cake hasn’t picked the flavors of other food items in the refrigerator.

Cut and serve as many slices that you need then, wrap the cake in cling film to wrap tightly around the rest of the cake. Make sure to not allow any air pockets to enter.

  1. Store In An Airtight Container

Airtight containers are fantastic alternatives to freezing bags to store the cake. If keeping the cheesecake in baggies that seal can be an option, you can keep your cake by placing it inside an airtight bottle. It’s recommended to wrap the slices in plastic wrap before placing them in the container.

  1. Refrigerate As Soon As Possible

If you baked the cake or purchased it, make sure you put the cake in the refrigerator immediately and then store it until you are ready to make use of it.

The maximum time that cheesecake can remain when it is at room temperature is 2 hours. If it is left longer, the cake could be dangerous for consumption due to having potentially dangerous bacteria.

If you are unable to cover the cake and not damage its cake’s surface, simply put the cake on the pan on a sheet, cover with plastic wrap and then store it in the refrigerator for no more than 7 days.

  1. Freeze For Longer Freshness

It is possible to freeze slices of cheesecake, or whole the entire thing. The cheesecake you have made is best refrigerated when you arrive home.

To store the cake in the freezer, wrap it in aluminum foil, then stick it into the freezer to keep it for two months. When you’re ready to enjoy it, defrost and cool it in the refrigerator for up to 7 hours before serving. We’ll discuss the best way to store cheesecake later.

The Risks Of Consuming Expired Cheesecake

Cheesecake expires within a couple of days after the date of manufacture. At the end of a week, even cheesecakes that have been carefully stored can become a signal for bacteria activity.

Let’s face it, there’s a significant danger in eating cheesecake that is expired. The risk is that bacteria like Salmonella Enteritidis, Escherichia coli and Campylobacter are likely to find a place within the cake.

Consuming bad bacteria could cause serious bacterial infections, and symptoms such as stomach pain and vomiting, fever, nausea, and dehydration.

If you spot even the tiniest hint of spoilage such as a sour flavor or smell, discoloration, oozing, and, of course, mold, you must remove the cake.

Can You Freeze Cheesecake?

Cheesecake can be frozen for a long time. It’s possible to prolong the shelf-life and keep the cheesecake safe for eating through freezing.

Use these instructions to make cheesecake freeze-ready.

Securely wrap each slice of cheesecake using aluminum paper. Be careful when placing them in the freezer, and let them cool until ready to consume.

Sometimes, cheesecakes can be too soft to wrap. It is possible to solve this issue with a baking sheet and then freezing it.

Slice each piece of cake that has been frozen, wrap it in plastic film and place the individual pieces into a freezer bag that is resealable.

Make a mini cheesecake which you can consume as needed. You can bake only enough to avoid having to throw away the entire cake once it is past its shelf-life.

If you’re in the mood to eat it, take the cheesecake out of the freezer and let it cool in the refrigerator for a night. If you want to use it right away you can let the cake cool at room temperature for between 20 and 40 minutes.

Make sure to note the date on which you froze the cake. This will allow you to monitor how long the cake has been stored in the freezer and examine the freshness of the cake when it is time to serve.

Remember that freezing can affect the texture and flavor of foods, for example, your cheesecake. While freezing can keep the cake in good condition for 3 months or more, we suggest that you finish the cake within less than a month.

Wrapping up

Does Cheesecake go bad?

Cheesecake is susceptible to bacterial activity, and your favorite dessert can spoil quite quickly. Refrigeration can help maintain the quality of the dessert for a longer period of time, but you must eat it or dispose of it before the end of one week. Do not eat cake with obvious signs of spoilage, and those that have been left out for more than two hours.


Related Post: Does Evaporated Milk Go Bad?


Do Radishes Go Bad? How Long Do They Last?

Do Radishes Go Bad?

Do Radishes Go Bad?

Do Radishes Go Bad?

When you’re planning to cook salads or make a quick roast dinner, radishes will be an essential ingredient. But the main issue with these delicious all-year-round foods is, do radishes go bad? It’s not a good idea to go through the effort of buying them only to have them get rotten before you start making that salad.

Do Radishes Go Bad?

You might be thinking about whether radishes can go bad? Yes, radishes like all vegetables can become spoiled. Why do radishes go bad? Because of their moisture content, they’re not able to last long. The trick lies to store them properly. You may be able to store them longer if you use appropriate storage strategies.

The temperature plays a major role in the length of time your bunch of radishes lasts. The high temperatures destroy these vegetables extremely quickly. If you’re looking to prolong their shelf life be aware of where you keep the radishes. For radishes, at least,  the colder the more nutritious.

How Long Do Radishes Last?

It is recommended that you ate your radishes fresh and crisp. Due to this, many people struggle to maintain their freshness. Otherwise, radishes will go bad. If stored correctly, however, you’ll be able to keep them fresher longer, and you can enjoy them for up to a week after purchasing.

Depending on where you reside depending on where you live, radishes can last for up to 3 days in water that is at temperatures of room temperature. What is the reason to put them in water? The answer lies in the cooling aspect. The cooler the atmosphere where you’re storing your radishes, the higher chances you have of keeping them longer.

You can keep your radishes in the refrigerator for up to 8 days, but you will still have that delicious red, white, or purple veggie on the day you’ll need it. If you opt for a canning container, radishes will last for up to 8 days, but they will not be becoming rotten. If you store them in a freezer, they can keep them for up to 2 weeks before they’re spoilt.

If you enjoy gardening and just picked your radishes with the correct method, even after a few months,  your radishes will still be in good shape. A container of sand or soil is all you require to extend the shelf-life of your bumper crop.

5 Tips To Tell If Radishes Have Gone Bad

If you’re a fan of radish, you’d certainly not like to learn that your favorite vegetables are spoiling. However, it does happen and you must be aware of the indicators of damaged radishes.

Soggy or soft The radishes you’ve stored most efficiently But then something seems off. Certain radishes are like they’re soft or soggy. This is a sign that they’re not fresh and you need to throw them away. the radishes. Fresh radishes must be crisp and tough on the outside.

A strong, unpleasant smell If your radishes emit an unpleasant smell, then it’s time to put them into the trash. An unpleasant smell is not an indication of healthy radishes.

Growing mold – Are radishes bad once they begin to develop mold? Yes. Just like any other vegetable, the radishes may begin to grow mold which signals the time is right to remove the fungus

Color change – A color change is another indication of a damaged radish. If your radishes have begun to turn dark, they might have been spoiled by shelf time.

Pay attention to leaves: If it’s leaves, look for moisture content. Avoid eating wilting leaves of radish. Also, the presence of dark spots may be an indication that radish is has gone rotten. Like in the case of roots, rotten leaves should not be in your refrigerator.

8 Tips To Store Radishes

  1. Chop Off The Greens

The first step is to take the leaves off. Why do radishes deteriorate more quickly if left with their leaves? Leaves contribute to a loss in moisture which is why you shouldn’t have to have wilted the radishes. However, don’t toss out the greens.

They’re also edible and you could save the leaves for another day. Try some dishes using the leaves, for instance, sauteing them in a pan or giving some color to your salad. The leaves can be stored within an airtight container.

  1. Dry Completely

After that, clean the roots thoroughly as they are often filthy. Water is a major enemy of any effort to preserve vegetables. So, to ensure your radishes remain firm, you should leave them out for a long time to dry before storing them. If you own a dehydrator, drying will be much more simple and speedier.

  1. Airtight Plastic Bag Does The Trick

The majority of radishes can be stored in a plastic container before throwing them in the fridge. But, you can add some paper towels to the plastic bag, and they will keep absorbing the moisture.

It is important to get rid of all air from the bag before storage. It’s not necessary to worry regarding black radishes. They will last longer in shelf life if they are kept dry. Find a perforated plastic bag to store them in.

  1. Blanch Before Freezing

The option to freeze can give you more days of radishes. This method is also great for leaves of radish. To get the most from the radishes following the thawing process, ensure that you ensure that they are properly preserved.

How do you go about this? Cut the radishes in half before blanching them. Make sure to keep the blanching time less than 3 minutes. It is important not to lose their texture or color. After that, soak the radishes in cold water and dry them. The radishes are now dry to be put in freezer bags for storage.

  1. Use A Canning Jar

Another great method is to place your Radishes in a jar that you can keep. After you’ve put water into it, gently put the radishes inside. Then, place the container into the fridge and you’re good to go.

  1. Wrap Each Bunch

If the damp container sounds like too much effort You can put the Radishes in a cool dry area without washing. Make sure that each bunch is wrapped in a way to keep moisture out. But, the radishes you buy will be ruined faster than if they were in a box.

  1. Sandbox Can Go For Months

Do radishes get rotten if you don’t wash them? There’s a way to keep them fresh. If you’re looking to keep them longer, do not fret. It is best to keep them in their natural state, but without cleaning them. This method is great for radishes that are straight from the garden. Take a box and place some soil or sand that is damp on top of it, and then place the radishes.

Avoid sand and dirt that is wet. Make sure you keep your radishes in an area that is dry and cool to ensure their preservation, such as in a basement or cellar. Be sure to check on them to ensure they’re in the right place in case they begin to rot.

  1. Always Mark The Storage Date

A great method of keeping track of the radishes is to write down the day that you placed them into the sandbox. If you discover that some of the radishes are decaying, throw it out. If you leave it in, it will cause the decay to spread to other radishes, so everything you have done will go wasted.

The Risk Of Consuming An Expired Radish

Do radishes deteriorate when left unattended? Absolutely. There is a chance of eating this veggie once it is past its shelf lifespan. Any food consumed after the expiry date could cause illness. Radishes consumed raw may cause illness because they could contain bacteria like E. coli and Salmonella that can cause fever or diarrhea. In the most severe cases, dehydration could be a result.

However, the pathogens which cause food poisoning aren’t identical to those that are found in rotten veggies. What is this referring to? If your radishes appear to be dying the reason is that they’ve been dehydrated. But they are not harmful to your health.

However, one aspect to be aware of is that once they’re rotten they lose their nutritional value. Thus, eating rotten radishes doesn’t bring any value to your diet. Why would you eat something irrelevant to you?

There are a variety of options concerning rotten radishes. They should be kept away from.

Beware of canned food items. One method to preserve radishes is making them into a can, and if they get rotten, you should remove them. Why? Botulism can be caused by canned vegetables that manifest as difficulties in swallowing and speaking, as well as paralysis. When it gets severe botulism could be fatal.

Can You Freeze Radishes?

You can keep radishes in the freezer because you may purchase more than you complete. Why do radishes go bad? Incorrect storage is among the main reasons. It is ideal to not gamble with your veggies and freezing is an excellent option for storing the vegetables.

This is done by blanching them before freezing. Why? Freezing whole radishes will cause them to harden so that they’ll explode.

But, there’s only one drawback. When you store radishes in a freezer the texture and flavor might change slightly. This is due to their high content of moisture. Additionally, the nutrient-rich radish loses some of its nutritional value following being frozen.

It isn’t an issue. Why? They’ve kept their youthful look and always cook great meals.

Another thing to consider is that there isn’t any magic to freezing. It is only a way to keep them in shape for a time and not permanently. In this case that timing is essential. Do not let them sit for more than an entire two weeks frozen.

Have a full week ahead? Here’s a fantastic radish trick for you. If you’re looking to save yourself the trouble of making an entire dish using radishes and freeze them, you can either cook them or roast them.

Wrapping up

Do Radishes Go Bad?

Why are radishes rotting as they’re an excellent food source for vitamin C and potassium, calcium as well as anti-oxidant qualities? They shouldn’t be. These simple tips will help you enjoy your favorite vegetables for a longer period by keeping them in the right way. The proper storage removes the anxiety when purchasing and will save you from frequent trips to the grocery store.

How long does tomato soup last in the fridge?

How long does tomato soup last in the fridge?

How long does tomato soup last in the fridge?

In this article, I’ll tackle the question “How long can tomato soup last in the fridge?” and “How to freeze and reheat tomato soup?” Read on if you are interested.

How long does tomato soup last in the refrigerator?

The soups that are refrigerated continuously stay fresh for 3 to 4 days when stored in the refrigerator. After opening then take the tomato soup that you have canned or packaged soup into a sturdy glass or plastic airtight container.

How long does tomato soup last when stored in the freezer?

The homemade tomato soup can last for 4 to 6 months on the frozen shelves if properly stored. However, homemade tomato soups can be consumed within a month after storage.

The soup that has been thawed and heated can be kept in the refrigerator for a further 3-4 days. It is not advised to chill tomato soup, especially when it is made with dairy ingredients such as milk or cream.

Can You Freeze Tomato Soup?

The tomato soup recipe is a cherished classic that is enjoyed at any time! Contrary to other soups tomato soup is not made with thickeners, which is why it freezes so well. This is true for canned as well as made tomato soup.

The addition of milk, cream, or any other thickener to the soup could cause the separation of dairy proteins as well as the soup’s liquids. There are, however, ways to alter the soup to prevent this from happening. A tip to keep in mind when freezing tomato soup,  you must make sure that the soup has completely cooled. This will extend the shelf time for the soup.

How to Freeze Tomato Soup?

Freezing Homemade Soup

Prepare the soup the way you would normally and then allow it to completely cool. After the soup has cooled completely, you can prepare a plastic container that has an airtight cover. Pour the soup straight into the container and leave about 2 inches of room. So the soup can expand more as it cools. Cover the lid with an airtight seal and mark the date of storage then put it into the freezer. Check out the video above for the step-by-step guide on making tomato soup freeze-ready.

Freezing Store-Bought Tomato Soup

If, for example, you purchased tomato soup at your favorite restaurant and leftovers or used tomatoes in a canned soup, then you could save the rest of the soup to enjoy later. Ideally, you’ll want to keep the soup you’d like to freeze from the remainder of the soup you’ll consume. However, if this isn’t feasible, be sure to utilize a serving spoon to minimize the chance of spoilage.

Make sure the soup has fully cooled and then put it in a sturdy plastic container with a lid that is airtight. Place the soup in the bowl leaving at least two inches of space so that the soup expands as it cools. Cover the container with an airtight lid, and write the storage date, and stick it into the freezer.

Cooking and Freezing Tips

If you’re cooking tomato soup in the kitchen and would like to add milk or cream do not add this ingredient until prepared to serve. After the soup has been removed from the freezer it is possible to add the milk or cream while you warm the soup.

For a soup that has more richness and flavor, you can consider roasting the vegetables first. This includes roasting the tomatoes prior to cooking the soup. We also suggest using beef or chicken broth in place of vegetable broth to give it more flavor.

Does your tomato soup’s consistency seem too fluid? Here are some suggestions to give somebody to soups that are thin such as roasted eggplants or Croutons. Roasted eggplants help to thicken the soup and adds a unique flavor to the soup. Croutons can also give bulk to soups that are thin, and without adding flavor.

A careful reheating process is required in the case of warming tomato soup that is creamy. Incorrect reheating can result in the milk ingredient curdling and give the soup an unappetizing appearance or lumpy consistency. To ensure that the soup’s consistency remains even, heat the soup over a low to medium temperature. Mix the soup thoroughly to ensure the consistency is and smooth. If the soup seems to be runny it is possible to add a bit of cream when you heat it.

If you’ve got leftover tomato paste leftover from cooking tomato soup you can also freeze tomato paste.

Tomato soup:  shelf life, thawing, and reheating tips

If stored in the freezer homemade tomato soup or tomato soup that is purchased from a store will last for between 4 and six months. Make sure to eat your soup in 1 month or less for maximum taste. Tomato soup that is thawed and then reheated can be stored for up to 4 days in the refrigerator. It is not recommended to refreeze the soup leftovers, particularly, when it’s a thick tomato soup.

To defrost the tomato soup, simply move the soup from the freezer to the refrigerator and allow it overnight to defrost. When the tomato soup is completely thawed, it is possible to warm it. To warm the soup it is possible to simmer it in a skillet on medium heat or microwave it in a bowl at high speed for about 15 or 20 seconds.

If you have removed the thickener or cream before placing the soup in the freezer, it is possible to include this ingredient together with other ingredients, while the soup is simmering.

How to make the finest tomato-basil soup?

Ingredients

  • 2 tbsp olive oil
  • 1 Vidalia onion
  • three tomatoes on the tree chopped
  • 3 cloves of garlic that have been crushed
  • 28 oz canned whole plum tomatoes that have been peeled
  • 2 tbsp all-purpose flour
  • 1 cup vegetable broth or chicken broth
  • 2 teaspoons sugar
  • 1/2 tsp crushed red pepper flakes
  • 1 Tbsp dried thyme
  • 1/2 teaspoon dried oregano
  • Salt
  • 2 tbsp fresh minced fresh basil

Instructions

In a saucepan, heat oil at medium-low heat, and cook onions until translucent.

Add the tomatoes to the mix and cook until tender. Add the garlic to the mix and sauté until fragrant.

Add canned tomatoes. Utilize a wooden spoon to break the tomatoes.

Incorporate the all-purpose flour, adding the vegetable broth little by little.

Mix all the spices and herbs.

Bring everything to a boiling point, then let it simmer for approximately 40 minutes under the lid covered.

Incorporate fresh basil. Blend until it is homogeneous. Return the soup that you have blended to the saucepan, and cook for another few minutes.

Variations

Blend 1 cup of shaving Parmesan into this soup for a more cheese-y and rich.

Incorporate 1/3 cup of whipping cream heavy into your blended

How To Tell If Pot Roast Is Done?

How To Tell If Pot Roast Is Done?

How To Tell If Pot Roast Is Done?

How To Tell If Pot Roast Is Done?

Pot roast is an iconic American dish, which is often regarded as an integral part of classic American cuisine. It is a combination of a huge chunk of meat, such as Brisket, or chuck, and other vegetables like onions as well as carrots and potatoes that are cooked to perfection. However, when cooking meat, the greatest challenge you face is how to achieve the perfect roast pot.

So, how do you know when the roast is cooked? Put a fork in the meat and test the hardness. If it falls off easily, then it’s cooked. Check the roast temperature at the end of cooking time with a thermometer.

The temperature inside the pot must be 145 ° or higher. To help make it easier I have outlined the steps in this post. Check it out!

How Do You Know if Pot Roast Is Done?

In the first place, you have to determine the precise quantity of heat and the time required for your roast. This will ensure that the roast does not become too soft or undercooked.

The procedure may seem a bit complicated, but with a little caution and a bit of care, your roast is going to come out perfect! Here are detailed descriptions of the steps you need to take to determine whether your roast is cooked.

Step 1: Buy a thermometer for your kitchen and use it

This prevents the serving of meat that has not been cooked or is overcooked.

The most commonly used kind of thermometer is it is the “instant-read” thermometer. They can be either digital or conventional with probes attached to one end and a display of numbers to the side.

Step 2. Correctly insert the thermometer.

Place the probe in the middle of the pot after it’s cooked to the correct length of time (time listed in the recipe for roast after cooking). Roasts cooked in the pot typically cook in 2 or 2 1/2 hours after cooking time however the duration will vary.

Step 3. Examine the temperature

Pay attention to the numbers shown by the thermometer. It is suggested that round toasts be cooked at 140°F while cooking the brisket or chuck should be cooked up to 160°F.

Roast red meats like lamb and beef to various temperatures based on your needs. Below is a short chart to help you determine the best temperature.

Temperature (in F) Temperature (in C) Roast Type

125 F 49 C Rare

130 F 55 C Medium-rare

140 F 60 C Medium

155 F 68 C Medium-well

165 F 74 C impressively done

How to Tell if a Roast is Done Without a Thermometer?

If you don’t own a thermometer, don’t have to be worried. I’ve got alternatives for you.

Pot Roast Cooking

Method 1. The test of the touch

A lot of chefs across the globe employ the test of touch. What exactly is the purpose of the test? It’s a method of testing the quality of your meat by rubbing it using your hands.

Make contact with the meat with your fingers. Next, touch the meat beneath your thumb.

If the meat is similar to the tip of your thumb It is raw. The meat is considered rare if it feels exactly the way when you press your thumb and index finger close.

Now, apply pressure to your middle finger.

If the meat is akin to that, then the meat is medium-rare. Then, join the ring finger to the thumb. If the meat is akin to this, then it’s medium.

Finally, join the pinky and the thumb. If the meat is an identical feel and texture, it does not require further cooking.

Method 2. Utilize a cake tester

Another technique that is employed by many people is to gauge the degree of doneness by using a cake tester.

Place the tester into the middle of the meat. When it’s cold the food is still raw. If it’s warm, the meat is cooked to medium-rare (it’ll be the same temperature as your own body). If it’s warm, you’re all set.

How to Tell if Pot Roast is Overcooked?

It is possible to tell if the roast requires more time to cook or not, by applying the next suggestions.

Cut a small slice or two of the roast to see whether the pot roast is undercooked or overcooked. If you’ve cooked your pot too long, the roast, it’ll appear dry and flaky fibers, and it will split when you cut it.

If you bake your roast excessively long time, the roast could be mushy or hard.

How Do You Know When a Crock-Pot Roast is Done?

If you cook in a crock-pot be sure the cooking duration is between 4-6 hours on high and 8-10 hours when cooking on low heat.

Continue to keep track of the time and then turn off the heat after examining how the meat is cooked. If your roast appears soft and you can fork it without difficulty, it’s completely cooked.

Take the roast out of the crockpot, and chop it into chunks. Serve with gravy and vegetables to enhance presentation and taste.

How To Tell If Pot Roast Is Done?

These factors will allow you to determine whether a roast requires more cooking time or not.

Temperature

In accordance with USDA guidelines According to USDA recommendations, roasts must be cooked at 145° F and allowed at a temperature of around three minutes. A temperature of 100.6 to 106 degrees F (minimum) must be guaranteed to allow the food to cook safely.

Color

Meat cooked to temperatures of 172-180 degrees Fahrenheit or 78 to 85 temperatures Celsius is considered to be well-cooked.

Additionally, cooked meat has an appearance of a dark brown crust on the outside as well as an interior that is completely brown or gray with the absence of any red or pink.

How do you cook a tender roast in a pot?

If you’re interested in learning how to cook your pot roast so that it’s tender and juicy each time, it’s helpful to learn some helpful tips and a bit of advice to guide you down the right track. Let’s see how you can cook pot roast in the correct way.

Selecting the Meat

Common cuts used in pot roast include chuck Brisket, top round bottom round, and the rump. It is always possible to ask your butcher at the grocery store for advice on the best cut suitable for pot roast.

Less fatty roasts like rump, chuck, or brisket are less marbling of fat, which means they are less chewy if they are not cooked properly. It’s the connective tissue and fat in the roast that gets softened through long slow cooking, which results in great flavor and tenderness. You can still get tender meat from less lean roasts through braising, that is, slow cooking the roasts in a tiny volume of liquid inside a covered pan for a prolonged period at low temperatures.

Always purchase more meat than you’ll need. leftover pot roast can make delicious sandwiches the following day. In general, you can expect to receive two to three servings from one pound of boneless roast and two servings from one pound of bone-in roast.

Moist Heat Is Required

The cuts of meat that are used to make pot roasts have lesser fat as compared to steaks, and the long cooking time with liquid (braising) reduces the meat’s fibers. There are a variety of methods of achieving humid heat, such as cooking on the stovetop, as well as in an oven using an enclosed pot or even in the slow cooker. Additionally, pressure cooking with the pressure cooker of your choice or an instant pot is also a great way to braise the meat, however in shorter amounts of time.

Prepare the Roast by Seasoning and Browning

Browning the roast on all sides before making it braised or put under pressure cook will help seal in the flavor. Begin by sprinkling it with salt and pepper and any other spices, such as Cajun seasoning, marjoram, or Thyme. It is also possible to dust the roast with flour or cornstarch before cooking. In a pan for frying cook the oil over a high temperature. Add the meat, and cook each side until it’s cooked. It will take between 8 and the 10th minute, but make certain to budget the time.

Browning enhances the appearance and flavor that the animal has. The high temperature used in browning will caramelize the proteins and sugars present that are present in meat resulting in a smoky flavor. If the recipe doesn’t require browning, you don’t have to be concerned about it.

Using an Oven or Slow Cooker

The most common way to achieve the most optimal results when making the roast bake in the oven in the slow cooker. If the roast simmers in a pan on the stove you must be more attentive to the process of cooking. One of the most appealing aspects of roasting a pot cooked in an oven crockpot is that you can put it in the oven and then walk away.

Try out the Cooking Liquid

When you cook your food, it may utilize anything from cola to tomato juice to beef broth. Explore different recipes for pot roast for ideas on what you can make your braising liquid. Aromatics like sauteed onions or garlic are usually used in the liquid used for braising.

Vegetables and All-in-One Meals

Add some vegetables to the meat, and you’ll have a delicious one-pot meal. Onions, potatoes, carrots, and mushrooms are common ingredients, but you can make your own ideas. It is important to add vegetables at the beginning while you cook in the Crockpot. When roasting in the oven include vegetables approximately one hour before when the meat is cooked.

Timing

If you want to make it as quick as possible opt for a pressure cooker pot roast. You can cook an entire roast in around an hour. If you bake it there is a need for 2.5 up to five hours depending on how big the pot roast. If you are cooking a slow cooker roast, it’s best to start the cooking in the morning, so you can get the roast prepared for dinner.

An undercooked roast will be chewy and hard. Check the roast using a fork before removing it from the pan. If it’s done it will slide the fork through easily and you’ll be in a position to pull off the meat with a forkful. If it’s still firm, transfer the roast to the pan and cook it for another one hour.

Another issue is cooking too long for the pot roast, which leads to dry and dry-looking meat. Avoid this by making sure that you have enough liquid to braise the pot, and make sure you don’t let the roast go dry. For smaller roasts that weigh less than three pounds in weight, test for doneness after two hours. For larger roasts check for doneness at three hours after the time of cooking.

Related Questions

Why is my roast so dry in the crockpot?

If the roast you have isn’t as tender it could be that you used an unboned chuck roast. It could also be that you didn’t cook it enough. It might require another 2 to 3 hours of cooking time, i.e. cook until it can easily be sliced with the fork.

What is the recommended inner temperature of a roast be?

With a meat thermometer, the temperature should not be less than 145°F and 65 degrees Celsius in the largest portion that is the meat.

The USDA suggests an inside temperature of 140 degrees Fahrenheit. Examine the meat’s temperature in different parts, starting with the largest portion. Take note of the smallest.

Can you overcook pot-roasted food?

Yes. If the first taste of roast is chewy, it’s most likely that you’ve cooked the roast for too long.

The roast is overcooked if it is placed on the stove for more time than it is advised. The optimal time to cook a pot roast is between 8 and 10 hours at the most.

Mistakes to Avoid When Cooking Pot Roast

  1. Roasting the wrong way

The tough, affordable cuts of beef are the best for pot roast. This means that you can use nearly every cut of beef, isn’t it? The problem is that cuts of beef that lack connective tissue may be too hard or will turn into the consistency of mush after a long slow braise in the oven.

Choose these roasts instead Find the chuck, brisket, or round roast to make pot roast. Each one is packed with connective tissues to gradually break down into collagen that is rich and supple which will tenderize the meat and enhancing the gravy’s flavor while they cook.

2. Not browning properly

Browning a large roast can be an overwhelming task because many believe that searing is not enough to create a juicer for roasts, it’s tempting to skip this step completely.

Make sure to brown the pieces: Browning, not searing is a true flavor enhancer that requires only an extra few minutes on the stove. The cooked parts are the equivalent of gold. Just a tiny amount can go in a big way to make the dish even more delicious. Cook your roast inside the exact skillet that you’ll cook the meat in after the deglazing.

You can also try this trick for a smarter, better method to brown Meat to make Stew

3. Deglazing with only broth

Deglazing lets out all the wonderful caramelized bits that are created when cooking the roast. But when a roast cooked exclusively with beef broth will be robust, it can taste flat and uninteresting after braising.

Make use of broth in addition to this using Red wine (or even vinegar from red wine) as the initial phase of deglazing. Incorporate beef broth with a small amount of tomato paste and fresh herbs before cooking the roast. Cover it with a lid and begin cooking the beef.

Don’t drink wine when you use this trick: The Most Effective Alternative to Alcoholic Substitutes for White and Red Wine. & White Wine

4. Cooking vegetables for too long

I’ve often imagined the pot roast as a one-pot wonder in which I could put all ingredients in one pot and with just the appropriate amount of time would miraculously make my roast and the vegetable fork-tender simultaneously. After a few mushy vegetables, I discovered that the beef needs to swim alone for a few minutes inside the braising fluid before the vegetables are added to cook.

Timing is everything: cook the roast of beef in 1 1/2- 2 hours before when the potatoes and carrots (or turnips, parsnips, or any other hearty veggies) are put into the pot.

5. Do not thicken the gravy

Gravy, to me, is among the main differences between stews made of beef as well as pot roast. The liquid that comes from the roast must be velvety and thick not just a little thickened, like a stew. The problem is finding ways to thicken the gravy after the braise that doesn’t result in lumps or a dirty pan.

You can also make an emulsion of flour and softened butter, then stir it in the braising fluid following the braising. This paste is similar in concept to roux — where the butter coating on the flour stops lumps but is known as beurre manie.


Horseradish Substitute – The 8 Best Options

Horseradish Substitute

Best Horseradish Substitutes

Horseradish Substitute


Finding a horseradish substitute may be much easier than you believe. If you suffer from an allergic reaction to horseradish, or don’t have any in your kitchen, here are five options to consider. We looked for ingredients that can deliver fiery heat since that’s the flavor you’ll get from horseradish.

We suggest the following as the alternatives to horseradish:

Five options for you If you don’t have any horseradish

1. Wasabi paste

Wasabi is part of the same family as horseradish.

Wasabi paste can be the most suitable alternative to horseradish since they have a comparable taste profile and come from a similar Brassica family. Outside of Japan Wasabi pastes are a mixture of green coloring and horseradish so the distinction between them is minimal.

Wasabi’s main issue is its vibrant green color which may not work for certain foods. For example, if you’re cooking roast beef in cream sauce, the green hue will appear odd. For other recipes, wasabi will match perfectly.

How much horseradish to use?

I’ve read on cooking websites and forums about increasing the quantity of horseradish by up to 50%. I would suggest being cautious when you cook with it. Wasabi can be a powerful punch, so try just a little amount and gradually increase it if you feel the need to.

Health warning: If searching for a replacement option due to allergies, stay clear of wasabi in the form of paste or root as it’s in close proximity to horseradish.

2. Brown mustard

Brown mustard served in a white bowl

Like wasabi, mustard also belongs to the same family as horseradish and therefore it also has a similar spice. Brown mustard has a great number of seeds. This provides it with a strong taste that is peppery and closely resembles horseradish.

In terms of appearance, brown mustard is more appealing than wasabi. It’s a lighter brown shade that’s more similar to the off-white color of horseradish.

Important: If searching for a dijon mustard replacement, then go to this site.

How much should you make use of?

Equal quantities are recommended when replacing brown mustard for horseradish.

3. Fresh ginger

Be careful not to add too much ginger to your food as it will make your food taste bad.

Fresh ginger has a distinct flavor with a blend of lemony and earthy flavors. It begins to warm gradually on the tongue but isn’t to the intensity of horseradish.

How much to make use of?

It is recommended to use more horseradish than ginger to increase the heat. However,  the flavor of the dish can begin to be unappealing if too much is consumed. The best choice is to make use of moderate quantities of ginger and acknowledge that the heat may be less than that of the original recipe.

4. Black Radish

A board with black radish

The skin is the spiciest component of the black-radish.

The black radish is characterized by skin that is dark black-reddish and resembles beetroot with respect to color, shape and size. Inside, the flesh is white and crisp and has a spicy, hot taste. Imitating the flavor of horseradish is attainable with this vegetable.

The problem with black radish is that the major part of its heat can be found located in the skin. Therefore, the best option is to grate the entire vegetable to get the hot spice. The skin, however, is extremely dark and doesn’t mimic horseradish in a convincing way. It is possible to peel the radish but the flavor will be less sour.

How much to make use of?

\Equal quantities are recommended when replacing black radish with horseradish.

Horseradish Sauce

If you prefer cooking from scratch, the recipe below will work for you. For all others, the horseradish sauce, which is available in bottles purchased from the supermarket, is an alternative. Do not expect the same flavor with packaged products as it’s likely to be smaller.

How much should you use?

It is likely that you will need to use 1.5 times the amount of fresh horseradish. However, as with all other alternatives in this list, you should make sure you use less than the amount required, and then taste it to determine if it is necessary to increase the quantity.

Tips: Vinegar neutralizes the reaction and improves the flavor. It should be added as soon as possible to freshly grated horseradish in order to create a more mild taste.

6. Daikon

Daikon is a winter radish that can be used to replace horseradish in numerous recipes.

This radish has a light, tart flavor, with a tangy texture that is distinct from horseradish. It’s milder and has a less spicy flavor than the other radishes.

Daikon is a great ingredient to substitute horseradish in stews or soups or stews, and you can also make it into an alternative to a low-calorie dish for a food item.

Daikon is a raw vegetable and serves as an energizing appetizer in a variety of ways.

7. Sauerkraut

This particular product is derived from lactic acid that is a natural component of the shredded and salted cabbage.

It can be used to substitute horseradish in savory dishes. It is created by cutting the heads of cabbage in order to get rid of the broken green leaves.

Sauerkraut has a bitter flavor and when the sugars have been converted to acid, it indicates that it’s prepared for use. You can incorporate it into recipes such as stock, sausages, and salted meats.

8. Parsnip

Make use of parsnips to replace horseradish for your next dinner. It’s a staple ingredient in soups, broths, and chicken. It can also be cooked, steam, or even mashed.

The root vegetable is known for its distinctive flavor. It’s sweet and tastes similar to carrots. The distinction between the two root varieties is that they are part of different families and come in distinct shades. Parsnip is a substitute for carrots in a variety of recipes.

Frequently Asked Questions

Does Wasabi an alternative to horseradish?

Yes, it is. Wasabi can be described as the most popular alternative to horseradish. It can be used in nearly every recipe that calls for horseradish.

Does horseradish resemble ginger?

Ginger and Horseradish are very similar. In fact, ginger is an excellent alternative to horseradish in numerous recipes. They share a similar flavor and produce excellent outcomes if you use them during the cooking process.

What is horseradish sauce made of?

The horseradish sauce is made of horseradish roots, which are not contaminated by salt and vinegar. It is possible to mix it with cream, sour cream, or another creamier ingredient to give it more flavor.

What is the flavor of horseradish?

When you eat freshly grated horseradish roots or the condiment it is a flavor that is strong and spicy with a distinctive spicy taste. While some ingredients like chili peppers are spicy to the palate, horseradish can be a great way to cause sinus irritation.

Horseradish is commonly used as a sauce for barbecued beef and other meats served within the U.K. and is well-known in Poland as well as other regions of the world.

Do I have to use radish instead of horseradish?

Any radish can be used as a substitute for horseradish. If you want a less spicy alternative you can choose daikon or the more common red variety. To increase the level of spice go for a black radish and make use of the skin and the flesh.

Is horseradish a great substitute to Bloody Mary?

Wasabi is a wonderful source of spice and heat in the Bloody Mary. Make use of 1 Tablespoon of wasabi to create four cocktails. You can also grate into the ginger to give it a bit of spice.

What’s a great horseradish alternative to prime rib?

Wasabi is a great option for those who are comfortable with the green flavor of your food. Brown mustard is a good alternative if you’re looking for similar flavors in addition to less vibrant colors in the dish.

Common uses of horseradish

  • Salads
  • cocktail sauce
  • potato salad
  • sandwiches
  • dressings
  • margaritas

Homemade Horseradish Sauce

Horseradish root is used for many purposes among them the well-known Horseradish sauce. It is easy to make at your home. Get the following ingredients together and start cooking

Ingredients

  • One teaspoon salt
  • One teaspoon sugar
  • 1/2 teaspoon of cider vinegar
  • 1 horseradish root peeled

Instructions

  • Begin by cutting the horseradish into pieces. After that, place them in the bowl.
  • Add salt, vinegar, and sugar.
  • Place the mixture in the food processor and run it for about a minute.
  • Then, you can place the mix in an airtight container.
  • It can be stored in the fridge. This sauce will last for up to two weeks.

Summing up

If you are looking for an alternative to horseradish, there are a variety of options in the local grocery store. The brown mustard freshly-cut ginger, black radish, and horseradish sauce are all good choices to replace horseradish. Although they taste similar, some appear very different. You should take this into consideration when deciding on which horseradish substitute should you use in your dish. Now go cooking!


Does Evaporated Milk Go Bad?

does evaporated milk go bad?

does evaporated milk go bad?


Evaporated milk can be described as a dairy product that is produced through the process of evaporation and the removal of approximately 60% of the water. In contrast to condensed milk,  it doesn’t have sugar or any other sweetener. However, it is more stable on the shelf than ordinary milk, so it can be used for a long time.

The main questions, however, you would like to ask are: how long does evaporated milk last and does the evaporated milk go bad? Let’s discover.

The dehydrated milk is later sterilized at high temperatures. The result is a dark, healthy product that has an aroma of caramel and a longer shelf time than milk.

You can add water before you get regular milk, however, it’s typically an ingredient you can utilize to cook delicious meals, without changing its form.

The shelf life of evaporated milk is largely dependent on its best before date as well as the method of storage. If you store an opened product improperly, it could turn bad and then become unfit to consume. However, when it is stored in an unopened container, it is unlikely to spoil even if the container is damaged.

How Long Does Evaporated Milk Last?

The milk that evaporates is sterilized, unsweetened condensed milk that does not contain sugar as an additive to preserve it. Therefore, it is important to be aware and be sure to check how long it lasts.

Unopened Evaporated Milk

The canned item will remain in top condition for at most 1.5 or 2 years following the date that is the best before when properly stored. If the storage conditions aren’t ideal If you store your container in your kitchen area, then you are able to make use of this product for the duration of a year.

Be aware that prolonged storage can alter the flavor, color, and color of evaporated milk and texture, however, it’s safe to drink in the majority of cases. However, refrigerating the product in sealed packaging won’t extend the shelf-life of the product.

Opened Evaporated Milk

The milk that evaporates will last 2 to 3 days after you open the can however, you must keep it refrigerated. Certain producers say they are safe to use for 5 days following the opening of the package.

Avoid storing evaporated milk in an open container. Make sure to pour it into a container that is sealed and keep it in the fridge.

Low-Fat, Skim Evaporated Milk

The evaporated milk can be consumed up to nine months after the expiry date if it is stored in a dark and cool pantry. A bottle that is opened will last no more than 2-4 days if it is kept in the refrigerator.

7 Tips To Tell If Evaporated Milk Has Gone Bad

Remember that you shouldn’t drink it for longer than 3 or five days, even if it seems fine as it’s probably not. However, it’s very rare. Most of the time you’ll see obvious evidence of spoilage. Let’s take a look.

Milk Skin

There are times when you will see milk skins appearing on the surface of the product that has been opened. This is not an indication of spoilage, but rather a normal process of fat segregation that happens when evaporated milk is stored in a container that has not been properly sealed or not airtight.

This will occur when you expose milk to air. It is possible to resolve this problem by warming the milk, stirring it up until it reaches that desired level of consistency.

Smell

It won’t smell awful. It’s likely to smell different from a fresh one. If you notice a foul smell, there is no need to think about it. It’s time to dispose of the smell away.

Color

The milk that is fresh evaporated will be white, therefore any color changes are a sign that something is not right. If your product begins to turn brown or green or black, you need to eliminate it.

Texture

It has a smooth texture. The appearance of curd-like lumps signifies that you have spoilt evaporated milk.

Taste

There’s no reason for you to try a taste of evaporated milk in order to conclusively say that it has gone bad. But, a sour flavor indicates that it’s not good food in the future.

Mold

If you see mold growing on the milk that has evaporated You can be certain that all the content has gone bad. This isn’t a solution that can be solved by simply removing the change. Get rid of it immediately to avoid health issues.

Can

If you discover that an unopened container containing evaporated milk has been damaged or dented, rusted, or is leaking, the most effective solution is to dispose of it. This type of container is at risk of extremely dangerous botulism poisoning.

How To Store Evaporated Milk

The best practice is not to keep opened evaporated milk in the refrigerator for longer than two hours. In the event that you do, you’ll allow the growth of bacteria in the fridge at ambient temperature which could result in potential harm.

Kitchen

It’s not difficult to keep an unopened container filled with evaporated milk on the countertop or in the cabinet of your kitchen. This way, you will be able to protect your item for between 6 and 12 months.

Pantry

Storing milk cans that have evaporated in a cool and dark area is an ideal way to extend the shelf life. It can be kept in a closed container for two years if it is not opened.

On the contrary, you can store an unopened bottle of skim evaporated skim milk, low-fat, and low-fat within your refrigerator for approximately nine months.

Fridge

After opening the can, it is time to put the milk that evaporated in the refrigerator. Don’t keep it in an open container, instead pour the leftovers into containers or jars that are airtight containers to keep them from inhaling the scents of other food items.

Beware of containers that aren’t airtight, as oxygen can alter the contents and lead to the formation of a film on the surface.

Freezer

It is not the best option because it weakens the structure of the product. It also results in loss of color and flavor and can lead the ingredient to separate. But, you can still make it happen if you need to and extend the shelf life of your product for up to 3 months.

Conversion

It is possible to convert the evaporated milk to regular by adding the same quantity of water. If you require one cup of milk, it’s sufficient that you mix 0.5 cups of the evaporated milk and 0.5 cups of water. Stir them thoroughly and take the milk exactly as you would normally.

A different option would be to create an alternative to buttermilk. You’ll require a one-half cup of evaporated milk as well as one tablespoon of white vinegar or lemon juice to make a cup of buttermilk.

The Risk Of Consuming An Expired Evaporated Milk

When you check the label of the product it will be apparent that your evaporated milk comes with an expiry date on it. This is the date that the product will be of high quality, however, you can consume it up to the date.

It is generally accepted that you will most likely utilize this milk for about two months, but keep in mind that the shelf life is generally shorter.

If you own a bottle of evaporated milk that’s been sitting for too long the best choice is to examine the ingredients before taking it. If you don’t, you could be suffering from digestive tract disorders or food poisoning. These are common symptoms which include:

  • Fever
  • Stomach cramps
  • Nausea
  • Diarrhea

Rusted cans pose a risk because they can directly trigger botulism, a serious illness caused by a toxin that is accompanied by symptoms such as:

  • Trouble breathing
  • Muscle paralysis
  • Death

Can You Freeze Evaporated Milk?

As you’d expect evaporated milk producers do not suggest freezing their milk because low temperatures alter their consistency. In the end, your creamy milk may be separated and the quality of your milk will decline.

But, freezing is still possible as well, and you can use the frozen food item to cook and bake as needed. In addition, you can increase your texture and texture simply by stirring it.

One of the most effective ways to store evaporated milk in the freezer is to pour it into an ice cube tray. So, you’ll have the ability to make use of a smaller amount when you need to. If you’d like to add this item to your broth or soup it is not necessary to let it thaw at all. It’s enough to select a couple of cubes and add the soup or broth.

Another option is to pour the remainders onto baking sheets, then put them in the freezer, and smash the ‘plate’ into powder.

It is enough to add some water to it once it’s thawed and then get the milk you can use as you require.

Do not freeze a can that hasn’t been opened. It’s not logical since canned food products don’t get rotten when the packaging is intact. There’s also the possibility of destroying the can when temperatures are low. It isn’t a viable option as you don’t need the entire amount at one time.

How To Store Evaporated Milk?

When it comes to the storage of evaporated milk, it’s simple and easy. Canned evaporated milk can be stored in a shelf-stable condition and is able to be kept at the temperature of the room. It should be stored in a cool, dry area far from light sources and heat.

The kitchen pantry or cabinet is the perfect place to store things. It’s not required to store an unopened container in the refrigerator. The manufacturing process and the packaging can ensure that it will last longer than the refrigerator.

After opening, store the product in a refrigerator for future use. Cover the surface that has been opened with plastic wrap or place the remainder of the product into a tightly sealed container or Jar.

FAQs

Are evaporated milk and condensed milk the same thing?

No. If you’re often confused about these two products, you’re not alone. Many of us have the same problem.

Many people believe that they are the same products. They aren’t, however. Condensed and evaporated milk are dehydrated concentrated milk.

The main difference is the sugar amount. Evaporated milk is often called unsweetened condensed milk. It’s simply dehydrated milk that has the addition of no added sugar.

Condensed Milk is short for sweetened condensed milk which is dehydrated milk that has been added with a significant quantity of sugar.

While both appear like they are similar, they possess different features and functions, and this is especially true when you add sugar. Be sure to follow the recipe carefully before you purchase the correct product from the store.

Do you have to use evaporated milk?

An unopened bottle of evaporated milk can be considered to have a long shelf time. If the container isn’t damaged and you don’t notice any signs of spoilage It is usually suitable for consumption.

There could be a change in flavor or taste due to the fact that the quality has been degraded over the course of time.

What else can you make use of the milk that you have evaporated for?

Add it to your tea or coffee, or use it in baking and cooking. There are many recipes that require evaporated milk. It is also possible to make use of it to replace whole milk. To do this, dilute the milk by adding water at the ratio of 1:1.

How long can you keep milk evaporated unrefrigerated after the opening?

In accordance with the guidelines for food storage according to the USDA Once opened evaporated milk must not be kept in the refrigerator for more than 2 hours.

Bacteria can multiply faster than what you’d imagine at room temperature and could make the food inedible to eat. While many people have consumed food or milk stored outside and didn’t become sick, you will never know what you’re going to get. It is always better to be safer rather than sorry.

Wrapping up

Does evaporated milk go bad?

Evaporated milk is a tasty and nutritious dairy product that will last longer than regular dairy. After opening the can, it’s important to consume the contents within five days in order to stop it from deteriorating and causing pain or illness. Be cautious, keep the nutritious food correctly and enjoy it for longer.

Beware of the risk of food poisoning by ensuring cleanliness and storage that is safe. If you notice any indications of spoilage, be sure to stay in the safe zone and dispose of the remainder.


Does Oyster Sauce Go Bad?

Does Oyster Sauce Go Bad?

Does oyster sauce go bad?

Does Oyster Sauce Go Bad?

Does oyster sauce go bad? I am sure this question is hovering in your mind at the moment and you’re looking for an authentic answer. Why not? If you’re thinking of making use of oyster sauce for one of your meals, you should be cautious about the oyster sauce becoming spoiled because it could make you sick if you consume the rotten stuff.

You’re probably aware that eating oysters is slightly dangerous. You’ve probably also have heard of the saying that you should only consume oysters during months with “R” in the title “R, which means September through April. You do need to be aware of all this. If they’re not fresh, they could cause illness. But what about oyster sauce? Does it go bad as well?

How you keep your oyster sauce can affect the length of time you can keep it after the bottle is opened.

In this post, I’ll detail everything you should know about this sauce. I mean, how to preserve it and how long you can keep it in the fridge as well as the indications of it being spoiled, and so on. Continue reading, and everything will be explained slowly.

How do I store oyster sauce?

There are certain condiments such as vinegar and soy sauce, which aren’t required to be stored in a refrigerator after being opened. It’s not the same for oyster sauce, though. But let’s not hurry. I want to take each matter step by step and discuss the reasons.

First thing first. After you have opened the oyster sauce bottle, it should be kept in a dark and cool space. The shelf of an antique kitchen is ideal, but any cabinet that is cool and doesn’t have a lot of light can be used.

It is important to store it in a sealed container. The container you purchased is okay provided you screw the top back securely. If you purchased it in a container and you have opened the can, you must put any remaining food items in a glass or plastic container with a secure lid and then freeze it.

A top-quality manufacturer, Golden Dragon,  advises that it is recommended to refrigerate the product following the opening, though, it’s not essential. However, keeping items in this manner at cold temperatures can prolong their life span.

Other brands, such as Maekrua don’t contradict. The labels on their products clearly state “refrigerate after opening.”

If you decide to keep an open bottle of oyster sauce at ambient temperature for a couple of days (maybe even for a couple of weeks) the sauce will not go off. However, the quality is likely to degrade more rapidly than if stored in a cool place which is why refrigeration is ideal.

How long will the oyster sauce last?

The shelf-life of oyster sauce depends on its “best before” date printed on the label of the bottle, as well as the method you preserve it. The ingredients used to make the sauce include oysters, sugar and spices. They are simmered until the sauce has caramelized and then its consistency turns thick, sweet and savory.

As with most food items that are cooked, if it’s left for long enough it will eventually be gone. However, regardless of what it is that the “best before date” is on the bottle, you’ll still be able to eat it safely for a while afterward.

Irrespective of the brand of oyster sauce we are discussing, the shelf-life of the bottle that remains unopened will be between 18 and 25 months. You must examine your bottle’s label that you are using and keep in mind that it’ll be edible for a brief time after the date has expired.

The best before dates are described in terms such as “best by” and “best if used by.” They all mean the same thing. Although it is best to know these guidelines and adhere to them whenever feasible, it’s not a requirement.

If you notice that your oyster sauce has developed an odd odor or if you test it by tasting it and its flavor is not what you would like, you should throw it out.

How long will oyster sauce be in its prime after its opening?

The method you use to preserve the oyster sauce will affect how long you can keep it after the bottle is opened. For the best extension of time, make sure you keep the bottle well-protected and refrigerated all the time.

Based on the recommendations of the foodsafety.gov website, you should use up what’s left of the bottle in about three or six months. This is the general rule but if you’re buying one of the most premium brands, you can count on it to last longer, possibly one year or more, in the words of Golden Dragon.

The bottom line is the fact that if you’re not sure whether the product is of good quality or not, try to use up the bottle within six months so that you can enjoy the best flavor and quality.

How long can oyster sauce last in the fridge?

When the oyster sauce has been stored in the refrigerator throughout the day after it is opened, it will last for up to 2 years.

Is oyster sauce opened safe for use after the expiration date?

As previously mentioned,  it is safe to consume oyster sauce even after the expiration date, provided it was stored properly and the quality of the product hasn’t been compromised. But, it is important to make sure there aren’t any indications that the product is damaged or spoiled.

Also, keep in mind that “best by” dates that manufacturers put on labels are not for reasons of safety. They’re there only to show when the merchandise is expected to keep its best, highest quality.

How can you tell if the oyster sauce has gone bad, or spoilt?

If you notice any bad smell of the oyster sauce, you ought to throw it out. Another reason to dispose of it is if you detect any evidence of mold.

By adhering to the most hygienic methods and following the most fundamental food safety guidelines, you will be able to avoid food poisoning.

In the long run, the oyster sauce will eventually go bad. Oxidation will cause it to darken in color and more intense in flavor. Now enjoy your sauce!

How to store the oyster sauce

Oyster sauce is similar to other condiments. The method of processing ensures it is shelf-stable. This means they will have an extended shelf life, even after being opened. Here are four ways for storing oyster sauce:

Keep it sealed: Depending on the kind of oyster sauce you purchase, it will usually come in a jar fitted with a screw top or flip lid. No matter which one you purchase be sure to secure the lid securely before placing it in storage. One of the primary reasons to seal it before storage is because it increases the spreading of bacteria. You should be aware that overgrowth of bacteria is among the main cause of food poisoning, even in cases where the food isn’t past the sell-by date.

Keep away from direct sunlight: Avoid direct sunlight. If you’re not planning to store an oyster sauce container in your refrigerator, you must ensure that it’s kept away from direct sunlight. One of the primary reasons is the fact that bacteria thrive on food items when exposed to temperatures ranging from 41 and 135°F. This is known as the “temperature danger zone”. Hence, it should be kept far from sunlight direct is specifically relevant if you reside in a hot region.

Keep it in a cool and dark place: In order to avoid exposing oyster sauce to the sun’s rays, it is recommended to store your oyster sauce in a cool and dark location. It can be kept in the pantry or in a cabinet in your kitchen.

Place your oyster sauce in the fridge: Although it’s not required to store the oyster sauce in your fridge, it will help in keeping the flavor longer, especially if you plan to keep it for a while.

If you are looking to store this sauce, the most effective suggestion is to follow the manufacturer’s guidelines. The brand you choose will vary the manufacturer will advise you to keep it refrigerated once opened, while some don’t.

Wrapping up

Does oyster sauce go bad?

Oyster sauce is an excellent addition to any dish, and based on the type of brand, it could cost a lot. So, it is important to preserve it for the longest time possible.

Also, it is important not to fall into the trap of eating oysters that have gone bad, you should ensure that you follow the proper precautions of inspecting the bottle to look for any evidence of mold and smell it prior to using it for your meals.

It is expected that when the bottle is first opened, it might go bad, and one of the first indicators you’ll notice is the liquid starting to split.

Oyster sauce that’s been kept for a time after opening may change its consistency, color, and flavor. However, if it has a pleasant aroma and no evidence or evidence of mold,  it is likely to remain safe for use.

When the oyster sauce is manufactured, producers make use of cornstarch to increase the thickness of the sauce. If you notice that water is separating on the surface of the sauce it’s a sign that the sauce has become old. You can stir it around, and, if this doesn’t fix the issue, discard it.

If your food is deteriorating, your health is at risk when you eat it. So, make sure you pay attention to the expiry dates and don’t neglect to ensure the safety of food items.


What Does Boba Taste Like?

What Does Boba Taste Like?

What Does Boba Tea Taste Like?

What Does Boba Taste Like?What Does Boba Taste Like? If you want to know more about this topic, you should go through this post right now as it contains all the details about Boba Tea.

Boba tea is an extremely sweet drink. The balls themselves don’t contain any flavor, though they take in some liquid they’re in. The only flavor you get from drinking tea boba comes from the liquid you choose to drink.

You can choose either a milk-based or fruit-based tea. Certain places offer more exotic flavors that give the boba ball an enticing taste.

That’s why I came up with you with the information you wanted to know. In this post, I’ll discuss all of your questions about the taste and texture of boba or bubble tea.

Let’s start, shall we?

Boba Texture

Boba tea is extremely creamy and frothy and has a texture similar to a melty milkshake. The tapioca ball in the middle of tea can be chewy because they are made of tapioca starch.

In general, boba teas are not cold, however, they’re not frozen and blended in the same way that frappes and milkshakes are, and therefore, they will not freeze the balls of tapioca that are at the bottom.

Do you chew the bubbles in bubble tea?

The bubbles on the top of your drink or bubble tea can be eaten and are extremely chewy which is something many people love.

You can also take a sip of the bubbles if do not desire to chew them as the majority of people chew on the bubbles and find it fun.

Why is Boba black?

The majority of tapioca pearls used in boba tea are black instead of clear or white. They are a better choice for bubble tea than the white tapioca pearls because they perform better in showing up.

Since boba tea typically has bright colors the only black tapioca beads are visible they are in the liquid. White tapioca balls become clear after being cooked and then disappear.

Is Boba supposed to be chewy?

Tapioca Balls are constructed of starch made from cassava. It is a common starch or flour substitute used in cooking. It will always be chewy once the food is prepared. Because of this, the boba tea balls will be chewy, but not too hard.

If tapioca balls aren’t cooking for enough time, they might have a hard center inside between the balls. This could be fixed by cooking it for longer and is an indication that the tapioca pearls were not cooked properly.

What is the difference between white and black tapioca pearls?

Although most cooks at home use white tapioca pearls in their kitchens The majority of boba teas have black pearls of tapioca. This is due to the sweetness they provide as well as their appealing color.

The black pearls are made of brown sugar. This is responsible for their sweetness and also for their distinctive hue. In addition, there is no discernible difference between white and black pearls.

They are both derived from cassava root and share identical cooking instructions before when they are used in the boba tea.

What Is Bubble Tea?

The bubble tea (aka pearl milk tea(also known as tapioca tea the boba nai-cha, boba milk tea, or simply boba) is a drink made of tea that was invented in tea stores of Taichung, Taiwan, in the 1980s.

The recipe typically has tea as the base, blended with fruit or milk. There are also slushy versions that are blended with ice and syrup, or fruit. The most popular bubble tea is served cold.

The most sought-after varieties of bubble tea include bubble milk tea made with tapioca and green tea bubble milk that contains tapioca.

There are many bubble tea stores in America that offer “milk smoothies” or ice shakes that are inspired by the boba concept however they don’t contain tea-based ingredients. There are some boba cafes that offer an alternative to sugar to sweeten the beverage, for instance, agave or stevia. It is common to find the drink offered in transparent plastic cups that have dome-shaped lids, however, many establishments now offer devices that let them close the top using cellophane to make a spill-proof cup (also permitting the shake to be done) and then to pierce it by a straw large enough that the pearls can go through.

Types, flavors and textures of bubble tea

The base of tea is made of black tea (usually Oolong and Earl Grey), green tea (commonly jasmine), or coffee!

The fruit flavors that are commonly accessible fruit flavors are the following: strawberry, green apple mango, passionfruit, lemon watermelon, lychee cantaloupe, pineapple, peach honeydew, bananas, coconut, avocado, jackfruit, and kiwi.

Other flavors that are not fruit-based: The most popular flavors that are not fruit include taro, pudding mocha, coffee, chocolate and sesame. Other popular flavors include barley, sesame ginger, almond rose, lavender caramel, and violet.

Snow bubble: It is a kind of drink made from boba by mixing flavorings with frozen ice instead of the standard coffee or tea base. The same mix-ins may be mixed into these slushy drinks made from boba.

Tapioca balls are the most frequently added chewy treats however there’s a vast selection of other options to add texture to the beverage, like green pearls that have some the flavor of green tea, jelly cubes that come in flavors like konjac, coconut jelly, grass, lychee and mango.

Azuki beans or Mung Bean paste also gives the drinks a slight taste and texture.

Foam red tea: (The English name “foam tea” is not used in all of Asia.) It is a bubble tea with tapioca, but without. It is blended using a cocktail shaker with either warm or hot tea with sugar or syrup, and the addition of ice cubes. Foam or froth can be made by mixing the drink manually or by using the aid of a machine.

Foam milk tea: similar except with the addition of milk.

Milk tea with black pearls: It is made from black tapioca balls (also known as “pearls.”

Instant tea bubbles: It is produced by DeDe or other brands. It is available in certain countries and is made up of tea bags that can be served one-time including powdered milk as well as sugar.

Boba Tea is sweeping the World

Since its inception during the 1980s throughout East Asia, bubble tea has grown in popularity throughout Australia, the UK, Australia and the United States, with boba shops and bars popping up mostly in the larger cities.

Consumers remain awestruck by all kinds of bubble tea, despite the numerous critics of the health benefits, the dangers of choking as well as chemical ingredients.

This is among the main reasons that the process of making your own bubble tea at home has become so popular. When you make your own bubble tea and know precisely what’s in the drink and you are aware of how safe and healthy it is. Additionally, you can alter the sweetness and flavor according to your preference by making the pearl milk tea yourself.

Even McDonald’s is stepping up its game!

As per huffingtonpost.com, “In June 2012, McDonald’s McCafe locations in Germany and Austria began offering bubble tea. They offer black, green, or white tea, available with or without milk. Fruit syrups are also available, bringing the total number of possible flavor combinations to 250.”

How to Make Bubble Tea at Home

If you don’t have a tea bar near your home, then you are able to make your own bubble tea at home. You’ll need access to an Asian supermarket or market to get the ingredients to make the boba.

There’s a wide range of bubble tea components and equipment accessible online, and you can find the best ingredients for making your own bubble tea quickly and conveniently.

Here is a video to check the reaction of people tasting this drink for the first time. Watch the fun!

Making Bubble Tea With Syrup

The video below demonstrates how to make bubble tea using the syrup, soaked into the pearls of tapioca to create a more sweet taste. This is an excellent tutorial on making normal bubble tea with a slight twist.

Wrapping up

What Does Boba Tea Taste Like?

Boba tea is lots of fun because of the delicious flavors you can pick from. It also comes with tasty tapioca balls that are at the bottom. You should try it when you have the chance, and allow you to enjoy this delicious beverage!


You may also read: What does almond milk taste like

Are Wild Bananas Edible? All You Need To Know!

Are Wild Bananas Edible? 

Are Wild Bananas Edible? 

Are Wild Bananas Edible? 

Have you ever observed wild bananas? It’s not like the typical grocery store banana. They are available in various shapes, sizes and shades, and they grow in different parts of the world.

There’s a good chance of finding natural bananas within tropical regions So if you’re going to an area that is tropical, you could easily spot them.

However, can you eat wild bananas? Are they so unique that they shouldn’t be eaten? Today, we’re going to find out exactly what, so continue reading.

Are wild bananas edible?

Yes there are wild bananas that can be eaten. A mature wild banana can be sweet and tasty in flavor. It could also possess a distinct fruity and fresh flavor that isn’t present in the regular banana.

It all depends on the type of wild bananas you come across. The bananas we are familiar with today are actually a blend of two different species of bananas that are Musa acuminata, and Musa balbisiana.

The balbisiana contains an amazing quantity of stone-like seeds that aren’t edible, and eating might be difficult.

The acuminata can be handled however it will certainly cause issues due to the texture.

Wild bananas are often robust, or extremely seedy, and only the flesh that surrounds the seeds can be eaten.

In short, wild bananas can be eaten, but eating them might not be an ideal choice in the absence of knowing exactly what sort of fruit it comes from.

Wild bananas are full of seeds

A lot of us do not eat raw foods from the wild and eating wild bananas may be somewhat challenging. One of the biggest issues people may face when eating bananas from the wild is the large amount of pea-sized, stone-like hard seeds inside them.

Wild bananas might taste delicious but eating them isn’t the same smooth experience like with regular bananas. There are many seeds in them, and they’re soft and chewy.

It is also impossible to eat them alongside the bananas. Although bananas’ pulp is sweet and soft the seeds are opposite, they are dull and hard.

So, can wild bananas really edible? The answer will depend on your own perceptions and largely on how you interpret the seeds present in wild bananas.

If the seeds are a complete turnoff and put the off button, bananas from the wild aren’t for you. If you are able to manage the seeds and accept the presence of seeds wild bananas are just equally delicious as other fruit with seeds, such as apples and pears and so on.

Like the name implies they are wild bananas that have not been planted or nurtured. They’ve grown in wild in their own way. If they’re carrying too many seeds, there is no reason to blame anyone for this.

So, how do you eat wild bananas?

Wild bananas are available in markets that are local to forests and hills across the globe. These bananas don’t look like regular bananas. Instead, they could have unusual shapes and not have the beautiful yellow skin that we’re used to seeing on bananas.

Because they are completely naturally occurring, they possess distinct flavor and taste. You can discover ways to get rid of the seeds and incorporate the pulp for shakes and smoothies. It’s a hugely tasty drink.

It’s recommended to ask the locals how they consume the local wild bananas, as they’ll know the best way to eat them.

They have different looks and shape

In addition to the flavor, there aren’t any outstanding features found in this wild fruit. They might not appear exactly like the bananas that we encounter in our daily lives.

They can have a unique form and shape based on the weather and conditions that they are growing in. For instance, it could appear stout, pointed at each end, with a protruding into the middle.

The skin might not peel off as cleanly and easily. The skin could be tightly linked to the fruit via interlinking fibrous. If you remove your wild bananas, you will find that a substantial portion of the fruit could remain in the skin.

Therefore, the sensation of eating a wild banana could be quite different from eating a normal banana. You can, however, enjoy eating wild bananas. They’re not poisonous neither do their seeds.

They’re perfectly edible so you aren’t averse to the numerous seeds that you will likely be exposed to while eating the wild bananas.

The modern banana came about as an attempt to create that perfect fruit. With seeds that are soft (or none at all) with a moderately firm yet soft texture and a great taste.

Wild bananas are available in many varieties and you won’t be able to tell which one you’ll receive.

Wild bananas can also be seedless

Wild bananas may also be seedless. Wild bananas of this kind can be found in the forest that is found in Costa Rica. These bananas are extremely slim and thin.

They are more similar to trees and are found everywhere. The fruits they produce are referred to as “baby bananas” and are delicious and sweet. You can slice and then bring your hand home filled with the ripening bananas. Let it ripen free of birds and insects.

The forest is filled with these banana trees, and you’ll be able to find plenty of options. A hand will typically have 60 yellow fingers that are 3-4 inches long. They can be eaten as they mature. There aren’t seeds inside these fruits.

However, they are extremely soft and they tend to become extremely mushy.

Are wild bananas edible?

Domestication of bananas

They were domesticated to ensure regular cultivation by two of the most well-known wild species Musa balbisiana and Musa acuminata. The latter being the more popular choice for farmers.

It took a while for the ideal banana-banana combination to be discovered however, once it did numerous offshoots were created. The most well-known fruit for dessert is known as the Cavendish kind.

It’s the longest, largest banana you can find and is probably the one you’re using at your home.

Bananas are in season all the time all year round, which means they’re always fresh as they don’t come in a particular season. They’re picked early and get ripe during transport, which means they’re the ideal fruit.

FAQs

Why do wild bananas have seeds and not commercial ones?

You may be thinking why wild bananas contain bigger and more seeds than commercially grown ones.

The reason behind the differences is due to the breeding method. In nature, seeds are required for the reproduction of plants. Therefore, seeds tend to be bigger and more powerful.

The commercially-grown ones are genetically bred and are not grown from seeds. They’re cultivated from pups. The mature banana plant produces what’s known as Rhizomes. These then grow into small plants that are sometimes referred to as pups. The pups are taken away and planted in different areas, from which the banana plant grows.

The changes made cultivators realize that seeds aren’t needed for the growth of bananas. Additionally, bananas grown without seeds are more supple sweeter, juicier, and are more likely to be sold. The seedless varieties also possess a greater shelf life than those with seeds. Therefore, farmers chose ones that do not contain seeds.

If you happen to find wild bananas with seeds, you might wonder whether it is safe to eat without risk. The answer is yes. It is possible to eat wild bananas that have seeds because they’re not poisonous. It is possible to eat both unripe and ripe varieties.

But they’re not consumed as an unripe banana. The people of Indonesia as well as Southeast Asia slice the banana thinly and take out seeds instead. Then they put the pieces in salads and eat them.

Thus, the seed is eliminated in any way. However, you are able to eat the seeds.

Expect a sour and bitter flavor with very little or any sweetness. However, some varieties, based on the season and the location may taste delicious.

A specific variety, referred to by the name of “Baby banana,” is essential if you wish to eat seeds of bananas. These are indigenous in Costa Rica and grow in the wilderness. If you see the plants, you can eat the seeds and enjoy the delicious flesh.

In general, it is not recommended to eat wild bananas. They may be exposed to viruses pesticides or bacteria. A condition known as “Panama Disease” is common in wild bananas. They can trigger negative reactions within your body and lead to complications.

Where Can You Buy Seeded Bananas?

There are bananas with seeds at certain retail stores. Be prepared to conduct some investigation. There are a few stores that have seeds of bananas. In accordance with the season and any special offers the store may be able to keep seeds of bananas. It is possible to search on the internet for seeds of bananas.

Stores that stock a supply of these fruits advertise the bananas on the internet. The last option is to look online to determine availability. If not, it could be that the seeded bananas you want aren’t available in your area.

There is a possibility of growing wild b

Can You Grow Seeded Bananas?

ananas in your backyard that would yield seeds-filled bananas. To do this, you’ll need to collect seeds, which would then sprout to produce banana plants. Begin by locating the seeds. Some nurseries have seeds. Therefore, you should visit a few nurseries and verify if they’re carrying seeds.

Once the seeds begin to germinate, they’ll take about a couple of months before bearing fruit. The resulting banana will have seeds. Depending on the species of banana the size could vary from small to medium or even large. For the biggest size seeds, you have to speak with the nursery person in the right way. Keep in mind that the banana you seed will differ from the bananas that you buy at home. Therefore, be prepared for the switch.

Wrapping up

Are wild bananas edible? Yes, they can be. Actually, it’s quite an intriguing idea that according to different studies, wild bananas are better than ordinary bananas.

The only drawback is the seeds, which may require some effort to completely eliminate from the wild bananas. However, the effort is indeed worthwhile.


What Does Cornstarch Taste Like?

What does cornstarch taste like?

What does cornstarch taste like?


What does cornstarch taste like? Is this what you want to know?  Are you confused about what you should do with cornstarch? This article we’ll examine the flavor of cornstarch as well as its texture, and the best way to use it for cooking.

So, without further ado, let us start.

What does cornstarch taste like?

Although it is made of dried corn kernels , it doesn’t have a corn flavor. It tastes more similar to flour, which is to say it doesn’t taste as anything at all.

When you get down to the bottom, cornstarch tastes a bit starchy. This could be due to the sensation of the tongue, rather than the taste.

Cornstarch texture

Cornstarch is very fine powder with an appearance and texture similar to powdered sugar. It’s smooth and silky. It’s usually used in liquids because it’s intended to act as a thickening agent that alters the texture.

Cornstarch dissolves in liquids and begins to gel when the liquid is heated. The more cornstarch you add the more jelly-like your liquid will be.

Why do I crave cornstarch?

If you’re craving cornstarch, it could be a sign of nutritional deficiency. It is possible that you are deficient in iron, zinc and other minerals. Your cravings could be your body’s way of signaling that.

The desire for cornstarch may be an indication of a disease that is often linked to nutritional deficiencies. In the end, cornstarch should never be consumed raw, and whenever you notice cravings, it is advisable to set up an appointment with a doctor.

Cornstarch vs. Corn Flour vs. Cornmeal

It is true that corn starch, flour and cornmeal come from the same source: corn. However, there are some distinctions that render them unchangeable for recipes.

The corn flour can be described as a powder that has been finely ground and made from corn kernels that are whole.  While cornstarch is a finely ground  powder composed of only the starchy portion in the kernel, Cornmeal is a granular substance that is made of dried corn kernels.

Cornstarch is generally tasteless and is utilized for a purpose (thicken the contents of a mix) and not to impart flavor. Both cornmeal and corn flour have an earthy sweet taste that can be easily detected in food items.

Corn flour is a good choice in lieu of wheat flour for baking. It gives a distinct flavor and golden color. Cornmeal can be used the same way. However, it will create some texture differences in the final product. Because cornstarch does not contain either fat or protein and isn’t a fat source, it shouldn’t be used the same way as cornmeal or corn flour in recipes.

Cornstarch Substitutes

In the event that you do not have cornstarch at your shelf, you can add a thicker layer of ingredients like flour, powdered arrowroot tapioca, potato starch or (in the case of a pinch) even instant potato Granules.

The flour thickens roughly in the same manner as cornstarch, but it does not produce a shiny shine. Arrowroot powder can produce shiny shine, however it requires cooking for longer time than cornstarch.

Find out more about cornstarch substitutes here What Can I Substitute for Cornstarch?

How to Store Cornstarch

Cornstarch must be kept in a dark, cool location. The majority of cornstarch available at the market is sold in resealable bottles, so ensure that the lid is securely fixed when you’ve finished with the product. If stored properly the cornstarch can be used for a long time.

What is a healthy alternative to cornstarch?

Some people don’t like cornstarch. So if you prefer to use another thickening agent for your sauces, there’s a wide range of options that are both healthy and vegetarian.

Flour, which includes whole wheat flour, is a good choice to replace cornstarch since it thickens liquids when cooked, though it could give off the characteristic “floury” flavor if used in greater quantities.

The starch made by the arrowroot plant is also a cornstarch substitute and is a great option to thicken fruit sauces and pie fillings. Tapioca starch is ideal for pie and other dishes where needs to remain transparent and gelatinous instead of somewhat transparent and starchy.

How to use cornstarch in your kitchen?

Because it’s such an amazing thickener, it’s great to have on hand to make everything including vegan cream sauces and cheeses that are vegan.

Here’s a fantastic recipe for a vegetarian cheese with a herb crust. Though this sounds like a lot of work, it’s actually not that difficult. All you have to do is blend cashews with water, cornstarch nutritional yeast olive oil, lemon juice and spices, then heat in your stove and let cornstarch do its magic, and then allow it to set in the refrigerator. Make your own toppings, and try everything from dried fruits to nuts.

Watch the following video in order to understand how to make cornstarch at home:

FAQs

Does cornstarch taste good?

There is no taste when it is made in your dish, recipe or correctly.

What is the flavor of cooked cornstarch like?

Cooked Cornstarch will not taste like anything whatsoever. However, you need to mix the cornstarch in a slurry of water that is free of lumps, and then cook it until it is completely removed of any flavor.

Does cornstarch leave an aftertaste?

It doesn’t leave any lingering taste if it is used in a proper manner. However, if you didn’t mix it correctly, you’ll end up with an unctuous texture, and some people will consider it to be a taste.

What texture do Cornstarch contain?

Cornstarch has a smooth and silky texture that’s almost exactly the same as powdered sugar. It’s added to liquids in order to thicken them, which alters the texture.

How to use cornstarch for cooking?

If you’re searching for a quick and easy method to thicken the flavor of any gravy or sauce without adding extra fat cornstarch is among the best options available.

It’s not quite as effective or have the similar effect as other options however it adds enough thickness to make the appear nice, while remaining lightweight and airy.

It is available in a lot of supermarkets these days or in the bakery aisle, or in the section of canned goods.

How to Store Corn starch?

If you intend to keep cornstarch in your home, make sure it is kept away from sources of heat, such as microwaves, ovens and so on. Since these components can cause the product to reduce its effectiveness.

There are ways to store cornstarch and not lose the properties it has. The most effective method to store cornstarch is to store it in an airtight container. It will last at twelve months if kept in a dry, cool place. Also, keep it away from direct light while it is kept.

Does Cornstarch change the flavor of food?

Not when it is properly handled. When mixed with liquids like juice, milk as well as soup, cornstarch produces an even consistency. However, it has to be cooked so that there isn’t any alteration in the taste of the food, or any texture that is grainy.

If you are adding too much cornstarch but not enough, the sauce may turn thick instead of smooth.

You’ll know if you’ve overused cornstarch after tasting the finished product. If it’s dry, reduce the amount next time.

Can you use any other type of starch than Cornstarch?

Yes! There are a variety of starches that are available today, such as tapioca starch, potato starch, arrowroot flour rice flour and gluten-free flour. All of them are suitable for replacing cornstarch. Make sure you be sure to follow the directions precisely because they behave in different ways.

Why shouldn’t you overuse Cornstarch?

The use of cornstarch too often can cause an unnatural texture. The substance turns into a gel, rather than being completely absorbed.

Why do people eat cornstarch?

Cornstarch is consumed by people since it is employed as a thickening agent. It’s not eaten because of its flavor, as when used properly, it doesn’t have any flavor.

Are Cornstarch and Potato Starch Interchangeable?

Do you have the option of substituting cornstarch with potato starch? Yes, since both starches behave in a similar manner. This means that a substitute could be utilized.

What is the best way to do it? If you’re replacing cornstarch with potato flour as a thickener, one tablespoon of potato flour to 1/2 teaspoon cornstarch should be used.

Wrapping Up

What does cornstarch taste like?

Cornstarch is a powder derived of corn and can be used to create a flexible thickening agent. It’s suitable for cooking with different substances. However, it’s not recommended to be consumed by itself. Cornstarch is a great ingredient to create sauces, to make tofu more crisp and apple pie made from vegan ingredients silkier.


You may also read: Why does people eat corn starch?

What Does Dragon Fruit Taste Like And How To Eat It?

what does dragon fruit taste like

What Does Dragon Fruit Taste Like?

what does dragon fruit taste like

If you’ve ever come across the dragon fruit, then you’ve probably wondered about what it tasted like. So, what does dragon fruit taste like?

In all likelihood, it looks like it’s going to have a delicious taste, does it not? It’s all pink and spiky and the inside is stunning. It’s seen in many pictures and videos from cooks to influencers to your fashionable friends.

So let’s check if a dragon fruit is like any other or not. If it does, then what’s that flavor? This will help determine whether it’s worth purchasing this costly food item or not.

So, what exactly do you think of the taste of dragon fruit?

Dragon fruit has a mild and slightly sweet taste that reminds us of an amalgamation of watermelon and pear and has the texture of a Kiwi.

However, its flavor does not match its stunning appearance. The flavor of the fruit is different in ripeness and when it is not and picking a mature one can be very difficult.

Dragon fruit doesn’t have a distinct flavor in the early stages; this is the reason that most people think it is tasteless.

Ripe dragon fruit is sweet and has a syrupy flavor, while unripe ones taste unappetizing with a little bitterness.

Additionally, it’s difficult to determine the true flavor of the fruit since its taste may differ from person to. The fruit that tastes sweet to one individual may seem very boring to another and the flavor of dragon fruit isn’t always clear.

How do you define dragon fruit?

Dragon fruit gained popularity together with travel writers who began to explore further into Asia as well as expose the West to exotic fruits as well as food items and places.

It’s most likely that you also saw the image of dragon fruit for the first time.

Dragon fruit, more commonly referred to as pitaya or strawberry is an exotic tropical Cactus plant that thrives in desert areas. The fruit is indigenous and is native to Central America, but is commercially grown in Vietnam and the majority in Southeast Asia.

The Dragon Fruit was named as such because of its appearance–which is a bit like an artichoke. The sharp “scales” around the oval-shaped fruit remind us of dragons. The fruit is available in four varieties and colors.

Different Varieties of Dragon Fruit

The majority of people don’t know there are many kinds of dragonfruit. They include:

White-fleshed Pitaya: This variety has red skin and white flesh. It’s the most popular variety that is sold in markets and supermarkets and is most likely what you’ll want to take in. The skin is regarded as red, but it’s actually pink with green bits everywhere. The leaves haven’t yet sprouted and won’t be. If you cut open the flesh, the inside is stunningly white and seeds are visible. There are many varieties of it out there This one is a bit plain.

Red-fleshed Pitaya: If you buy the red-fleshed pitaya, it is easy to will notice that it is similar to the white-fleshed variant. After you cut the pitaya open, you will see an orange or crimson red hue inside. I believe that this variant offers a more complex taste profile when compared to the white variant. There’s a little acidity also. Make sure to be cautious when making it, since the red juice may make your clothes and skin smudge.

Yellow Pitaya: The yellow dragon fruit is extremely difficult to come across in a store or in the market. If you find these, get whatever you can! They are yellow with white flesh and spiky hairs. It is not evident that they exist since they are removed before when you buy it kind of plant, which is the reason that stores don’t have these. This kind of wine has a lot of flavors and has a sweeter, more appealing scent.

What part of the dragon fruit do you eat?

A lot of fruits and vegetables have skin, membranes stalks, leaves, and stalks that aren’t edible. Dragon fruit is one of them. It has skin that is thinner and can be eaten as seeds. It is a good alternative for people who want the most bang for their money.

There aren’t any special tools to cut the dragon fruit. Simply cut the fruit by cutting it in two from bottom to top, and take the pulp out. Each part is edible. If you’d prefer to peel off the skin just like you would peel off the skin of a banana.

Dragon fruit is lovely to behold with its vivid and vibrant shades. Set them on the table for a centerpiece that can be eaten. The skins can be used when they’re taken off as mini-displays to hold desserts and ice cream!

Dragon fruit is richer in fiber than other fruits and is rich in vitamin A, magnesium and calcium. It’s a great choice for vegans as it’s hard to obtain these nutrients without meat or dairy in certain instances.

How do you select and store a dragon fruit?

When picking a dragon fruit ensure that it is firm with some flex when you squeeze it lightly. If you notice that it’s difficult to squeeze, buy it and allow it to mature for a couple of days before letting it ripen. The skin should be clear and vibrant with no stems becoming shriveled or brown spots.

When you have purchased the fruit and taken it home, you may place it on the kitchen counter or table for around three days. Dragon fruit that is cut can stay inside an airtight container stored in the fridge for about 3-4 days.

If you’d prefer to hold off for them to be eaten, place them in a plastic bag and place it in the refrigerator’s vegetable drawer for up to 3 weeks. They must remain in their original state with their skins on up to the point that you’re set to consume them.

How does dragon fruit taste like?

Ways to eat dragon fruit

The majority of people like eating it fresh on its own. Cut your fruit into half, then scoop out the inner parts using the help of a spoon. Add chili powder and black pepper in order to enhance the flavor.

Cut the fruit into small cubes and mix it into your fruit salad. Add it with melon, pineapple and any other fruit you’d like to add.

Make the juice of dragon fruit or include it in a non-dairy smoothie to make nutritious food.

You can make sorbet or fruity Ice cream (made using non-dairy milk products) to make dessert.

You can make jam or jelly, chutney, or preserves using it.

Incorporate fruit into cakes or muffins for an ethereal touch of tropical taste.

How do you tell if a dragon fruit is ready?

It is easy to tell whether a fruit is ripe, or not based on its skin. It means that you won’t be able to judge how the fruit feels in your palm or even a half-sized fruit.

Inside the fruits will not change color when it matures and will remain the same.

Once the skin color is uniform, the wings become yellow and the edges begin browning. The fruit is considered to be overripe when its skin shows dark spots or splotches.

The fruit can be stored in a fridge or store at room temperature.

However, be aware that dragon fruit is a difficult fruit to choose. Farmers take the fruit down a bit early to ensure it doesn’t spoil in transport.

This results in some fruits not being ripe, and therefore not being very delicious.

How to eat Dragon fruit?

Despite its sometimes unappetizing taste, the majority of people use it because of its many health benefits (aside from the fact that it looks cool).

It’s a great source of vitamin C, fiber, and omega-three fats that are contained in the seeds. Due to its nutty flavor, it is usually blended with other fruits to make frozen smoothies or bowls.

Here’s an easy way to devour this dragon fruit. Slice the fruit lengthwise or crosswise and eat its flesh with spoons. It is also possible to cut the fruit into quarters, and then peel off its skin starting at the sharp edge, in case you wish to remove the flesh easily.

Choose a fruit that is ripe It should have evenly colored skin. This is deep pink, red or yellow.

Utilizing a knife, cut the fruit into half, and cut straight across it.

Remove the outer skin, then slice the flesh or make use of a spoon to eat it.

The fruit can slide down a bit on the plate or into your hands, similar to the kiwi that has been peeled. Be careful, especially when your knife has sharp edges.

When you eat dragon fruit in its natural state, you’ll get to taste the full flavor without any other ingredients. However, if you feel that it requires an extra boost, here are a few suggestions.

What can be added to dragon fruit?

The fruit is easy for any recipe and can be served with other dishes in a balanced meal or eaten on its own.

It’s possible to chop the fruit into small pieces and eat them as is. Many people say that this isn’t the ideal way to eat fruit because the bland ones aren’t the best.

Cut the dragon fruit into smaller pieces and enjoy the fruit with chopped nuts, along with Greek yogurt. A drizzle of honey could be beneficial too.

Include chopped dragon fruit in salads, whether it’s the form of a salad or fruit salad is entirely up to you

Add chunks of frozen dragon fruit into smoothies to make an ice cream-like bowl similar to soft-serve cream.

Health benefits of dragon fruit

It’s evident that when you ask people what they enjoy more about the dragon fruit they will not necessarily respond that it tastes delicious.

Dragon fruit is delicious If you choose an excellent one. However, what people focus on is the health benefits of the fruit, which is one of the main reasons to eat dragon fruits.

Here are a few of the top reasons to eat dragon fruit, in addition to the flavor.

  1. Dragon fruit is excellent for skincare

Because of its levels of antioxidants, the fruit can be an all-natural treatment for beauty. For instance, people from Southeast Asia believe making a paste out of pitahaya, and then apply it on their face can help them look older for a longer time. The paste can also be great for treating acne and sunburns.

  1. Aids in the fight against chronic illness

Dragon fruit is abundant in antioxidants, which neutralize free radicals which cause chronic illness, thereby protecting cells from injury and inflammation. According to research, antioxidants could stop chronic diseases like arthritis, cancer and heart disease, as well as diabetes.

Here are a few of the antioxidants in the dragon fruit:

Betalains can combat the effects of oxidative stress, as well as suppressing cancer cells.

Vitamin C: Consuming a high amount of vitamin C can reduce the risk of cancers of the head and neck.

Carotenoids: Dragon fruit’s color is derived from Beta-Carotene and Lycopene plant pigments. The high carotenoid-content of diets helps protect against cancer and heart disease.

  1. Magnesium-rich source

Contrary to other fruits, dragon fruits contain an increased amount of magnesium. Research has shown that magnesium is crucial in the daily life of people as well as in other foods like cocoa powder, nuts and avocado, to mention a few.

  1. Dragon fruit promotes a healthy gut

In the gut, there are billions of different microorganisms that include bad and good bacteria. These microorganisms could cause asthma and heart diseases when there is a serious imbalance. Dragon fruit is thought to be an effective treatment for this because it is able to regulate the balance.

The fruit is rich in probiotics that have the potential of helping balance microorganisms. If you consume probiotics regularly they will help reduce digestive tract infections as well as diarrhea.

  1. Strengthens the immunity system

Dragon fruit is rich in carotenoids and Vitamin C that boosts your immune system. They protect white blood cells from damage.

  1. Dragon fruit increases the iron level

As with other fruits such as apples, fresh dragon fruits are an excellent iron supplement. Iron is a vital component for the distribution and transportation of oxygen throughout the body.

It also assists to break down food in order to give energy. If you’re suffering from a low amount of iron, the dragon fruit is a great option for you.

The fruit has around 4 percent of the recommended daily intake of iron in a single serving. Furthermore, the fruit contains an abundance of vitamin C for the absorption of iron to an excellent level.

Side effects of dragon fruits

In general, dragon fruit appears to be safe. However, this isn’t true for all. Some individuals develop allergic reactions to the fruit after eating it however, these are very rare instances.

According to research, there are only two cases reported of an allergic reaction to the fruit.

Wrapping up

What does dragon fruit taste like?

Dragon fruit is often very tasteless, particularly when you discover an unripe fruit.

If you can discover a mature dragon fruit, it’s quite sweet and refreshing. Similar to watermelon, kiwi and pear, the amount of water is high and it’s a delicious fruit.

Dragon fruit is vibrantly colored and is a great source of vital body nutrients. Even if you happen to find a dull one, it is going to taste well in smoothies.

The idea of eating dragon fruit might be to be a bit scary for some. It’s so difficult to prepare and cook which can turn off a lot of people who are new to the concept. A lot of people love it once they’ve gotten past the look.

Dragon fruit brings lots of enjoyment to food and is a beautiful addition to the table. Its refreshingly mild tropical taste is similar to Kiwi, but it’s less invigorating. It’s a fantastic beginner fruit because it’s easy to open and you can eat without any difficulty.

What Does Avocado Taste Like?

What Does Avocado Taste Like?

What Does Avocado Taste Like?

What Does Avocado Taste Like?

I know you have arrived on this site with a question in your mind: what does an avocado taste like? The answer is given here. While it’s mild its flavor is distinctive. The flavor is subdued and has a flavor that is earthy-sweet, and nutty yet fresh. Many call it buttery, though.

What is an avocado?

It’s a very popular fruit that is frequently utilized in savory dishes. The avocado trees flourish in warmer weather like that of Mexico as well as other regions that have similar climates. It is easy to recognize its balloon-shaped oval shape and dark-colored peel which is a mix of green and deep purple.

If you slice open an avocado that is fully ripe there is one seed that is hard (avocado pit) inside with soft, green and yellowish flesh. People like to add it into dips, salads and sauces or mix it to desserts like brownies and mousse!

The real pleasure of eating an avocado lies in its texture. When you take the initial bite you’ll realize how creamy and smooth it feels!

While the taste is not strong, it’s extremely dense and dense. When it comes to avocado, the texture is much more prominent than the flavor.

Due to its light taste that is barely noticeable Avocado is well-matched with numerous stronger, more flavorful ingredients. Apart from being nutritious and delicious, its popularity is due to its flexibility. There are so many ways to make use of it!

Are you interested in saving this blog article? Fill in your email and we’ll deliver the post right into your email!

Different Ways to Use Avocado

Because avocados are known for their smooth, mild taste and a mild flavor, it is a great match for various foods. It doesn’t matter if you’re turning it into guacamole or serving it on toast.  Here are the most delicious ways to enjoy the avocado you’ve got.

Guacamole

Since it is because this Mexican dip has become so well-known and popular, it is a lot of individuals’ first exposure to avocado. It is made of coriander, onions, tomatoes and lime with avocado mashed in order to tie the ingredients.

It’s easy to make! Make it into the form of a quesadilla or burrito or even make it topping for chips made from corn.

Avocado Smoothie

Another way to appreciate avocado is to add it to your smoothie. Because of its texture, it provides a perfectly creamy and thick consistency to your drink.

There are many ways to make an enjoyable smoothie. You can add a bit of sugar or honey to add extra sweetness. Include spinach or kale to create a fantastic smoothie. Also, add some bananas as well as the berries for some extra sugar and acidity.

In just 10 minutes, you’ll have an excellent breakfast for the go!

Avocado Toast

Perhaps the most simple and easy way to enjoy avocado is with toast!

Why not? It’s delicious, nutritious and will surely earn you some more fans! Simply cut your avocados into slices and spread them on the bread you prefer.

You can top it off with a squishy sunny-side-up egg, and sprinkle it on salt and pepper. Make sure to snap an image!

Avocado Salad with nuts

Salad

If you’ve tried a salad made with avocado it will be the last time you complain that salads aren’t sufficient in terms of calories! Avocado is a healthy fat that you can add to salads that make you feel full and satisfied.

Add your favorite fruits, veggies or nuts, cheese and your favorite protein. Sweet corn, cherry tomatoes and pecans are a few of my favorite foods.

If I’m feeling indulgent, I’ll throw in mangoes and shrimp as well! It might seem like a wild salad, but believe me that you’ll love this!

Avocado Ice Cream

It’s probably my preferred way to make avocado. It’s not exactly a sin however, can you blame me? A homemade avocado ice cream recipe is the absolute most delicious!

The smooth, creamy texture of avocado makes an amazing Ice cream. It’s only four ingredients: Coconut milk maple syrup, bananas, and of course, the main ingredient avocado!

Mix everything in your blender. Then pour into a pan or tub and then put it in the freezer for a night. Simple to do, right? It is, minus the part that requires you sit and wait until it is ready to be frozen. But I can tell you that it is worth it!

How to Store Avocado

The rule of thumb for avocados is to stay clear of buying them at a super-ripe. Avocados are usually harvested before it’s fully ripe, and, once removed out of the bush, the avocados are likely to get ripe extremely quickly. Therefore, unless you’re planning to use it immediately, opt for a more green more unripe avocados.

To store avocados that aren’t fully ripe they can be left on your kitchen counter at temperatures of room temperature. Based on the stage they are in their ripening process and when they’ll be ready to consume between 3 and five days.

In the event that your avocados appear to be getting close to ready to be eaten (or already almost ripe) and you wish to keep them for future use, place them in the bag of plastic and put them in the refrigerator. This gives you an additional 3 to 5 days until you are ready to use them all up.

Does avocado taste like eggs?

Many people are of the opinion that avocados taste a bit like eggs. There’s a reason scientific for this similarity in flavor. Both yolks of eggs and avocado are rich in fats and specific carotenoids which are beneficial antioxidants that benefit the body. The similarity in chemical composition is the reason for the egg-like flavor that the avocado is known for.

Avocados that are fresh taste sweet with an earthy flavor and are almost creamy. The world’s population isn’t able to get enough avocados And we certainly can’t! The delicious fruit is loaded with vitamins, minerals and healthy fats.

How to tell whether an avocado is ripe?

There are two methods to gauge the degree of ripeness within an avocado. The first and most obvious method is through the color of the skin. As the avocado ripens its peel turns from a light green color to an intense, dark purple hue. Certain varieties of avocados do not display the dark purple hue on their peels and stay green throughout their entire period. Another option is to gently press on the avocados, and think of them as ready to eat once they yield to this gentle pressure.

Avocado health benefits

Avocados are considered to be a super-food since it is loaded with many nutrients. This includes healthy fats and carotenoids, minerals, fiber and vitamins. Here are a few advantages you can reap by eating avocados frequently.

Avocado helps protect the heart from high cholesterol levels. It’s full of healthy fats that help balance the natural levels of cholesterol.

It is a rich source of carotenoids that improve vision like zeaxanthin and lutein in the flesh.

Avocado can also help keep your weight under control. It’s a great source of fiber which helps keep you fuller for longer and prevents excessive weight gain due to overeating.

It helps strengthen bones as the vitamin K contained in it increases calcium absorption in the body.

Avocados that are ripe taste smooth with earthiness and are almost creamy. All over the world, people cannot get enough of avocados and we can’t either! This delicious fruit is packed with minerals, vitamins, and healthy fats for your body.

Ways to eat avocado

The ways to make use of avocados are limitless, and here are a few of our favorite ways:

You can mix it into vegetables, fruit, or salads of berries.

You can slice it into slices and put it on toast to make breakfast.

You can mash it thoroughly to make Guacamole dip.

You can also cut it into half, take out the seeds, then grab the spoon and eat it on its own.

How to tell whether an avocado has gone bad?

The most obvious indication is when it’s mushy and easily dents under just a little pressure from your hands. If you cut the flesh, it has a dark brown hue and the fruit is no longer in good condition. Sometimes the flesh can be strung out and it has an unpleasant taste and smell. Be sure to throw away any avocado that has been spoiled as eating it may cause you to become sick.

Avocado Toast Recipe

Avocado toast is made in less than 5 minutes to cook It’s also one of the most delicious breakfast options.

Prepare Time: 3 Minutes Cooking Time: 2 mins Total Time: 5 minutes Servings: 2. Calories 315kcal Food type: Breakfast cuisine

  • 1 avocado
  • One teaspoon lime juice
  • salt and pepper according to taste
  • 2 slices of bread
  • 2 hard-boiled eggs

Instructions

You will have to toast bread with a toaster until golden crisp.

Now smash the avocado onto the dish. Then sprinkle lime over it.

Then you will have to spread half of the avocado mashed on each slice of bread that has been toasted.

After that, sprinkle salt and pepper as desired.

Finally, top it with sliced egg yolks that have been hardboiled. Serve and enjoy the food!

Wrapping up

What does avocado taste like?

If you have tried eating avocados before, this information isn’t novel at all. However, if you’re among the people who haven’t had the pleasure of trying avocado, but are planning to give it a go, you’re now aware of the idea of what avocado might taste like.

You won’t be surprised by anything, after going through this post. Instead, you’ll simply confirm what you’ve discovered here. What are you waiting for? Test the avocado fruit today!

Can You Eat Tofu Raw?

Can You Eat Tofu raw?

Can You Eat Tofu Raw?

Can You Eat Tofu raw?

Can you eat tofu raw? If this question is actually hovering in your mind right now, I would suggest that you go through this post as it has all the details about it. Now let us get into the actual topic.

With the growing popularity of diets that are raw, specifically in conjunction with veganism tofu is an ingredient that is used in many different dishes. However, is it safe to consume raw tofu? We’ve addressed a few of the frequently asked questions regarding eating raw tofu, to help put your mind at ease.

In general, raw tofu refers to it that hasn’t been cooked after it was made and packed. It is possible to eat tofu raw straight out of the package however, it’s best to remove the excess water first since it’s messy and does not enhance the flavor of the food. Soft tofu and silken are the most commonly used kinds that we’ve seen individuals eating raw, but you can safely experiment with any kind.

How Is Tofu Made?

ting more popular lately, some aren’t sure how it is made. What’s the reason to care? This information can aid you in deciding if tofu is nutritious enough for you.

To make tofu, factories soak large quantities of beans in water, which softens their pulp. Once the beans have doubled in volume, they go through a crushing machine that transforms into a fine paste. Strainers are then able to separate that paste into milk and solids.

The pulp, also known as Okara, serves a variety of reasons, like making animal food and making beef. The milk eventually turns out into our favorite tofu.

What does tofu taste like when it is raw?

It’s all dependent on the kind of tofu that you’re eating. Silken tofu contains a high content of water when eaten raw, just like soft block tofu. But both are very neutral in flavor that makes them ideal to be blended in liquid dishes (see the following for some suggestions!)

The tofu that is cooked can also be “wetter” when eaten raw as opposed to when it was cooked. If you wish to reduce this so that you don’t mix tofu’s water with the dressing for your salad, you can put the tofu between two towels for a bit before serving. Fermented tofu, as one would think, has a more pronounced flavor than other varieties, particularly when consumed raw and on its own.

Is it dangerous to eat raw tofu?

Do you have to take raw tofu for a meal? It’s safe, so provided you are careful to practice good hygiene. We’ll discuss this later as with any other food item, if tofu isn’t properly stored and prepared there is a possibility of contamination by bacteria and the possibility of getting sick. This isn’t just a matter of having raw or raw-cooked tofu. It’s as safe as many other food items as compared to certain foods, such as raw chicken or salad leave there is a lower chance of food poisoning even when prepared with care. We recommend taking appropriate precautions when eating any food item you intend to consume or serve.

Benefits and risks of eating raw tofu

Is Tofu really raw?

Did you remember what we mentioned right at the start of the article? Raw tofu is tofu that isn’t cooked after it was packaged and pressed. Technically, it’s not raw. Soybeans are incubated for a few hours to make them soft and then cooked to make soymilk. The milk is cooked again to allow coagulants to be added.

When you receive the tofu it’s basically soybeans that are already cooked.

The benefits of eating Tofu

Tofu is a great source of protein and has numerous health advantages. It’s loaded with protein. If you’re vegetarian or vegan, this should be one of your top substitutes for meat. It’s also packed with amino acids along with the minerals magnesium and calcium. Even though it’s packed with all of these minerals, it’s not high in calories and fats which means you’re unlikely to gain pounds if you eat some of it. The goodness of it makes your nails, bones, and hair stronger. It also helps reduce menopausal symptoms.

Overall, tofu is a great food item to add to your daily diet.

The risks of eating Tofu

The only thing to be sure of is to ensure that the food you’ve chosen isn’t infected. Anything that’s affected by contamination is likely to cause you to become sick. Remove the tofu from its packaging and wash it thoroughly. If you’re dealing with raw meat at the same with the tofu, utilize separate tools.

In addition, there aren’t any dangers in eating raw tofu.

Does cooking with Tofu change its texture?

If you’re familiar with how you can cook your tofu you’ll likely have observed some texture changes however this is dependent on the cooking method that you choose to use. The primary distinction between eating raw and prepared tofu is that once cooked, much of the moisture is absorbed by the tofu, resulting in the texture becoming more chewy and firm. This is particularly the case when you fry tofu at high temperatures like stir-fries. This is less of a problem in recipes where tofu is cooked in liquid, for example, in soups.

Can you get food poisoning from eating Tofu?

Sure it is possible to contract food poisoning from tofu, like with other food items. It’s all about the quality of the production as well as the storage and preparation process for the food. Tofu cooked in the oven is one method to lower the possibility of food poisoning. However, there’s no reason why raw tofu shouldn’t be consumed safely if you adhere to sanitation guidelines, just like you would with any other raw food.

How long does Tofu last?

There’s no one solution for this query. It is contingent on the location where you store your tofu and whether it’s removed from the fridge or not as well as whether or not you’ve frozen it. The best option is to go through our post on the time span of tofu according to these diverse aspects.

Can you eat Tofu on a raw vegan diet?

A large portion of raw vegans eat tofu. The benefits are greater levels of essential nutrients, such as essential amino acids like iron manganese, selenium, calcium as well as magnesium, phosphorus zinc and copper and vitamin B1.

It is also excellent for controlling blood pressure, reducing cholesterol that causes harm, and increasing estrogen levels in a balanced diet.

How do you remove excess water from Tofu?

The presence of excess water is a frequent problem for raw tofu. It is typical for this to evaporate in the process of cooking but you can remove it from the tofu without cooking by press your food for a few minutes. Place the tofu on newspaper towels, then cover with more paper towels, and then place the book or pan on top to make the shape of a press. It should be left for about around an hour and you’ll notice that a lot of the water that was left is squeezed out making it a firmer and dryer texture. You can reduce or increase the press time for those who prefer their tofu to be slightly moister or dry.

How to Select the Best Tofu Consistency?

In the process of making tofu, factories can alter the quantity of water they mix into the tofu. This consequently, alters the consistency of tofu.

Silken tofu, also known as Japanese-style tofu, is the highest amount of water making it a creamy consistency similar to white cheese that is still young. This type of tofu can be used to create smooth sauces and dips desserts, and so on.

Regular or light-firm or firm tofu is slightly more dense than the silken variety however, it’s still soft. A lot of my friends use the type of tofu in soups for noodles or spreads, as well as salads.

It has a consistency that’s similar to feta, and tofu that is firm is the most popular kind. It can be pan-fried stir-fry or deep-fry this kind of tofu since it’s not prone to breaking down easily. But, you might want to thoroughly wring the water before you can make room for the delicious marinades.

If you’re not sure you’ll ever be able to live without the delicious texture of meat The extra-firm tofu will provide you with a similar chewy sensation. It’s designed for cooking for purposes, and you won’t have to squeeze the liquid before cooking.

Recipes Using Tofu

If you’re able to make raw tofu there’s a vast variety of dishes to explore to increase your options for using the ingredient.

It is also possible to use it in its original state whether eating it raw from the package or cutting it up and adding to salads you can also explore different methods you would not have considered:

Tofu smoothies – adding silken tofu into a smoothie can boost the protein content and make the consistency thicker without altering the taste.

Tofu yogurt – Pureed silken tofu is used to make a cream or yogurt substitute in a variety of recipes, such as sauces, dressings, dips and more.

 Tofu Ice Cream – Raw silken tofu mixed with oil, soy milk and sugar, and any flavorings you’d like will give  you delicious vegan Ice cream.

Curry Tofu

The curry tofu is among the most well-known foods throughout East Asia, especially in India. While it’s quite simple to make, it’s extremely delicious.

Preparing the Tofu

Extra-firm tofu is the best choice to use for this recipe because we’ll have to fry it. If you have tofu that is firm you can use it after you squeeze out the water.

Whichever one you prefer to use, break the tofu up into smaller cubes. Then, sauté the tofu in a cast-iron pan with a tiny amount of oil. Stir the tofu cubes until they are slightly brown. Remove the tofu cubes from the skillet and keep them in a warm area.

Preparing the Sauce

Within the same skillet as earlier, cook three cloves of minced garlic along with an onion chopped for around three minutes at medium-high temperature. Once the onion has become translucent then add:

  • 1/2 cup coconut milk
  • 1/4 cup chopped cilantro
  • 1 Tablespoon curry powder
  • Salt and pepper according to your preference

When the mixture is boiling it down, turn the heat down to medium-low and allow it to simmer, covered, for 5 minutes. Then you can add the tofu and allow it to simmer for five more minutes.

Serve with noodles or rice.

Crispy Peanut Tofu

If you’re looking for the delicious classic chicken wings you’ll be a fan of the crunchy peanut tofu.

Preparing the Sauce

In a large bowl, mix:

A quarter cup worth of peanut butter

1/8 of a cup water

1 tablespoon of one tablespoon of tamari

Two teaspoons rice vinegar

1 tablespoon miso paste

1 tablespoon of red pepper in flakes

Mix all ingredients until they are smooth. You can also make use of a blender to cut down on time.

Preparing the Tofu

After cutting and pressing the tofu into cubes, place them into the bowl of sauce and let them sit overnight. If you’re short on time, a half-hour will suffice, but the result won’t be as delicious.

On a baking sheet large enough sprinkle some cooking spray and lay the marinated tofu over the top. Bake in an oven preheated at 350 degrees Fahrenheit for about 40 minutes. After 15 minutes then flip the cubes using a spatula for an even bake.

After taking the tofu out of the baking pan, serve it hot with vegetables, rice and Sriracha sauce.

Tofu Dessert Recipe

Yes, you read that exactly! Tofu is versatile enough to create both sour and sweet dishes. My absolute favorite dessert is the tofu peanut butter and chocolate mousse.

  • Mix in a blender. mix:
  • 15 pounds of silken tofu
  • 1 cup of peanut butter
  • A quarter cup worth of syrup from maple (or less honey)
  • A few droplets of vanilla extract
  • 4 tablespoons of dark chocolate liquid

Blend these ingredients until you achieve an even color. Divide the mixture into 3 cups and place it in the refrigerator for 30 minutes.

Mix in whip cream and chopped nuts and chopped chocolate.

You can try these very popular Tofu desserts at home. Watch video:

How Long Is Tofu Good For?

After you’ve learned the best methods for cooking tofu, I’m hoping you’re attracted enough to buy several tofu items. However, there are a few questions that ask themselves: How do you store tofu? How long does it keep fresh?

It is recommended that you don’t open the package of tofu until you’re prepared for cooking it. Within its sealed packaging, the tofu will be able to last three months following the date of manufacturing.

If there are leftovers after cooking, place them in an enormous plastic container and then pour in enough water to submerge them. Put the container in the refrigerator and wash the water each day. In mild conditions, the refrigerated tofu will remain fresh for three days. However, it will begin to become stale after seven days.

How to Tell if Tofu Is Bad?

You’ll be able to recognize the difference for you’re the one to know!

In about 10 weeks, mold-causing spores can enter the tiny crevices within the tofu. As they multiply, they’ll begin to ferment the tofu, creating a sour, unpleasant scent.

If you didn’t notice the scent, don’t overlook the look. After around two weeks, the tofu begins to shrink into green or yellow pieces.

Wrapping up

Can you eat Tofu raw?

I hope this article provided answers to any questions you may have asked about whether or not you should eat tofu in raw form, as well as how to cook and preserve it should you choose to do it.

It is important to remember that tofu must be thoroughly cleaned before preparation to avoid moisture. Getting rid of any excess will result in an enjoyable and delicious experience. Tofu is an excellent source of nutrition and is an excellent addition to your diet.

If someone asks you “Can you eat tofu raw?” Just send him or her a link to this article that I’ve written for everyone. Now, go cooking!