What Does Falafel Taste Like?

What does falafel taste like? If you want to know more about this food, read on.
Falafel is a deep-fried ball, commonly served in pita, which is a mouth-watering snack that is available from street vendors, or served by high-end Mediterranean restaurants in Europe and America.
Since its introduction, the falafel dish has been creating waves as a delicious vegan food that is both traditional and adaptable and has taken veganism to a new level.
With its distinctive taste and texture falafel has spread all over the globe as a substitute for meat in foods like sandwiches and burgers.
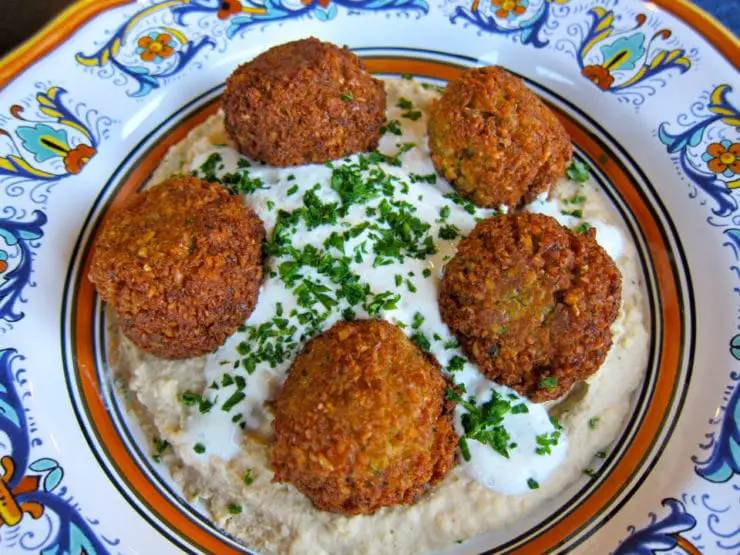
What exactly is the flavor of falafel? While the ingredients can differ, the falafel is traditionally a bit crispy texture and a smoky flavor, with a savory, grainy and herbaceous flavor, consisting of a variety of spices and herbs such as cumin, coriander mint, and parsley.
Here, you’ll be able to find out exactly what ingredients in falafel gives it its distinctive flavor, what it tastes like, how it is made, its texture and where to find it, and the options for eating it!
What is Falafel?
Falafel is a tiny vegan deep-fried ball that originated within the Middle East.
It’s typically shaped as an oblong or a patty and is mostly made from chickpeas and fava beans or a mix of both.
It’s generally bigger than a meatball; however, it is smaller than burger patties. Its dimensions are between the two items of food.
Falafel is crisp on the outside because of the cooking process, but soft and dense inner (many have even been comparing it to a delicious donut!)
It is prepared in many ways. It can be very vibrant green hue or more dull and brown depending on the ingredients that are included in it.
Falafel can be cooked using oil and baked the oven. Thanks to the latest kitchen technology they are also prepared using an air fryer and toaster oven.
It is usually served with a dip sauce on a platter with vegetables and rice or as a wrap or sandwich.
What are the ingredients in Falafel?
As I’ve mentioned before falafel can be prepared using a variety of ingredients.
The falafel base can be made from chickpeas or Fava beans or even a combination of both. The most common ingredient is garlic or onion.
The place where the ingredients can differ greatest is with the spices and herbs in the mix. It is typically made up of the spices cumin, coriander and pepper.
The most common herbs used in falafel mint, parsley and cilantro. Lemon juice could be included in this recipe, or eaten as a side dish for a more flavorful experience.
Since falafel can be baked or cooked the main component is oil. For falafel to be cooked properly it is necessary to use an oil that has high smoke points is required. Avocado or vegetable oils, such as canola as well sunflower oil, are excellent choices.
Oils that have a strong flavors and a low smoke point, such as olive oil, don’t provide a great choice for frying, since the flavor might be dominant and the falafel might not cook correctly.
What is the texture Of Falafel?
Falafel is distinguished by its texture. It’s slightly crunchy on the outside but soft and firm in the middle.
The exterior of falafel will be crisper if it has been made to be fried in oil. Falafel that has been baked will retain the crunchiness of the original but it won’t have the same crunch like one that is cooked.
After you’ve had a taste of the crunchy exterior, the inner layers of falafel are likely to have a firm and airy feel. But, as it is composed of chickpeas, also known as Fava beans, the interior of the falafel tends to be somewhat rough too.
Falafels made mainly of chickpeas can have a softer texture in contrast, falafel made with fava beans tends be a bit harder to the touch.
Falafel’s texture could be compared with similar fried foods that come from different cultures such as arancini or hushpuppies.
What does Falafel smell like?
Because the ingredients that make falafel vary, the scent of the vegan food can also vary.
Fava and chickpeas don’t influence the aroma of falafel since they’re both extremely fragrant and mildly smelling beans, even though they help a little.
The majority of falafel’s aroma comes from the spices, herbs and aromatics in the mixture. Aromatics typically comprise onion garlic, onions, and occasionally lemon.
If you are eating falafel in the traditional way is expected to smell delicious because of the parsley, coriander, mint and/or cilantro.
Furthermore, pepper is often included, so you are likely to taste the strong scent of black pepper when you eat falafel.
Are all Falafels vegan?
There many different versions of falafel. Some aren’t vegan. The best method to stay clear of the dangers from eating an non-vegan one is to read the ingredients and confirming with your server what kind they serve before ordering or should you have any concerns, you can ask them right now.
It may also depend on the kind of sauce you select with the falafels. Some sauces could include egg whites and milk in them, whereas others don’t.
Is Falafel like Hushpuppy?
Hushpuppies are cornmeal-based balls that are deep-fried that are often served alongside seafood. It’s easy to see why people may confuse them due to their looks.
However, the main difference that distinguishes them is in their texture. The hushpuppies have soft sides and are hardened in the middle while falafel balls stay mostly crisp throughout, with soft centers once they are cooked to the highest quality.
What do you eat with Falafel?
Falafel is generally eaten with pita bread veggies, and a sauce with a variety of flavors. It is also delicious with hummus or tahini dips to give it a flavor boost.
Pickles, olives and onions, and tomatoes are just a few of the toppings that you can put on the falafel sandwich. You could also add cilantro or parsley to give it a kick.
If you’re eating falafel for an appetizer or for a main dish, there is plenty of food options to pair it with.
Other favorites include the shawarma (a form of meat) and Kabobs (chicken or beef) and rice pilaf, along with salads.
How to make Falafel?
Making falafel can take some amount of time, but it’s quite simple to make.
Begin by soaking your beans (chickpeas or fava beans or both) for a few hours.
It is then time to crush the beans using either a fork or food processor, taking care not to blend too much of the beans into a paste.
Then add the aromas. Here is where you can have some freedom! To make a falafel that is more traditional, you can use garlic, onion parsley, mint, cilantro and cumin, coriander as well as black pepper. These ingredients can greatly affect the flavor.
Blend the spices and herbs with the chickpeas until all is mixed.
When the mixture is ready, then cover it with a lid and put it in the fridge for at least an hour. This will allow the mixture to remain cool, making the process of cooking much easier.
After the mixture has cool, roll the mixture into patties or small balls to prepare them to cook.
For cooking, there are two alternatives. They can be cooked in oil with high smoke points (canola avocado, canola, or sunflower oil are good choices for this) for 3-5 minutes each side.
You can also place the falafels on a baking tray and apply a light coating of oil. They can be baked in an oven of 350 degrees F for about 15 minutes or until they’re deep golden brown.
What do you eat with Falafel?
Because it’s a versatile food, falafel is served in a variety of ways.
Traditionally, falafel is served as a meal with a sauce for dipping. The sauce is typically an old-fashioned hummus or tahini (a sauce made of ground sesame seeds that have been toasted). Hot sauce is another well-known alternative.
It is often served as a main course along with the traditional Middle Eastern sides like rice tomatoes, cucumbers, along with pickled onions. When it is served as a main meal it is often served with the sauce to dip it in.
Falafel is often eaten with pita bread to form wraps. The wrap typically contains vegetables such as lettuce, tomatoes onion, cucumber and. Most often, it comes with some sauce too such as tahini, hummus, or Tzatziki.
But, due to its growing popularity, many restaurants include falafel in their sandwiches and burgers as a vegetarian and vegan alternative.
Since it is made from beans, it could act as an ingredient in these foods that are typically made from meat.
In any way that falafel is served it is essential to have a sauce. Because it’s a little dense, falafel is perfect to soak up whatever sauce you decide to use, whether it’s tahini, hot sauce or Hummus!
Where Can I Buy Falafel?
Since it gained popularity over the past few years, falafel is accessible to anyone around the world.
Falafel was initially sold by street vendors and it is still offered by them at present. A lot of major cities across the globe still have street vendors selling falafel!
Falafel can also be found in Mediterranean, Middle Eastern, and Greek restaurants in your area.
Smaller eateries tend to be more authentic in the preparation while more upscale eateries tend to include distinctive ingredients that are not in line with the tradition of their falafel recipes.
Finally, you can purchase falafel mix frozen or fresh at certain grocery stores and falafel mix at almost every major grocery store. However, these kinds aren’t always as delicious, fresh and traditional as alternatives.
What Does falafel taste like?
Related Questions
After we’ve covered the inside workings of falafel we can look at a few questions about falafel!
Can I freeze falafel?
Falafel that is cooked as well as uncooked can be kept in the freezer for later consumption.
Falafel that is not cooked can be kept inside an airtight container for one month prior to making it for cooking.
Falafel cooked in the oven can be stored on the counter for 3 to 6 months.
Can you eat falafel cold?
Falafel is delicious hot or cold, which makes it a wonderful thing to have at hand for meals, as well as for snacks. While there is nothing better than fresh falafel straight out of the fryer, if made right, falafel will last for years without losing their shape.
This means they are easily heated up, should you wish, or you can eat it cold.
What is falafel green?
Certain falafels are greener in comparison to others. This just means that there are more herbs in the recipe of falafel. Incorporating extra cilantro, parsley, or even mint can make the falafel green.
There aren’t as many herbs included or choosing dried herbs as opposed to fresh will not result in the same color changes.
How is falafel served?
Although falafel is flexible, there are a couple of methods of serving it that are more popular.
Don’t bother with pitas and go for fresh greens to have a refreshing salad with falafel on top.
To create a unique take on falafel, you can make tiny patties as opposed to balls, and serve them in small burger buns for sliders. They’re guaranteed to be a popular choice.
What foods can you eat with falafel?
The most commonly used method to serve falafel is to have tomatoes, pickled onions and cucumbers served alongside and as garnishes. Tahini, spicy sauces, and hummus are usually also included.
However, this doesn’t mean you must choose one of these choices, since falafel is a versatile dish. Try avocado-based sauce or white kimchi or even roasting eggplant for an alternative take on the traditional dish.
Wrapping up
What Does falafel taste like?
Falafel is an excellent food item to serve to others and keep in your refrigerator for when you’re in need of an easy snack.
Whatever you decide to serve it with, you’ll surely enjoy the distinctive blend of spices and herbs and everyone you give the food to will surely appreciate how delicious the food is.


 Do They Taste Good?