
Best Fresh Peach Cobbler Recipe
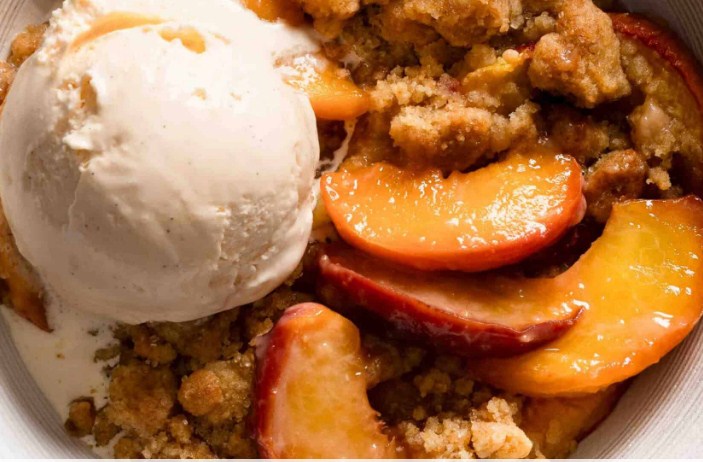
If you are looking for the best fresh Peach Cobbler Recipe online, you should feel lucky because this article exactly does that recording my experience of getting it right. Are you ready? Well, you know that moment when you bite into a peach and juice just runs straight down your arm? That’s the only sign you need. That peach is going into a cobbler, and it’s going into my skillet. I made this recipe for the first time on a sticky July afternoon when I had about nine peaches threatening to go soft on my counter, a half-stick of butter, and absolutely zero patience for anything fussy. It came together in under an hour, it made my whole kitchen smell like summer, and my husband ate three servings before it even cooled down.
Peach cobbler has been around forever. But a skillet peach cobbler? That changes things. The cast iron holds heat in a way a ceramic baking dish just doesn’t, and what you get is this deeply caramelized bottom layer where the butter and peach juices sort of meld together into something almost jammy. The biscuit topping puffs up golden. The edges get crispy in the best way possible. And it all happens in one pan.
This is the version I keep coming back to every single summer, and I’m pretty sure once you try it, you will too.
Why You’ll Love This Recipe
Let me tell you exactly why this skillet version beats every other method I’ve tried.
First — the pan does most of the work. You melt the butter directly in the skillet, pour the batter on top, then add the peaches. That’s it. No mixing bowls full of fruit. No separate pans for the topping. The batter literally rises up around the peaches as it bakes, which is kind of magical every single time.
Second — those edges. If you’ve only ever had cobbler from a rectangular baking dish, you might not know about the edge situation. In a cast iron skillet, the sides of the cobbler get these slightly crispy, buttery rims that are honestly my favorite part. I’ve been known to carve out the edges first and leave the middle for everyone else. No shame.
Third — it’s genuinely hard to mess up. The ingredient list is short. The steps are forgiving. And fresh peaches are doing most of the flavor heavy lifting, so as long as your peaches are ripe and your butter is real, you’re in good shape.
And fourth — it goes from skillet to table. No transferring, no extra dishes, no presentation anxiety. Just set the whole thing down and hand people spoons.
Ingredients
Here’s what you’ll need for a 10-inch or 12-inch cast iron skillet. I’ll note a few spots where quality actually matters.
For the peach filling:
- 6 cups fresh peaches, peeled and sliced — About 5 to 6 medium peaches. Ripe is everything here. If your peaches smell good, they’ll taste good.
- ⅓ cup granulated sugar — You can adjust this depending on how sweet your peaches already are.
- 1 tablespoon fresh lemon juice — Brightens the whole thing. Don’t skip it.
- ½ teaspoon cinnamon
- ¼ teaspoon nutmeg — Just a little. It’s background music, not a solo.
- 1 teaspoon vanilla extract
For the cobbler batter:
- ½ cup (1 stick) unsalted butter — Quality matters here. This is the base of your batter and the soul of the crispy edges. Use real butter.
- 1 cup all-purpose flour
- 1 cup granulated sugar
- 1 tablespoon baking powder
- ½ teaspoon salt
- 1 cup whole milk — Whole milk gives you a richer batter. I’ve tried 2% and it works, but whole milk is noticeably better.
That’s your whole list. Nothing obscure. Nothing you have to hunt for. Just good, honest ingredients.
Step-by-Step Instructions
Step 1: Prep the Peaches
Peel your peaches first. The easiest way — score an X on the bottom of each peach, drop them into boiling water for about 30 seconds, then move them straight into an ice bath. The skins will slip right off. Once they’re peeled, slice them into roughly ½-inch wedges. Don’t go too thin or they’ll fall apart during baking.
Toss the sliced peaches in a bowl with the sugar, lemon juice, cinnamon, nutmeg, and vanilla. Stir gently, then let them sit for about 10 to 15 minutes. This is important — they’ll release their juices and you want that liquid. It’s going to do beautiful things in the skillet.
Step 2: Melt the Butter
Preheat your oven to 375°F. While it heats up, put your stick of butter directly into your cast iron skillet and slide it into the oven. Watch it. Once it’s fully melted and just barely starting to bubble at the edges, pull the skillet out. This usually takes about 5 minutes.
Don’t walk away from it. I’ve burned butter more times than I’d like to admit because I got distracted by my phone. Melted is the goal. Brown is an accident.
Step 3: Make the Batter
In a bowl, whisk together the flour, sugar, baking powder, and salt. Pour in the milk and stir until just combined. A few small lumps are completely fine — overmixing is what you want to avoid. The batter will be fairly thin and pourable. That’s exactly right.
Step 4: Build the Cobbler
Here comes the technique that makes this recipe work: do not stir anything once it goes into the skillet.
Pour the batter directly over the melted butter in the skillet. Don’t mix it. Don’t swirl it. Just let the batter settle over the butter. Then spoon the peaches — juices and all — right over the top of the batter. Again, don’t stir. The batter is going to rise up around and through the peaches as it bakes, creating that signature cobbler texture.
It looks weird going in. Trust the process.
Step 5: Bake
Slide the skillet into your 375°F oven and bake for 45 to 50 minutes, until the top is deep golden brown and the edges are pulling away slightly from the sides of the pan. The batter in the center should be cooked through — if you press it gently, it should spring back.
Your kitchen is going to smell absolutely incredible from about the 25-minute mark onward. That cinnamon and vanilla and butter all mingling together? It’s a lot. In the best way.
Let it rest for at least 10 minutes before serving. I know. It’s hard. But cutting in too early means everything slides apart. Give it a minute to settle.
Cooking Tips
A few things I’ve learned after making this more times than I can count:
Use a ripe peach, not a pretty one. A hard, underripe peach will bake up bland and mealy. You want peaches that give slightly when you press them and smell like actual peaches, not just produce.
Don’t crowd your skillet. I tried to double this recipe once in my 10-inch skillet and ended up with a soggy, underdone center that took forever to cook through — and the edges were burning by the time the middle was set. Use a 12-inch skillet if you’re doubling, or bake it in two batches. Crowding is the enemy.
Let the butter get fully melted before adding the batter. If the butter isn’t quite melted, the batter won’t spread properly and you’ll get uneven coverage. A few extra minutes in the oven is worth it.
Check your oven. Cast iron retains heat differently than other pans, so if your oven runs hot, start checking at 40 minutes. You’re looking for a deeply golden brown top, not a pale one — but also not burned.
Don’t refrigerate before it cools completely. Putting a warm cobbler straight into the fridge can make it sweat and get weird and soggy. Let it cool on the counter first.
Substitutions & Variations
Okay, so what if you don’t have exactly what the recipe calls for? Good news — this cobbler is flexible in a way that a lot of baked goods aren’t.
No fresh peaches? Frozen works. Thaw them completely and drain off the excess liquid before tossing with the sugar and spices. Canned peaches in juice (not syrup) can also work in a pinch — just cut your added sugar down to about two tablespoons since canned peaches are already sweetened. The texture won’t be quite as lush as fresh, but it’ll still be really good.
Brown sugar instead of white? Yes. Use it for the filling and you’ll get this deeper, almost molasses-y caramel note underneath the peaches. I’ve done half-and-half before and loved it.
Gluten-free? Swap the all-purpose flour for a 1:1 gluten-free baking flour. I’ve tested this with Bob’s Red Mill 1-to-1 and the texture held up surprisingly well. Not identical, but genuinely close.
Add other fruit. Peach and raspberry is a combination I make every August and it’s stunning. Just swap out one cup of peaches for fresh raspberries. Peach and blueberry is equally good — the blueberries kind of burst and swirl into the batter in the most satisfying way.
Make it more biscuit-style. Some people want a thicker, more biscuit-like topping instead of the pourable batter approach. If that’s you, cut the milk down to ½ cup and work in two tablespoons of cold butter into the dry ingredients before adding the liquid. It’ll bake up more like a drop biscuit crown. Totally different vibe, also delicious.
Spice it differently. The cinnamon and nutmeg combo is classic, but cardamom is a really interesting swap. Use ½ teaspoon of ground cardamom instead of the nutmeg and it gives the whole thing this almost floral, slightly exotic warmth that pairs beautifully with peaches.
What to Serve With It
Honestly? Vanilla ice cream. Full stop. A warm scoop melting into the cobbler, pooling into the crevices — there’s nothing better. I use a good vanilla bean ice cream if I have it, but even the basic store brand does the job here because the cobbler is the star.
Whipped cream is the other obvious move. Lightly sweetened, softly whipped — not the canned stuff if you can help it, though I won’t judge you. I’ve absolutely used canned whipped cream straight from the fridge at 11pm and had zero regrets.
If you want to lean into a brunch direction, a dollop of crème fraîche works beautifully. It’s tangy and rich and cuts through the sweetness in a way that feels a little more grown-up.
And if you’re serving this as a casual weeknight dessert with no extras at all? Still great. The cobbler is rich enough on its own.
Storage & Reheating
Let the cobbler cool completely before covering it. Then store it right in the skillet — just cover it tightly with foil or plastic wrap — or transfer it to an airtight container. It keeps well in the refrigerator for up to 4 days.
To reheat: individual servings go great in the microwave for about 45 seconds to a minute. But if you want to bring back some of that crispiness on the edges and bottom, reheat it in the oven. Cover the skillet loosely with foil and warm it at 325°F for about 15 to 20 minutes. The top won’t be quite as golden as it was fresh, but it’ll be warm all the way through and still really satisfying.
Can you freeze it? You can, but I’ll be honest — the texture of the batter topping changes a bit after freezing and thawing. It gets a little denser and less fluffy. If you know you’re going to have leftovers for a while, freezing is better than throwing it away, but fresh or refrigerated is always going to eat better.
FAQ
Can I make this ahead of time?
You can, and it holds up well. Bake it fully, let it cool, then cover and refrigerate. Reheat it in the oven at 325°F before serving. I wouldn’t assemble it unbaked and try to refrigerate overnight — the batter will absorb too much liquid from the peaches and you’ll lose that rise.
Do I have to peel the peaches?
Technically, no. Peach skin is edible and soft enough after baking that some people don’t bother. But I always peel mine because the skin can get a little tough and chewy in texture once it’s baked, and it occasionally separates from the fruit in an unpleasant way. The blanch-and-peel method takes about 5 minutes and is genuinely worth it.
My cobbler came out soggy in the middle. What happened?
A few possible culprits. Your oven temperature might be off — an oven thermometer is worth buying if you bake regularly. The skillet might have been too crowded. Or the peaches had too much liquid that wasn’t accounted for (this can happen with very juicy peaches or with thawed frozen peaches that weren’t drained well). Next time, drain off a bit of the peach juice before adding them to the batter.
Can I use a different pan if I don’t have cast iron?
Yes. A 9×13 inch baking dish or a similarly sized oven-safe skillet will work. You’ll lose some of the crispy edge magic that cast iron gives you, and the cook time might vary slightly, but the overall result will still be a really good cobbler.
How do I know when it’s fully done baking?
The top should be deep golden brown — not pale, not tan, but actually golden. The edges will be pulling away from the sides of the pan slightly. If you gently press the center, it should spring back rather than feel wet or jiggly. When in doubt, give it five more minutes. Slightly overdone is far better than underdone with a cobbler.
Can I reduce the sugar?
Yes, within reason. For the filling, you can drop the sugar to ¼ cup if your peaches are very ripe and sweet. For the batter, I wouldn’t go below ¾ cup — the sugar in the batter is doing structural work as well as sweetening, and cutting it too much affects the texture.
Can I make individual servings in smaller skillets?
Absolutely, and it’s actually really fun for a dinner party. Use 5 or 6-inch cast iron skillets and divide the butter, batter, and peaches proportionally. Reduce the bake time to about 30 to 35 minutes and start checking early. Everyone gets their own crispy-edged individual cobbler and it feels slightly fancy with minimal extra effort.
Final Thoughts
If there’s one recipe that genuinely captures what summer cooking feels like to me — unhurried, a little messy, and completely worth it — this is it. I’ve made this cobbler for potlucks, for family dinners, for random Tuesday nights when I just needed something warm and comforting. Every single time, the skillet comes back to the kitchen empty.
It doesn’t require any special skill. It doesn’t ask much of you. You just need ripe peaches, a little patience while it bakes, and the willpower not to cut into it too early. That last part is the hardest, honestly.
If you try it, I really hope it becomes your summer staple too. And if your peaches are particularly ripe and sweet and your kitchen smells absolutely unreal while it’s baking — that means you did everything right. This best fresh peach cobbler recipe belongs in your skillet rotation, and once you make it, I think you’ll understand exactly why I keep coming back to it every single year.