Best Electric Frying Pan On The Market
OUR TOP 3 ELECTRIC FRYING PANS OF 2021
-
Presto 06857 16-inch Electric Skillet VS 2. Maxi-Matic Non-stick Electric Skillet VS 3. De’longhi Bg45 Electric Skillet With Glass Lid
THE WINNER AND OUR NO: 1 CHOICE WITHOUT DOUBT IS: Presto 06857 16-in Electric Skillet
Are you looking for the best electric frying pan? Well, you don’t have to go anywhere. For, we have done all the heavy lifting for you and you can choose any product among the best three electric frying pans we have selected for you.
To begin with, an electric frying pan or electric skillet may not really be a staple of the kitchen, but it is an incredibly valuable kitchen appliance used by cooks all over the world. It can serve as an extra cook top when your other burners are being used. It is also incredibly good for cooking large quantities for a group and it can maintain a dish at a uniform temperature for serving. Depending on the type of electric frying pan you decide to choose, it can also be used as a steamer, deep fryer and food tray – the possibilities are endless for this flexible appliance.
Since electric skillets or electric frying pans heat quickly and are generally easy to clean, it’s only beneficial to have one in your kitchen cabinet. Do you feel motivated to acquire one?
To begin with, a cook is simply as good as the weapons in his arsenal, also called the kitchen, which is actually the “belly of the house”. A beautiful assortment of pots and containers as well as appliances which are great performers can really help to create magic in the kitchen. Moreover, when we talk about the quintessence of kitchen enhancement, a decent and durable electric frying pan has no equivalent.
But which ones can you count on to get the best value for your money? Which ones are sure to satisfy your kitchen needs? What are this season’s special ones that need to be checked? In fact, don’t start sweating because we’ve got you covered! We’ve reviewed numerous studies on electric frying pans and electric skillets and narrowed the surveys down to three of the best electric fry pans available on the market today.
So, without further ado, let’s take a close look at the top three selections of this year.
No 1. 16-inch electric folding pan Presto 06857 and 2nd Maxi-Matic electric non-stick deep dish pan and 3rd Maxi-Matic electric deep dish pan.
Let’s see how they fare when they are pitted against each other.
-
Presto 06857 16-inch Electric Foldaway Skillet Review
Overview

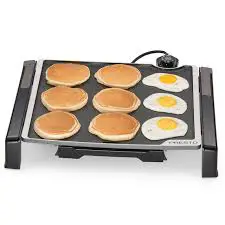
First in its category, the Presto 06857 16-inch electric folding frying pan is an exceptional electric frying pan among the products available on the market today. It is ideal for frying. This thin electric frying pan offers an built-in pour spout that can be folded like a spoon rest for your convenience.
Plus, with its huge 16-inch base and high sides, it can handle extra cooking and serving limits, ensuring that you never have to ask for more on those lovely evenings with your loved ones. Its top-notch design and first-rate innovation encourage you to save energy, making it an environmentally-friendly alternative. What’s more, its safety glass cover and heat-retaining handles make it an ideal aid when your home is crowded. Easy to clean, this better electric frying pan is dishwasher-safe, with no heat control, of course.
Who is this product for?
Basically, everyone from culinary experts to occasional users, the Presto 06857 16-inch electric folding frying pan is an incredible addition to any kitchen. You can use this pan if you don’t have an oven ready to serve you, or if you have one. It can also be used on a buffet to serve food, making it ideal for parties with many visitors. It is also ideal for students in small apartments, for cooking outdoors or for use in a campervan.
Advantages
Comes with an accompanied spout which makes it ideal for buffet workers.
Easy to handle with a “stay-cool” handle.
Arrives the tempered glass lid
Non-stick surface that helps you avoid grease.
Heavy cast aluminum base ensures even cooking.
Master Heat Control to maintain a constant temperature.
Disadvantages
Some may find that the power cord is too short, but this is easily solved with an extra cord. Probably not a big problem!
Depending on the type of food you’re working with, this pan may require light cooking from time to time to ensure even heat distribution.
It has also been reported that the glass lid has broken, which is rare though!
VERDICT
Despite a few flaws, the Presto 06857 16-inch electric folding skillet is a decent frying pan for people who can’t get their hands on a grill or burner, or anyone who simply wants to buy a simple alternative to their over-stuffed kitchen.
Check price on Amazon
Now let’s come to our second choice:
-
Maxi-matic Elite Gourmet EG-6203 Deep Dish Heavy Duty, Easy-Pour Spout, Dishwasher Safe, 1500W Non-stick Electric Skillet
Overview

d stoves and integrates perfectly into the kitchen.
The Maxi-Matic consists of a non-stick marble stone coating and a molded heating element. It has a variable temperature control knob with a range of 200 to 400 degrees F and an indicator light.
From frying to boiling to low temperature cooking and more, this pan can cover all of your meals throughout the day. And due to its ETL certification and a one-year warranty against manufacturing defects, you can rest easy while filling your tummy with some amazing delicacies.
Who is this product for?
Perfect for anyone who needs an extra cook top in the kitchen, or for those who live in small apartments, the Maxi-Matic non-stick electric skillet is a great addition to their arsenal of kitchen appliances. It is also ideal for students in dormitories or anyone who needs to cook away from home or in a camping van.
Advantages
Its non-stick honeycomb pattern makes it more durable than traditional non-stick coatings. Plus, the non-stick coating won’t crack or crumble, so you can cook with confidence.
With extra large dimensions of 16″ x 13″ x 3. 15″, it is ideal for preparing large family meals.
The spout allows for easy drainage of excess juice.
This product is dishwasher safe after removing the temperature control button.
With the precise temperature setting varying from 200 to 400°f degrees, you can easily avoid burned food.
In some cases, the plug-in unit may be a little loose in some sockets, which can be easily fixed by switching between the inputs.
Disadvantages
This pan may need a little attention from time to time to ensure even heat distribution, but it is not really a hugely cumbersome task.
VERDICT
Apart from the handles mentioned, the Maxi-Matic non-stick electric frying pan is without a doubt a first class model when it comes to having the best electric frying pan. It makes cooking an enjoyable experience without any major problems.
Check price on Amazon
-
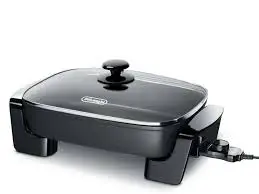
De’longhi BG45 Electric Skillet With Gass Lid
If you have a large family for which you have to cook, you need an appliance that can do a lot. Traditional electric frying pans are usually a little small, making them ideal for individual culinary specialists or for single chefs. However, the De’Longhi’s BG45 electric frying pan is here to serve all your requirements.
Who is this product for?
This fancy model is big enough for you to use it to prepare dinners for the whole family. It also makes it easier to prepare meals for evening gatherings. In addition to being exceptionally attractive and simple to use, this model also has some valuable features.
For example, there is a temperature regulator that makes it easy to select the ideal heat level. The keep-warm function makes it possible to keep food at the ideal temperature for longer. It is also ideal for slow simmers if you need to keep cooking that way.

Wants to know why it comes in our list of the 3 best electric frying pans?
The De’Longhi BG45 electric frying pan is equipped with adjustable steam vents. This means that it is not at all difficult to remove extra moisture from food when steaming. You have the opportunity to take a peep at fresh and healthy meals being cooked without having to worry about moisture in the food.
Another amazing feature is the way the heating component is located inside the pan. This improves the heat circulation and therefore the food is prepared much more evenly. The lower part of the pan also has a non-stick coating to prevent the food from getting burnt.
To make things even sweeter, this pan is anything but difficult to clean. Just apply a little washing-up liquid and all food debris will slide right off. Preparing delicious meals for a big party becomes a breeze when you have a Delonghi electric frying pan by your side!
Advantages
Extremely wide border
It gives off an equal amount of heat
Plastic handles remain cool to the touch
Accompanies customizable steam vents
Features a strong non-stick coating.
Disadvantages
A little too big for a single person or a small family.
VERDICT
As we have already mentioned, the Delonghi electric frying pan is an excellent choice for people who are good at entertaining guests in weekend parties. If you are single user, or just a couple living in a small apartment, you can restrict choice to the first or the second one we have chosen for you.
Check price on Amazon
Wrapping up
Hopefully, this post on the best electric frying pans will help you choose the best one among a host of frying pans readily available on the market today. We have deliberately reduced our list and confined it to only three so that you don’t have to smash your head against the wall trying to find out the best one among the top ten products given in most long posts about this kind of kitchen tools and appliances. Now go cooking with one of these electric frying pans!
 It offers a comfort that didn’t exist before, but can you put a slow cooker in the oven? We will address this and many other questions in this article.

 You should prepare the orange juice by peeling them first. Then, chop them into smaller parts to fit your juicer chute.
 Can you put a cast iron skillet in the oven? This is one question that people frequently ask in question answer forums, especially in quora or reddit.com. The answer is yes. You can put cast iron skillet in the pan and there is no problem. Moreover, cast iron skillets are absolutely oven-safe. Anyway, if you are one of those readers who want a definite answer, just go through this post carefully.
 I like my Toast almost-burnt and my waffles extra-crispy. When I started seeing pictures of impossibly fluffy, soufflé-like Japanese pancakes all over on social network platforms, I knew I needed to work out how to create them at home. After a bit of experimentation and a great deal of sugar consumption, I developed a foolproof recipe. Here’s how to do it.
 But, since the late 70s, the popularity of cottage cheese has been on a steady decrease. Due to the growing prominence of new high quality pasta manufacturers and weak marketing related to the different aspects of cottage cheese, it plummeted down to become one of the very unpopular products in the dairy section of stores–but is the world ready to appreciate cottage cheese once more?

 Are you one of those people who have never tasted lamb? Are you curious about the exact taste of lamb? You may hesitate because the meat is more unusual, but when you taste it, you will find out that lamb tastes like a wonderfully tender and crispy specialty meat.
 A garden spring roll, for example, is probably filled with a variety of fresh vegetables such as carrots, bamboo shoots, peppers and cabbage. And spring rolls, which are much juicier, tend to be filled with meat and vegetables, usually pork, poultry or shrimp.
 Nothing is more delicious than fully cooked shrimp. How many times have you been in the kitchen while roasting shrimp? In case you sound like me, cooking shrimp is not something you do from time to time. This article is to a lesser extent a formula, but generally a guide to methods. Cooking shrimp is so natural if you just know how to do it.

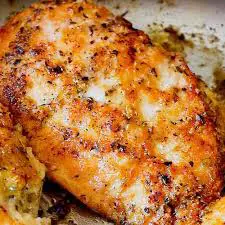
 To begin with, boneless, skinless chicken breasts are a staple in the kitchen, which I offer four times a week for dinner anyway. They can be thrown on the grill for a simple dinner or thrown on the slow cooker on a hectic day. However, like cooking chicken, sautéing it in a pan has never been my forte. I usually end up with an intensely dry chicken breast that no amount of sauce or smooth and creamy side dishes can help.
 Now I would like to tell you how I entertained a few of my guests with some healthy and sumptuous banana pancake recipes adding my own twist to it. That’s another story, though. Just read on carefully if you want to know all the details.
 As for myself, I’m someone who likes the idea of having pancakes on Sunday mornings – and lots of pancakes, so to say. In fact, I’ve been gobbling up all these regular pancakes lazily relaxing on my bed with a few cups of tea or hot coffee around.
 To begin with, knowing the correct doneness temperature when cooking chicken guarantees juicy results, but what if the meat or juice is pink and there seems to be blood in it? If you’re like many others, the sight of anything other than completely opaque meat with clear juices can make you shiver when chicken is provided on the dinner table in that manner.
 Chicken thighs and all brown chicken meat should be cooked at a higher temperature – 175 to 180 F – because of their greater proportion of connective tissue. Cooking thigh meat at 165° F produces a gummy, soft meat, but at 175 to 180° F it is tender and juicy, while the collagen melts and turns into jelly.
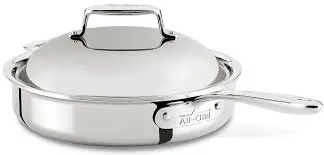
 All-Clad 4403 Stainless Steel Saute Pan")