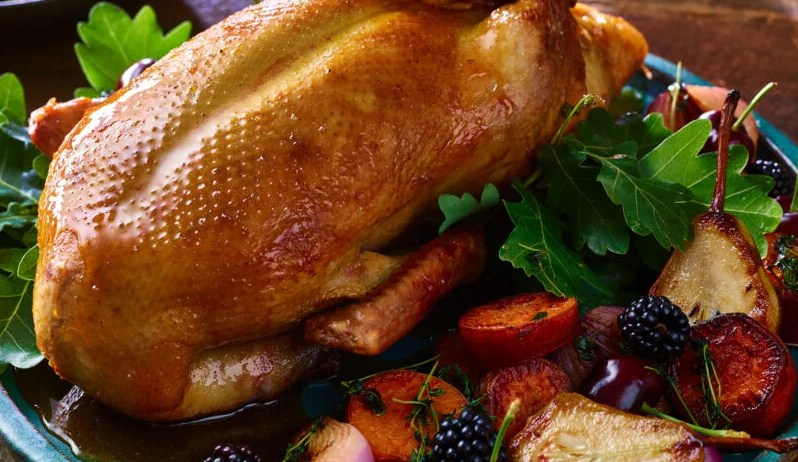

Do you want to know the 3 most duck roasting mistakes people should always avoid? Well, the first duck I ever roasted set off the smoke alarm at 7:40 p.m. and produced skin with the texture of a wet leather wallet. That bird taught me more than any recipe did. Most duck roasting mistakes come down to three things: wet skin, one blazing oven temperature, and guessing at doneness.
Fix those and you get skin that shatters when you tap it with a fork, plus meat that’s juicy instead of greasy. I’ve now roasted somewhere around thirty ducks, and I still remember the sad first one. It smelled great, which made it worse.
This recipe is my crisp-skin roast duck with a simple salt-and-pepper rub. It uses a 5-pound Pekin duck (the standard grocery store kind). You don’t need fancy gear. You do need patience, because the best part of this recipe happens in your fridge while you sleep.
Why You’ll Love This Recipe
It’s hands-off for most of the cooking time. Once the duck is in the oven you’re mostly just draining fat twice and pretending you’re not hovering by the oven door.
You also end up with a jar of rendered duck fat, which is honestly the bonus prize. Potatoes roasted in it taste like the best fries you’ve ever had, just less embarrassing to eat in public. And the method is forgiving once you understand the three fixes below, so a weeknight-tired version of you can pull it off.
Ingredients
- 1 whole Pekin duck, about 5 pounds (thawed completely if frozen)
- 2 tablespoons kosher salt
- 1 teaspoon freshly ground black pepper
- 1 teaspoon baking powder (aluminum-free, trust me on this one)
- 1 orange, quartered
- 4 garlic cloves, smashed
- 4 sprigs fresh thyme
- 1 kettle of just-boiled water
Equipment Needed
You’ll want a roasting pan with a rack, a sturdy pair of tongs, a sharp paring knife or a skewer for pricking the skin, and paper towels, a lot more than you think. An instant-read thermometer is the one item I’d call non-negotiable, and a heatproof jar for saving the fat is nice to have. That’s it.
Step-by-Step Cooking Instructions
Mistake #1 fix: dry the skin properly.
- Take the duck out of the packaging, remove the neck and giblets from the cavity, and trim the extra fat flaps near the opening. Save those trimmings for rendering if you like.
- Set the duck on the rack in your sink. Pour the just-boiled water slowly over the whole bird. The skin will tighten right in front of you, which is what you want.
- Pat it dry with paper towels until you feel silly. Then pat it again.
- Mix the salt, pepper, and baking powder. Rub it over the entire bird, including the cavity.
- Put the duck on the rack, uncovered, in the fridge for 24 hours. Twelve hours works if you’re desperate, but 24 is better.
Mistake #2 fix: render slowly, then blast.
- Heat your oven to 300°F. Stuff the orange, garlic, and thyme into the cavity.
- Prick the skin all over with a skewer, especially around the breast and thighs. Angle the skewer sideways so you go through skin and fat only, not into the meat.
- Roast breast-side up for 2 hours. At the 45-minute mark and again at 90 minutes, carefully pull the pan out and pour off the fat into your heatproof jar.
- Raise the oven to 425°F and roast another 20 to 25 minutes, until the skin is deep golden and blistered.
Mistake #3 fix: use a thermometer and rest the bird.
- Check the thickest part of the thigh with your thermometer. I pull mine at 175°F, since duck legs turn tender at a higher temperature than chicken.
- Move the duck to a cutting board and let it rest, uncovered, for 20 minutes. Covering it with foil will steam your beautiful skin soft again.
- Carve and serve while the skin still crackles.
Cooking Tips
Draining the fat matters more than it seems. Leave two cups of it sloshing around in the pan and the bottom of your duck basically fries in it, while the smoke alarm starts its little concert. I found that out around 11 p.m. on a Sunday, when I knocked the pan and half a cup of fat hit the oven floor. Don’t do that.
Also, don’t skip the rest. I used to carve right away because everyone was hungry, and turns out that was a mistake. The juices ran all over the board instead of staying in the meat.
One more thing. If your oven runs hot, check the skin at the 15-minute mark of the final blast, because duck skin goes from golden to too dark very quickly.
Substitutions & Variations
No orange? A halved lemon or apple wedges work fine. Swap thyme for rosemary or a few star anise if you want something warmer. If you can’t find aluminum-free baking powder, use a little extra salt and accept slightly less crackle, since the baking powder helps the skin blister. For a glaze, brush on a mix of honey and soy sauce during the last 10 minutes, though watch it closely because sugar burns fast.
A frozen duck is fine, but thaw it in the fridge for two to three days. Rushing that step in a sink of warm water is how you get uneven cooking, and I’ve done it, so I’m speaking from experience.
What to Serve With It
Roasted potatoes tossed in a few spoonfuls of the rendered duck fat are the obvious pick, and I stand by it. A bitter green salad with a sharp vinaigrette cuts through the richness nicely. Steamed rice with a drizzle of soy is another easy route, and braised red cabbage or roasted carrots also play well with duck. If you want something a little sweet, try a quick cherry sauce made with a splash of vinegar.
Storage & Reheating
Let leftover duck cool, then refrigerate it in an airtight container for up to 3 days. Store the skin separately if you can, because it softens overnight.
To reheat, place the pieces on a rack in a 400°F oven for about 10 minutes, skin side up, so the skin crisps again. Skip the microwave for the skin unless you enjoy sadness. The strained fat keeps in a jar in the fridge for about 3 months, and it freezes well too.
Cook and Prep Time
- Active prep: 20 minutes
- Drying time in fridge: 24 hours
- Cook time: about 2 hours 30 minutes
- Rest time: 20 minutes
- Servings: 4
Nutrition Facts
Per serving (about 6 ounces of meat and skin, fat drained): approximately 480 calories, 34 g protein, 38 g fat, 0 g carbohydrates, 620 mg sodium.
Nutrition disclaimer: These values are estimates calculated with a standard online nutrition tool and can vary based on the size of your duck, brands used, and how much fat renders out. This information isn’t a substitute for advice from a doctor or registered dietitian, so please check with a professional if you have specific dietary needs.
Why This Recipe Actually Works
Duck skin sits on a thick layer of fat, and that fat has to leave before the skin can crisp. Pouring hot water over it tightens the skin, the overnight dry-out pulls moisture off the surface, and the slow 300°F stretch melts the fat gradually. The final blast at 425°F then does the crisping.
Baking powder raises the pH of the skin a little, which helps it brown and blister. It’s a cheap trick and it actually works, so I stopped being suspicious of it years ago.
The Small Change That Made a Big Difference
Leaving the duck uncovered in the fridge. For years I wrapped it in plastic because it felt “safer,” and I got soft skin every time. One night I ran out of foil, shrugged, left it bare, and the next day’s skin was noticeably crispier. A tangent, but I now do the same with my roast chicken and it works there too.
What I’d Do Differently Making It Again Tomorrow
I’d start earlier, honestly. The 24-hour rest is where the magic happens, and I’ve caught myself racing the clock more than once. I’d also line the bottom of the oven with foil to catch any drips, and I’d set out a bigger jar for the fat than I think I need. It’s always more than I expect.
What I Skip When Short on Time
I skip the glaze and the fancy sauce. I also cut the fridge rest to 12 hours if I have to, though I’ll grumble the whole time. What I never skip is the thermometer or the rest at the end, since those two save the meat.
FAQ
Why is my duck skin never crispy?
Usually it’s leftover moisture, too much fat left in the pan, or a covered rest. Fix the drying step first.
Do I really need to prick the skin?
Yes. Those tiny holes let the fat escape. Just keep the skewer out of the meat.
What internal temperature is right for roast duck?
For a whole roast duck, I pull it at about 175°F in the thigh. Duck breast alone is often cooked lower, but the legs need more heat to turn tender.
Can I roast a duck the same day I buy it?
You can, but the skin won’t be as crisp. Even 8 to 12 hours uncovered in the fridge helps a lot.
What do I do with all that fat?
Strain it and store it. Roast potatoes, fry eggs, or sauté greens in it.
Final Thoughts
Once you know the three duck roasting mistakes to dodge, roasting a whole duck feels a lot less scary than it looks. Dry the skin, cook low before you cook hot, and trust a thermometer more than your gut. I’m still tinkering with my own method, and some day I’ll probably change something about it again.
If you try it, let me know how the skin turned out. And if your smoke alarm goes off anyway, don’t worry, it happens to the best of us.