Easy Bean Burrito Skillet – One-Pan Dinner
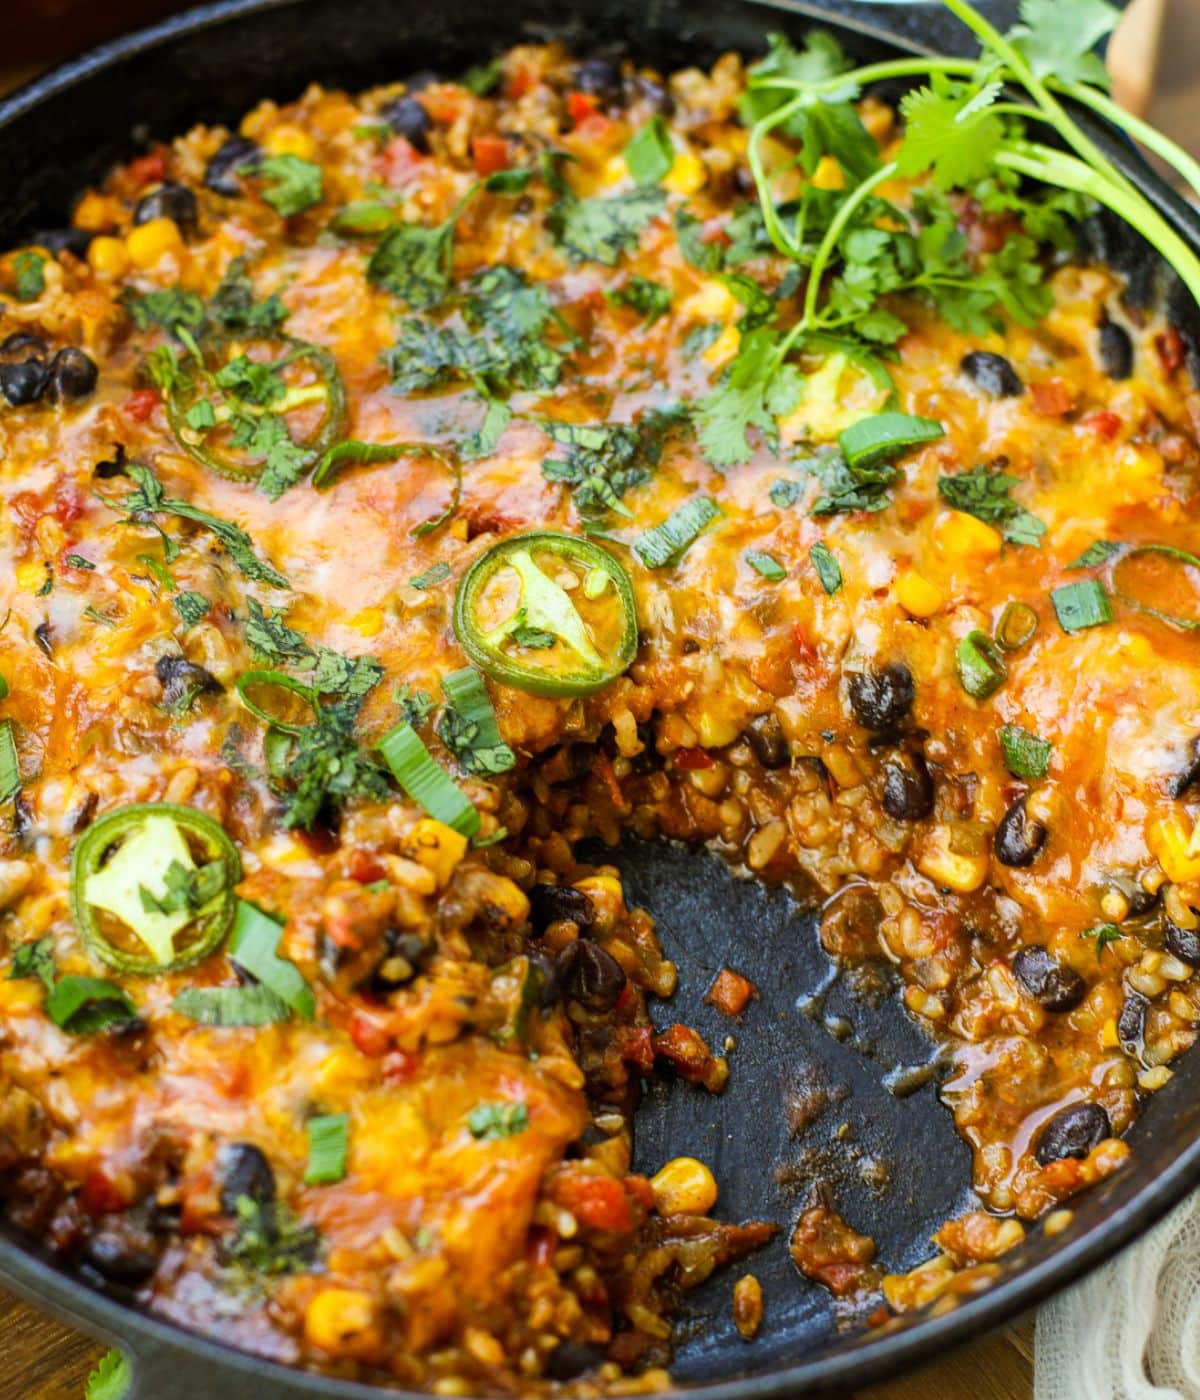
Before I start writing this post titled “Easy Bean Burrito Skillet”, I would like to confess that my favorite skillet has a dent on one side as I dropped it on the tile floor back in March this year, and somehow that dent has become the tell-tale sign that one of my favorite recipes, the bean burrito skillet dinner is about to happen fast. Yes, this is the recipe I reach for usually on weeknights when I’ve got maybe twenty-five minutes and zero patience for cleanup. It’s basically a burrito that gave up on being folded and decided to just live its best life in one pan instead. You get all the flavor — beans, rice, melty cheese, a little heat if you want it — without the wrapping, rolling, or the inevitable burrito that falls apart halfway through eating it.
I make some version of this one-pan dinner at least twice a month, sometimes more when the weather turns cold and I don’t feel like standing over multiple pots. It’s the kind of meal that doesn’t ask much of you. Dump, stir, simmer, eat. Even my neighbor, who once told me she “doesn’t cook, she assembles,” has made this one successfully, which I think says something.
Why You’ll Love This Recipe
Honestly, the biggest selling point is the single pan. One pan means one thing to wash, and after a long day that matters more than it should. Beyond that, this bean burrito skillet comes together in under 30 minutes, uses pantry staples you probably already have, and stretches easily if unexpected guests show up — I’ve fed five people off a recipe meant for four more than once by just tossing in an extra can of beans.
It’s also forgiving. Burn the rice a little at the bottom? Stir it in, nobody will know. Forgot to buy fresh cilantro? Skip it, life goes on. This isn’t a fussy recipe that punishes small mistakes, which is exactly what a weeknight dinner should be.
Ingredients
- 1 tablespoon olive oil
- 1 small yellow onion, diced
- 2 cloves garlic, minced
- 1 pound ground beef or ground turkey (or skip for a vegetarian version)
- 1 packet taco seasoning (or 2 tablespoons homemade blend)
- 1 cup long-grain white rice, uncooked
- 2 cans (15 oz each) black beans or pinto beans, drained and rinsed
- 1 can (14.5 oz) diced tomatoes, undrained
- 1 can (4 oz) diced green chiles
- 2 cups chicken or vegetable broth
- 1 ½ cups shredded cheddar or Mexican blend cheese
- Salt and pepper, to taste
- Optional toppings: sour cream, sliced avocado, chopped cilantro, lime wedges, sliced jalapeños
Equipment Needed
You really just need one large, deep skillet with a lid — a 12-inch cast iron or a nonstick sauté pan both work fine. A wooden spoon for stirring and a can opener round out the list. That’s it. No blender, no food processor, no fourteen mixing bowls dirtying up your sink.
Step-by-Step Cooking Instructions
- Heat the olive oil in your large skillet over medium heat. Add the diced onion and cook for about 3-4 minutes, until it starts to soften and turn translucent.
- Add the minced garlic and cook for another 30 seconds, just until it smells fragrant. Don’t walk away here — garlic burns fast and turns bitter.
- Add the ground beef (or turkey) to the skillet. Break it apart with your spoon and cook until browned, roughly 5-6 minutes. Drain excess fat if needed.
- Sprinkle in the taco seasoning and stir well so the meat gets evenly coated.
- Pour in the uncooked rice, beans, diced tomatoes with their juice, green chiles, and broth. Stir everything together until combined.
- Bring the mixture to a boil, then reduce the heat to low and cover the skillet with a lid.
- Let it simmer for 18-20 minutes, stirring once or twice, until the rice is tender and most of the liquid has absorbed.
- Remove the lid, sprinkle the shredded cheese evenly over the top, and cover again for 2-3 minutes, just until the cheese melts.
- Take the skillet off the heat, taste, and season with salt and pepper as needed.
- Serve straight from the skillet with your favorite toppings — sour cream, avocado, a squeeze of lime, whatever you’ve got.
Cooking Tips
Keep your heat at a true low simmer once you cover the pan — if it’s still bubbling hard, the rice on the bottom scorches before the top ever cooks through, and I learned that one the hard way on a Sunday night with company already at the table. Stir sparingly while it simmers, too. I used to stir constantly because I thought it would help — turns out that was a mistake, since it releases steam and slows the rice down. Just lift the lid, give it one good stir, and put the lid right back on.
Also, rinse your beans. I skipped this step for years because I was lazy, and the skillet came out with a slightly murky, starchy liquid that nobody wants. Thirty seconds under the tap fixes that completely.
Substitutions & Variations
This recipe bends in about a dozen directions depending on what’s in your fridge. Swap the ground beef for shredded rotisserie chicken, crumbled chorizo, or just extra beans and corn if you want it meatless — brown rice works too, though you’ll need to add roughly 10 extra minutes of simmer time and a splash more broth since it takes longer to soften. If you like things spicy, throw in a diced jalapeño with the onion or use a hot enchilada sauce instead of plain diced tomatoes. Quinoa is another option in place of rice for anyone avoiding grains that aren’t gluten-free, and cauliflower rice works in a pinch too, though it’ll turn out softer and a bit more like a casserole than a skillet.
What to Serve With It
I usually just serve this straight up with tortilla chips on the side for scooping, because honestly it’s a complete meal on its own between the protein, carbs, and beans. A simple green salad with lime vinaigrette cuts through the richness nicely if you want something fresher on the plate. Warm flour tortillas on the side turn it into more of a build-your-own situation, which my kids weirdly love more than eating it straight from a bowl.
Storage & Reheating
Leftovers keep in an airtight container in the fridge for up to 4 days, and honestly it tastes even better on day two once the flavors settle in. Reheat portions in the microwave for about 90 seconds, stirring halfway, or warm it in a skillet over medium-low heat with a splash of broth or water to loosen it back up since the rice tends to firm up in the fridge. It also freezes surprisingly well for up to 2 months — just thaw overnight in the fridge before reheating.
Cook and Prep Time
Prep time: 10 minutes Cook time: 25 minutes Total time: 35 minutes Servings: 4-6
Nutrition Facts (per serving, based on 4 servings)
Calories: 480 | Protein: 28g | Carbohydrates: 42g | Fat: 20g | Fiber: 8g | Sodium: 810mg
Nutritional values are estimates only, calculated using standard ingredient data, and will vary based on specific brands, substitutions, and portion sizes used. Please consult a registered dietitian or use your own nutrition tracking tools for precise dietary needs.
Why This One Actually Works
The reason this bean burrito skillet holds together so well, instead of turning into mush or a soupy mess, comes down to the ratio of liquid to rice. Two cups of broth against one cup of rice, plus whatever moisture comes from the tomatoes and beans, gives you just enough for the rice to cook through without drowning it. I tested this with less liquid once, thinking I’d save time, and ended up with crunchy rice in the middle of dinner. Not my finest moment.
The Small Change That Made a Big Difference
For the longest time I added the cheese at the very start, mixed in with everything else. Big mistake — it turned greasy and separated into weird little pools by the time the rice finished cooking. Now I add it right at the end, off the direct heat, covered just long enough to melt. That one switch made the whole dish look and taste ten times better, and it takes zero extra effort.
What I’d Do Differently Next Time
If I’m being honest, I’d probably toast the rice in the pan for a minute or two before adding the liquid next time I make this. I’ve done that trick with other rice dishes and it adds a nutty depth I think this skillet is missing right now. I just always forget until the rice is already sitting in liquid. One of these days.
What I Skip When I’m Short on Time
On my busiest nights, I skip dicing the onion small and just rough-chop it — nobody’s grading my knife skills at the dinner table. I’ll also use a rotisserie chicken instead of browning meat from scratch, which shaves off a solid seven or eight minutes. And if I don’t have fresh garlic on hand, a half-teaspoon of the jarred stuff does the job fine, don’t judge me.
FAQ
Can I make this bean burrito skillet vegetarian? Yes, just skip the meat entirely or double up on beans and add a cup of corn instead. The seasoning and texture still carry the dish just fine.
Why is my rice still crunchy after 20 minutes? Your lid probably isn’t sealing tightly, or your heat was too high, causing liquid to evaporate before the rice finished absorbing it. Add a splash more broth, cover tightly, and give it another five minutes.
Can I use instant rice instead of regular rice? You can, but reduce the simmer time to about 8-10 minutes and check it early, since instant rice cooks much faster and can turn mushy if left too long.
Is this dish freezer-friendly? It is. Let it cool completely before transferring to a freezer-safe container, and it’ll keep well for up to 2 months.
Can I double this recipe for a crowd? Absolutely, just make sure your skillet is large enough or split it across two pans, since overcrowding the rice layer can lead to uneven cooking.
Final Thoughts
At the end of the day, this easy bean burrito skillet earns its spot in my weekly rotation because it doesn’t demand much and still delivers a genuinely satisfying dinner. It’s the kind of one-pan meal you can make without really thinking about it after a while, which honestly might be the highest compliment I can give a weeknight recipe. Give it a shot the next time your week feels like too much of a burden and your energy for cooking feels like too little — I think it’ll earn a spot in your rotation.