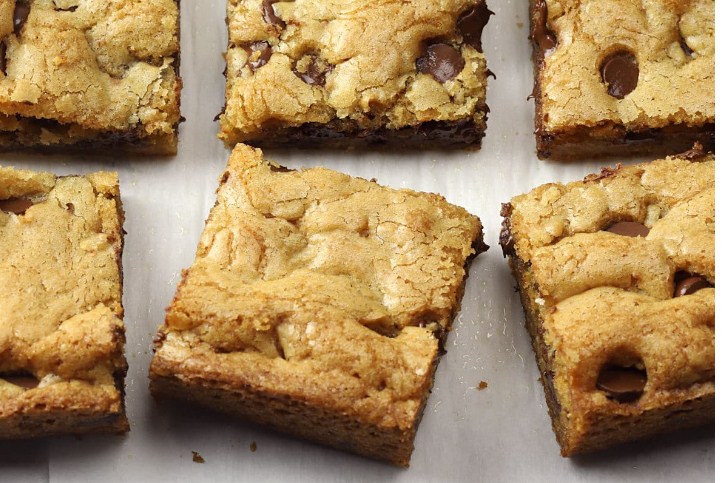
Easy Chocolate Chip Cookie Bars Recipe
I made this easy chocolate chip cookie bars recipe on a Tuesday night because I did not have the patience to scoop individual cookies onto a tray. That’s the honest truth. My daughter had a bake sale the next morning, it was already 8:40 pm, and I needed something fast, one pan, minimal cleanup. These bars saved me, and now they’re the thing I make when I want cookie flavor without babysitting three trays in the oven. If you’ve never made cookie bars before, think of them as chocolate chip cookies that got lazy in the best way possible — same gooey centers, same crispy edges, just dumped into one pan and cut into squares.
Why You’ll Love This Recipe
Honestly, the biggest reason I keep coming back to this one is speed. You mix everything in one bowl, press it into a pan, and you’re done in under ten minutes of active work. No chilling the dough, no rolling anything into balls, no standing at the oven for twenty minutes rotating trays. My neighbor Jennifer asked me for this recipe after I brought a tray to her son’s soccer game last spring, and she texted me a week later saying it was now in her “permanent rotation,” which honestly felt like a bigger compliment than it should have.
These bars also travel well. They don’t crumble apart in a container the way some cookies do, and they hold their shape even after sitting in a lunch bag all morning. Plus, and I say this as someone who has burned more cookie batches than I’d like to admit, cookie bars are far more forgiving. The thicker, even layer means you don’t get that awful situation where half the tray is burnt and the other half is raw. Trust me, that alone is worth the switch.
Ingredients
Here’s what you’ll need for a 9×13 pan of bars. I keep most of this stuff on hand anyway, which is part of why this recipe became a staple in my kitchen.
2 and 1/4 cups all-purpose flour
1 teaspoon baking soda
1 teaspoon salt
1 cup unsalted butter, softened (not melted, that’s a different texture entirely)
3/4 cup granulated sugar
3/4 cup packed brown sugar
2 large eggs
2 teaspoons vanilla extract
2 cups chocolate chips (I usually go half semi-sweet, half dark, but that’s just me)
That’s it. Nine ingredients, most of which are probably already in your pantry. No fancy flours, no weird ratios you need a kitchen scale to figure out.
Step-by-Step Cooking Instructions
Preheat your oven to 350°F and grease a 9×13 inch baking pan, or line it with parchment paper if you want to lift the whole thing out later (I do this about half the time, depends how lazy I’m feeling).
In a medium bowl, whisk together the flour, baking soda, and salt. Set that aside for a minute.
In a large bowl, cream the softened butter with both sugars until it looks light and fluffy, roughly 2 to 3 minutes with a hand mixer. Don’t rush this part — I used to skip proper creaming to save time, and the bars came out dense and a little greasy. Turns out that step actually matters.
Beat in the eggs one at a time, then mix in the vanilla. Gradually add the flour mixture, stirring just until combined. Overmixing here is the enemy of a soft bar, so stop as soon as you don’t see streaks of flour anymore. Fold in the chocolate chips by hand.
Press the dough evenly into your prepared pan. I use the bottom of a measuring cup to smooth it out because my hands always leave weird dents.
Bake for 22 to 25 minutes, until the top is golden and the edges start pulling away from the sides of the pan. The center might look slightly underdone — that’s fine, it firms up as it cools. Let the bars cool in the pan for at least 20 minutes before cutting, or you’ll end up with a gooey mess (which, fine, sometimes I eat straight from the pan with a spoon anyway).
Cooking Tips
One thing that changed my results more than anything else was using a light-colored metal pan instead of a dark nonstick one. Dark pans absorb more heat and can scorch the bottom before the center sets, which happened to me more than once with a hand-me-down pan from my mother-in-law. If that’s all you’ve got, just drop the oven temp by about 15 degrees and keep an eye on it around the 18-minute mark.
Also, room temperature eggs blend into the batter more evenly. I know that sounds fussy, but cold eggs straight from the fridge can make the butter seize up a little, and you end up with a slightly lumpy batter. Not a huge deal, but if you’re chasing that perfectly smooth texture, it helps.
Substitutions and Variations
You can swap the butter for an equal amount of plant-based butter if you’re keeping this dairy-free, and it works pretty well, though the bars come out a touch less rich. For a gluten-free version, a 1-to-1 gluten-free flour blend does the job, just know the texture turns slightly more crumbly. Some people like adding a cup of chopped walnuts or pecans for crunch, and if you want to get a little wild, press some mini marshmallows into the top during the last five minutes of baking for a s’mores-style bar. I tried that once for a Halloween party and it disappeared faster than anything else on the table.
You can also play around with the chocolate. White chocolate chips, peanut butter chips, even chunks of a leftover candy bar all work fine here since the base dough is pretty neutral and forgiving.
What to Serve With It
These bars are rich enough on their own, but a scoop of vanilla ice cream turns them into an actual dessert instead of a snack. Warm one up for about 12 seconds in the microwave, add the ice cream, and you’ve basically got a deconstructed cookie sundae. A glass of cold milk is the obvious classic pairing too, and honestly, it’s still my favorite way to eat these at 9 pm standing at the kitchen counter.
Storage and Reheating
Store leftover bars in an airtight container at room temperature for up to 5 days. They stay soft that whole time, which surprised me the first time I made them since regular cookies dry out faster. You can also freeze them for up to 3 months — just wrap individual bars in plastic wrap, then toss them in a freezer bag. To reheat, a few seconds in the microwave brings back that fresh-baked warmth, or let them thaw at room temp for about an hour if you’re not in a rush.
Cook and Prep Time
Prep time runs about 10 minutes, and baking takes 22 to 25 minutes, so you’re looking at roughly 35 minutes start to finish, not counting the cooling time. This recipe makes about 24 bars depending on how you slice them, though I’ve definitely cut mine into oddly large squares before because I wasn’t in the mood for math that night.
Nutrition Facts
Per bar (based on 24 servings): approximately 210 calories, 10g fat, 28g carbohydrates, 2g protein, and 17g sugar. These numbers shift depending on the brand of chocolate chips you use and how generously you cut the pan, so treat this as a rough estimate rather than gospel.
Why This Recipe Actually Works
The reason this easy chocolate chip cookie bars recipe holds together so well comes down to the ratio of butter to flour and the fact that you’re baking one thick, even layer instead of dozens of small mounds. Heat distributes more predictably across a flat pan, which is part of why you get that consistent chewy center every single time. There’s also less surface area exposed to direct heat compared to individual cookies, so the bars stay moister overall. It’s basic kitchen chemistry, but it makes a real difference on the plate.
The Small Change That Made a Big Difference
For months I baked these at 375°F because that’s what a random blog told me years ago, and the edges always came out a little too crisp for my taste. Dropping the temperature to 350°F and adding two extra minutes of bake time fixed that completely. Small tweak, totally different bar. Sometimes the fix really is that boring.
What I’d Do Differently Making It Again Tomorrow
Honestly? I’d measure my flour by weight instead of eyeballing it with a cup, because I once packed the flour cup too tight during a rushed Sunday batch and ended up with bars that were dry and almost cakey. Not terrible, but not what I was going for either. A kitchen scale takes the guesswork out completely, and I keep telling myself I’ll use mine more often.
What I Skip When Short on Time
When I’m really pressed for time, I skip greasing the pan and just use parchment paper instead, which cuts cleanup time in half. I also skip creaming the butter with a hand mixer and just do it by hand with a wooden spoon — it takes a little longer arm-wise, but it means one less appliance to wash.
FAQ
Can I double this recipe?
Yes, just use a larger pan, like a half-sheet pan, and add a few extra minutes to the bake time.
Why are my bars cakey instead of chewy?
This usually means too much flour got packed into the measuring cup, or the bars were left in the oven a bit too long.
Can I use salted butter instead of unsalted?
You can, just cut the added salt in the recipe down to about half a teaspoon so the bars don’t turn out too salty.
Do I need to chill the dough first?
No, that’s actually one of the best parts of this recipe. No chilling required, which is a big reason it’s faster than regular chocolate chip cookies.
Final Thoughts
At the end of the day, this easy chocolate chip cookie bars recipe is the kind of dessert you make when you want something homemade without the fuss of standing over a cookie sheet for half an hour. It’s forgiving, it travels well, and it tastes just as good as the classic cookie it’s based on, maybe even better once you get the temperature and timing right. Give it a try the next time you need a quick dessert for a potluck, a bake sale, or honestly just a random Tuesday night like mine was.