Flourless Chocolate Cake Recipe
The first time I came across this flourless chocolate cake recipe, I genuinely didn’t believe it would work. No flour? In a cake? That felt like trying to build a house without walls. But my sister-in-law is gluten-free, and I wanted to make her something for her birthday that didn’t taste like a sad, dry consolation prize, which, let’s be honest, is what most gluten-free desserts felt like back then.
So I gave it a shot. And within one bite, I understood why this flourless chocolate cake recipe has been quietly famous in fancy restaurants for decades. It’s dense, it’s fudgy, it tastes like a cross between a brownie and a truffle, and somehow it comes together with basically five ingredients you probably already have.
I’ve made this cake more times than I can count now, for birthdays, for holidays, for one particularly rough Wednesday where I just needed chocolate immediately. It never fails, and it never tastes like a “substitute” dessert. It just tastes like really, really good chocolate cake that happens to be gluten-free.
What surprised me most is how few ingredients are actually involved. No flour, no baking powder, none of the usual cake science. Just good chocolate, butter, eggs, sugar, and a bit of cocoa powder doing all the heavy lifting.
Why You’ll Love This Recipe
I’ve made a lot of desserts over the years, and this one gets requested more than almost anything else I bake. Here’s why:
- It’s naturally gluten-free without tasting like a compromise. Nobody at the table will guess unless you tell them.
- Only 6 ingredients, most of which are pantry basics.
- The texture is closer to a rich mousse or fudge than a typical cake, which honestly makes it feel more special.
- It’s a one-bowl, no-mixer recipe. Less cleanup, more chocolate.
- It looks impressive with almost zero decorating effort. A dusting of powdered sugar and you’re done.
My father-in-law, who is famously unimpressed by desserts (the man once described a wedding cake as “fine, I guess”), asked for a second slice the first time I served this. I nearly fell off my chair.
Ingredients
- 8 oz (about 2 sticks) unsalted butter, cut into pieces
- 8 oz good quality dark or semisweet chocolate, chopped
- 1 1/4 cups granulated sugar
- 4 large eggs, room temperature
- 1/2 cup unsweetened cocoa powder
- 1/4 teaspoon salt
Optional for serving:
- Powdered sugar for dusting
- Whipped cream or a scoop of vanilla ice cream
That’s it. Six ingredients, and honestly, the salt barely counts as a real ingredient either.
Step-by-Step Instructions
Step 1: Preheat your oven and prep your pan.
Set the oven to 375°F. Grease a 9-inch springform pan really well, and I mean really well, since this cake loves to stick if you’re stingy with the butter. Line the bottom with a circle of parchment paper for extra insurance. I skipped the parchment once. Never again.
Step 2: Melt the chocolate and butter.
In a heatproof bowl set over a pot of gently simmering water, melt the butter and chocolate together, stirring occasionally until completely smooth. You can also do this in the microwave in 30-second bursts, stirring between each one. Just don’t rush it or you’ll end up with grainy, seized chocolate, which is a genuinely sad thing to witness.
Step 3: Whisk in the sugar.
Remove the bowl from heat and whisk in the sugar until fully combined. The mixture will look glossy and thick at this point, almost like a chocolate ganache.
Step 4: Add the eggs.
Whisk in the eggs one at a time, mixing well after each addition. This step is where the cake gets its structure, so don’t dump all four eggs in at once and stir lazily. Take the extra thirty seconds per egg. It matters more than you’d think.
Step 5: Fold in the cocoa powder and salt.
Sift the cocoa powder over the batter (sifting really does help avoid lumps here) and fold it in gently along with the salt, until no dry streaks remain.
Step 6: Bake.
Pour the batter into your prepared pan and bake for 25-30 minutes. The top should look set with a slight crack forming around the edges, but the center should still have a tiny jiggle to it. Overbaking is the number one way people ruin this cake, so start checking around the 25-minute mark.
Step 7: Cool completely.
Let the cake cool in the pan on a wire rack for at least an hour, then refrigerate for another hour or two before slicing. I know waiting is torture. Do it anyway, because this cake firms up beautifully as it chills, and slicing it warm just gives you a gooey mess on the plate.
Cooking Tips
A few things I’ve learned through trial, error, and one memorable cake that stuck to the pan so badly I nearly cried:
Use good chocolate. This cake has so few ingredients that each one really shows up in the final flavor. Cheap chocolate chips will give you a flatter, waxier taste, so splurge a little on a decent dark chocolate bar if you can.
Don’t skip the parchment paper on the bottom of the pan. I learned this one the hard way, scraping half a cake off the bottom of my springform pan while my dinner guests waited politely in the other room.
Let it cool fully before slicing, even though the smell coming from your kitchen will make this genuinely difficult. A warm slice tastes good, but a chilled slice holds its shape and tastes even richer.
Also, a hot knife makes cleaner slices. Just run your knife under hot water and wipe it dry between cuts. Small detail, but it makes the cake look like it came from a bakery instead of a Tuesday night kitchen experiment.
Substitutions & Variations
No dark chocolate on hand? Semisweet works just as well, and milk chocolate can work too, though the cake will turn out noticeably sweeter and slightly less intense.
Want a flavor twist? A teaspoon of espresso powder added with the cocoa deepens the chocolate flavor without making it taste like coffee. I do this almost every time now, and I genuinely think it’s an upgrade.
Dairy-free? Swap the butter for a plant-based butter substitute, one-to-one. I’ve tested this twice for a dairy-free friend and honestly couldn’t taste much difference.
Want it boozy? A tablespoon of orange liqueur or coffee liqueur added with the eggs adds a nice grown-up edge, though I’d skip this version if kids are eating it too.
What to Serve With It
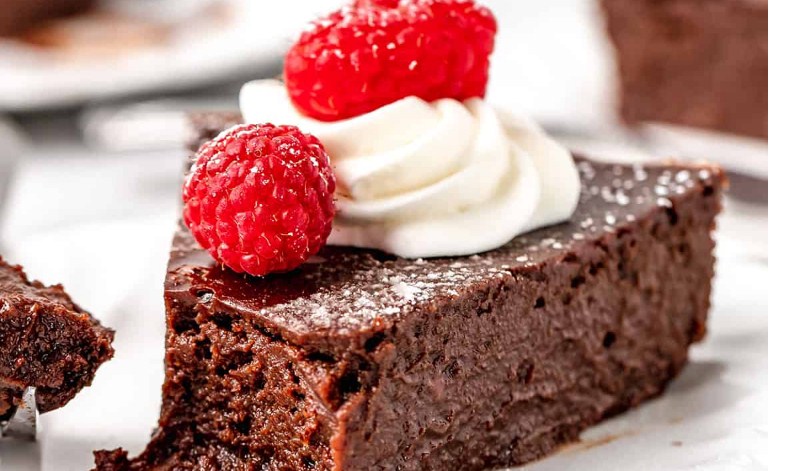
This cake is rich, borderline decadent, so I usually serve small slices with something to lighten it up. A dollop of lightly sweetened whipped cream and a few fresh raspberries cuts through the richness perfectly.
For a slightly more indulgent route, a scoop of vanilla bean ice cream melting against a warm slice is basically unbeatable. I’ve also served it with a light raspberry sauce drizzled over the top, which adds a nice tartness against all that dense chocolate.
Storage & Reheating
Store leftovers covered in the fridge for up to 5 days. Honestly, I think it tastes even better on day two, once the flavors have had time to settle.
This cake doesn’t need reheating, it’s meant to be served chilled or at room temperature. If you want it slightly less cold, just let a slice sit out for 15-20 minutes before serving.
You can freeze it too, wrapped tightly, for up to a month. I usually slice it first, then freeze individual pieces so I can grab just one whenever a chocolate emergency strikes.
Why this one actually works
The whole trick behind a flourless chocolate cake is the eggs. Without flour to provide structure, the eggs are doing all the work of holding this cake together while still keeping it soft and fudgy in the middle. That’s also why overbaking ruins it so fast, since too much heat turns those eggs from silky to rubbery in a matter of minutes.
Small changes that made a big difference
Adding the espresso powder was a genuinely small change that made a huge difference in flavor depth. My early versions tasted good, just a little flat and one-dimensional. That little pinch of coffee flavor rounds everything out without adding any noticeable coffee taste.
If I were making this again tomorrow
I’d probably use a slightly better chocolate than I usually reach for, since I’ve noticed the quality really does show up in the final bite. I’d also chill it overnight instead of just a couple hours, since the texture the next day is honestly even better, firmer and fudgier.
What I skip when I’m short on time
The parchment circle in the bottom of the pan is the one thing I’m tempted to skip when I’m rushing, and it’s also the one thing I should never actually skip, based on personal, sticky experience. Beyond that, I sometimes skip the fancy raspberry sauce and just serve it plain with a dusting of powdered sugar. It’s still delicious without the extra effort.
FAQ
Is this flourless chocolate cake really gluten-free?
Yes, as long as your chocolate and cocoa powder are certified gluten-free, since some brands process on shared equipment. Always double check labels if you’re baking for someone with celiac disease.
Why did my cake sink in the middle after baking?
A little sinking is completely normal for this cake, it’s part of the dense, fudgy texture. If it sinks dramatically though, it likely needed a few more minutes in the oven.
Can I make this cake ahead of time?
Absolutely, it actually improves after resting in the fridge overnight, which makes it a great make-ahead dessert for parties.
Do I need a springform pan?
It’s strongly recommended since this cake is delicate and sticky. A regular cake pan makes it much harder to remove cleanly without a springform’s removable sides.
Prep and Cook Time
- Prep time: 15 minutes
- Cook time: 25-30 minutes
- Chill time: 2 hours minimum
- Total time: about 3 hours
- Yield: 10 slices
Nutrition Facts (per slice, approximate)
- Calories: 340
- Fat: 24g
- Carbohydrates: 28g
- Sugar: 24g
- Protein: 4g
These numbers are estimates and will shift depending on the exact chocolate and butter brands you use.
Final Thoughts
This flourless chocolate cake recipe completely changed how I think about gluten-free desserts. I went in expecting a “good for gluten-free” cake, and instead got one of the richest, most satisfying chocolate desserts I’ve ever made, gluten intolerance or not.
If you’re on the fence about trying it, just remember: good chocolate, patient eggs, and a whole lot of willpower waiting for it to chill. That last part is honestly the hardest step in the whole recipe.