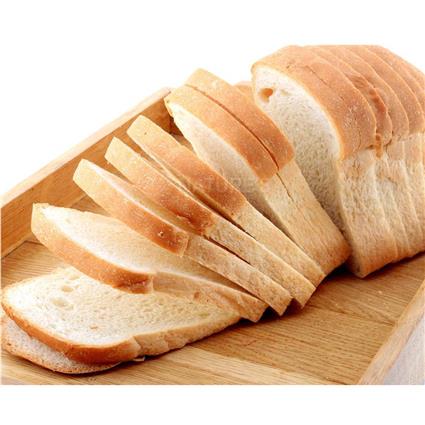
How to Reheat Casserole: Top Tips And Tricks

How to Reheat Casserole?

How to Reheat Casserole?


A casserole is a simple dish to prepare and requires only a few steps. It’s also packed with great ingredients such as meat, cheese sauces, pasta, and cheese making it a favorite of the family.

If you’ve ever prepared the perfect casserole but had leftovers, don’t worry! It’s possible to heat leftover casseroles, while making sure it’s tasty. But how to reheat casserole? Read on to learn more.

How to reheat casserole without drying it out?

To successfully heat the casserole, use a pan with a lid tightly fitting and an oven. it can take 20-30 minutes at 325 degrees F. You can also utilize a microwave, a toaster oven or stovetop. Most effective results are achieved by warming it up to temperatures at room temperature. Additionally, make sure the food is distributed evenly to ensure uniform heating.

The casseroles that are sold in stores usually have specific instructions for heating and some can be heated right away when frozen. However, homemade casseroles aren’t usually equipped with heat guidelines. The most effective method to heat one will depend on the size of portions and the kind of casserole. However, it is best to follow some common rules to follow to stop your dish that has been reheated from drying out.

Reheating Casseroles: Top Tips and Tricks

Whatever the kind of casserole or the method used to heat it, there are a couple of essential points to remember.

How To Store Casseroles Properly

Casseroles are simple to make ahead and are able to be stored in the refrigerator for a couple of days. It is typical for the casserole to be kept within the freezer. Whatever the location you decide to put it in storage, you’ll need to keep certain things in your mind.

Cool it quickly. It must be cool within two hours prior to putting it into the refrigerator or freezer. If your house is warm it is necessary to transfer the casserole to an area cooler to chill while covering it. If you plan keep it stored in portions sizes, make sure to divide it today to speed up down the process of cooling. Food is also cooler in containers that are shallower.

Be sure that the casserole is sealed tightly before placing the casserole in your refrigerator or freezer. In the absence of this, it could result in the dish to become dry or suffer freezer burn and could result in a loss of flavor.

Defrost the Casserole Before Reheating

If you’ve stored an item inside a freezer for a while, the dish should be completely defrosted prior to being heated. It is not recommended to use homemade casseroles to be heated from frozen.

If the food isn’t properly defrosted, you could end up with cold and soggy areas with burned or overdone edges. Unskillful defrosting may cause the top layer of a casserole becoming hot, while the bottom is frozen.

The best method of defrosting the casserole is to place it in the refrigerator the evening before you intend to take it out to eat. If you’re not in a position to do this, there are options for defrosting for microwaves of all kinds. Some microwaves however, do better than others on this option. In addition, microwaves generally provide more efficient results when using smaller amounts.

Reheating At Room Temperature

If you want to reheat the casserole, be sure to remove it from the refrigerator and let it sit for up to one hour. This is not just limiting the amount of time it can be placed in the microwave, oven, or microwave. It is also more secure on the baking pan. Even cast iron becomes cranky when exposed to an electrical shock. (Also cracked glass or Pyrex can be a terrible seasoning to any dish.)

Remember: Reheating is Not Recooking

Be aware that when you reheat the casserole, you’re heating it again instead of making it again. Re-cooking it can lose its flavor and could dry it out or make it burn.

How to Reheat Casseroles in the Oven?

The oven is a great method of warming many casseroles. Even those that are more similar than stew (or are stews) generally work best in the oven since the heat encircles the dish. If a stew-like dish (or simply stew) is heated on the stove it is important to look for the possibility of burning the bottom of the dish and also try to stop the food from coming to a boiling point.

Preheat at 350 F (176 C).

Make sure that your casserole is placed in a oven-safe dish that is oven-safe. If you don’t, move it to a dish that is oven-safe.

If the casserole can be cut into pieces Do this right now, because it can cut down the time of reheating.

Be sure that the casserole evenly spread across your baking dish. This will ensure that the casserole is evenly heated.

The casserole should be covered with foil. If you don’t have bread-based dishes the covering can make them watery. Many people poke the foil multiple times in order to create vents. Some bakers place a baking test on top of a rack to form a “shield” so the bread casserole doesn’t get brown but doesn’t “steam” and become soggy.

Place the hot oven into the oven.

Make sure to check it every 10 minutes.

Mix the casserole in the middle of heating, if it’s one that can be stirred.

You should remove foil as soon as you feel you’re five to ten minutes away from finished.

If you want your tops to become crisp and some of the crunch has disappeared then switch to the broiler towards the end. It’ll only take only a few minutes to get back the crunch.

Take it off when you are done. The typical time for reheating is between 20 and 30 minutes. However, it is contingent upon the kind of dish, the density and its overall dimensions. Some may take more than 45 minutes.

If you own an oven thermometer then you should aim for the casserole to reach 165 F (74 C) in the middle.

How to Reheat Casserole in the Microwave?

The only option is the option of heating your food in the microwave. If you’re heating just one portion, the microwave can be significantly more effective than an oven.

Make sure that the casserole is placed in a microwave-safe dish.

Be sure to ensure that the portion is evenly distributed to ensure an even cooking.

Remove the lid but put a damp towel (not plastic wrap) over the food. The moist towel will prevent drying out the food.

In two minutes, heat it and test. If it needs to be heated for longer you can increase it by 30 seconds.

If the casserole is able to be stirred, then do it every time you look at it.

If you are satisfied with the result however you would like it to be a little crisper, put it in the oven or in a toaster oven to bake for couple of minutes, if readily available.

How to Reheat Casserole in a Toaster Oven?

Toaster ovens are a fantastic alternative to microwaves for reheating small portions. They are less likely to make your food soggy. They are ideal for casseroles with fritted or breaded pieces, or bread bases.

Make sure that your casserole is stored in a toaster oven-proof dish.

Turn on the heat not more than 350 F (176 C).

Cover with foil to stop the foil from drying.

Remove foil whenever you think it’s about time.

How to Reheat Casserole on the Stove?

A large pan, such as one called a Dutch oven is ideal for casseroles that look more like curries, stews, or chilis. Make sure to use a gentle heat and plenty of stirring. Keep in mind that you are heating it and not cooking it for the second time and while a light simmer is acceptable but you don’t want or require boiling (ruins taste).

Rice pasta, noodles, and noodle-based casseroles also work as long as they’re those which can be stirred. You may have to add some liquid to the dish (stock gravy, milk or even water). There is a lot of stirring to prevent burns and keep in mind that there shouldn’t be any flames and there should be no boiling.

Double boilers are ideal for foods that could easily be burned, like potato mash and heavy sauces. But, you’ll need to stir often to ensure that it is evenly heated and does not lose the consistency (separating or becoming clumpy).

Reheating the casserole in a convention oven

Convection ovens are oven that has a fan. It can cook food exactly the same way. Place food items in an enclosed pot, preferably with having a lid that is fitted or a container covered by aluminum foil. Make use of the lower temperature, 250degF to offset the effect of the force of the fan over the pot. Reheating time is contingent on the amount of water in the pot.

Reheating Casserole in an air fryer

An air-fryer can be an excellent option to prepare delicious cooked food, but it’s definitely not the most suitable device for soups, stews and other gravy-based meals. It’s not just a matter of ruining the food you cook by this method, but you can cause an electric shock!

Reheating Casserole in a Slow Cooker

It is not advised to cook leftovers in the slow cooker. However, you can serve dishes that have been reheated in the warm slow cooker.

Simply heat on the stovetop, in the oven or in the microwave before making sure to place the warm dish into the slow cooker.

Utilize an instant-read thermometer to ensure that the food’s temperature in the safe limit of 140 degrees Fahrenheit.

Wrapping up

So, how to reheat casserole? Well, they are a popular choice for many due to the fact that they offer all the advantages of cooking at home without hassle. Casseroles can be prepared in many methods and, based on your personal preferences there is a method to be more effective than the other. If you’ve been seeking an excuse to cook more casseroles or even start planning them today, I am sure that these tips will help you a lot!

How Long Does Chili Last In The Fridge? 

chili

How long Does chili last in the Fridge? 

how long does chili last in the fridge

In this blog post, I will try to address the question “how long does chili last in the fridge” by providing an in-depth review of the shelf life of chili stored in the refrigerator. Additionally,  I am going to going explore ways to determine when chili is going bad and provide practical tips on how we can extend the longevity of chili.

The word chili is derived from  the word ‘chili con carne” or “chili con carne’. It is the same as chili with meat dish in Spanish and it is is a product of Texas.

Chili is among those winter-time meals that are often prepared in huge quantities. The huge amounts mean that, unless you’re serving a large group of people, some of it will surely be destined for the refrigerator. If you’re confused about the shelf-life of your tasty chili in the refrigerator You don’t have to worry since we’ve got your back and will inform you in full detail concerning “how long does chili last in the fridge”.

So , without further ado, let’s jump into the topic and learn more about it.

How long does chili last in the fridge?

Chili is able to last up to an entire week within the refrigerator with no significant changes in taste or texture. Chili made from the meat product has less of a duration than chili made without meat since the latter is the same shelf-life like meat products.

So the chili that has meat inside can last for 3-4 days without degradation. Therefore, it is suggested to consume the chili in this time period and consume it after heating it thoroughly in the microwave to make sure food safety.

Does chili go bad?

How long will chili last and whether or not it’ll become stale is dependent mostly on–

  • How you how to store it
  • When and where you store it

The most effective method is to keep it in airtight bags, or containers within 2 hours following the time it has been cooked to ensure that there are any chance of any growth of microorganisms on it.

What is the process of making chili?

Chili is a rich source of seasonings as well as meat, preferably beef, which is its place as the principal ingredient in the dish. But different types of meat could also be used. It is cooked using tomatoes, beans onion, chili powder garlic, jalapenos and cinnamon, and cumin. However, the selection of seasonings mostly depends on the specific location and the preference of the people.

How can you tell if chili is bad?

It is possible to tell the old chili from the new one using your sense of scent and visual. The chili that is cooked and has gone bad will possess an unpleasant smell. Additionally, if you notice an appearance of mold or the color is off, this suggests that the chili is bad. A slimy texture is also a sign towards the fact that the chili is old. Thus, it is important to be alert for these indicators.

Another thing to bear to keep in mind that when the chili smells nice however, that does not suggest the chili is safe for you to eat since some microorganisms responsible for foodborne illnesses do not cause an obvious difference in the way they smell or appear.

I don’t recommend to taste a chili that has an unpleasant smell, however if you’re courageous (and foolish) enough to take the risk and you do, then you’ll notice a difference in the flavor and the texture aged chili. The chili will also be off-flavor.

Tips for maximizing the shelf life of chili

To extend the shelf life of chili, while also maintaining the freshness and quality chill the chili rapidly in airtight containers.

Chili cooked in the oven can last 3-4 days in the refrigerator in a matter of minutes if properly stored.

Microscopic organisms grow rapidly when temperatures are between 40 degrees and 140 degF. Therefore, the chili cooked should be disposed of if you leave it out for more than two hours at room temperature.

If you wish to extend the shelf-life of the chili, then it is best to put it in within an airtight container. Furthermore, the chili that is frozen at 0 degrees Celsius will be suitable for long period of time.

Keep chili in small, shallow containers to ensure that it can be quickly chilled.

How Can You Tell If Canned Chili Is Spoiled?

\It is possible to determine if the canned chili is deteriorating prior to opening it. The chili can that has affected by leaks, bloated or has a large amount of damage is not recommended to be opened. It could cause damages to seals. The cause of bloating cans is an excessive growth of bacteria inside the can.

It is safe to eat the container in the event that it’s in good shape ( exactly as it was financed in the shop).

What Could Happen If You Eat Expired Chili?

It’s all about the kind of chili you are using and whether it was canned or was opened. Avoid eating food that is expired. Here are some facts:

It is not important if the can was sealed, and not opened. The chili can be kept for at least five years before becoming stale. If there is no evidence of loss of flavor, canned chili will last for a minimum of three to five years.

There is a chance that you will get E.coli, E.perfringens, or botulism in canned chili left open. Chili could pose a threat to your health as it is a meat-based. Food poisoning is a possibility and this could cause the death of your loved ones.

Consumers of rotten chili can experience stomach discomforts. The pathogen that causes the symptoms the symptoms can range between an hour and several weeks.

It is possible to be required to be admitted to the hospital if you suffer from food poisoning after eating chili made at home. E.coli Look at me!

How Long Does Chili Last In The Fridge?

Chili is among the most loved dishes in America. It’s the most loved meal for cowboys, and is an excellent option for any time during the day. If you’re similar to me, chili can be more than you and your family could consume in one night. There’s always leftovers. However, it’s up to discussion how long they’ll last.

Chili made with meat can be eaten in 3-4 days. Chili made with beans lasts for up to 4-5 days. If you store your chili in the original container, it could last for up to seven days. Since it’s less prone to bacterial growth and fungus, chili made of vegetarian ingredients can be stored in the refrigerator for seven days.

Even if you’ve got an immune system that is strong and a healthy digestive system the chili that is been spoiled can be serious danger in your overall health. This article will help ensure your family’s safety from an emergency visit to the ER.

How Should You Store Chili In Your Fridge?

Knowing the length of time chili can last in your refrigerator is vital. It is also crucial to be aware of what you can do to preserve it safely. Here are some guidelines to ensure your child’s safety and tasty for all the time you can.

Before you start thinking about storage, make sure that the chili is correctly cooked. The chili must be cooked at a temperature of 160 degrees Fahrenheit. There is a chance of contracting an E.coli disease from your chili.

Maintain your chili at the temperature of room for not more than two hours. Temperatures between 40 and 140 degrees is when the rate of growth of bacteria can increase rapidly. Studies have shown that food items exposed to room temperatures for more than 2 or 3 hours could cause food poisoning.

Be sure to use appropriate containers. Store the chili inside an airtight container, such like a baggie, Tupperware or another plastic. Before storing your chili, ensure that it’s sealed properly. Containers that are not airtight or covered can increase the risk of exposure to bacteria.

Does Refrigerating Your Chili Change Its Flavor?

Chili tastes better the following day, if you’ve heard it. This is due to the use of jalapenos and others hot spices. Capsaicin is added to chili when chili cooks for a longer time.

For those who enjoy spicy foods, prepare to give a kick to your taste senses. Chili retains more flavor when it is stored in the refrigerator over night.

Can You Freeze Chili?

It’s a fantastic way to extend the shelf time-to-use of chili. Chili can be frozen for as long as one month before having to be thrown away. Make sure you freeze the chili in a container which is at least one inch bigger than the chili’s capacity. This will ensure that your child will not expand when it’s cold.

Transfer the chili into the refrigerator over the course of a few hours. Then, heat it and consume it. It is recommended to cook the chili at 160 degrees prior to eating it.

Wrapping up

In this quick guide, we tackled to the query “how long does chili last in the fridge” by providing an in-depth look at the shelf time of chili in the refrigerator. Additionally, we covered ways to know if the chili is rotten and practical tips on how to extend the shelf longevity of chili.


How Long Do Cooked Veggies Last in The Fridge?

cooked veggies

How long do cooked veggies last in The fridge?

how long do cooked veggies last in the fridge

How long do cooked veggies last in the fridge? Any idea? If you don’t, you should go through this post since it will give you all the necessary information about it.

If you’re cooking the meal at home for your family members, it’s easy to miss the amount of food you’ll have to prepare to ensure everyone is fed. The majority of the time we underestimate the amount of food that needs to be cooked. We end up with a lot of food leftovers which includes the leftover vegetables that were cooked. Knowing how long cooked vegetables last in the fridge could help you avoid wasting tons of food, and ensure that you don’t be eating food that is rotten.

In this article, we’ll examine how long you can keep cooked food at ambient temperatures, inside the refrigerator as well as in the freezer. Yes, I know you are looking for an exact answer to this question as well: How long do cooked veggies last in the fridge?

Is it safe to eat leftover cooked vegetables that you have cooked?

If you choose to keep the cooked vegetables you have left in the refrigerator it is possible to keep them for up to four days if stored properly. The exact number of time the cooked vegetables can be safe to eat is contingent upon the specific vegetable. However, 4 days is the standard number of time during which cooked vegetables are safe to consume.

How you keep your cooked leftovers is crucial which could also be the key to ensuring that they last as long as is possible. If you keep your veggies within an airtight container inside the refrigerator, then there is a an excellent chance of ensuring that the cooked veggies will last for the whole four days.

Can you eat cooked vegetables after a week?

We suggest that you keep your cooked vegetables for up to 4 days but no more.

After 4 days, they will begin to deteriorate. It is possible that they are unsafe to eat them. Be sure to look for indications that cooked vegetables have gone bad prior to eating the vegetables.

What happens if you eat the leftovers of a cooked vegetable?

If you haven’t properly stored the cooked vegetables there is a possibility that they’ll spoil.

There are two types of bacteria that grow in cooked food items. The first type is known as pathogenic bacteria while the second type is known as spoilage bacteria. Both kinds of bacteria develop quickly and multiply more quickly when cooked food items. This may happen when the cooked vegetables begin to lose scent, altering appearance and texture, and can even growing mold.

If you eat cooked veggies that have gone bad, you may fall sick from food poisoning. Food poisoning can cause extremely serious health issues and symptoms like nausea as well as vomiting, diarrhea and stomach discomfort.

How long will cooked vegetables last in the freezer?

It is possible to freeze cooked vegetables. This is the most efficient method of storing them for an extended period of time. The vegetables that you cook will be safe to consume and of excellent condition if you choose to freeze them for as long as you properly freeze them.

It is best to place any food you cook and intend to freeze in an airtight container. This will ensure that none of the moisture or oxygen gets into the food. If your veggies aren’t secured, they might grow mold. They may also begin to decline in quality once you freeze them.

Freezing is the ideal method to preserve them in case you don’t plan to consume them within over the course of a week. If you can freeze veggies that you have cooked, they will last for 9 months with the help of the freezer. We suggest eating your cooked veggies within three months after freezing. The vegetables begin losing their quality after 3 months.

How long will cooked vegetables last at room temperature?

The expiry dates of cooked vegetables can change when they’ve been stored at room temperature longer than 2 hours.

In certain kitchens, cooked veggies can be safe for two days at temperatures of room temperature. However, this is contingent on the temperature in the kitchen.

If it’s summer the kitchen is likely to become hotter. The temperature in the kitchen will rise to levels similar to the winter. It is not a great time to put cooked food in the room to be stored. The most dangerous zone for cooked vegetables placed out at room temperatures is between 40° Fahrenheit or 140°F. If your cooked veggies sit between these temperatures for any amount of time, they could begin to develop harmful bacteria.

Can you eat cooked vegetables the next day?

The short answer is yes, it is possible to eat leftover cooked veggies the following day, if only they’ve been properly kept in the fridge.

Because they’ve been properly stored in the fridge One day after the vegetables are cooked is not enough for harmful bacteria to develop on the vegetables. If you’ve stored prepared vegetables inside a sealed container, they are usually able to last from 3 to 4 days before they begin to go bad. If you’ve put lentils or beans in your refrigerator and properly stored they will last for until 7 days prior to going bad.

Cooked vegetables can last up to 4 Days in the Fridge

If you have cooked vegetables left over, there is no reason to be concerned. They can be safely stored and use them at your own pace.

If you store cooked vegetables correctly, you will be able to ensure that they remain fresh for up to 4 days after having been cooked. If you intend to make use of them in a short period of time, you can put these in the refrigerator. By doing this, they can last for as long as 9 months.

It is essential that regardless of where you keep your cooked food items, it is stored in an airtight container. This will ensure that oxygen doesn’t harm them.

The shelf-life of cooked vegetables is approximately one year.

On the countertop in your kitchen, cooked vegetables can last for hours to days, depending on the temperature in the kitchen. In summer, when the temperatures are higher in the room the vegetables will be in the fridge for a few minutes, whereas during winter when temperatures are moderate it is possible to last for days or more.

How can you store properly the cooked vegetables?

If you’ve cooked a substantial portion of your vegetables with the intention to use them in the days ahead, and also preserving them in a proper manner if there are some leftovers, it will surely help in avoiding the waste of food items and money.

If you’re sure you’ll be able to use your cooked vegetables in the next few days, place the vegetables in an airtight bag and put your vegetables in the freezer.

Storing the cooked veggies will allow you to enjoy them up to seven days, but bear in mind that the veggies that have a higher amount of water like cucumbers as well as tomatoes lose quality and flavor faster than those with lower water content like potatoes and garlic.

If you intend to store prepared vegetables for months the first thing to do is divide the cooked vegetables into equal smaller portions. This is essential because, if you’ll need to use the veggies you’ve stored you will be able to defrost the amount you need without affecting the entire inventory.

The cooked vegetables should be placed in an airtight bag or plastic bags that are reusable and store their contents in the refrigerator. When the temperature is at a minimum the vegetables can be kept for a long time, however their quality can begin to decline after about 2 months dependent on the kind of cooked vegetables.

Other Vegetable FAQs

Are cooked vegetables rotten?

If you’ve not properly stored your cooked vegetables, they may get rotten. To fully comprehend this fact it is necessary to understand the concept of bacteria as well as its various types first. Two kinds of bacteria can be found with food preparation and storage when it is spoiled: the pathogenic bacteria as well as the spoilage bacteria.

The pathogenic bacteria develop in a greater rate when cooked food is consumed without producing any unpleasant smell or color change of the food or a change in how the food is cooked. If your food gets affected by these bacteria, you’re more likely to becoming a sufferer of food poisoning since there is no odd item in the food you have stored.

However, the spoilage bacteria develop at a much lower temperature, and can cause the food to spoil with visible indicators such as unpleasant odor, changes in color, as well as changes in texture.

Evidence that cooked vegetables are bad

Mold

If you suspect any form of mold development it is evident that the vegetable is going bad. Avoid eating any vegetables that are moldy at all times as there could be the development of secondary bacteria which can cause you to get very sick.

Color

If the vegetables don’t seem to be showing their true colors, it’s not safe to eat them. Take a careful look at the vegetables that you store and ensure that all of the ingredients are identical in color at the time they cooked. If not, it’s best to throw out any cooked veggies.

Texture

The texture and taste of your stored vegetables has drastically changed , and they appear to appear slimy, don’t consume them since they are now rotten.

Smell

The smell of rottenness or unappetizing taste of the stored and cooked vegetables is a surely a clear warning to throw away the veggies. For one thing,  it’s much better to throw them away instead of wasting your time and money in eating something that might make you sick.

Wrapping up

How Long Do Cooked Veggies Last in The Fridge?

In this short guide, I’ve addressed this question “How long will cooked veggies last in the fridge?”, and also provided the answers to issues such as how to properly store cooked vegetables and also how cooked vegetables go bad. Hope all this information will help you a lot when you think of doing some delicious vegetable dishes at home.

How Much Does a Gallon of Honey Weigh?

weight of one gallon of honey

How much does a gallon of honey weigh? Do you have any clue? Honey is a unique product because it’s not uniform. There are a variety of honey types and they weigh differently as well as differ in volumes. Also, regardless of whether you choose to sell your honey in a bottle, or to cut chunks of raw combs filled with honey, there’ll be some rules you should be following.

As a rule of thumb, the honey weighs 12 lbs per gallon. However, the density, the water content, quality, and, of course, the different varieties in honey are all variables that could cause minor differences in the density of honey. This, in turn, could affect the weight of honey per gallon.

Therefore, the most efficient method is to use the scale and weigh honey in order to calculate the actual weight.

Honey weighing should be easy when you know the procedure. This article will help you help you answer any question you might have regarding the honey’s weight.

Two types of Gallons

The first thing to do is this. When you talk about the gallon size, this perplexing measure of quantity or the amount of space that something occupies confuses people. A gallon of water, milk and paint are always exactly the exact quantity of liquid; however it won’t weigh the same.

What is the reason? This is because US gallon sizes differ in comparison to the Imperial gallon. For the United States, a gallon equals 128 fluid ounces. It is also called 3.785 milliliters. For the United Kingdom, and places like Canada and other Caribbean countries, one gallon equals 4.546 milliliters.

However, there’s more. A gallon is multiple meanings within the United States because the United States also uses the measurement of dry ingredients.

Dry gallons in the United States measures 4.404 liters. This means that the fluid gallon is 14.1 percent lower that the dry gallon and the imperial fluid gallon is 3.2 percent bigger.

We’re sure you’re already feeling dizzy because of the ‘gallon-themed extravaganza. We chose to make use of American gallon sizes to maintain the same standard of knowledge throughout this post.

Is weight really necessary for honey packaging?

Alongside the process of determining the weight of honey which is different from the milliliter amount and is legally required by the US Food and Drug Administration to calculate the net weight of the product being offered for sale.

Both in pounds/ounces along with the weight in grams of metric measurement should be displayed at the very bottom of the label.

It is also crucial to mention the country of the honey’s origin in relation to honey.

Then, in South Africa, there have recently been inquiries into the quality of honey when it became apparent that honey products advertised in the name of pure honey had been mixed with syrup and water.

This issue is one that is universal. Honey from a single source is typically more reliable than honey that comes from many nations.

Better yet, you can support the local beekeeper who can provide you with unfiltered and raw honey.

How do you define honey density and why does it vary?

The density is different between kinds of honey. If one gallon (3.79 Liters) of honey is very dense, it could weigh higher than one gallon honey that is less dense.

Why does the honey density really matter? Why should you bother about it?

The density is often a most telling indicator of how pure honey is. It is vital since it is the determinant of the amount of chemicals contained in the honey. Thus, honey that is denser is basically cleaner and even purer than other types of honey.

A tiny drop of honey that is pure remains on your finger, while honey that is contaminated is likely to spread and spill out. You are also able to test the purity using the help of a glass of water.

Pure honey sinks once placed in the glass.

Another method of determining the purity of honey is by testing it with flame. When you place a lighter in pure honey and then strike it, it’ll ignite.

Heating honey may also offer answers since honey that has been contaminated can be bubbly or foamy when heated. Pure honey is able to caramelize rapidly.

Factors affecting the weight of Honey

There are a variety of aspects that affect the amount of honey consumed. Here are some of these:

  • Moisture Content
  • Temperature
  • Monofloral Honey Vs Polyfloral
  • The Method of Storing Honey
  • The Pureness Of The Honey
  1. Moisture Content

The moisture content of honey influences how much weight the product will have. The more moisture content the greater the weight.

Raw honey’s content in moisture is optimal at less than 14%. High-quality honey should be treated with less that 20 percent water content, but ideally 17-18 percent.

It is measured by an instrument called a refractometer that weighs the amount of a liquid like honey through the reflection of light. To ensure the most accurate outcomes, it is essential to ensure that your instruments are properly calibrated.

The honey’s water content is due to the moisture content in the air. It will decrease over time as bees perform their work. It can affect the ability for the honey to remain fresh and prevent fermentation. This is the reason it’s not advisable to collect your honey too late.

Different honey varieties have different moisture levels.

For instance clover honey is known to have an average moisture content that is 23% which is fine, but other honeys will begin to ferment when the measurement is reached.

Methods to eliminate moisture are to use a humidifier or the use of a fan in a smaller space.

  1. Temperature

The heat is another element that affects the quality and weight the honey you purchase. It may have an impact on the enzymes and flavor, color, and aroma of honey.

Since temperatures vary throughout the year, honey weight will also fluctuate. It can also differ across regions.

In the summer heat it is common to find greater humidity throughout the atmosphere, which leads to the accumulation of moisture in honey.

Heating honey can also be an option to eliminate moisture. However, of course it can affect the quality of honey if temperatures get to a high level. The temperatures inside hives stay around 35 ° Celsius. We’ve written an extensive article on how bees keep this temperature throughout winter. The article is entitled How Can Bees Keep Warm During Winter?

  1. Monofloral Honey Vs Polyfloral Honey

Like the name implies, the monofloral honey originates from one flower source. It is also referred to as different honey. The polyfloral honey is derived from a variety of sources of flowers. The flavor appearance, color, texture and density can be distinct between the seasons and places.

But, while less than polyfloral flowers the same flowers may differ from season to another. Monofloral honey may vary in scent, color and also in density. The main reason for this is the amount of rainfall. If the rainfall is insufficient, then less honey will be produced, and usually, they possess a stronger flavor.

In general the monofloral honey is more homogeneous in density and consequently weight. However, polyfloral honey can differ in density and weight depending on regions and seasons.

You might be surprised at how many honey varieties are available. If you’re interested, take a look at this article we’ve written: 13 Honey Types You Should Explore.

  1. The Method of Storing Honey

The manner in which honey is stored influences not just the quality of honey, but also the amount of it.

The most effective method to store honey is to store it in an airtight glass jar or container away from direct sunlight.

In the event that moisture enters into containers that aren’t airtight can cause additional moisture to seep into the container. Place it in a place with a steady temperature or it could change the color.

  1. The Pureness Of The Honey

The quality of honey is crucial in determining the quality of honey.

Honey that is dense and more pure than honey with added chemicals or more water is less pure and usually lighter because of the lower density.

Pure honey won’t run through your fingers, however, when other components like syrup or and water, the honey could turn fluid.

As previously mentioned there are many tests, such as the flame test, or using an empty glass to determine the quality of honey.

It is also important to be confident in the local beekeeper. You can ensure that the honey that you are purchasing isn’t contaminated. Always inquire whether the honey you are purchasing is unfiltered and raw.

Different honey weights per Gallon by honey variety

Based on their origins in temperatures, their origin, the humidity in the air and of course the different kinds of honey bees, various kinds of honey will have slight differences in weight.

The average honey is expected to be close to twelve pounds for a gallon however it could vary a bit.

A gallon of honey could weigh considerably lesser, or more, than other materials, because the density is different.

Do you realize that one of the densest materials on the market is mercury? It’s thirteen times denser than water.

Here we examine other substances that are fun to use in everyday life and then compare how much each weighs with the honey weight for each US gallon.

Wrapping Up

So, how much does a gallon of honey weigh?

There are many variables that affect the amount of honey that is consumed. Since it is a natural substance its density will vary according to the water content, purity, as well as the kind of flower that the honey was made from.

While different honey types will differ in weight for each gallon of honey, most pure honey is approximately 12 pounds per gallon.

Since the weight of honey may differ, it’s ideal to purchase or sell your honey according to weight and not by the quantity.

Can You Eat Cooked Shrimp Cold? 

cooked shrimp

Can You Eat Cooked Shrimp Cold? 

can you eat cooked shrimp cold

Can you eat cooked shrimp cold? Shrimp can be consumed hot and cooked or cooked, and later chilled, such as in a salad of shrimp. Before we begin cooking, the shrimp needs to be defrosted. How you remove them from the freezer can affect the final texture. Allow to rest for 10-20 minutes, after which the shrimp will be fully defrosted but still cold.

Can you eat cooked leftover shrimp? If cooked shrimp is refrigerated, it is able to be consumed for up 3-to-4 days from the date being cooked. Then, it must be removed from the kitchen. It is recommended to refrigerate the cooked shrimp immediately after it has been cooled and not later than two hours following cooking.

Can you eat frozen shrimp once cooked? If properly stored, the cooked shrimp will last between 3 and 4-days in the fridge. Shrimp that have been cooked and chilled in the fridge may be stored for another up to 3-4 days when stored in the refrigerator prior cooking. Shrimp that has been frozen in the microwave or cold water must be consumed immediately.

Can you consume refrigerated cooked shrimp? The shrimp that has been cooked can be stored in the refrigerator at least 3 to 4 days. Flour can be kept for as long as 6 months in a room at temperature since the higher temperatures can create a welcoming environment for bugs and mold.

Are you prone to getting sick from taking cold seafood?

Vibrio (or Vibrio vulnificus) is a marine bacterium that can be found in sea animals. It can cause human illness with vibriosis, a disease. It is possible to contract the germ through taking raw seafood or eating it uncooked. You can also be infected when a wound is touched by raw or undercooked fish or its juices.

How do you heat cooked shrimp?

It is possible to reheat your shrimp using a microwave, skillet, or steamer. To cook your shrimp in the microwave, put your seafood in an oven-safe dish then cover it, and cook for about one to two minutes.

Does grilling shrimp taste good?

Yes, shrimp cooked can be kept for up three days inside the refrigerator! We were trying to find ways to make the most of it.

Can you eat cold fried shrimp?

If you start to smell something fishy and sour emanating from your microwave, turn off the heat immediately, and apply your thumb to the cooked shrimp. If the outside is hot, it’s done and ready to be eaten! If it’s cold, you can warm it for a couple of minutes.

What do badly-cooked shrimp taste like?

 Foul odor

Fresh shrimp should not have any bad smell. Ammonia smells are created by bacteria that are growing on the shrimp, and it is likely to cause food poisoning. The shrimp that is cooked and has been rotten will emit an unpleasant sour smell.

Are shrimp safe to store over the course of a night in the refrigerator?

Fresh shrimp, shelled or not, remains fresh in the refrigerator for 2 to 3 days. Be sure that your refrigerator is at least 40°F or less, and then place the shrimp in the bottom part of your fridge which is where the temperatures are the coldest.

Can I reheat shrimp?

Do you know how to reheat shrimp? Yes, you can cook shrimp. It is best to cook it on the stove or oven but you can utilize a steamer, or microwave, when you follow the correct steps. These options, however do not offer the best options for shrimp that have been breaded, because they can cause a mess in the texture.

How long can cooked seafood be stored in the refrigerator?

The fish that is cooked and the other seafood can be stored in the refrigerator for 3 until 4 days. The effect of refrigeration is to slow down but not hinder the growth of bacteria. So, it’s crucial to consume food within the timeframe that is recommended before it spoils or becomes hazardous.

Can you get sick by eating old shrimp?

The condition may become fatal if you consume excessive amounts of damaged shrimp. Shrimps naturally have tiny bacteria that have to be destroyed by cooking them properly. If kept raw and not properly handled then the parasites and bacteria begin to build up within the fish, leading to contamination.

At what temperature does shrimp get fully cooked?

Temperature: The temperature of fully baked shrimp will be 120 degrees F. This is merely to give you a reference point — very few home cooks are likely to use an oven thermometer for these small decapods and it’s certainly not required. However, issues with shrimp’s doneness are a bit difficult to understand.

Does shrimp work well to treat a cold?

Shellfish like oysters, crabs, and shrimps are well-known for their high content of selenium, which is a mineral as well as an antioxidant It can assist to maintain a healthy immune system as well as prevent cell damage. It also helps prevent chronic illnesses like cancer and heart disease.

What kind of illness can you expect due to bad quality shrimp?

Food poisoning is a frequent illness that can be caused by eating contaminated food items. The symptoms can include stomach cramps, vomiting diarrhea, and fever. In reality, more than 90 percent of cases of food poisoning result from Salmonella, E. coli, Vibrio, or Bacillus and are present in shrimp that is raw.

Why is my shrimp sour like ammonia?

Cooking can produce an unpleasant smell which indicates that the food is spoilt. Don’t confuse the smell of ammonia and the taste of iodine. It does not have anything to do with spoilage. Shrimps that feed on certain organisms may produce a unique Iodine-like flavor.

Do I have to reheat the shrimp for the next day?

It is possible to safely heat seafood for up to four days after it is cooked. Seafood dishes that contain onions or garlic may taste better after the second time. The only issue with the process of reheating fish is the fact that they may dry out and develop an unpleasant fishy scent.

Is it safe to heat seafood in the microwave?

Making use of the microwave is an easy and safe way to warm the shrimp that has been cooked by placing the shrimp in the microwave, and then heat the shrimp on high for one minute increments until they’re hot all the way.

How do you cook pre-cooked frozen shrimp?

In general, defrost the shrimp, take off the tail, if you wish, and wipe it dry prior to putting it in a salad dish or hot food dish. Because the shrimp is cooked, all it takes is just a few minutes in a hot pan to heat. Always serve warm with butter, oil, or sauce in order to maintain the shrimp in a moist state.

Can you eat shrimp when they are a week old?

Once the shrimp have been purchased, they can be kept refrigerated for up to two days. The “sell-by” day on the package could expire in the time of storage. However, the shrimp remain safe following the sell-by date provided they are properly stored.

How many times can you cook shrimp?

Be sure to keep it safe and only heat your prawns a few times.

If there are still cooked prawns that have not been eaten, it’s time to throw them away. Prawns can be reheated by using a microwave, oven or even the stovetop.

Do you need to rinse shrimp that you have cooked?

Do you have to wash cooked shrimp? Clean shrimp can be cleaned when they’re still raw or have been cooked. Here are some tips to clean prior to cooking such as stir-fries, pasta dishes as well as Shrimp Fattyas. Clean after cooking: Shrimp salad, Seafood Pasta Salad.

Do you need to cook already cooked shrimp?

Since the shrimp are cooked, you don’t need to heat them up to a specified internal temperature to ensure the safety of your food. Sauté the shrimp until the surface begin to turn golden brown. Make a simple sauce in the same pan as the shrimp are cooking to your preference, if you want.

Can you eat cold shrimp?

It’s fine to consume chilled shrimp, such as a shrimp cocktail, so long that the shrimp have been cooked well prior to cooking. It’s the temperature at which shrimp are cooked at the end of it has been cooked is what counts. After the shrimp is cooked, you can cool it to make refreshing cocktails.

What is the best way to eat precooked shrimp?

4 Delicious Methods to Make Use of Shrimp Precooked to make a quick and easy meal

  • Mix it into a salad bowl or grain bowl.
  • Add soup to it (hot or cold).
  • Create spring rolls and wraps of lettuce.
  • Make a large quantity of cold noodles and pasta dishes.

How do you cook frozen shrimp that you have pre-cooked?

In general, you should defrost the shrimp, take off the tail if you want and then dry it before adding it to an appetizer or hot meal. Since the shrimp has already been cooked, all it takes is just a few moments in hot pan to heat. Always keep warm by adding butter, oil, or sauce in order to maintain the shrimp in a moist state.

Do you prepare cooked shrimp in pans?

Do you prepare cooked shrimp over the stove? Instructions Prepare 1 tablespoon of olive oil inside a big pan at medium-low temperature. Place shrimp in a bowl with a mixing spoon and rub it with the seasoning mixture. Add the shrimp into the pan that is hot and fry for 2 minutes per side, rotating once halfway until the shrimp is cooked through and cooked to perfection.

Are you allowed to consume refrigerated, cooked shrimp?

Refrigeration: In the event that the cooked shrimp is refrigerated it is safe to eat for three or four days after it has been cooked. Then, it must be removed from the kitchen. It is recommended to refrigerate the cooked shrimp when it is cool, but not more than two hours from cooking.

How do you cook freshly cooked shrimp?

Follow these steps:

  • Preheat oven to 300 degrees Fahrenheit.
  • Sprinkle or coat the shrimp pieces with butter or olive oil.
  • Wrap the shrimps that will be cooked in an aluminum foil (loosely). …
  • Lay the foil on an oven tray. Place them in an oven.
  • Heat for approximately 15 minutes.
  • Remove the oven from the baking pan and let cool.

How long should you cook shrimp that has been precooked?

What is the time to cook shrimp that you have already cooked? The shrimp should be cooked for 2 to 3 minutes both sides, flipping at mid-way. Based upon the size the shrimp and the amount of shrimp to cook in your pan, it should generally take between 4 and 6 minutes. Finally, transfer the shrimp to an serving dish.

What can you do to fix frozen shrimp that has been cooked?

Shrimp cooked in frozen could be added boiling pasta at the end of the minute of cooking. They are then drain along with the pasta. It’s ready to be tossed in your preferred sauce. Try adding frozen shrimp to an Asian-inspired spicy stir fry. Simply add them in the last few minutes or so of cooking time to heat the shrimp up.

Are you able to cook precooked freeze-dried shrimp using the microwave?

Utilizing the microwave is an easy and safe method of heating up cooked shrimp. Place the shrimp in the microwave, and then heat them up to high, in one-minute increments until they’re hot all the way.

What are the best ways to use frozen shrimp that have been cooked?

The frozen cooked shrimp are a great addition to boiling pasta in the final second of cooking. It is then drain along with the pasta. It’s ready to be tossed in the sauce you prefer. Try adding the frozen shrimp to spiced Asian-inspired stir fry. Simply add them in the last few minutes or so of cooking time to cook the shrimp up.

Wrapping up

So, can you eat cooked shrimp cold?

Yes, you can, if the shrimp that has been cooked was properly refrigerated. It can  be eaten for up to 3-to-4 days following the time it has been cooked. After that, it needs to be removed from the kitchen. The shrimp should be refrigerated when it is cool, but not after two hours following cooking.


How Long Can Cookie Dough Sit Out?

cookie dough

How Long Can Cookie Dough Sit Out before it goes Bad?

how long can cookie dough sit out

Nothing can compare with the scent of freshly-baked cookies that come out of the oven. If you’re making your own the cookies yourself, they may require several trays to transport all these delicious stuff in the oven to bake. What can you do with dough that you don’t need right now? And surely the question you would like to ask now is: how long can cookie dough sit out before it goes bad?

Cookie dough can be left out for between two and four hours at temperatures of room temperature. Once it is at the time, you can wrap it in plastic and place it in the freezer or refrigerator.

The main ingredients in your cookie dough include butter and eggs and both require refrigeration in order to avoid the dough from becoming spoiled and potentially leading to illness.

How Long Can Cookie Dough Sit Out Before it Goes Bad?

You might be thinking that the two-to-four-hour duration is dependent on the ingredients. There are certain things to keep in mind when baking cookies that contain eggs, you should keep the same time regardless of the type of cookies you’re baking.

A period of two to four hours applies to cookies that are left out on the table at room temperatures. If your surroundings are particularly hot (such as outdoors) then you might have to keep the dough for cookies in a refrigerator sooner.

It is recommended to place any dough left over directly in the freezer or fridge immediately after you’ve finished baking cookies. If you’re baking cookies in several batches, keep any remaining dough in the refrigerator as you are waiting.

The main thing to look for could be food poisoning if put out your cookie dough over a prolonged period. Bacteria can form on the surface of food items when they are left at the counter specifically things such as cookie dough. Baking might not be enough to get rid of these bacteria, leading to stomach discomfort and illness, as opposed to delicious cookies.

What are the Bacteria that can cause Food Poisoning?

Certain bacteria that may cause food poisoning are also fond to live on foods’ surfaces such as raw cookie dough. The two most prevalent ones are Salmonella (found within eggs) and Escherichia coli or E. coli (found in flour). Ingestion of raw cookie dough, or letting cookie dough sit out could allow these bacteria to multiply in food items and eventually cause you to become sick.

Perishable Ingredients in Cookies Dough

Which are the best loved cookies in America? Chocolate chip cookies are top of the list. Other favorite cookies comprise sugar cookie, M&M Cookies, as well as peanut butter cookie. Each recipe contains eggs, which are among the most perishable ingredients found in cookie dough.

If the cookie dough you are making is made using eggs, it’s particularly important to properly store it. This is also true for cookies made using flour. The best method to ensure that your cookies don’t become rotten is to treat each cookie dough recipe with the same care and then store the dough in the refrigerator for 2 to 4 hours.

How To Store Cookie Dough

To store cookie dough:

Make a big log or ball.

In cellophane, or the reusable wrap for storage

Place it in the refrigerator in a cool place, where it can be kept for up to 4 days. It will become harder which is great for cutting cookies. If you’re creating drop-shaped cookies you may remove the dough from the fridge and let it soften for about 15-30 minutes prior to baking.

It is possible to store the raw Cookie dough frozen for two months.

Tips: Save individual portions of dough for cookies in the freezer. Spread the raw dough on the pan, and then put it in the freezer for between two and four hours. After the cookies are frozen, you can put them in a freezer-safe storage bag to be stored in the freezer. If you’re looking for cookies the only thing you need to do is pick them up and bake!

How do you determine if the cookie dough is still fresh?

A quick visual test will usually suffice to confirm that the dough is in good condition. The signs of discoloration and mold are obvious signs that the dough needs to be removed. If the dough is solid in parts, or if it has an unpleasant, rancid scent throw it out also.

Cookies can be made in just a few steps with inexpensive ingredients, therefore it’s not worth putting your health at risk over it. Even if you’re strapped for time and prefer to use prepared dough from the store however, you can purchase the dough for a fairly affordable cost.

Can chilling cookie dough make a difference to the final product?

The addition of uncooked dough directly to the fridge is the best method to ensure food safety and also for baking delicious cookies. Though you may think of mixing cookies and cook immediately by chilling it, making the dough chilled will certainly improve the end result of your baked products.

How can cooling the dough improve its performance?

  1. Enhances flavor

The time you give the cookie dough in the fridge allows for the dough to be broken down to basic building blocks. This includes the simplest carbs (sugar). Sugar adds flavor to the dough and gives it sweetness.

The mix also gets dry, which might not be like a good thing. Actually, it can help to enhance the flavor and flavor of ingredients!

  1. Controls dough spread

When you cool the dough for cookies, you allow time for butter or other fats to set. The fat will keep its shape longer because it takes much longer for it to melt. It is the result that will be a cake that keeps its shape more effectively and does not expand out like a pancake that has been flattened. If cookies that are very flat are your preferred, then begin cooking the dough when it is warm.

  1. Improves texture

When the dough gets cool (and it dries completely) the sugars increase, making a more chewy texture, with crisp exterior. The most sought-after cookie for many!

Instead of putting your cookie dough on the kitchen counter for an hour as you’re distracted by your chores, kids or your favorite TV show take it out and put the delicious mixture into the refrigerator. Most people will prefer the final result of chilled dough is likely to be the most preferred.

Homemade vs. Store-Bought

If you bake cookies from scratch, you can determine precisely what ingredients are used in them, and you can be alert. Most cookie doughs made from pre-made doughs include an ingredient list printed on their packaging, so you know for certain whether they’re made from dairy or eggs. If you’re unsure it is, make sure to treat it as though it was made from dairy and eggs. This can help avoid food poisoning and possible allergens.

How Long Does Cookie Dough Fresh at Room Temperature?

If you bake cookies, any dough left uncooked will remain in the preparation bowl as your first cookie batch is baked and cooling. Unless you’re operating a walk-in refrigerator which means the dough for cookies is sitting at temperatures of room temperature. The dough for cookies can be left in the room for anywhere from two to four hours. However, the quicker you can store it in the refrigerator, the more efficient.

Tips: Spread the extra dough for cookies on an additional baking sheet. After the first batch is baked and cooling, put the second tray in the oven for baking.

How To Store Raw Dough?

When you have reached the conclusion of your two-to-four-hour period, you’ll have to keep any dough that is not used in the freezer or refrigerator. Depending on when you’ll plan to bake cookies, it might be better to store them in the refrigerator, or keep them over the long haul inside the freezer.

The best method of storing the cookie dough is to seal it to ensure freshness. It is possible to put the dough in airtight containers, covering them in cellophane or placing the dough in an airtight freezer container. If you decide to put cookie dough into bags, be sure that you press all the air before sealing.

Does Cookie Dough Work if It’s Left Out All Night?

When you’re in a baking (and eating) exuberance, you may overlook that you have leftover cookie dough. If it’s left to sit out for an extended period of time does it remain safe to consume? Unfortunately, no. Cookies left out over night is certainly out longer than the recommended 2 to 4 hours. It must be thrown away.

Making your cookie tray in one go and keeping the leftovers in the freezer or fridge is a great method to avoid forgetting the dough in the fridge overnight.

Storing Baked Cookies

After you’ve made cookies, you don’t have to take similar precautions to avoid food poisoning. Cookies can be kept in a cool, dry place but they must be wrapped in plastic or sealed to ensure their freshness. Cookies can be stored in the fridge for them to stay fresh longer.

Tip: Put a slice of bread inside the airtight container and add the cookies. Cookies will absorb moisture of the bread, making them more soft over time.

How Long Will Cookie Dough Last if it is not refrigerated?

In the refrigerator cookies can last for two to four hours before being at risk of becoming stale. It will differ based on the temperature in your space, with higher temperatures causing the cookie dough to spoil quicker. If you’re not sure you’re in the right place, keep to the 2-hour duration for dough that is not refrigerated.

Food poisoning from cookies Dough

Infections after eating cookies could be a possibility and the chance of getting sick increases the longer you let cookies out. If you consume cookie dough that’s become rotten, you may be ill with food poisoning. Although it’s not usually dangerous, food poisoning is sure to affect your plans for fun.

The Bacteria That Are Harmful in Cookie Dough

If you keep cookie dough for longer than the suggested maximum of 2 to 4 hours, it could be a home for bacteria that can cause food poisoning. There are some specific culprits that could be identified in cookie dough when it becomes rotten.

It is recommended to store your dough in the refrigerator within 2 hours of making it is the most effective method to safeguard yourself from the bacteria that cause the symptoms of food poisoning that accompany the symptoms.

Salmonella enterica and Escherichia coli in Wheat Flour

The same bacteria can be present in a variety of ingredients that make up cookie dough. This is why it is best to avoid the consumption of raw dough, unless specifically designed to be eaten without baking. As per the Center for Disease Control, these bacteria can be destroyed during the baking process so long as the raw dough was stored in a safe manner.

What happens if you contract Food poisoning from Cookie Dough?

If you eat cookies that are contaminated or dough for cookies you may feel effects of food poisoning.

  • Stomach upset
  • Stomach cramps
  • Nausea or vomiting
  • Diarrhea
  • Fever

Sometimes these bacteria can cause infection that can be dangerous or grave. However, every person has different experiences. Some people can get over such slight sickness easily, while people may become severely sick. If you’re lucky enough to get a slight infection from food, it’s still less fun than eating the perfectly safe cookie.

Food poisoning may be light and relatively brief-lived (just an hour or two) or last for several days. Food poisoning is usually cured in its own time when the food that is poisonous passes through your digestive tract.The biggest threat to your health is getting dehydrated. If you have a fever that exceeds 105 F or you are unable to keep any liquids within your body, then it’s time to consult your physician to be checked.

Consuming raw cookie Dough

It’s tempting to eat the raw cookie dough while baking. The dough hasn’t been in the oven for more than two hours therefore you’re safe you think? It is not recommended to consume cookie dough that is raw. Certain ingredients can result in food poisoning. Eggs that are raw can be contaminated with salmonella, as I have already mentioned, and eating raw cookie dough could transmit harmful bacteria to your body.

If you’re craving for cookies that are raw, search a product advertised for eating raw. They can be found at the dairy aisle of the supermarket and are usually refrigerated. They’re typically egg-free and have special-treated flour that makes them free from any harmful bacteria.

Cookies Dough Recipes

Apart from traditional cutout or drop cookies, you can create exciting cookies from cookie dough.

Cookie Pizza Bake: is a large cookie on the bottom of the pizza pan. Serve with yogurt and slices of fruit. Serve in triangle pizza slices for a fun variation on pizza.

Ice cream sandwiches: Prepare cookies as normal and then apply ice cream to one of the cookies. Then, top it with another cookie and then enjoy!

Cookie Dough Ice cream: Stir your favorite raw cookie dough to vanilla Ice Cream. Make sure that you make use of cookie dough that has been intended to be eaten in raw form.

Cookie Dough Brownies:  If you’re stuck between a cookie and brownie. Why not have both? Mix brownie dough and cookie dough batter to create a delicious and delicious baked dessert.

Frequently asked questions

Do edible cookie doughs have to be stored in a refrigerator?

The edible cookie dough shouldn’t be kept in the refrigerator for more than 2 hours. The storing of food that is perishable at temperatures of 40 to 140F for more than two hours increases the risk of illness resulting due to the growth of bacteria.

Does cookie taste remain acceptable if it’s left out over night?

Cookie dough that’s been left out for a night shouldn’t be eaten in its raw state. If the ingredients aren’t degraded, cooking the dough thoroughly can kill any bacteria.

Wrapping up

Cookie dough is able to sit for up to 4 hours before it begins to go bad. It’s recommended to follow this advice for all cookie doughs, whether homemade or purchased from a store, however you must be especially careful with dough that is made with flour or eggs. If you happen to get food poisoning due to cookie dough, wait until the symptoms go away and keep an eye on yourself for dehydration.

Make sure you take extra care the next time you bake, and enjoy cookies, not battling an upset stomach.

Cookie dough is simple to make and isn’t too costly to buy from the supermarket, so don’t be taking any chances. If you’re not sure, throw it away.

Are you ready to get to work at the table? Explore your creativity by making these delicious chocolate chip cookies that everyone would drool over and ask for more!


Are Ramekins Oven Safe?

Are Ramekins Oven Safe?

Are Ramekins Oven Safe? 

Are Ramekins Oven Safe?

Are ramekins oven safe? This is the question people often ask in food-and –kitchen related forums. To determine the extent to which your dish or bowl is oven-safe, it is necessary to search for an Oven-Safe symbol below. The types of oven safe include metals like cast iron and stainless steel. Avoid items that have non-metal components, such as handles made of wood or plastic.

Are all porcelain ramekins oven safe?

Ramekins were introduced to American kitchens as an ingenuous choice to serve creme Brulée and custards in individual portions, like flan. Made of tough ceramics, tempering glass porcelain or melamine the ramekins are oven dishwasher-, microwave-,safe for freezers and ovens.

Do you bake using a ramekin?

Ramekins can be used for many classic desserts, like mousses, custards and mini baked cheesecakes. They are also ideal for baking fruit desserts in small portions like crisps or cobblers.

How to tell if a bowl is oven safe?

Find bowls identified as oven-safe when buying cookware or dinnerware. If the packaging does not explicitly state it’s oven-safe and oven safe, you should look for a picture on the side of the dish.

At What temperature does ceramics crack?

Some oven-safe ceramics only be able to handle a certain temperature amount, which raises the problem of “at what temperature will ceramic break?” While many ceramics can withstand temperatures of up to 3000 degrees F but they can also be susceptible to sudden changes in temperature.

Can you bake with ceramic?

Let’s address this issue right now. Ceramic can be used into the oven however not always. Ceramic dishes are the only ones are safe to put into the oven are ones that are labeled as oven-safe. This means they are able to endure temperature fluctuations, and won’t be damaged in an oven that is preheated.

Can porcelain go in the oven?

Porcelain is a good fit for the refrigerator, oven, and microwave ovens easily and it can even go under the broiler without second thought. Why? because porcelain can be fired to higher temperatures than other ceramics.

Can Target Ramekins be used in the oven?

It’s great for everything. It is also perfect for making tiny cakes that are single serving in the microwave or a regular oven.

How hot can you bake in a Ramekin?

If ceramic ramekins have broiler safety and oven-safe, they will be safe up to 550°F. If they are marked oven-safe, which most ceramic ramekins do, the highest temperature can be set at 500 degrees. The manufacturer may vary according to the maximum temperatures that the ceramic ramekins can handle.

What else can I make use of instead of ramekin?

Substitutes for Ramekins It is possible to use 6 ounces, square or round form quiche dish or flan. OR you can mix all of the ingredients in a large dish, such as a shallow casserole, or any other baking dish.

What size ramekin is the most useful?

As we mentioned previously the most popular and flexible size is the ramekin with six ounces. Other sizes that are popular include 1 to 2 grams between three and five ounces between seven and nine pounds and 10-12 grams.

What is the ideal size of ramekin?

Three to five ounces ramekins are small but they are able to be used for things that aren’t condiments. Ramekins of this size are ideal for mini-desserts and to serve as sample platters. If you only want to purchase the same size, a 6-ounce Ramekin is likely to be the most suitable choice for any purpose.

What pans are suitable to go in the oven?

Cast iron, stainless steel copper, cast iron, and carbon steel frying pans boast the highest oven safety ratings, with an average temperature of 500 degrees F. Non-stick pans are oven safe for temperatures of up to 450degF. Non-stick pans coated with the PTFE (Teflon) coatings should not be used in ovens at temperatures higher than 500degF.

Can Microwavable bowls be used in the oven?

The microwave safe plastic containers and plates have been tested and are safe to the use of microwave ovens. The dishes or containers that are melted can ruin the food, the container itself as well as the oven. do not use them in conventional ovens.

Can Aluminum foil be used in the oven?

“To prevent heating damage to your oven We do not recommend making use of foil made from aluminum to be used to line on the inside of the oven. Instead, we suggest that you place a piece of aluminum foil that is heavy duty on the oven rack below the casserole or pie that you’re baking. The foil will collect drips prior to they make it to the bottom of the oven.”.

Can you put ceramic clay in the oven?

Since kitchen ovens are able to only reach certain temperatures, it’s recommended to select clay that is fired at a lower temperatures (around 120 degrees Celsius). Don’t over-fire the clay using the oven because it could get too hard and fragile.

Why is my ceramic cracking?

Cracks generally result from stress in the clay. There is always a certain amount of stress in the clay due to its shrinking when it dries. It also shrinks when it’s fired and also expands and shrinks when fired. Sometimes the strain becomes too great for clay to handle, and it breaks.

Why do ceramic baking dishes crack?

The fine cracks in the top layer of a dish’s glaze are called “crazing.” When you own a brand new dish you know was created using safe glazes, then you can still use the dish. Certain dishes from the past have trace levels of lead and other heavy metals. They may leach into food via the smudged surface.

How high can a glass get in the oven?

High Temps Pyrex cookware is intended to withstand baking, however it can’t be used at temperatures higher than 425 degrees. That means for recipes that require higher temperatures it is recommended to use pans made of metal.

Which one is better for baking in glass or in metal?

Metal bakeware can stand up to greater temperature than glass making it suitable for food items that bake for a brief amount of time and at an elevated temperature which includes baked goods like cakes, cookies, biscuits muffins, breads, and cakes.

Do you bake for longer in a glass pan?

Since glass is an insulator rather than a conductor it takes a long time to heat up however, once it’s hot, it keeps that heat for a longer period of time. (Some bakers recommend cutting down the temperature of the oven by 25 degrees when baking with glass to prevent this.

What are oven safety guidelines?

Oven-Safe indicates that the item is able to stand temperatures up to 500 degrees F (260degC) within an oven for prolonged time without melting or getting damaged. A lot of cookware has both purposes, being utilized on the stovetop as well as inside the oven. Benefits are realized by the flavor, cleaning as well as time.

Safety Considerations For Ramekins

Most cooks prepare meals in advance and then place the ramekins into the freezer to use later. When the ramekins are taken from their freezers and put in the oven, the ramekins usually break due to the extreme temperature fluctuations.

To prevent this from happening, let the ramekins thaw and get to room temperature prior to placing them into the oven to bake. In certain instances the manufacturer may suggest placing the ramekins into warm water prior to baking. This helps the ramekins adapt to warmer temperatures and stops cracking when baking.

Do not pour cold water through an ramekin that is hot to allow it to cool faster. The sudden temperature drop will cause it to crack or break. Do not place a ramekin over the flame, as it can heat up or burn the bottom and cause damage to the ramekin. Avoid using ramekins near flames. They’re not meant to be used for cooking or camping. Flames that are open can result in uneven heat distribution, which could break the ramekin.

Many companies sell ramekins constructed of plastic, which look similar to porcelain or ceramic designs. They were designed to be used for food preparation as well as portion control and for snacks. Don’t use them in the oven, no matter what!

Materials For Ramekins

Since ramekins are used for a variety of purposes They are made of different materials, based on the purpose they are used for:

Aluminum

It is a fairly flexible, lightweight malleable, ductile and malleable material that has a look that ranges from dull gray to silvery depending on the roughness of the surface. It is not magnetic and doesn’t readily ignite.

Golden aluminum foil cup for cupcake baking

CHECK ON AMAZON

Aluminum is a very popular material for baking and cooking since it is a good conduction of heat. It is quick to heat up and cooks evenly for excellent baking.

Melamine

It is a tough, lightweight , and hard thermosetting plastic. Melamine is utilized as an ideal, hygienic and long-lasting alternative to china since it is almost invulnerable to the harsh requirements of regular usage.

Melamine Smooth Ramekins are oven-safe

CHECK ON AMAZON

In addition to being nearly indestructible, it is resistant to scratching and staining. It is resistant to heat and dishwasher safe.

Alumina

Enriched is a crockery item that has the ingredient Alumina. Alumina is an aluminum oxide which is added to clay to increase its strength. It is more expensive than regular porcelain, however it’s generally less expensive that bone china which is why it can be used in lieu of bone china.

Porcelain

It is a material made of ceramic produced by heating the raw materials, mostly clay, in the form of Kaolin in a Kiln, to temperatures of between 1200° Celsius (2,192 degree Fahrenheit) and 1,400 degrees Celsius (2,552 degrees Fahrenheit).

White microwave – and oven-safe porcelain Ramekins

CHECK ON AMAZON

Porcelain is resistant against “thermal shock” that is the reason it is commonly used to make oven-safe tableware.

Stoneware

Stoneware is resistant to chipping and can be used in many different ways within the kitchen such as the refrigerator oven, microwave, and refrigerator. Stoneware is made from strong clay, which is then fired to the highest temperatures (about 2185°F) and turns to vitreous.

Vintage stoneware baking dish

CHECK ON AMAZON

They are known to be sturdy and durable, which makes it the perfect crockery set for everyday use.

Pyrex Glass Bakeware

Pyrex Bakeware Custard Cup

CHECK ON AMAZON

It is Pyrex glass bakeware has always been reliable, durable and secure. Pyrex glass bakeware is reinforced to improve its ability to withstand breakage that is caused by the impact of a sudden or uneven temperature.

Its resistance to heat (up 300 ° Celsius) lets you make use of it in the oven as well as the microwave. Its non-porous and stain-resistant characteristics ensure that your food items remain clean and clear for a long duration of.

Wrapping up

So, are ramekins oven safe? There are various types of Porcelain ramekins, a variety of types of materials, and different features that are heat-resistant as well. In this article, I think I’ve answered the most- frequently asked question people generally ask, “are ramekins oven safe”? The porcelain ramekins mentioned above are ideal for you in the event you make a buying decision.


Dutch Oven Vs Stock Pot: Which Should You Buy?

Dutch Oven Vs Stock Pot: Which Should You Buy?

Dutch oven vs Stock pot

Dutch Oven Vs Stock Pot–What’s the fuss about? If you’re looking to buy new kitchenware, I am sure you would get into a thinking mode: what are the similarities and differences between a Dutch oven and a stock pot? Do you require both? Is one good enough to replace another?

If you’re wondering about this kind of questions, you’ve arrived at the right spot. In this article I will be comparing them to determine what similarities and exist between them.

For starters the Dutch ovens as well as stock pots are among the most commonly utilized cookware pieces. They share a lot of similarities; however, they differ in some important ways and are suitable for various cooking styles. In this article, we’ll look at the characteristics of each and how you can utilize them for.

Dutch Oven And The Stock Pot –The Differences

Dutch ovens as well as stock pans are highly versatile pieces of cookware for the kitchen. They are used in a variety different ways however there are some basic differences between them.

The first step is to provide you with an overview of the basics, and after that, we’ll go deeper into the meaning of these differences on a practical level.

Dutch Oven Vs Stock Pot

What is a Dutch Oven?

Dutch ovens are durable cast iron, versatile cookware. A lot of them are coated with enamel, making them non-stick.

The pots are made of heavy-duty materials and distribute heat evenly across the vast area and come with lids that help to keep in moisture.

They can be moved directly from the stovetop to an oven that is preheated and can be used on an open flame. The only place where you should never, ever utilize your Dutch oven is the microwave.

If they’re coated with enamel it is possible to clean them with your dishwasher, based on the recommendations of the manufacturer, but you don’t need to.

There is nothing that sticks to enamel and they clean amazingly effortlessly. Non-coated Dutch ovens should be maintained in the same manner as an iron skillet by using regular seasonings to guard against rust and maintain the cooking surface smooth and non-stick. surface.

Dutch ovens are nearly indestructible and are able to cook virtually everything, including bread.

What does a Dutch oven look like?

A Dutch oven resembles the size of a heavy, thick pot with a lid that is constructed from the same material. They are available in a range of sizes and shapes. They appear to be a hybrid between an oven dish and a huge stock pot.

They are generally oval or round and are tall enough to hold adequate amount of liquid, but not as tall as stock pots. The sides are never taller that the bottom.

The majority of Dutch ovens come with sturdy handles that are on the opposite side of the pot they are essential as even empty, these ovens are extremely heavy.

You require sturdy handles to spread the weight of the food you’re cooking. This will make the transport as secure as is possible.

The lid is made with the same materials as the oven, ensuring an even heat distribution and cooking. The lid also allows it to function in the similar places where the pot can be utilized including the oven, to the campfire.

In the event that lids are made of glass as is the norm in a casserole dish for instance, they wouldn’t be nearly as secure.

What is Dutch Oven Made of?

Dutch ovens are made from cast iron. Cast iron is weathered, durable and is among the oldest materials to make cookware due to the strength and durability, as well as high-quality energy retention, distribution and heat storage.

Contemporary Dutch ovens are typically equipped with an enamel coating. It’s stylish and practical. The coated Dutch oven doesn’t require to be dried out, so cleaning is simple. And it’s equally robust and durable as the stock pot.

It is not a problem to remove enamel from the surface so cleaning up is fast and simple, and sometimes dishwasher-friendly.

The primary drawback to selecting an enamel-coated Dutch is the fact that you’re not able to cook over an open flame. If you’re planning to take your cookware to the campsite and later take it back to your kitchen, choose iron that has been seasoned instead.

Dutch Oven vs Stock Pot

What is a Stock Pot?

stock pot

The stock pot is also classic pieces of cookware. They were initially designed to be large and durable enough to create an enormous amount in soup stocks.

Stock pots feature high, straight sides that let in plenty of liquid, but also give you plenty of room stirring your soup.

The sides can be at least as long as what is the width of the base.

They have two handles. The ability to grip the opposite side of your stockpot is more secure when you are transporting large pots filled with hot liquid around your kitchen.

The bigger handles get, the more you’ll be in a position to swiftly and easily grasp the handles.

Be aware that you could be grabbing them with oven mitts , or similar items that need extra room to hold the extra volume.

Certain stock pots come that have a flared lip around the inside of the rim. This is extremely useful when pouring a thick and full pot of broth or soup.

What is the Stock Pot made of?

Stock pots are made to store a significant amount of liquid, so they must be extremely sturdy. Liquid itself is a lot of weight however, which is why the most effective stock pots contribute the least amount of weight as is possible.

The lighter metals, like stainless steel or aluminum, are the most popular substances to use in stock pots. Stainless steel is among the most commonly used metals for cookware and stock pots aren’t an any exception.

It’s durable, lightweight and reasonably priced. It doesn’t react with food as do other metals, meaning you’ll know that there aren’t any harmful chemicals leaked through your foods.

However, it’s not the most reliable conductor of heat metal. Aluminum is, however is able to conduct heat well, however it’s much more brittle and therefore less strong and less durable.

To compensate for this, aluminum stockpots are usually coated with anodizing. This treatment enhances the toughness and non-stick properties of aluminum.

Stock pots are also hybrids of stainless steel and aluminum and bring out the best features of both metals to create an extremely strong pot that can also conduct heat efficiently.

There are also stock pots, made of stainless steel and aluminum which have been coated in enamel. This makes the pots stronger making them extremely non-stick and improves their heat tolerance which allows them to be used at higher temperatures.

In addition, they’re fashionable, and they come in a variety of colors.

Additionally, stock pots have lids. Most lids are made of the same metal that the pot is but you can typically discover lids made of glass.

Glass lids are as efficient as lids made of metal However, they also have the advantage of being transparent so that it is possible to see the cooking process and not needing lift the lid in order to let the steam out.

What Size Pot of Stock Pot Do I need?

There are various sizes of stockpots and selecting the one that is suitable for your home is dependent on the way you intend on making use of it.

A lot of stock pots are sold in sets ranging from 6 to 16 qts, however it’s not difficult to locate a pot that can hold 30 or 60 cubic inches if your kitchen can handle it.

The bigger the stock pot will be, the more batches of stock you’ll be able create in a single attempt however, you must ensure that the pot you select is suitable for the stovetop.

There are a few other aspects to be aware of, aside from the capacity of the pot. The majority of stock pots are narrow and tall and are designed to reduce the loss of water, which is crucial in soup and stock.

To generate heating throughout the whole space it is also important to ensure that the bottom of the pot is strong enough to keep the soup from boiling during cooking for long periods of duration.

Dutch Oven Vs Stock Pot: Substitutes

Dutch ovens, as well as pots for stock are durable robust pieces of cookware from the past which may be deserving of a spot in your kitchen, however, do you really require both? Do you have a way to substitute one for the other?

The purchase of multiple cooking appliances isn’t always the best choice, no matter if it’s to do with finances or space constraints, or just the desire for minimalistic tastes.

There are a myriad of recipes that permit you to switch one cooking dish for another however, knowing how each performs under pressure could assist you in making purchasing decision more effectively.

What if I used a Dutch oven instead of a stock Pot?

In the majority of instances, if the recipe requires cooking ingredients in a stock pan or a Dutch oven, you can make use of the Dutch oven in place.

The only area where the Dutch oven isn’t the best is when it comes to quick cooking. The heavy metal takes longer to warm up in the beginning. Once it’s the metal is hot, it will remain in a constant and even temperature for longer than stock pots.

The enamel coated Dutch ovens tend to be adaptable in the kitchen, since they can cook just about anything. Cast iron that is seasoned is more sensitive to acidic foods including rich tomato bases and wine sauces.

They are a possibility in a pinch, but they can reduce the flavor quicker when you don’t have the enameled Dutch oven. You’ll be required to give it some extra attention following this kind of cooking task.

It’s important to keep in mind it is true that Dutch ovens are typically heavy. You can cook a massive amount of soup stock in the large Dutch oven however, it’s significantly more difficult to move as well as pour than employed a lighter stock pot.

Can I use a Stock Pot instead Of a Dutch Oven?

Replacing the Dutch oven using a stock pot isn’t as simple or efficient as working in reverse order. Dutch ovens can be more flexible over stock pans in a variety of ways.

If your recipe requires you to switch from the oven to the stove and in reverse, it’s not recommended to make use of a stock pot instead.

If you’re grilling or exploring the thrilling camping cooking world making use of the Dutch oven can be a superior option than stock pots.

If but, cooking solely be on the stove You may discover that you can make your dish just as quickly by using a stock pot or, at times, more easily.

If you don’t own a Dutch oven or a slow cooker, a crock pot is better options to a stock pot. Dutch ovens are also comparable to braisers.

However, if you insist on using a stock cooker rather than a Dutch oven, generally you’ll need to select a lower temperature. Stock pots don’t have the same thickness as Dutch ovens and can be more efficient in heating. It is also possible to monitor the liquid frequently.

If you’ve learned that you can swap Dutch ovens as well as stockpots with one another in a variety of scenarios, let’s look at an in-depth look at the purpose each piece of cookware can be used for.

Uses Of Stock Pot

Stock pots are ideal for stock, naturally. They can withstand high temperatures but also help limit evaporative loss to minimum, making them perfect to speed up heating as well as long simmering.

Stock pots are fantastic to use when you are making:

  • Massive quantities of soup, broth or stock
  • Boiling huge quantities of water to make huge chunks of meat or huge portions of pasta
  • Recipes that require an enormous amount of liquid to cook will require draining quickly
  • Large quantities of sauce
  • Foods that can be blanched

Uses Of Dutch Ovens 

Dutch ovens, as I’ve already discussed, are a great option for a wide range of uses. However, their weight could be an advantage or a drawback. They’re ideal for cooking and heating evenly but they aren’t the most compact.

If you own one, you can use the Dutch oven to cook:

  • Anything that requires moving away from stove-tops to ovens or the reverse
  • Slow-cooking and braising, as well as roasting
  • Any dish that requires moisture to remain moist for a prolonged period of time is crucial.

If you’re looking for the best recipes to get the most out of your brand new Dutch oven, here’s another article with the best Dutch oven cookbooks that are waiting for you!

Deep-Frying

Are you able to deep-fry in a stock pan? Do you have the ability to cook inside a Dutch oven?

If you like a crispy food item on occasion but don’t need a dedicated deep-fryer occupying space in your kitchen cupboard You can use an old Dutch oven or your trusty stock pot however with slightly uneven outcomes.

The Dutch oven is the perfect one to deep fry. It is made of a strong bottom that will not be damaged by the hot oil. It will also maintain constant heat after it has reached the ideal temperature.

Enameled Dutch ovens can be cleaned of oil effortlessly, and seasoned pans will also improve with use. Stock pots can heat the oil quicker however, they tend to be more difficult to keep at temperatures.

It is possible that your food cooks too quickly , and later, when you lower the temperature the food cooks much too slow. The oil could cause discoloration on the surface or cause a buildup of oil within your stockpot.

If you’re faced with a decision to make, go with the Dutch oven each time. If you only have an empty stock pan, it can work , but you’ll have be a bit more vigilant and cautious.

Cooking with Stock Pot

Stock pots are ideal for dishes that require lots of liquid. If, for instance, you’re making a stock it is necessary to pour in a large amount of liquid to make the amount you require. Traditional pots won’t have enough capacity as a dutch-oven is going to be difficult to carry and lift.

A stock pot is able to be used to handle extreme heat when boiling your water or making stock for a long period of time It’s secure. Glass lids help you monitor the temperature of the liquid so that it doesn’t become too hot. Vents within the lid permit excess moisture to evaporate while keeping the bulk of it in for ideal cooking atmosphere.

Pick a stock pan if you’re:

  • Simmering soups for a large number of guests
  • Making homemade broths and stocks
  • It is necessary to boil larger meat pieces for meals, but you’ll be storing the liquid to use in the dish.
  • Any dish that cooks requires you to remove the liquid quickly and efficiently

Cooking in a Dutch Oven

Dutch ovens are great tools for all kinds of purposes. Their robust materials produce an even heat which helps cut through tough pieces of meat, slow stews and add a unique taste to vegetables. It is possible to get amazing results from meat without boiling the meat to death as the stockpot. They can also be cooked on the stove and inside the oven.

Dutch ovens don’t require much heat, so you should start by setting the heat to low on your stove top. Let the Dutch oven to warm up for a minimum of ten minutes or so to create an even cooking space. Increase the heat gradually and allow the oven to heat up again until you’ve reached the ideal temperature.

You should use a Dutch oven if:

  • You require a multi-functional kitchen tool that can be used in a variety of ways
  • Often cook using less than ideal cuts of meat
  • Cook meals which require shifting from the stovetop to oven
  • You want to cook your food low and slow.

Wrapping up

Dutch oven vs stock pot

So, Dutch oven vs Stock pot–so which one should you buy? Let us think about the  issue once again. Contrary to a Dutch oven, a lot of stock pots aren’t suited to be used in ovens or even the ones advertised as oven safe might not be suitable for prolonged use in the oven.

Excessive exposure to temperature fluctuations could cause them to warp or deform them. Just a little bit of warping is annoying in the event that your lid for your stock pot is no longer fitting correctly after just a few times of use.

Cast iron can be a robust and sturdy material buying a few good pieces like the Double Dutch pan and oven, and they will have a collection of items you can keep for the rest of your life.

Pots with a non-stick coating might make them unsuitable for use in ovens over a long period of time because the coating can be damaged or begin flake off of the bottom, and this could cause food contamination.

While there’s some crossover between the different types of cooking that these two types of cookware are suitable for, it’s recommended to select the one that is best suited for your job at hand. And should you need to switch one cookware item for the other, you must keep in mind what you are going to cook as well as the tips to prevent damages to the appliances or cookware or culinary accidents that might prove hazardous.


How To Separate Frozen Chicken? All That You Need To Know!

separating frozen chicken

How To Separate Frozen Chicken 

How To Separate Frozen Chicken 

How to separate frozen chicken? Is this what you want to know? Frozen chicken is a great way to keep the chicken longer. The problem is in how to separate it from the freezer. It will be difficult to separate frozen chicken if you don’t have the right skills. Read on to learn more.

You may notice that the chicken in your freezer looks like one big block of ice when you remove it from the freezer. If you don’t know how to properly separate the chicken pieces, it can be very tiring.

How do you separate frozen chicken? Frozen chicken can easily be separated by placing it under warm or cold water. Cold water is fast and safe for separating frozen chicken.

Continue reading to learn more about how to freeze chicken.

Is it possible to separate frozen chicken without thawing?

A knife can be used to cut the frozen chicken. This method can be dangerous because the knife could cause injury or cut your fingers. It can also be time-consuming.

You can also place the pieces of chicken in a zip-lock bags and smash it on a hard surface. This may or may not work.

We recommend that you first freeze the chicken, then separate it with a butter knife.

A band saw or a meat saw are the most common tools used by people who need to quickly separate frozen chicken without it thawing.

Four Different Ways To Separate Frozen Chicken

There are four main ways to separate frozen chicken. You can choose from any of the options, depending on how convenient and efficient you are.

Method 1: Using A Microwave

You can defrost and separate frozen chicken in a microwave if you are short on time. It’s fast and easy to get your chicken separated.

Here’s how to use a microwave for separating frozen chicken.

Modify the Microwave Settings

Place the Frozen Chicken in the Microwave: The timer should be set for approximately 10 seconds.

Verify if the Chicken is Thawed: After 10 seconds, remove the chicken and check if it is thawed enough to be broken into pieces. If it’s, remove it. You can microwave it again for another 10 seconds.

Take out the Chicken: After the chicken has thawed, you can take it out and cut the pieces with a butter knife or your hands.

This allows you to quickly and easily separate frozen chicken with a microwave.

The Pros of Using This Method

  • A microwave can be used to separate frozen chicken
  • Very quick process
  • Convenient

Cons of using this method

The main drawback to using a microwave is:

This could lead to an increase in bacteria in your chicken. It is best to use the chicken immediately after it has been thawed and separated.

Some parts might be slightly overcooked. There is always the risk of overcooking certain parts of the chicken.

Method 2: Use cold water

If time is not a problem, you can use cold water to thaw and separate frozen chicken. This is safer than using the microwave method, and it does the job well of separating the chicken.

Here are some ways to use cold water for separating frozen chicken.

You will need to first get the frozen chicken. Then, place it under cold water for approximately 5-10 minutes. You can also place the larger batch of chicken in a blocked sink if you need it.

You can check the ice between your chicken by using a butter knife. You can do this by inserting a butter knife into the chicken. You can also try to separate it if it is able to penetrate.

Turn the Butter Knife. Once the butter knife penetrates the chicken, turn it around to separate the pieces.

To avoid injury, we recommend using rubber gloves to hold the frozen chicken.

The Pros of Using This Method

Separating frozen chicken with cold water has many benefits, including:

  • As long as the temperature doesn’t rise, it is safe.
  • It’s faster than other methods.

The Cons of This Method

This method can be difficult for larger batches of chicken.

Method 3: Hot Water

This method is great if you don’t have access to a microwave and need to quickly thaw frozen chicken.

Experts don’t recommend this method as it can lead to bacterial growth and chicken being overcooked.

You can still use hot water safely.

To prevent hot water from entering the chicken, first pack it in an airtight bag or ziplock bag.

To heat water, use a kettle To check the temperature, use a thermometer.

Pour water into a bowl. When the water has reached 140°F, add it to a bowl. To separate the chicken pieces, place the chicken packet in the bowl.

Take the chicken out and separate it. If it has not, the ice should be melted. If it has, check the packet of chicken and take it out.

Separate the Chicken Pieces: You have two options to remove the pieces of chicken.

This allows you to use hot water to separate frozen chicken.

The Pros of Using This Method

  • Cold water is slower than hot
  • Keeps the chicken’s flavor intact, unlike in the microwave

Cons of using this method

  • Could cause an increase in bacteria in chickens
  • FDA has not approved the method.

Method 4: Using A Refrigerator

If you have the time, freezing the chicken in the fridge before you separate it is the best method to do so.

This method is capable of quickly thawing large quantities of chicken and can be used to separate them. Heat is not a risk factor for bacterial multiplication.

Here are the steps:

Check the Temperature of Your Refrigerator: First, determine whether the fridge is at 35degF (or 40degF). It may take longer if it is 35degF.

Keep the Chicken in the Fridge: To let the chicken thaw, place it in the refrigerator. It can take up to one to two days, depending on the temperature of your refrigerator.

Finally, Check and Separate: Make sure the chicken is not thawed. Take it out of the fridge and easily separate it!

It is best to keep the frozen chicken in the refrigerator at least a day before you plan on using it/separating it.

The Pros of Using This Method

This method has many benefits:

  • It is safe and simple to freeze the chicken block again
  • There is no risk of bacterial multiplication

Cons of using this method:

Some cons to this method include:

  • It takes a lot of effort
  • A slight loss in texture

Is it possible to cook chicken without separating the pieces?

If you don’t want to separate the chicken, you can cook it whole.

Keep in mind, however, that cooking time can increase 50% from the original time. Frozen chicken can take 65-70 minutes, while chicken may take approximately 45 minutes to cook.

To check the temperature of the frozen block of chicken when you are cooking it, use a meat thermometer.

You should inspect the thickest portion of the chicken. The chicken is done when it reaches 165°F.

You should not separate frozen chicken

You may not want to eat certain foods while you are separating and thawing the frozen chicken. These items can cause the chicken to lose its texture and taste. These things can also render the chicken unfit to be consumed.

These are just a few of the things you should be aware of:

When you separate chicken with hot water, make sure the water doesn’t get into the packaging. This could lead to the chicken becoming stale or even causing it to become contaminated.

While the chicken is in the microwave, make sure you check it every 10 seconds. The chicken may dry out if it is left in the microwave for too long.

If there is water on the surface of the chicken, don’t freeze it. Freezer burns can cause a change of taste.

How to prevent chicken from sticking together?

It’s possible to freeze chicken so that it doesn’t stick together or cause problems when trying to separate it.

Two tips are available for this:

  • Separately store chicken pieces in separate containers or zip-lock bags
  • Place the pieces on a baking sheet and freeze them. Place all the pieces in a larger container/bag.

Can you refreeze thawed chicken?

After you have separated the desired chicken pieces, you might wonder if it is possible to refreeze the thawed bird again.

It all depends on how you thaw it.

It is safe to refreeze chicken that has been thawed in the refrigerator for at least two days. Chicken that has been thawed in the microwave or water should not be refrigerated.

If there are still ice crystals on the chicken, you can refreeze it.

Avoid Thawing and Use the Quicker Way to Separate Your Frozen Chicken

If you don’t have the time or patience to wait, forget about thawing. You might not be able to thaw. I tried other methods. These tricks can be risky, so I’m going to warn you.

Place the chicken in a plastic bag. The bag can be thrown or hit on a hard surface. Ice can be quickly broken down, so when the bag is hit, the ice between the chicken pieces’ joints also breaks apart.

You can also use a knife for separating the chicken. You should only partially thaw the chicken for this method. You run the risk of cutting your own fingers.

A band saw or a meat saw are good options for proper equipment. It is very dangerous. It is possible to handle it, but I do not recommend it to anyone who needs to separate large quantities of chicken at once.

There are some mistakes you should avoid when separating frozen chicken

We make mistakes when separating frozen chicken. This can lead to chicken harm. Let’s take a look at some of the mistakes that you should avoid.

Avoid freezing chicken with water on the surface. This can cause freezer burn and reduce your chicken’s flavor.

When using the microwave, be sure to check it every 10 seconds. As soon as you can, take the chicken out of the microwave to avoid drying out.

Use hot water only. It will cause bacteria to grow and cook your chicken.

How do you separate frozen chicken?

Because they are the most reliable and safest methods, cold water and refrigerator methods are the best. These methods will not dry or cook your chicken’s juice as hot water and microwave top-notch.

Can you thaw frozen chicken?

You can freeze thawed chicken. However, you should not do so in the following conditions.

If you have cooked the chicken, it can be fully defrosted.

You can refreeze the chicken again in two days if you have thawed it in the fridge.

You can safely refreeze chicken that is already partially defrosted.

The texture of chicken can be altered in the circumstances described above. There is nothing to be afraid of. It can decrease the quality, but it is still safe. However, it is best to not refrigerate the chicken.

Microwave defrosting

You can defrost in cold or hot water.

Here are some tips to stop chicken sticking together while frozen:

You may be wondering how you can avoid this troublesome issue. Here are some tips that will prevent your chicken from sticking together when it freezes.

Before freezing, remove any excess water.

Place the pieces of chicken on a baking sheet and let them freeze individually. Let them cool for several hours before they become solid. You can then store them in a bag with the chicken pieces, without tension.

To keep the pieces of chicken separate in the freezer, use foil wrapping or individual zip-top bags.

You can also store individual pieces of chicken in a Tupperware container.

You don’t have to separate the frozen chicken. You can then freeze it.

You can also cook frozen chicken if you don’t want to separate it by thawing. Don’t be too concerned about it.

This idea works well if you cook the whole chicken at once. It won’t work if you need to separate only a portion of the chicken. Let’s now learn how to cook frozen chicken.

Step 1: Begin your cooking process. Frozen chicken takes half the time to cook than fresh chicken.

Frozen chicken takes 45 minutes to prepare, while raw chicken can be prepared in 30 minutes.

Step 2: When you believe the chicken has been cooked, check the temperature of the meat. Take a thermometer to check the thickness of the chicken breast.

You can safely cook your chicken when the internal temperature reaches 160°F.

Some of the Most Frequently Asked Questions

Here are some frequently asked questions, along with their answers, to provide you with additional information.

Is it safe to separate the chicken in the microwave?

Yes, it’s safe. It is best to cook it right after it has thawed. It increases the chances of bacteria growing if you wait.

Can I let the chicken separate all day?

No. It is dangerous to leave the chicken out for too long. This is why it’s important to stop.

How much time does it take to separate chicken at room temperature?

It doesn’t matter how long it takes for chicken to be separated at room temperature. I don’t recommend it.

This is because chicken at room temperature is warm. This makes it ideal for bacteria growth. This will result in food safety being compromised.

Wrapping up

So, how to separate frozen chicken? I hope you have now got a fair understanding of ways and means to separate frozen chicken. If you are able to properly separate frozen chicken, then you can quickly meet your next urgent chicken need. Each of these methods is very simple. You don’t need any special equipment to use them. It is impossible to predict when or how these methods will prove useful.

To avoid messy situations, you should be familiar with all of the kitchen tricks. Let us know what method you prefer. However, I suggest trying each technique to determine which one is best for you. Start your experiment soon!

It can be a pain to separate frozen chicken, especially if it is time-sensitive. But with the right method, it is possible to do it in your own time and at your convenience.

For thawing and separating chicken, you can use hot water or a microwave. There are safety issues.

If you have the time, cold water is a better option. You can refrigerate the chicken and then thaw it if you have time for more than 2 to 3 days.


Top Disadvantages Of Cooking In Clay Pots

disadvantages of cooking in clay pots

Top Disadvantages Of Cooking In Clay Pots 

disadvantages of cooking in clay pots

What are the disadvantages of cooking in clay pots? Any idea? If not, then just go through this blog post where I have dealt with this topic in details for the benefit of my readers. Read on if you are interested.

Pottery is associated with the earliest civilizations. Since the beginning clay pots have played a significant role in shaping the food lifestyle of these countries.

Have you ever visited the kitchen of your grandmother? If yes you might have witnessed her cooking delicious meals using clay cookware. After tasting these delicious meals, you may be able to feel a sensation of magic.

There is a tendency to question the safety of clay cookware. What are the drawbacks to making meals in pots made of clay?

This article will inform you about the advantages and disadvantages of cooking in clay pots. Additionally, you will be able to acquire all the necessary information on how to select the best cookware for clay!

The top disadvantages of cooking in clay pots

The benefits of cooking with a clay cookware are greater than the disadvantages. But, it is important to know the main drawbacks of these pots.

Here are the top disadvantages of cooking in clay pots:

  1. Contamination

Thanks to the advancements in manufacturing techniques, the quality of clay pots is being compromised.

The clay cooking pan you’ll find in the market will contain an assortment of elements. Manufacturers produce these pots with clay from various areas of deposits. Thus, the transport will introduce foreign materials into the clay.

This could include the impurities, iron oxide and even trace amounts of metal. Certain of these substances are hazardous to your body’s health.

Clay pots that aren’t pure could contain elements which pose dangers to the human body. There are clay pots that claim to be 100% pure. But, when purchasing such pots, be sure to purchase them from a reliable brand.

  1. Porousness of Clay Pots

Contrary to ceramic cookware, one can’t clean clay pots similarly. Additionally, you can’t make use of soap to remove food particles. If you do this then soap will get into the pores, and remain there. And, your slow-cooked food might taste like soap!

Their porous construction could affect their performance. However, this didn’t appear to be a problem for more than millennia.

  1. Glazed Clay Pots Can Give Rise to Health Concerns

As we mentioned the clay is a naturally porous material. It could delay the cooking process, making it less effective. In certain instances cleaning a pot made of clay challenging. Therefore, industry professionals created the lead-based glaze technique.

Unglazed clay will maintain its original texture and give an authentic look. However, clay pots that are glazed guarantee a perfect cooking process and are more efficient.

It also makes the texture clean and easy to remove! But these glazes can produce a harmful adverse effect for your wellbeing.

Cooking in a shiny and appealing lead-glazed pan will expose you lead.

  1. Earthen Pots are Fragile

The clay pots are brittle and may crack when heated absorption. When slow cooking in your clay cooking pan, it is important to monitor the temperature.

In the event of uneven heat distribution, it will cause parts of the pot break. So, ensuring uniform temperature levels is essential! Therefore the cooking process in a clay pan can be exhausting due to its delicate nature.

You will need the patience to reduce or increase the temperature while cooking slowly.

  1. Flavor Problems in the Clayware

Clay pots are an iconic symbol of traditional flavors to food preparation. But cooking with clay could be a problem when you cook delicious curries.

The more flavors you add to your food, the greater the clay vessel will absorb. The spices will be absorbed into the pores and the clay will hold its essence. In addition, the porousness the pot plays part in the formation of the stains that curries leave behind.

After the flavor is settled in your cooking pot, it could affect the flavor of other recipes.

  1. Heat Absorption is Very High

Do you really want burning your fingers when cooking? No, absolutely not!

When using clay pots you could run the danger that your fingers will burn. This is why you must be extremely cautious when cooking your food. Furthermore, the pots are able to cool quickly. To ensure safety it is recommended to keep them far from your children.

Advantages of Cooking in Clay Pots

With all its drawbacks clay pots have many advantages in addition. What makes it safe to use clay cookware to cook in?

Let’s begin by discussing the health-related aspect of eating. The pure clay has a non-toxic nature meaning it doesn’t react with food items.

Even if this weren’t the situation, clay is stuffed with minerals like calcium and magnesium, in contrast to the chemicals and toxins that are found in cookware made of metal.

  1. Delicious Food

The food cooked in clay pots tastes better than other cooking pan.

Why? Because the moisture content in the foods is preserved. This results in food being more succulent and tender than traditional cooking.

It is unique in cooking with clay and assists in bringing the seasonings and spices more deeply into the food, providing it with that extra special taste.

  1. PH balance of food

The clay material is known for its alkaline properties. It balances the pH of food items by interfering with the acids present in food items.

The acidic food items like tomatoes are able to take on a natural sweetness and taste fantastic with clay cookware.

  1. Keep 100% Nutrition through food

Clay pots possess the distinctive property of keeping any steam or vapors that evaporate when cooking.

It aids in the retention of all nutrients in the food. It helps reduce the need for adding more water or oil.

  1. Less Oil:

A healthy, fat-free dinner is feasible when cooking with clay pots because they possess non-stick properties.

This can help reduce the amount of oil used during cooking in crock pots which results in a reduction in bad cholesterol, as well as slimmer waistlines.

  1. It retains heat for a longer period of time

Terracotta is not the best conductor of heat. However, the benefit is that the amount of heat that it conducts is ideal to cook food without burning or overheating under pressure.

  1. Uniform cooking

It is a porous material that lets heat and moisture flow evenly throughout the cookware during cooking unlike stainless steel cookware.

This innovative method of heat circulation assists in cooking meat and vegetables equally.

  1. Environmental benefits

Clay is an eco-friendly material, since it is entirely natural, inert and safe. If properly maintained the clay pots are able to last for a considerable period of time.

A Historical Trip to Clay Pots

Since the year 400 BC pottery is a craft that has been practiced in the industry of handicrafts. Humans from the prehistoric era discovered the strength of clay hardened by accident. Thus, they resulted in the making of robust containers which later developed into pots.

The form that was hardened of this pottery was durable enough to store water and food. The earthy appearance of the utensil was considered to be the most basic.

And then, came the age of ornamental elements that were carved into these pots!

In the past, Egyptians were the first users pottery made of clay. Additionally, the ancient Greeks believed that decorations made of clay as holy and attractive.

In the Middle Ages when people used clay and sand in order to make earthen clay pots for cooking. Since then, all over the world are using clay pots to create an exquisite aroma into their food.

Indians use these as “Handis or Matkas.” These pots are found everywhere within rural India.

The clay pots were used by the people who owned them because they neutralized the acidity levels in food items. This makes slow-cooked meals nutritious.

It is a unique ingredient that can assist in the cooking process. However, there are few drawbacks that weren’t evident until a few thousand years ago.

Choosing the Right Clay Pot

Are you considering purchasing clay cookware for your cooking endeavors? Be aware of these suggestions to ensure you purchase the highest clay pots.

  • Choose a clay-based pot from reputable business houses.
  • You must ensure that it is 100% pure clay (100% clay tag).
  • Testing the purity of the product prior to production is vital.
  • Select a clay pot that is unglazed to cook in.
  • Understand and analyze the various types of clay pots.

Understanding the Different Types of Clay Pots

When you do your research, you’ll see a range of clay pots on the market. Therefore, knowing the different varieties is essential.

Stoneware – A durable, tough material that is that is resistant to chipping and cracking. (Can endure extreme temperatures)

Earthenware – It is impure due to its soft permeable, earthy appearance. (Can stand up to low temperatures)

Porcelain– is made from the purest clay known as Kaolin. They are thermal or flameproof clays and microwave-resistant. (Can be able to withstand extremely high temperatures)

FAQs About cooking In Clay Pots

Are you looking for more information regarding clay pots? If you do, this section was specifically designed for you!

Are cooking with clay pots safe?

Yes! Cooking food using pure clay pots is secure. But the flavor may be different, and requires the proper supervision during cooking. Clay cookware is prone to overheating and could be risky if not cautious.

Does it make sense to cook in clay cooking pots?

Yes! Clay vessels are eco-friendly and can make food smell delicious. Additionally, they infuse the food with a variety of beneficial nutrients. These pots can preserve the oil content of foods, making them taste better and healthier.

Clay pots are great to steam, roast, braising, baking, and steaming!

Clay pots are unglazed or glazed. Which one should you pick?

If you choose to use a clay pot without glaze, it is a better choice to cook in. Glazed clay pots are infused with lead in the. When you heat them, they let the lead in the food you eat and turns it harmful.

What are the various types of clay used in making pots?

There are three kinds of clay pots you can select from:

  1. Stoneware
  2. Earthenware
  3. Porcelain

Can you check whether the clay pot is poisonous?

It is possible to add baking soda and water into the pot, and let it simmer. After a couple of minutes, shut off the source of heat. Therefore, allow the water to cool before tasting it.

If you experience a spongy or chemical smell in the water, the pot is not hygienic. Additionally, you might detect metals circulating within the waters.

What is the correct method to clean clay pots?

If you wash clay pots by using soap or a dishwasher that isn’t used regularly the soap will be absorbed into the clay pot. Instead, it is best to employ steaming hot clean water along with a scrubber to wash the clay pots thoroughly. If your clay vessel has difficult stains, then you can soak it in the mix of 1 to 4 tablespoons of baking soda, 1 tbsp vinegar, and water for a night. Baking soda can help in removing the smell of foul from the clay pot.

Can you cook food in clay cookware?

Yes, the clay cookware is safe to cook any kind of food. If you are careful about specific things like clay cookware can be temperature sensitive and can get very hot, easily break and break easily. and handle cookware with care and it’s the safest and most effective type of cookware to use in any kitchen. Pots made of clay can be used to cook, grill and browning, among others. It’s safe to place in the microwave as well as refrigerator.

Can you safely utilize ceramic or clay pots on gas cooktop?

Yes you can utilize clay pots with gas stoves. But, ensure that the clay is an unglazed clay pot made of natural clay. Based on the manufacturer, you may use an unglazed clay pot for the top of your cooking stove of gas, electrical stoves and ovens.

Wrapping up

So, I hope that after learning about the advantages and disadvantages of coking in clay pots, you will be able to decide whether you would like to buy them for your own cooking purposes.

Pots made of clay have been around for a long time. The ancient civilizations used them to cook, store food and for other functions. Additionally, it comes with unique attributes and benefits that blend into cooked meals.

However, the drawbacks of cooking in clay cookware are severe and sometimes quite annoying. Cooking in clay can keeps the food’s pH levels in check and ensures it is healthy. However, cooking in a pot that is not clean could have negative effects on your health.

Thus, choosing the purest clay regardless of its porosity is absolutely vital.

In this way, you’ll be able to find a clay pots and pans that are suitable for your needs and begin your culinary journey. The earthen pots will give your food a delicious scent and a traditional flavor.


Is Strawberry A Fruit Or Vegetable?

is strawberry fruit or vegetable

Is strawberry a fruit or vegetable?

Do you like strawberries? Yes, you will reply, but can you answer this simple question: is strawberry a fruit or vegetable?  You’re probably thinking of them in terms of a fruit just like the majority of people. However, the answer is not as simple as you think. For, the truth is that strawberries have much more to offer.

There is often a huge distinction between what’s commonly accepted and what’s scientifically exact.

Let’s get this mystery and discover the strawberry once and once and.

So is strawberry a fruit or vegetable?

Strawberries are fruits, but they’re barely so. This is really bizarre and we’ll need to learn something more about it.

However, strawberries aren’t vegetables. They are definitely not berries.

They’re a category in their own.

The most exact method to explain the strawberry (the juicy red parts) is to call it the seed receptacle.

The seeds that you see when looking at the “fruit” are the real fruit. The tiny, green pods that are fruit are actually called “achene”.

The red, fleshy portion is the middle that has been overgrown of the strawberry flower.

It functions the same way as a branch or vine from which other fruit would be hung.

It could be difficult to grasp, as we’ve imagined the strawberries as fruit throughout our lives.

Botany, however, doesn’t explain things like layman do, and we can’t play with science. Can we?

What Is a Fruit?

Although we typically categorize fruits and vegetables according to their sweetness or savory, there’s an actual botanical definition. When it comes down to defining the term “fruit” in a plant can be described as the mature ripe flowering ovary.

In most cases, it develops out of a flower and develops into the fruiting portion that grows on the plants. The ovaries of the plant contain seeds which are essential for this plant’s reproduction, and to create new plants.

A simple method to determine whether a particular food is a vegetable or fruit is to determine whether it is a seed-containing food. If it does, then the chances are that it’s technically going to be a berry.

Based on the definition of a fruit strawberries fit neatly into this category. They are a part of the flowering buds that is the plant of strawberries. They are covered with tiny seeds to aid in the growth of the next generation of strawberries.

What Is a Vegetable?

Vegetables are defined in a different way than fruit because they are comprised of many different components from the same plant. The best method to determine whether something is an herb is to not include it from being a fruit.

The stalks of vegetables can be such as rhubarb and celery. Also, there are vegetables that are leaves such as lettuces and cabbages.

A few of our favorites are tuber and root vegetables such as sweet potatoes, carrots and beets.

Other classifications of vegetables are asparagus which can be a stem, as well as flowers which include things such as Brussels sprouts, broccoli and cauliflower.

If you consider all these vegetables, none of them have seeds because you can find them in another section of the plant. The answer to the question of whether strawberries are vegetables is a definitive no.

What “Vegetables” Are Actually Fruits?

Although you might have thought whether strawberries are actually vegetables, you may not realize that based upon the above definitions, many of the most well-known vegetables actually are classified as fruits.

“Vegetables” that are actually fruits are as follows:

  • Avocados
  • Olives
  • Tomatoes
  • Cucumbers
  • Zucchini, among other summer squashes
  • Butternut squash and many other winter squashes\
  • Eggplants
  • All peppers
  • Okra

The common theme in these fruits disguised as veggies is the fact that they are laden with seeds.

If you’re ever in doubt about whether the food you eat is an edible or a fruit A common rule is the food has seeds that aid the plant to reproduce, then it’s an fruit.

What is the reason these fruits were even considered vegetables in the first beginning? The culinary definition is different and is not as precise as the botanical definition.

In time, “vegetable” came to be any edible plant that falls at the savory end the spectrum. The majority of people don’t use the terms “botanical” or “vegetable” in their daily lives or if you’re a professional botanist or gardener.

We all encounter terms used in the kitchen more frequently. This is the main reason it’s so bizarre to consider avocados, as an instance, as an actual fruit.

Are Strawberries a Berry?

Berries are any fruit with a lot of seeds like watermelons, lemons, tomatoes, and grapes.

Technically speaking, watermelons belong to an exclusive family of berries known as pepos. Other fruits that are part of this berry family are gourds and cucumbers.

Citrus fruits, such as lemons, limes and oranges are all classified as berries under the hesperidium family.

You might be surprised to discover that some what we call the berries like raspberries, blackberries and strawberries aren’t really berries.

They are referred to as aggregate fruits. This means they are composed of several smaller fruits.

If you think of a blackberry, you’ll notice that every one appears like a tiny bunch of grapes, in contrast to a complete berry. Blueberries and the cranberries both have one seed which is why they’re classified as botanical berries.

Are Strawberries Nuts?

Technically speaking, strawberries are an aggregate fruit that is composed of multiple fruits.

If you take a look at the strawberry, the fleshy red part is actually the swollen area that is the stem. The tiny green specks that appear on the fruit are actually classed as nuts!

But, because of their similarities to other berries, we tend to label them as such regardless of the scientific botanical classification of the strawberry as a nut that is actually is a fruit nut.

What is the minimum requirement to make strawberries an actual fruit?

The botanically only fruits if the seeds that are in the fleshy portion. This means that the fleshy portion is the casing/receptacle the seeds inside will grow into new plants if they are placed into the soil.

The strawberries currently are inside-out, as it were. The fruit is outside – the tiny seed-like green dots, and the red flesh that they are sitting in or on isn’t protecting the fruit.

The red, fleshy portion of the bloom is in fact its core called the perianth.

They’re basically hanging there as apples hang from the branches of a tree. But they’re laying on a cushion.

If strawberries were fruits which we’ve all heard of would mean that the seeds that are green from the outside should be the primary star and be inside that red flesh.

If you really want to be a bit more technical there would be no red flesh as that’s an equivalent to the vine or branch that holds the fruit.

The seeds that are green (achene) are actually the fruit. If you break them open and then look under a microscope, you’ll find an embryo inside.

Therefore, the actual fruit the strawberry is extremely small.

It is worth looking at the process of making a strawberry an adult, moving from a flower to a ‘fruit’ as things will become clearer.

What happens when a strawberry transforms from flower to “fruit”

As with any different plant species, strawberry appear as a kind of flower, but they mature before becoming fully.

This flower is usually adorned with 5 white petals. They also have an orange center – known as the perianth, which is where you can find the seeds for the future (that will later become the actual fruits).

As the strawberry matures the fleshy part of perianth grows, wrapping the seeds on the edges.

Take note of those thin lines of white that run from the middle to the edge and terminating at a seed of green.

That’s why, if you’ve ever seen an x-section of an strawberry, it will have this thin whitish line that runs from the middle to the edges of each strawberry.

Once it’s fully formed it’s still white, or slightly green. It will gradually but surely mature and change to bright red. Sun exposure is vital for this.

If you’ve ever purchased strawberries that were mostly red , but nevertheless had a white-topped the tops, then they’re probably not yet ripe.

There are white strawberries available for on sale, but they are white in the whole.

In essence, when you eat strawberries the majority of what we consume is actually fleshy perianth.

If this is news to you, then you may also be interested in knowing that the strawberries we know as are cultivated by man. They’re quite different from the ones you’d see in nature.

Strawberries are a man-made product.

Many fruits and vegetables are manufactured by man, such as apples, for example. Small tweaks have been implemented to increase yield and fruit size, taste, etc.

However, they are a form of experiment and also a tasty one.

The two species utilized to create modern strawberries were the typical North American, Fragaria virginiana and Fragaria Chiloensis, which were imported from Chile.

Gradually, strawberries were widely grown and improved by various cultivators in many countries.

The original wild strawberry, however, is still located in forest.

The strawberry’s original size was smaller and often found in forests. It’s still present at the very least, in European woodlands, and is truly a delicious and sweet fruit.

As for size they’re about half of the size of a olive. They are extremely small and they are soft, the seeds which are in the green of strawberries are red.

Related Questions

How to Freeze Strawberries?

If you’re looking to preserve the abundance of strawberries you have this summer to ensure that you enjoy a small slice of summer every day then freezing them is a good option.

How to store strawberries?

Clean and dry your strawberries.

Trim the green stem away from the top.

If you’d like to freeze them in whole form you can leave them in their natural state. If you’d like, you can cut them in half or quarters.

Place parchment paper on the surface of a plate or baking sheet.

Place the strawberries in one layer on the parchment lined sheet or plate.

Place the frozen strawberries in the freezer for 12-24 hrs.

When your strawberries have been frozen, you can put them in a freezer bag that is airtight bag.

The bag should be labeled with the dates and the contents so that you won’t forget when you freeze them.

Strawberries will remain fresh for about 12 months following being frozen.

Top  Ways to Use Summer Strawberries

With the abundant strawberries just in the near future, now is the perfect time to begin stocking up recipes to make the most of the abundance.

Here are some amazing ways to use strawberries:

Make our recipe for margarita-flavored strawberries

Cut them in quarters and incorporate them into your salad of choice.

Enjoy them fresh, dipped in yogurt or whipped cream.

Make them into fillings for pie. Combine them with rhubarb to create the perfect sweet and tart combo.

Place them in between two pieces of fresh biscuit, and then top it with some whip cream to make strawberry shortcake. Sprinkle it with icing sugar for an extra hint of sweetness.

Incorporate them into your favorite smoothie recipe.

Try drizzled with a balsamic reduction, and eating them with goat cheese as an elegant alternative to your usual platter of charcuterie.

You can cover them in chocolate for the perfect sweet treat. You can keep chocolate-covered strawberries in the freezer for future use!

Nutritional Benefits of the Strawberry

The heart-shaped design on the strawberries is the primary indication to the fact that it is great for you.

The strawberry is now one of the top fruits, with sales peaking around Wimbledon which is a time when everyone loves the classic strawberry and cream. It’s not just a tasty fruit.. The strawberries are brimming with nutrients, fiber and have particularly rich in antioxidants, known as polyphenols.

They’re low in sodium, fat-free, low-calorie, cholesterol-free food. They rank one of the 20 top fruits with antioxidant power and are an excellent source of manganese as well as potassium. A single serving – roughly eight strawberries – contains the same amount of vitamin C as an orange.

Wrapping up

So, is strawberry is a fruit or vegetable?

Strawberries are not vegetables. It is a fruit which comes from the flowering portion of the plant. They also contain seeds. In the case of vegetables, you’ll usually have stems, roots or leafy parts of the plant.

The seed that you can see when you examine a strawberry actually is the fruit. Small, green pods of fruit are known as “achenes”. The juicy, red part of the strawberry is located in center of flower. It is used as a stem or vine from which other fruits could develop.

They are used to flavor foods frequently, so that children become familiar with them right from the beginning.

If you decide to bring home some strawberries (although technically speaking, they’re not even considered berries), you do that because they look so appealing and delicious!

They certainly deserve to occupy a prominent place in our kitchens as well as in our hearts. They’re so popular and delightful that they’ve become an integral part of our lives thanks to their delicate taste and nutritional value.


What Does Trout Taste Like?

trout-taste

what does trout taste like


Different people have different ideas about how different foods taste like. This is the reason there are some who like certain food items while others might not like the same food that others drool over. There are a variety of species of fish that can be found across the globe and each has a distinct taste. Trout is one of the most popular varieties that people love to enjoy in the dinner table. But what does trout taste like?

Well, trout has a mild taste and a soft skin texture. The meat of trout has an intense “fish-like” flavor and splits into smaller pieces. Have you ever had the pleasure of tasting a piece of catfish or chicken? It’s the same flavor from trout.

In this article, I am going to examine the various opinions regarding the flavor of trout. This article will provide a discussion of what constitutes a trout and the taste of trout based on the type of habitats it uses. In addition, I would also discuss and distinguish between the flavor of trout and salmon.

What exactly is Trout?

Trout is among the species of fish that can be that can be found in fresh water. Scientifically speaking, it is part of the family of Salmonidae and the subfamily Salmoninae. Trout are found in a variety of environments from rivers to lakes, consequently, they have distinct designs and hues. Their habitat can affect their taste as well as the length of time they live.

Trout come from various species like Rainbow trout and brown trout Lake trout, Brook trout Gila trout golden trout Splake trout Apache trouts, bull trouts, cutthroat trout and so on. But, certain species of salmon may be mistaken for trout.

Trout is a staple of diet for centuries. The species of fish described above is quite bony but it’s a big chunk of tasty meat. They also are thought to have a significant nutritional value. The nutrients found in trout are Omega-3 and low-fats vitamins, proteins, and minerals like potassium. Do you not deserve to have a fish as a part of your daily diet?

What does Trout taste like?

A variety of opinions determine the flavor of this oily fish. As we have mentioned there are various kinds of trout, and they are flavored differently. This means that there isn’t a specific taste for trout.

Trout has a moderate flavor. It doesn’t have that distinct and strong flavor like fish or the deep taste that is similar to ordinary meat. A pink piece of meat made from trout that is cooked using the same recipe should not make you feel uncomfortable about trying it. Based on the chart of taste for fish trout has a soft texture.

But, the precise flavor of trout will be contingent on a variety of factors. A certain way to cook trout manner is important to different people. They might like it or totally avoid it.

They are:

The method of cooking used is smoking a trout, grilling it, steaming, baking, or roasting.

Is it frozen or fresh? Fresh trout has an improved taste than frozen trout.

Recipes: The different people will have their own choices of recipes for cooking their trout

The habitat in which it is found: Trout taken from freshwater can have a distinct taste compared to that of saltwater. Saltwater trout has a much richer flavor due to its large amounts of amino acids. It is also recognized that species that are raised for trout differ from wild ones.

To find out the true and natural flavor of trout, stay clear of adding flavoring spices. A basic recipe would consist of cooking oil and squeezed lemon juice and a pinch of salt for taste.

  1. What does Rainbow Trout Taste Like?

Rainbow is among the most popular kind of trout. It is a common food item in American families. But, don’t mistake this trout for Steelhead trout. Both are identical species. They similar in many ways however they do differ in their flavor. What is the taste of rainbow trout like?

In the preceding article we looked at the various factors that determine the flavor of trout. Rainbow trout isn’t an exception to these factors. As opposed to other varieties of trout, this one has a mild flavor.

It also has a tender meat texture that has the flavor of butter and sweetness. It isn’t a sour flavor on its own, but precisely the type of scent that are able to tell you’re eating fish. Many people believe that this type of trout tastes similar as nuts.

It’s a good choice for those who don’t like eating fish due to the smell. Rainbow trout can be a great part of your food.

  1. What does Steelhead Trout Taste Like?

As previously mentioned, Steelhead trout is very similar to rainbow trout and many people make the mistake of comparing the two. Additionally, it is similar to salmon and many people substitute it for salmon. One of the things they have in common is the texture and similar flavors. Let’s take a take a look at the taste that comes from Steelhead trout.

From various observations, this type of trout is known to have an astringent flavor and an odd texture. The taste is milder and like fresh oranges. It doesn’t also possess that fishy flavor.

But, steelhead trout that is raised on farms can be different in taste. In terms of texture, it’s a bit softer. It’s a tasty meal consumed in many households as a stand-alone dish or in salads and soups.

  1. What does Lake Trout taste like?

The majority of lakes are freshwater reservoirs; consequently, trout have habitat in these places. The taste of lake trout is different according to the freshness of the fish, the quality of skinning it’s skinned, the ingredients used, as well as the method used to cook it. In addition, the size of the fish can affect the taste; however, you will not be aware of it.

The majority of people believe that lake trout can be too oily and possess a “fishy” taste. It may be the case for certain species of trout. However, others might be different.

What’s the main difference? It is the depth that it grew from the coldest levels in the water, as well as the kind of water found in that lake.

The actual taste of the fish will depend on the individual’s perception and the experience that he/she might have had with the lake trout. The above mentioned factors are essential to determine the flavor you will get after cooking your trout.

  1. What does Sea Trout Taste Like?

The majority of sea trout originates from salty water. The majority of sea trout be different in flavor because of the large production of amino acids. It usually has a light-flavored, delicate texture and mild flavor.

But, like other trout species, they don’t possess a taste that is similar to fish. In cooking, it does not require a lot of seasoning. Its flesh is soft and smooth. It will surely help you create your ideal recipe.

As with other species of trout, the exact flavor of sea trout depends on the species the cooking method, freshness and the kind of water that the fish was taken from.

  1. Does Trout taste like Salmon?

Trout has a distinct flavor unlike salmon. They share a lot in common which make them difficult for many. Can you discern the differences between them before you have a taste? They usually have identical physical appearances and this has led to a lot of people misunderstand the difference between them. The main difference is the fact that they are distinct varieties.

It is more slender because of its distinctive flavor. Additionally, it is flaky and delicate flesh. The other side of the coin is that trout is flavorless with a subtle texture on the flesh. The mild flavor of trout makes it a breeze to spice and taste amazing with various ingredients.

The distinctness of trout is the flavor will alter based on the path they travel in the course of migration, which is part of their cycle. Steelhead or rainbow trout fish that migrates to salty water will cause an increased quantity of amino acids, thereby altering the flavor.

Both are believed as being rich in nutritious Omega 3 fatty acids. If you’re not familiar with eating these two kinds of fish, it is difficult to tell the difference, even if you try to taste. Some sellers have difficulties trying to identify the two fish, and they might mislead customers. Salomon is salmon, and trout refers to the trout, despite the similarity they have.

FAQs

Does Trout Taste like fish?

Trout is a light fish, which means you won’t feel any “fishy” flavor. If your trout is odd, there’s a great possibility that it’s gone bad.

What other fish species can be used in place of trout in your recipes?

The subtle taste from trout is what makes it an excellent option to use in recipes that require more flavorful fish, like salmon. You could try substituting the original recipe that calls for salmon by using your favorite piece of trout fillet.

How can you tell whether a piece of trout is actually fresh?

Fresh trout is semi-translucent, moist and hard texture. Fresh trout can be purchased whole and without heads. If the trout is cut up in small pieces, then it’s likely to be not fresh. If you’re worried about whether your fish is in good condition to consume (for example, when it’s been at the table for couple of days or you don’t know for sure how the time it’s been in the refrigerator) You should smell and taste it prior to eating it. If it has a foul flavor or smells bad it is not a good idea to take it in.

Does trout taste like tilapia?

The tilapia and the trout are both mild fish, which means they’ll have a similar flavor. Both are delicate in texture and are perfect for frying or grilling. The skin of either kind of fish isn’t recommended to be consumed.

Does trout have a better taste than salmon?

The taste of salmon can vary in accordance with the location it was caught from and the method of cooking it. Salmon has a richer flavor than trout due to its fat content that is higher; but unlike trout it’s not as exciting. Salmon can be prepared in a variety of ways because of its oily flesh.

Wrapping up

So, what does trout taste like? Well, different people have differing opinions on what the trout tastes like, I have delved into the different factors that impact the different tastes. Additionally, the particular species and life-cycle of trout is crucial in the quest to discover the right answer for what trout tastes like.

From a cooking perspective, cooked, smoked and fried trout appears to taste the best. A lot of people across the globe enjoy it this way.

The species that is the most sought-after by many because of preference can be described as the Brook Trout. Additionally, a large number prefer rainbow trout. They are cheap and easily accessible.

A significant portion of the population tends to be negative toward some freshwater trout species like those of Lake trout. But, a lot of freshwater trout, such as rainbow trouts, brook trout and cutthroat have been praised because of their delicious, savory flesh. They say they have a fish-like taste. Saltwater trout, such as the speckled trout, have an appropriate brand name in the market.

Trout create delicious recipes from the kitchen to restaurants. Many people like to mix diverse ingredients to produce various tastes. Trout is a treat that contains vital nutrients for your body.

Although trout are widely accessible at the market but you need to know the cooking process as well as where the trouts originate from, if you consider yourself a gourmet. Knowing these differences will not only keep you from eating a boring meal but also steer away from false expectation

Is Sugar Homogeneous Or Heterogeneous?

Is Sugar Homogeneous Or Heterogeneous?


Is sugar homogeneous or heterogeneous?  If you have no clue and you are looking for an authentic answer, you should not go anywhere as you will get all the information right here in this blog post.

Sugar is part of a group of molecules known as carbohydrates. They taste sweet. Carbohydrates give us energy and are necessary to maintain a balanced diet.

Water is an fluid that is polar. It is frequently used to dissolve solvents due to its characteristics of affordability and availability. Additionally, it is necessary to human survival.

This article we’ll learn about the properties of a mix made by mixing two substances–sugar and water, and determine its classification based on the degree of consistency in chemical composition.

Therefore, is sugar water heterogeneous, or homogeneous? It is an homogeneous substance because sugar completely dissolves in water. We can’t discern between liquid and solid phases. The sugar molecules get combined with water molecules to form a homogeneous mix.

The chemical name for table sugar, which commonly utilized at home, is sucrose.

Sucrose is a type of disaccharide as well as one unit of sucrose is composed of two monosaccharides namely fructose and glucose. The chemical formula for sugar is C12H22O11. It is extracted naturally in plants. It is biopolymer.

What is the reason why Sugar Water Homogeneous?

If sugar and water are combined sugar molecules disintegrate completely in water due to the fact that they are more attracted by water molecules than to one another.

It’s impossible to differentiate between water and sugar once sugar is completely dissolved.

One phase is the only one that can be observed when sugar solution is formed. The sugar solution is homogeneous.

What does sugar dissolves in water?

Dissolve is the term used to mean “to get incorporated”. In the event that we combine sugar and milk or water, the sugar dissolves in the liquid. This makes it sweet. It keeps its properties in the mix.

In a sugar crystal the sugar molecules remain together by the force of attraction between molecules (weak).

After they are added water, the crystals will first sink down to the bottom of the bowl in the event that we do not stir them. The reason is that intermolecular forces are not broken and the exposure to water has no effect. In this moment it’s a heterogeneous blend.

When you stir the mixture, the sugar crystals dissolve slowly. The sugar dissolves as it is dissolved into water.

In the event of mixing, sugar molecules are attracted by water molecules. Their attraction to water molecules is far higher than their attraction towards each the other.

Water molecules cut connections between sugar molecules as they cover them. Sugar is believed to dissolve because all sugar molecules are covered by water. We can’t differentiate between two different phases.

It takes energy for breaking the bond between sucrose molecules. The bonds that are formed in the end are able to compensate for the energy required to break pure solvent and bonding with solvent.

Sugar particles are found into the spaces between water molecules due to intermolecular forces that are lower in liquids than solids.

How do the molecular levels of sugar and salt appear when they are dissolved in water?

What is a Mixture?

A mixture occurs by mixing two pure materials combined so that they do not create bonds. The ingredients of a mix remain their properties and can be separated.

Mixtures are classified as

  1. Based on consistency in appearance and composition
  • Homogeneous mix
  • Heterogeneous mix
  1. Based on the size of the particle.
  • Solution
  • Suspension
  • Colloid

What is a homogeneous mixture?

“Homo” is a reference to the word “homo” refers to the same thing.

A homogeneous mixture occurs when the chemical composition and appearance are the same across. It is impossible to distinguish between different elements in a homogeneous mix. We can only see one phase.

Homogeneous mixtures are often mistaken for pure compounds, and are known as solutions.

We can’t get rid of the mix’s components through physical processes.

An example of this is that an alloy can be described as an unidirectional mixture of metals or other elements. It is made up composed of zinc and copper. it is difficult to differentiate copper and zinc in brass.

What is a Heterogeneous Mixture?

The term “hetero” refers to a variety of the opposite of what it means. A mixture is heterogeneous when the chemical composition and appearance do not match across. We can distinguish between various components.

We can observe two or more different phases. We can distinguish the constituents of a mixture using physical processes.

For instance, the mix of nails and sand is a heterogeneous blend that we can visually differentiate the sand and the nails.

Homogeneous mixes can be heterogeneous when they aren’t properly mixed.

Classification of mixtures are based upon the size of the particles.

Colloid- A colloid is a heterogeneous mix of small-sized particles. They are big enough for one to be seen, but not big enough to be able to settle or to be separated from the mixture.

For example, gelatin, homogenized milk, etc.

Suspension: A suspension is a heterogeneous combination of massive particles. The particles are big enough to be able to see them and settle or get filtered from the mix.

For example, you can sand paint, water, etc.

Solution – A solution is a homogeneous mix of tiny particles. These particles are tiny for us to be seen and are also tiny enough to not settle or filter from the mix.

For example, sugar solution, salt solution, etc.

What is the reason sugar solution is not a heterogeneous mix?

The sugar solution isn’t a homogeneous mix because we cannot observe water and crystals separately in the sugar water.

One phase can only be observed.

Any solution where one phase is considered is a homogeneous system.

How can we separate sugar from solution?

Sugar solution can be described as a mix and therefore we are able to sort the components. The sugar solution can be heated solution until the water molecules have left the solution.

The distillation process is employed to remove the sugar and water. This process allows various components of the mixture can be separated according to temperature of each ingredient in the mixture.

In the case of a liquid-solid mixture such as a sugar solution, we warm the solution to it reaches the point where the liquid is boiling. The liquid transforms into the form of vapor at this point and we are left with solid.

The sugar we use is a hygroscopic material that means it has the ability to absorb water from its surroundings. Sugar starts decomposing at around 180 degrees Celsius.

The process of making crystals of sugar that are pure is known as crystallization. The temperature needed for crystallization is significantly higher than the boiling point of water.

In this way, we can obtain sugar through heating the solution to the point where it is boiling. The solution is heated until the water molecules have been transformed into the form of vapor. The result is the pure crystals of sugar.

It is also possible to remove sugar from the solution through the process of evaporation which involves the transformation of liquid molecules into states of vapor.

The downside of using evaporated sugar is that we don’t get purified sugar in the final. The sugar that is derived is then charred.

Why is sugar solution homogeneous, while water and oil are heterogeneous?

Water and oil

The water is an polar liquid unlike oil, which is a non-polar liquid. The rule of thumb of the solubility of a liquid is “like dissolves just like.”

The sugar dissolves through breaking down the bonds that are formed between sugar molecules and pure water molecules.

Sugar (sucrose) oxygen is able to develop the negative charge of a small amount while hydrogen is charged with an inverse positive charge because of the bond formed between hydrogen and oxygen atoms (O-H bonds).

Sucrose is a polar molecule too. The positive and negative regions of the sucrose molecules that are polar are drawn by the water molecules with polarity which causes the sucrose molecules to disintegrate in water. This is due to the fact that sucrose in water forms a homogeneous mix

In order for oil to dissolve in water it needs to rupture the hydrogen bonds of water. This isn’t allowed since the bond formed in the future would not be stable and energy is not compensated.

So, polar water as well as non-polar oils cannot create a homogeneous solution.

Water and oil have different densities. Both are liquids, but it is possible to distinguish between the two types. Water can be separated from oil by using a separation funnel.

Therefore, water and oil create a heterogeneous mix.

Take a look at the article I wrote about is water and oil a heterogeneous blend.

Interesting Facts

The sugar’s solubility within water is greater at higher temperature.

When temperatures of the water rise, the kinetic energy of particles increase and they move at more speed.

Their interactions with sugar molecules are more frequent and faster, because they are able to interact with ever larger sugar molecules.

There is no increase in the volume of sugar added to water since sugar molecules are put into those spaces that water molecules leave.

Related Questions

Does saltwater constitute a homogeneous mix?

The salt water mentioned above is homogeneous since the salt that is dissolved is evenly distributed across the entire sample of saltwater. Sometimes it is easy to mistake the homogeneous mix with a pure substance since they’re identical.

What is a mix of sugar and salt called?

The mixture of sugar and salt is known as homogenous mix.

Are you sure that Salt an instance of heterogeneous mix?

Saltwater appears as if was one substance, even though it’s actually two elements: salt and water. It is a homogenous blend that is also known as it is a solution. Soil is made up of small pieces of various materials, which makes it a heterogeneous blend.

What is Salad a heterogeneous blend?

The explanation is that no salad is a homogeneous blend. A homogeneous mixture is uniformly compositing across the entire spectrum, similar to coffee or salty water. Thus salad can be described as a heterogeneous blend. Sand and Skittles are both examples of heterogeneous mix-ups.

Is mayonnaise a heterogeneous mixture?

Mayonnaise is a heterogeneous mix.

What is the reason mayonnaise is a heterogeneous mix?

As with the other components, mayonnaise is composed of small droplets of oil dispersed within a fluid medium. The path that leads between a point within one droplet to another outside of it has to traverse a boundary of a phase, which is why the mix is heterogeneous.

Is cement homogeneous, or heterogeneous?

Cement is a solid, homogeneous combination of calcium compound when mixed with sand, gravel, and water, it forms the heterogeneous concrete mixture which is one of the most significant building materials around the globe.

Is vinegar and water different or homogeneous?

Vinegar is a good example of a homogeneous blend of water and acetic acid. Heterogeneous is “different across.” Heterogeneous mix includes a large portion of components which differ from each the other.

Wrapping up

So, is sugar homogeneous and heterogeneous? It is a homogeneous solution. It’s also known as sugar solution.

We are unable to distinguish between water and sugar in sugar solutions.

Sugar dissolves in water since sugar molecules are more attracted by water. The attraction force of sugar molecules is less than that between two sugar molecules and a water molecule.

Sugar is separated from the sugar solution using distillation.

Water and oil form a heterogeneous combination because the oil is non-polar, while water is Polar. Oil is able to float on water since the density of the oil is lower than that of water.


Is Baking Soda a Pure Substance? 

baking powder

Is baking soda a pure substance or a mixture? Well, I am sure you have many questions on your mind. Let me address each one one at a time.

Leavening agents are utilized in small amounts, but they are the essential ingredient to create a rise and bond for the baked goods. Apart from yeast cream of tartar baking powder, and baking soda are also regarded as a leavening agent. The sodium bicarbonate (scientific) is an alkalic crystal powder that has transparent white color.

In order to activate the substance baking soda requires contact with a mix of acidic ingredients as well as liquid. When activated, it’ll create carbon dioxide particles that permit the baked goods to release air and make your batter into a light and fluffy. This is the reason baking soda is suggested for recipes that contain an acidic ingredient such as lemon juice, buttermilk, or sour cream.

Baking requires an understanding about the composition of the ingredients. Knowing what chemical components are present in your leavening ingredients will provide you a more precise idea of how to use these ingredients to meet your baking requirements. This can be accomplished by putting baking soda’s chemical composition. Chemical substances can be classified into four varieties:

  • pure element,
  • pure compound,
  • A mixture of elements or compounds
  • A mixture of properties and compounds.

When combined, they create the result of a mixture. The mixture can be homogeneous or heterogeneous based on the reaction of the different variants to one another.

Is Baking powder a Pure Ingredient or a Blend?

This way it is easy to discern the chemical properties of different leavening agents. Baking soda is one of them. it is considered to be a type of an undiluted compound. The mixture of sodium, carbon, hydrogen and oxygen molecules creates one homogenous substance, resulting in an undiluted substance. When a variety of components are mixed together, it’s known as the compound.

If the elements of four are combined they create the chemical reaction which produces one crystal that is white. This means that baking soda will remain its chemical compound even when it is the baking soda is combined with other compounds or crystals.

Baking powder can be described as a blended compound.

The baking soda result that is created by mixing baking soda, cream of tartar and cornstarch creates a homogeneous blend compound. This is why it is uniform in appearance (homogeneous) and does not bind the mixture. However the alkaline reacts with acids rapidly, and is possible to stabilize it by using the fillers such as cornstarch.

However, the singular properties of each compound won’t affect or alter the rest of the ingredient. Thus, another aspect about the blended mixture is the possibility of resulting in different results. For instance, suppose that the alkaline-acid ratio is not correctly followed. If that happens it could cause disruption to the mix quite quickly.

For leavening ingredients, baking soda is considered to be a complete ingredient since it includes two components: bases (baking soda) as well as acid (cream of tartar) to aid in allowing the product to increase in its volume. But, because acid and base react rapidly the buffer (cornstarch) is added to stop the mixture. Baking powders can be found in a single-acting as well as double-acting type, with the double-acting variety typically used in baking.

Does Baking Powder constitute a Homogeneous or Heterogeneous Mixture?

Baking powder is a leavening agent that is a alternative to baking soda. It is typically used in recipes that are acid-free since baking soda requires an acid companion to create an chemical reaction. Because baking soda has its base and acid that it releases carbon dioxide molecules.

This is the reason cakes made with baking powder need to be cooked right away to avoid their creation of one big crater in the middle of the baked item.

While baking powder can be described as a mixed compound but it still creates an homogenous mix, which is crucial to the baking requirements. If the mix is homogeneous and the elements are mixed, they form uniformity throughout the range of ingredients.

When baking with baking powder all three ingredients are in powder form, creating an even mixture. Homogenous mixes are vital in baking because they determine the proportion of food that is evenly distributed throughout the mixture.

Leavening agents should be thoroughly mixed to avoid the formation of speckles or large pieces left undistributed. Apart from reducing the leavening qualities of your dish they can also create a bitter, sour taste that could be unpleasant for the taste buds of anyone.

A further example of homogenous mixes that are used in baking is the following:

  • Sugar and water (syrup)
  • Food coloring and water
  • Saline solution
  • dry ingredients (flour leavening agent cocoa powder)
  • eggs and milk
  • pancake batter or crepe batter

Why baking Soda Isn’t Mixture?

In terms of science, baking soda can be classified as a an organic compound. That means that its component or compounds are evenly distributed across the whole space. Thus, this leavening agent cannot be considered to be a mixture, despite the composition of elements due to its homogenous characteristics.

As previously mentioned homogenous mixtures occur in which all the components or compounds create one appearance. This is different from what heterogeneous mixtures have because the composition displays every single visible aspect of various elements.

The bicarbonate sodium (general name: baking soda) is a byproduct of sodium that is formed by the interaction of oxygen, hydrogen in addition to carbon molecules. It produces white crystals with an aftertaste of bitterness. If it is combined by acid it breaks down the alkalic bonds, which result in carbon dioxide. Carbon dioxide is vital for baking as it allows for bread’s expansion.

When pastries and bread are thoroughly expanded they will develop air pockets within them. These air pockets indicate that carbon dioxide has been released into the bread. In addition to moisture, air helps to distribute the complicated mix of ingredients quickly. It creates a baked item with a more robust flavor profile when compared to the original design.

If baking soda isn’t an ingredient in a mix, then what is it? The answer is that baking soda is a type of the pure, homogenous chemical substance. For those with little chemistry knowledge it can be described to:

Baking soda can be described as a natural substance, which means it is made of natural components and substances that create an even appearance. This is why baking soda appears uniformly white and has a crystal shine.

Baking soda belongs to the category of chemical which means that it is composed of multiple elements. In addition, sodium bicarbonate is a chemical compound created through the mixing of sodium, hydrogen carbon, oxygen, and sodium.

Baking soda can be described as a homogeneous mixture that is, it is of a uniform dimensions and form. A homogeneous mixture is simpler to work with as it is possible to ensure that the ingredients are integrated equally without risk of chunks and clumps.

FAQs

Why isn’t Baking Soda a Mixture?

Baking soda is a substance composed of many different kinds of substance.

However, multiple materials aren’t the only thing that can be considered a mix.

To qualify as a mixture it must be composed of multiple substances. Furthermore, these substances have to be separated easily and typically keep their original properties.

If the substances are chemically linked to one another and are chemically bonded, then these materials are not able to be separated. It is usually a result of a type that involves chemical reactions.

Beach sand is an excellent illustration of a mix. There are typically multiple substances that are present in sand, like various kinds of mineral and rock. However, these materials are easily separated without the need of an chemical reaction.

Furthermore, the minerals keep their original properties of hardness, solubility in addition to their original internal shape. Not only that even if one of the materials was filtered out, such as all granite’s grains, sand would continue to be present.

Baking soda may also referred to by the name sodium bicarbonate. It is the chemical formula NaHCO3. It’s carbon, hydrogen, sodium and oxygen that are bonded together.

The sodium, hydrogen carbon, and oxygen are chemically bound to each other. They cannot be separated without chemical reactions.

The atoms that comprise baking soda are joined to one another in this way, they lose their initial physical properties. The hydrogen and oxygen do not exist in the natural state as gas and instead, they are solid.

Then, baking soda cannot exist if any of the ingredients which make it disappear. If you were to take all the sodium from the solution, you’d never be left with anything that could be akin to baking soda.

This is why baking soda isn’t considered as a mix.

Is Baking Soda A Compound?

Baking soda is thought to be a compound.

In the field of chemistry, a compound is considered a compound if it is composed of identical molecules made up from two or more components.

For instance, pure water is a compound. Water is comprised of molecules. Each of these molecules is made in identically, and has two hydrogens joined to one oxygen.

As with water baking soda is also composed of molecules.

Each one of them is made of the same material one sodium one carbon, hydrogen as well as three oxygen molecules.

Is Baking Soda a Pure Substance?

Baking soda is a natural substance.

Pure substances are substance made up of the same substance, throughout and consistently.

The substance could constitute an element or could be an element or a compound.

Because baking soda is comprised of a constant building block (the same chemical molecule that is repeated throughout) It is classified as a pure substance.

However, this isn’t a guarantee that the baking soda you buy at the market is a pure ingredient.

It’s pretty normal for commercial products intended to be used by the general public for sale to come with contaminants which help to make the item last for longer or function better.

For instance, it’s fairly common for powdered ingredients (like baking soda and salt) to be packed with an anti-caking agent.

In that scenario the baking soda commercially sold with the added ingredient would not be considered to be a “pure substance” according to what we know as a chemical term.

Is Baking Soda a Homogeneous Mixture?

Baking soda isn’t an homogeneous blend. The baking soda components are chemically linked to one their respective components, and they cannot be separated.

Is Baking Soda a Heterogeneous Mixture?

Baking soda isn’t a heterogeneous blend. Baking soda is composed of several ingredients, bonds that connect them create a compound rather than mixing.

Is Baking Soda An Element?

Baking soda does not count as an element. An element is a chemical that cannot be separated into simpler substances.


Can You Freeze Cream Cheese Dips?

Can You Freeze Cream Cheese Dips? 

Can You Freeze Cream Cheese Dips?

Can you freeze cream cheese dips? This often crops up in discussion in food and kitchen forums. Let’s discuss the subject in this blog article. Cream cheese dips are characterized by distinctive texture and flavor. It provides a wonderful creamy, tangy flavor to all sorts of food and that is why it’s popular for all types of sweet and sweet dips. But what do you do with leftovers?

A majority of pre-frozen dairy products contain other ingredients added to ensure they can defrost and reheat correctly.

Certain dairy products do not can be frozen, but freezing them could be an attempt to guess, but and you don’t know whether you’ll end up ruining your food.

What is the best way to put cream cheese dip in the freezer? The problem is that freezing cream cheese dip causes the texture to change drastically because the protein and fat bonds that make up cream cheese break when those water molecules grow and form crystals when frozen.

Certain cream cheese dips that include stabilizers such as sugar, or heavy creams, may help keep the dip from being destroyed however, not all of them.

It may be difficult to determine if the creamy dip you’ve just prepared can be stored in the freezer, but this is much easier than you imagine. It is helpful to know the scientific process that affects cream cheese when it’s frozen.

The Science That Goes Behind It

The issue with cream cheese dips in the case of freezing isn’t the dip part. It’s the “cream cheese” aspect. Cream cheese contains about 50 percent water. That is quite astonishing, isn’t it?

The water expands and it becomes ice once freezing it. This is why ice cubes often end up in their containers.

Because the entire cream cheese’s liquid is bound to all the fats and proteins. This expansion could ruin the texture.

When the water cools, the protein and fat bonds break. The broken bonds transform the texture from smooth and smooth to watery and crumbly.

Because the water isn’t anymore bonded to the proteins or fats and proteins, it is floating over your food.

The fats and proteins required this water. It was essential to maintain the proper texture. If it isn’t there, the structure of the food appears to be crumbly.

The problem is that the broken bonds remain. Although the water will get denser (shrink) when it melts, there’s not any way to form new bonds from proteins and fats.

It doesn’t mean the cream cheese dip will be ruinous if it’s frozen however.

This alteration occurs that occurs when you freeze cream cheese is completely safe. The taste of the dish will not be affected by this change.

There are certain dishes that can be frozen more effectively than others, and a variety of cream cheese dips can be frozen without much influence on the final result.

Whether or Not to Freeze

Once you know some of the things that happens with the cream cheese used in your cream cheese dip , if you choose to put it in a freezer, we could think of different kinds of dips that might be ideal to freeze.

For instance, a layered dip that has toppings on the top of cream cheese might not be ideal to freeze. Because the cream cheese isn’t mixed with other ingredients the texture changes will be more apparent.

If you’ve got dip that you serve warm, such as buffalo chicken dip or taco dip, freezing it is an excellent idea. This keeps the meat that is in the dip fresh. The process of warming the dip prior to serving will help evaporate any extra water, and keeps the dip creamy.

It’s a bit difficult to freeze a dish and it is more watery than it did when it was fresh. This is because it is the water that had strong bonds to ingredients like fats and proteins that make up a dish.

The process of freezing warm cream cheese dips implies that you’ll need to heat them prior to serving. This means you don’t need to worry about water particles altering how the cheese dip tastes.

Although warm dips can be the ideal choice for freezing, there are chilled cream cheese dips can be frozen well too. This is largely to do with the ingredients are in the dip.

A dessert dip that has added sugar is able to be frozen because sugar acts as an stabilizer. When the dip is frozen, it will aid in reducing the amount that creamy cheese splits.

Cold or hot, the majority of dips that have lots of ingredients are also able to be frozen. In the event that the cream cheese has been well mixed with the other ingredients, the change in texture is less apparent.

Add a splash of cream or milk to dips that need it. This will make them more freeze-able easily.

How To Freeze Cream Cheese Dips

When freezing cream cheese dip, you should remember that you will have to keep things as airtight as possible. The more air you have, the more humid that can affect its texture.

Ideally, you’d put a seal on your cream cheese dip however, if that’s not possible, there are alternative options.

In addition to using vacuum seals, the most efficient method of freezing is to make use of containers for food storage that have an enclosed lid. Be sure to fill it until the top.

A small amount of space inside the container will reduce the amount of air that comes into touch with dip. The dip should be creamy and delicious inside, so be sure you close the lid, and then chill!

If you’re using something like the bowl that does not have a lid ensure that you wrap it in double.

Put a piece of parchment or cling wrap inside the bowl, with it touching with the bowl’s top. Then, place another piece wax wrap or film on bowl’s top, and put it in the freezer for a few minutes.

If you’re using a lidless container to store creamy cheese spread, you must be generous when wrapping your container! If you’re using disposable cling film or recyclable canvas wrap that is coated with wax it is important to do a thorough job.

This prevents humidity or air from entering the dish.

Certain people prefer to use glass canning jars to store their food in the freezer. It is very practical, but is not suggested for dips with cream cheese.

Glass is a good alternative to freeze food items that are low in moisture. In the event that the water cools it is possible to break the glass jar.

Another option to freeze is to set the dip into ice cube tray. This is ideal for large batches because it can help control portion sizes.

Instead of heating up a big batch of dip that you will not complete, you can take out just what you require. If you decide to do this, you should cover the tray with wax or cling wrap.

Does Freezing Affect Cream Cheese Dips?

The dips with cream cheese can be simple to make. You will require cream cheese, sour-cream, or yogurt, and your preferred spice or herb.

These spreads are perfect for snacks, crackers, chips and bread. However you decide serving them, they’ll always be a big hit at your parties. Once they are prepared, the dips can be frozen and kept within the refrigerator until it is ready to use.

The issue is that freezing may alter the flavor of the dip once you remove it from the freezer and then thaw it. Foods that are frozen dry out  means that they don’t be as fresh or tasty when they were frozen.

The best way to stop this from happening is to ensure the dip is hydrated enough in it when the dip is frozen. It is also essential to select containers that are safe for the food items and doesn’t let air to enter it after you seal it.

Make sure to freeze the cream cheese dips inside shallow, small containers, if you can. Securely wrap them using non-reactive materials. For instance, you can use aluminum foil or plastic wrap.

Non-reactive substances are vital as they will not react with food. The first thing to consider is the type of wrap that you employ.

This will help determine the extent to which the freezing of cream cheese dip could cause problems with the flavor and consistency.

Be sure to take as much air is possible from the containers. Then, put them in a freezer bag and seal them.

The best option is to keep the dips in the freezer for the night and let it freeze completely before placing it into the freezer.

Can You Freeze Whipped Cream Cheese?

If you’re wondering whether it is possible to freeze cream cheese whipped in the freezer, the answer is yes, this can be done. It’s possible and your dip won’t lose its flavor or quality once it’s thawed.

When freezing cream cheese whipped it is crucial to be aware that air can influence how they perform in this particular environment.

After being frozen, the dips can be very difficult to disperse.

If you take as many air pockets from the containers as you can before placing them back in your freezer they’ll remain more convenient to use even after they’ve been frozen.

Can You Freeze Philadelphia Cream Cheese?

Yes, you can. But you must remember the fact that Philadelphia cream cheese composed with more water than the other varieties.

It makes it easier for bacteria to flourish and it means that it does not remain as long if it’s frozen. You are advised to consume them within two months after they have been frozen. If you don’t then, the cheese will turn dry and hard, rendering it impossible to spread onto crackers or bread.

Even if you’re fortunate enough to have your dip to taste like this after the thawing process, its flavor has changed dramatically too.

Be sure to adhere to the guidelines for freezing for you are freezing Philadelphia cream cheese, or other varieties.

After the dip has thawed out it will give you the best chance of returning the dip to its original condition.

Can You Freeze Cream Cheese Frosting?

Yes you can put cream cheese frosting in the freezer in the event that it is safe to do it.

What can occur after freezing this spread is that the spread will be more solid after being thawed.

This can make it difficult to spread over cake, or any other item that requires spreading.

If you choose to keep your frosting frozen, make sure you follow the guidelines above.

It will also increase the chance of it becoming soft and smooth after thawing out, which will allow for the perfect decoration for your food.

After you have labeled the frosting according to when it was made as well as the time it’s been stored for, place it into an air-tight container, or in a bag, in the freezer.

It can be frozen for up to 2 months at a time however, you must let it thaw prior to serving or using.

How to Thaw Frozen Cream Cheese Dips?

To defrost the cream cheese dip that you have frozen, you can place them in the fridge for 12 hours or even overnight.

But this isn’t always feasible, based on the time it takes to make your menu.

In this case it is recommended to place it in a water bath that is cold and let it sit for at least one hour prior to removing it from the container.

Once it’s out, it’s able to be used immediately without any issue.

If you’re in a hurry and can’t put off waiting for an hour before using the cream cheese dip then put it into the microwave and cook for 10 to twenty seconds each time until it is soft enough for use.

Make sure to not do this for too long this could defeat the purpose of freezing it in the first place.

What you don’t need to do is cook the dip that can happen with long heating.

How to Make Cream Cheese Dips Taste Better and Creamier?

How can cream cheese dips be made more delicious and creamier? Is there any way?

A good way to make sure that the cream cheese dip you make tastes more delicious and creamy is by making use of fresh ingredients from the beginning.

You can add several varieties of cheeses, like mozzarella or parmesan, which will make it taste better than other kinds of cheese.

You can also prepare your own dip, since it gives you complete control over the amount of fat in the dip.

You may also find it simpler to make than purchasing already-made products from the store.

In order to make it creamier some people include dairy products to their dips to make it creamier when it is frozen prior to serving.

All you have to whisk the dip up while you are making it or sprinkle it on after the dip has been frozen.

Related Questions

After we’ve covered the basics for freezing cream cheese let’s look over a few additional questions you may have been thinking about as you read this article.

Can you freeze cream cheese?

Yes it is possible to freeze cream cheese. But the texture is likely to decrease. To decrease the amount of separation of the cream cheese, make sure to store it as airtight as is possible. Double-bagging, or either vacuum sealing is recommended.

Due to the change in texture Due to the texture changes, it is recommended to put plain cream cheese in the freezer when you intend to use it in other ingredients in the future. Another option is serving it warm. After defrosting, mix it well to incorporate any more water.

How can you make frozen cream cheese creamy again?

The fact is that frozen cream cheese won’t be as creamy and delicious as fresh cream cheese.

The process of freezing causes the cream cheese’s water to expand when it is turned into the form of ice. This causes a break in some molecular bonds of the cream cheese, and this cannot be reversed.

The most effective way to make your frozen cream cheese creamy is to warm it. In the event that the cream cheese makes up a recipe such as chip dip, you can include a bit of cream to ensure that the dish is reheated properly.

Can you freeze taco dip?

Taco dip is a great item to store in your freezer , and does not require any special techniques to freeze. When you freeze taco dip, include a tiny amount of creamy sauce to your dish. This helps the taco dip retain its delicious creamy texture after it has been frozen.

After it’s been frozen, it is best to consume taco dip that is served warm. Otherwise, the texture might be unpleasant. The process of freezing could make the dairy components of the dip brittle, if not heated.

Can you make cream cheese frosting in the freezer?

The cream cheese frosting actually keeps more effectively than cream dip made from cheese. This is due to the sugar that is added to the frosting. It functions as a type of stabilizer.

When freezing, it may assist in reducing how the mixture separates and prevents a poor texture. If you plan to freeze cream cheese frosting, it is recommended to keep it in a sealed container.

How do you defrost cream cheese?

The most effective method to defrost cream cheese is transfer it to the refrigerator for a night. This helps defrost the cream cheese at a slower rate.

This can reduce the effect on the texture of the cream cheese warms. After defrosting, mix thoroughly to incorporate any water left over.

Wrapping up

So, can you freeze cream cheese dip? In the end, freezing cheese-based dips is feasible but only if you are doing it correctly.

If you are short on time, thawing the refrigerator for a few hours or placing in a bath of water is the best way to go as they’ll give you instant results.

If, however, you have more time to return your dip to its original form adhere to the guidelines above. They can help you accomplish this, and will have your dips prepared for future events or gatherings easily.


How Many Chicken Eggs Equal One Ostrich Egg?

ostrich eggs

How Many Chicken Eggs Equal One Ostrich Egg?

How many chicken eggs equal one ostrich egg? If want to know the actual answer, you should go through this short blog post to learn more about this topic.

What’s an Ostrich egg worth?

Ostrich eggs that are fresh and ready to eat can be purchased for $35-50 for a single. One ostrich egg is the equivalent of two chicken eggs! Based on the American Ostrich Association, a single bird is capable of laying 40-60 eggs in a year.

How many chicken eggs equal one ostrich egg?

An ostrich egg weighs equivalent to two dozen eggs or 24 eggs from a chicken. Ostrich eggs are typically between 3 5 and 3 1/2 pounds. On the other hand, chicken eggs range from 1 1/4 to 2 1/2 ounces. As of May 2008 the largest egg of ostrich ever recorded measured 5 pounds and 11 ounces.

Do ostrich eggs taste like chicken eggs?

In terms of taste, Ostrich egg is very similar to an egg from a chicken. Furthermore, when cooked, it’s more substantial than an egg from a chicken. The boiled egg of an ostrich appears to be able to give the same flavor like chicken eggs.

Can someone consume the egg of an ostrich?

You can not only consume them, but they are delicious, nutritious and can be found online or in some supermarkets. Ostrich eggs are rich in iron and magnesium, significantly less cholesterol and lower saturated fat than an equivalent portion of chicken eggs.

What is the amount of land an ostrich require?

Ostriches require anywhere between one to three acres of land to run on and be healthy. Make a simple shelter in order to shield birds from the harsh weather and build fencing to stop Ostriches from fleeing.

Are ostrich eggs healthy?

So per portion, an egg from an ostrich is a rich source of choline as well as B vitamins like vitamin B12, vitamin B12, riboflavin as well as the folic acid. But, ostrich eggs have lower levels of vitamin E as well as vitamin A than the eggs of an egg from a chicken. Ostrich eggs are also higher in iron and magnesium than chicken eggs.

What is the largest egg ever found in the world?

The record-breaking egg measured 2.589 kg (5 lbs 11.36 1 oz) it was laid by an Ostrich (Struthio camelus) on a farm run by Kerstin and Gunnar Sahlin (Sweden) in Borlange, Sweden, on 17 May 2008.

What eggs look like chicken eggs?

Duck eggs are similar to chicken eggs with a slightly bigger yolk. The flavor is rich and smooth. They also contain more protein and fat than chicken eggs. Duck eggs are thicker in shell which lets them stay fresh for longer periods of time.

For how long are ostrich eggs useful?

The experts suggest that an fresh egg of ostrich will last for 30 days in the fridge and up to 60 days in your refrigerator.

Why aren’t we eating turkey eggs?

Turkeys are larger than chickens, which means they require more space they require more space and food. And they only lay two eggs per week, as opposed to a chicken’s daily production, as reported by Modern Farmer. The result is when that a turkey egg is available being offered for sale, the price is between $2 and $3 per egg.

Preparing And Cooking An Ostrich Egg

Similar to any normal poultry egg Ostrich eggs can be scrambled, cooked or fried.

What does the ostrich’s meat taste like?

Ostrich meat doesn’t have the same flavor as other birds. The meat is red as venison, and its flavor is like prime beef. It is said to taste like meat from veal. You must try it out for yourself, and then draw your own conclusion.

Can we eat ostrich meat?

It’s not as fat and tastes similar to beef, but it’s much lower in fat. In fact, ratite is less calorific than turkey and chicken”. Ostrich meat is increasingly becoming an element of a balanced diet.

What dishes can you make with an egg from an ostrich?

There are a variety of ways to prepare an ostrich egg. just like any other egg and you can cook the same with them as you would with a typical chicken egg.

With ostrich eggs, you can create:

  • Boiled Ostrich Egg
  • Scrambled Ostrich Egg
  • Fried Ostrich Egg
  • Ostrich Egg Omelette
  • Poached Ostrich Egg

What is the color of an ostrich egg?

They’re glossy and cream-colored with thick shells surrounded by small pits. The eggs are laid by females during the day , and by males in the evening. This is done by using the coloring of the male and female to deflect the nest’s detection The drab female blends into the sand while the male in black is almost invisible at night.

Wrapping up

How many chicken eggs equal one ostrich egg?

So, how many chicken eggs equal one ostrich egg? Hope you would now be bale to answer this question with a lot more aplomb since I have covered almost all related question along with the one you have been looking for.

Do Chickens Have Nipples? Do They Have Breasts?

chicken

Do chickens have nipples?Do chickens have nipples? Do chickens have breasts? 


Do chickens have nipples? Do they have breasts? I have seen many people asking these questions since most of they have no clue about it. Go through this blog post to learn more about this topic.

No, chickens don’t have nipples. However, they do possess breasts, but they do not have mammary glands, and do not produce milk in the same way as mammals. This is true for all birds since they are in a different category from mammals.

Why do Chickens Have Breasts but no Nipples?

The term “breast” has a completely different meaning when it is used to describe birds’ chests as well as the female mammal.

The main difference is that while all mammals (such as dogs, us monkeys, cats, etc.) have mammary glands. birds don’t. This is one reason why that these animals are referred to as “mammals”, but chickens aren’t.

Mammary glands are a part of mammals. This is that they produce milk, lactate and also nurse their babies. Chickens are, however don’t have mammary glands, nor do they feed their young (as it is not possible without glands).

It doesn’t mean that mother hens let their chicks take care of themselves, though. Don’t panic. They take care of them by giving them leftovers of food and bugs and giving them food to consume.

Mammary glands can be found behind the chest, or pectoral muscles in mammals. For females, they are commonly called breasts.

Chickens have only pectoral muscles. They don’t have glands in the front or beneath the skin’s surface. Because they’re in the same place, they are also referred to as breasts.

It implies that chickens don’t require nipples because they don’t produce milk and do not have the need to produce it. Of course, men too wear nipples since they’re not necessary however that’s a subject for another time.

To sum up, chickens have breasts since they require muscles to move the parts in their bodies. They don’t have mammary glands or milk, so they don’t require or have the nipples.

Do chickens have one two or three breasts?

This is an interesting factual item, as you’ll be surprised to learn that chickens have only one breast, not two. This issue is asked more frequently when trying to cook a meal since the solution to using just one breast is typically two halves.

After the chicken’s breast is taken out of a bird and split in two pieces we usually find on shelves in supermarkets.

They are often referred to as chicken breasts or as a bunch of breasts. The correct way to describe them is, according to a number of credible information sources is they are the halves of a breast of chicken.

What about the crop milk?

Do chickens give their young crop milk?

To add more complexity or confusion around this subject , some birds make something known as “crop milk” to feed their babies.

Crop milk, sometimes referred to as pigeon’s milk, is a milky liquid that birds ingest through the linings of their crops to provide food to their babies.

As far as I could discover, the pigeons, doves and a few other birds are also known to do this. The crop milk is distinct from mammalian, but it is different in appearance and the nutritional value.

If you’ve heard about birds that actually feed their babies through the production of milk, it may be some truth to this.

It’s an entirely different method in comparison to the way mammal feeds their babies with milk but. They don’t make lactate, milk or use nipples in order to feed it to their children.

What is Poultry Nipples?

It is possible that you have been aware of the phrase “poultry nupple” being employed. I will also describe the meaning behind them – and they have nothing to do with have anything to do with bodily organs!

The nipples of the poultry are tiny gadgets that can be slid onto the surface holding their water. They let chickens peck and release water.

It’s similar to drinking bottles like you’d find on a rodent or rabbit cage. However, they don’t utilize the ball bearing; instead, they work using something like a small push button that releases drinking water.

They’re an amazing invention. It lets you make use of larger buckets of water since you can seal the bucket, and chickens can only drink the water they require for drinking when they require water.

This prevents the water they drink from turning green as quickly, and also reduces the risk of contamination. In addition, it means it’s not necessary refill it more often, and it’s simpler to hang their water bottles.

If you’ve not already you should check them out. They certainly has made my life simpler as well as my chickens seem content with the products.

Wrapping up

Do chickens have nipples? Are they breast-fed? Actually, I’ve already given an answer to this in the first part of the article. Check out the article in case you didn’t. I hope that you have found this post informative and  has helped clear all confusions you might have experienced regarding chickens and nipples.

When you consider the matter from a biological and evolutionary standpoint, similar to the majority of bodily functions, it makes total sense. It’s also a great illustration of the way birds differ from mammals.

Can You Freeze Tamales?

tamales

Can You FreezeCan you freeze tamales? Tamales? 


Can you freeze tamales? I am sure you are here because you want an authentic answer to this question. Read this blog post where I have not only answered this question but all other questions related to tamales.

Mexican cuisine has a long tradition of Tamales. These starchy, doughy, savory corn-based dishes are steamable in a banana leaf or corn husk. You can fill Tamales with meat, cheese, fruits, vegetables, or chilies.

Tamales are a special event. Tamales-making is a big part of Mexican culture. Tamales can be difficult to make, so it is worth making a few batches at home.

Can you freeze tamales to keep extra batches? Tamales can be frozen, and they will keep well in the freezer. Tamales can be kept fresh in the freezer for up to 3 months if they are properly packed and prepared. This will not affect their texture or flavor.

It will save you so much time if you know how to properly freeze tamales. This will allow you to make one batch and freeze it over several months.

We will show you how to freeze both cooked and uncooked Tamales, and the best thawing, reheating, and storage methods so that you always have delicious Tamales on hand.

Tamales are best frozen after they have been cooked.

This is a great meal that you can make ahead. Once you have prepared the tamales you can combine them in one pot. This will save you the effort of cooking the tamales raw once you take them out of the freezer.

You must pack the tamales properly after they are done cooking. The original corn husk wrap is not strong enough to withstand the extreme cold inside the freezer.

It is best to freeze cooked tamales. Uncooked fillings can change the flavor and texture of tamales when frozen. Therefore, freezing tamales after they are cooked saves more flavor, texture and quality.

How to Freeze Tamales

You would make a few extra batches of tamales before freezing. These tamales can be made exactly as you would if you were making them right away.

Freezing Cooked Tamales

After you have prepared the tamales, it is time to cut them into pieces.

This is how to freeze tamales for another day.

Allow to cool – Before freezing the tamales, you need to allow them to cool completely to room temp. Let the tamales cool on a rack for approximately an hour.

To ensure that they are completely cooled, check them often. You should not leave the tamales out too long, as they can spoil if left out for too long.

You can pack them – After the tamales are at room temperature, you can place them in their storage containers for freezing. The tamales can be placed in an airtight container. However, this limits the number of tamales that can be stored in a single container. Also, the containers take up a lot of freezer space.

You could also wrap each tamale in plastic wrap and place them in a freezer bag. This will allow you to take out as many tamales you like, and not have to defrost them all.

Label – Seal the container well, regardless of whether it is a freezer bag or plastic freezer container. Label it with the contents and date of freezing. This will help you determine the best time to eat the tamales.

Freezing Uncooked Tamales

Masa, a soft dough used in making tamales is extremely perishable.

Uncooked tamales are best avoided as there is a greater chance that the masa or other ingredients might not be able to withstand the freezing process. They might lose their great texture and taste after freezing and thawing.

You can prepare the tamales ahead and freeze them in the freezer for later cooking.

This is how it works: Make the filling exactly as usual, then wrap the tamale in corn husk wrap, or leave the entire batch unwrapped and put in the freezer.

This is the best option, but it’s up to you. You can either wrap the filling in corn husk wrap or on its own, but you must place it in a freezer safe container.

The tamales could become damaged by frost and ice crystals if they are not stored in a freezer-safe container. They will also taste different when thawed.

Cooking Frozen Uncooked Tamales

There are two options when it comes to cooking frozen uncooked Tamales. The tamales can be left to thaw overnight in the refrigerator. After that, place them in the steamer and cook.

You can also place frozen tamales directly in the steamer to start cooking from frozen. You can steamer wrap tamales to make them from frozen.

If the filling was frozen separately, the dough and filling should be left in the fridge overnight. Then wrap them in corn husk wrap and steam the tamales.

You can steam the defrosted tamales for 25 minutes on medium heat. However, this will depend upon the size and amount of the tamales.

What is the maximum time that tamales can be frozen?

Tamales can be stored in the freezer up to six months if they are kept in an airtight container or wrapped in plastic wrap and placed inside a freezer bag.

They will still be acceptable to eat, but the quality and flavor of the tamales will start to decrease and they won’t taste as good.

It is important to label the container with the date of freeze so that you can eat the tamales as soon as possible.

What Effect Does Different Fillings Have on Freezing?

Although most tamales can be frozen, it is important to pay attention to the contents of your tamales when freezing. Most fillings such as meat or shrimp freeze well and taste nearly the same when thawed.

For vegetable fillings, however, it is important that you note that frozen vegetables tend to become more watery and mushy once they have been thawed.

It is best to not overcook vegetable fillings before freezing. Even if the vegetable filling is not cooked, it can be thawed and then reheated to ensure it has the right texture. It shouldn’t become too soft or mushy.

Fillings made from dairy, such as cheese, can be difficult. It is possible for dairy to separate or become crumbly depending on its contents.

You should ensure that the cheese filling is well balanced to avoid it drying out or crumbling after freezing.

It is better to freeze tamales with cheese fillings for three months than to wait six months.

How to Reheat and Defrost Frozen Tamales

To thaw frozen Tamales, transfer the container from your freezer to the refrigerator. Allow the dish to thaw in the fridge for at least a few hours or overnight. There are many ways to heat tamales. To reheat the tamales, you can use a steamer for tamales. If you steam the tamales, leave the husks on them to ensure that the dough doesn’t stick to the steamer.

Thawed tamales can be reheated in the microwave. If you are reheating the dish in this manner, however, you will need to remove the husks. First, remove the husks. Next, place each tamale on a plate that is microwave-safe. Next, add a cup water to the same platter. This will ensure that the tamales stay soft while they heat up. Put in the microwave for 2-3 minutes.

It is also an excellent way to heat the tamales. Once again, take out the tamales’ husks and fry them in a skillet with a little oil for about 5-10 minutes. Keep turning the tamales until they are golden brown on all sides.

Finally, the oven can be used to bake the thawed Tamales. Place the tamales, with the husks removed, in a baking dish. Bake at 425°F for 30 minutes.

Can You Refreeze Tamales?

Refrigerating tamales is not recommended. The tamales will soften once they have thawed. The texture of the tamales will deteriorate if they are frozen again.

It will freeze fine but it will not thaw. The masa will dry out quickly and then fall apart. The tamales won’t taste as good as they should.

It’s a smart idea to make sure you have enough tamales in your freezer so that you don’t have leftovers.

Similar Questions

Here it is: A guide for freezing tamales of any type so you can enjoy them again later.

These questions are also available in case you have additional questions about tamale-freezing.

Can you freeze tamales in foil?

Tamales can be frozen in foil. You can wrap the tamales in aluminum foil instead of wrapping them with plastic wrap. After wrapping the tamales with aluminum foil, place them in a large freezer bag. Seal it tight.

How do you Thaw Frozen Tamales?

It is better to let the tamales thaw in the refrigerator overnight if you don’t plan on reheating them from frozen. This is the best way to freeze the tamales. It also prevents them from being left at high temperatures that could lead to increased bacterial growth.

If you don’t have the time or desire to wait, you can keep the tamales in the refrigerator for a few hours to allow them to thaw enough to be heated up.

Do I need to Thaw Tamales before Freezing?

Tamales don’t need to be thawed before being reheated. However, it is a good idea to let them sit for about 30 minutes before heating them up on the stove, steamer or microwave.

Although you can steam tamales frozen from the freezer, it is best to give them at least half an hour to warm up before reheating.

Wrapping up

So, can you freeze tamales? Yes. It is safe to freeze tamales for later consumption. Most people make more tamales than they need to store in the freezer to be able to enjoy them again.

Tamales can take a lot of time. It is better to spend an hour making tamales one day and then freeze the rest.

You can save time by having some frozen meals in your freezer.

What Happens If You Eat Bad Chicken Broth?

chicken broth

What Happens If You Eat Bad Chicken Broth? 

What Happens If You Eat Bad Chicken Broth? It seems that you’ve drank a bitter chicken broth along with your favorite soup and are searching for signs of what might happen in the event  you consume poor chicken broth. So, what happens if you eat bad chicken broth? There’s nothing to be concerned about. I am here to help your out of the mess. Just go through this post and you will stay safe.

While chicken broth is needed in large quantities because it is its importance as a component in recipes Do you know the length of time you can keep it in your refrigerator or pantry? If not then this article could help you out.

Orrington Farms Chicken Flavored Broth Base & Seasoning, 12-Ounce (Pack of 6)

Each 12 ounce jar can make up to 56 cups of broth.

Soup Make sure to add cooked pasta barley, rice, veggies and even meat into the prepared broth to make a delicious homemade soup.

Flavor: Use the broth you have prepared to flavor pasta, rice as well as potatoes, vegetables and stuffing

Seasoning: Use it as an ingredient straight from the container to enhance the flavor of sauces, casseroles, vegetables and gravies. The temperature should be 200°F or higher prior to serving.

Check Price Now in Amazon

It is better to know if the broth is safe to use or has deteriorated after eating it just once. What is it you are still waiting on? Let’s dig in!

How To Tell If The Chicken Broth Is Bad?

Expired chicken broth may ruin your entire recipe. If you’ve had it for a long time it is important to ensure that it isn’t sloshed off prior to pouring it into your food items.

Chicken broth that is spoilt will not taste right, and the appearance and color are off and it’ll smell. In addition to keeping the chicken broth beyond the expiration date the broth can also turn bad if not properly stored.

Here are six ways to determine if the chicken broth is deteriorating:

The smell: Hot or cold, the broth of chicken has an aroma that is delightful and delicious. When it is expired it will be unpleasant and sour. There’s no way to recover from the smelly broth of your chicken Do not even think about sampling it, or attempt to revive it using boiling it. Pour the broth down the drain.

Make sure the container is in good condition:  If the container is swollen or expanding container is a sure indicator that your broth is past the sell-by date. If food begins to spoil it is when the yeast and bacteria release gas that causes it to expand. It is important to remember that if buy a jar of chicken broth only to discover that it’s not sealed or swollen, there’s an increased chance that it’s been infected by a harmful chemical known as botulinum. Before throwing away the can it is essential to purify it by letting it rest in hot water for about 30 minutes.

Check how it is Stored: If it was canned or homemade it is essential to stored in the refrigerator within 2 hours and the temperature of the refrigerator should be set to forty degrees F or lower. If the broth was exposed to temperatures of 40 and 140 degrees F for longer than two hours, there’s the possibility that it’s come into contact with harmful bacteria, and may cause food poisoning if consumed.

Check expiration date: When the can of chicken broth is open, it will last between 3 and 4-days in the refrigerator. It’s the same with making homemade chicken broth. If you are aware that the broth was stored in the fridge for more than 3-4 days, it’s recommended to avoid using it.

Check the flavor: If you think your chicken broth has gone bad but you don’t need to conduct an experiment with taste. If you do take a bite of the broth and don’t realize that it might be degraded and tastes bad, do not consume it and then dispose of the remainder.

Check how it looks like Chicken broth should be an obvious yellow hue to it. In addition it should not show evidence of mold floating over the top. If you purchased the chicken broth at a shop, it shouldn’t contain any sediments or sludge and should be clear and not cloudy.

What Happens If You Eat Bad Chicken Broth?

The broth for chicken is prepared by boiling raw chicken in water,  so there is a chance for bacteria to set in quickly. In addition, chicken is usually contaminated with the varieties from E.coli as well as salmonella that are responsible for the occurrence of food poisoning

It is recommended that if you notice any signs of loss of flavor in your broth, eliminate it in the earliest moment you notice it to avoid poisoning. If, however, you or someone within your circle accidentally consumed the wrong chicken broth you might be sick and suffer from the symptoms listed above.

Dizziness: It is an illness that occurs when you can’t stand for longer time and experience lightheadedness.

Vomiting: Some people experience nauseating after eating a meal and then tends to break the food particles that are not digested from his mouth.

Diarrrhea: This condition could be the first indication that you’ve eaten unclean food. There is a possibility of going to the toilet multiple times due to loose and watery movements.

Fatigue: You will feel tired, despite the fact you’ve been sleeping all the whole day.

These are a few signs that suggest the consumption of chicken broth. All of these signs are not life-threatening, but could be fatal to a degree. The likelihood is that these symptoms will last for 2 to 3 days.

Furthermore, a proper treatment along with a good night’s sleep and a balanced diet are the most effective way to treat this issue.

What Does Bad Chicken Broth Smell Like?

Spoilage bacteria may grow at a low temperature, which ultimately spoils the broth of chicken and makes it smell unpleasant. The bacteria such as E.coli and salmonella create in the broth, which can ruin the broth of chicken.

The smell of eggs that are rotten is a far cry from the wonderful, delicious scent of the broth. You can also detect any unpleasant or foul or smelly odor from the jar that you have used to make your broth. It is recommended not to taste it or drink it in any way, such as after cooling or boiling the broth as it can be hazardous.

In addition, the brain’s smelly nose is not acceptable since the brain tells us that the smell could be an indication of danger. It is also possible to cause disease.

Does Chicken Broth Go Bad In The Fridge?

The broth of chicken is either purchased from a store or homemade, it needs to be stored properly to avoid the early onset of spoilage or microbial activity. Therefore, the solution to your question whether chicken broth get spoiled in the refrigerator is no.

The chicken broth will not go bad when stored in the fridge. It’s not the only method to avoid spoilage. You may be wondering what the science behind this is, so let’s  make it clear. The refrigerators and fridges we have are usually equipped with a lower temperature in order to prevent the growth of bacteria in our food.

The broth of chicken will remain fresher in the refrigerator instead of remaining at ambient temperature or in the pantry. Additionally, it is evident on the package of chicken broth to keep it refrigerated once the broth is opened.

How Long Will Chicken Broth Last In The Fridge?

The chicken broth that has been opened will stored in the refrigerator for approximately 3-4 days. Also, a chart shows the variation in expiration dates in the event that you store the broth of chicken in the freezer, refrigerator and in the pantry.

Chicken Broth (Opened): Pantry –Refrigerator- Freezer

Duration: 1-1.5 days, 3-4 days, 3-4 months

How To Store Chicken Broth?

If you require a fresh broth on a regular basis it should be properly preserved to prevent loss of flavor. There are many ways to preserve your stock you make from chicken. This is why we have compiled a list of suggestions for storing the broth of your chicken properly so that it retains the flavor that it has every time you’ll need it.

Freezing: The broth of chicken can be frozen to extend the shelf time. As you can see in the chart, broth that is frozen will keep it fresh for three to four months, while maintaining its flavor.

Add a fat layer: It is possible to add an additional layer of fat to the outside of the broth following placing it in the jar. As the fat becomes thicker it helps keep the broth in the pot, while also preventing air from escaping. When you are using the broth, you can spoon fat into another container.

Canning: Canning is one of the methods used by firms to store chicken broths for longer periods of period of time.

These are just a few strategies that will aid you in storing the broth from your chicken instead of waste it. The most effective tip is the right method of handling it, and how to avoid contamination.

Can I Freeze Chicken Broth?

Yes you can do it, as freezing is among the most effective methods for preserving food. It’s a proven method to freeze chicken broth in order to prolong the shelf life of the broth. It is possible to frozen by placing it in the tray of ice or if you’ve got an abundance of broth, put the broth into a tray for muffins, and take it in every time.

Wrapping up

What happens if you eat bad chicken broth? The good news is that I’ve given you the solution in this blog post. Chicken broth is an excellent flavoring ingredient in any recipe. You can sip it plain or if you wish to ensure that you don’t waste your broth, or wish to keep it longer than the suggested expiry date, you should learn to store it in the correct manner.

The purpose of chicken broth is to give an exotic and delicious flavor to your favorite food recipes. But, it’s important to determine if the broth is suitable for use, or not. In the past, consumption of poor broth could cause sickness and symptoms of food poisoning.

Following the tips laid down in this article, you can preserve the chicken broth for up to 3 months without risking food poisoning. Eat healthy, stay safe!


Is White Rice Bleached? All You Need To Know!

brown rice

Is White Rice BlIs White Rice Bleached?eached? 


For the majority of people who want to eat white rice their first time tend to be unsure if it’s safe and natural to consume it. If you’re one of them, you’re free to be mindful of  your food choices. In the meantime, let’s address the question: whether white rice is bleached? Also, in this blog post, I am going to talk about the benefits of consuming white rice. Let’s get started.

Is White Rice Bleached?

The first thing you should do is need to know that there are various varieties of rice to choose from. However, the most common varieties are the basmati, brown and white varieties. However, you can find over 10,000 different brands available on the market.

The only one difference in white and brown varieties is that bran and husk are removed through a mechanical process in the first. This is in contrast to the widespread notion that the process requires polishing and bleach for brown rice. When it comes to the issue of whether it is safe to eat white rice to consume it is totally safe to consume.

The level of processing that is activated can alter the texture and taste in comparison to brown rice; however, this will help preserve the flavor and texture. As it helps prevent storage white rice is more durable in shelf life in comparison to other varieties.

One issue that is troubling dieticians using white rice is that it loses biological and nutritional nutrients which are lost during the process of refining. They can help boost the amount of fiber and vitamins in your diet which could be beneficial for the body. When it comes down to what food has the most nutrients, you can bet on which one would be the top of the list. However, there are ways to get the most benefit of white rice.

Can You Eat White Rice?

If you are looking to limit your intake of fiber and other fibers, you’ll discover it to be an ideal addition to your diet. It is high in folate and added pregnant women could discover it to be a great option to aid in the fetal development. If you consume the supplement regularly, there’s no reason to be concerned. It’s all as long as you keep it in balance along with the other nutrients.

What Are The Risks?

You must be aware that rice is a major source of arsenic contamination. It is due to the soil conditions that are poor in every region of the world. Consuming a lot of the substance can cause an increase in the risk of cancer, diabetes as well as heart diseases. It is also associated with a decrease in brain function.

However, you must be aware it is true that brown contains higher levels of arsenic when than the white. This is because a large amount of arsenic is found in the bran and husk that is then removed when processing. However, there’s some left over when it does make it to the market. To get the most effective options that have the lowest arsenic content it is recommended to opt for basmati. Jasmine and various other varieties are found within the Himalayas.

Another concern to consider is that it can increase the likelihood of having metabolic syndrome. The high glycemic index can be one of the main triggers in type 2 diabetes, which means it isn’t a good choice for those suffering from the condition.

How to stay safe with White Rice

You should consume lesser amounts of arsenic. Arsenic levels are high and one thing to be wary about. Consuming large amounts of food frequently will not have the same impact as a daily intake. Therefore, limiting your consumption to a minimum is what you need to do.

If you’re enjoying a meal of rice, it is best to serve it with fruits and vegetables to counterbalance the loss of vitamins and fiber. This will assist the body get rid of the toxins that accumulate in our food. Additionally, it is important to wash your food with water, not just juice. Also, as a matter of importance, make sure you are keeping up with your daily intake of water. When I last did a check, it was around three liters for males while women had two liters. If you’re not reaching this level then you need to stay ahead of the curve.

Where is white rice sourced from?

The major portion of all rice grown is sourced out of China, India, Indonesia, Pakistan, Bangladesh, Vietnam, Thailand, Myanmar, Philippines, and Japan. Asian farmers continue to account for 92 percent of the world’s rice production.

Does white rice get bleached?

However, one thing to be aware of is that white rice not bleached. The color difference is due to the milling process which removes bran and husks and is not a chemical process that involves dye.

How does brown rice turn to white rice?

The initial milling stage removes the outer hull that is not edible and produces brown rice that includes bran layers as well as germs that are intact. The second milling stage removes the bran layer leaving white rice milled.

Is white rice harmful to you?

Although white rice is more processed, it’s not necessarily bad. The majority of white rice is consumed in the US is rich in folate and vitamins to increase their nutritional content. In addition its fiber content could help in digestion problems. But brown rice is healthier and more nutritious.

What is the natural color of rice?

Rice naturally turns brown after harvesting, however when the bran, a nutrient-rich layer of bran has been removed, it becomes transparent and white. Black rice, red rice and purple rice contain unique pigmentation in the bran.

Why is rice so expensive?

The most straightforward answer is demand and supply. Rice is affordable because many people cultivate it. For instance, 90 % of the people living in countries like India and Bangladesh are rice farmers. This means that the poor rural villagers who can’t afford to attend school continue to be farmers of rice.

Why do bodybuilders consume white rice?

The intense workouts can deplete the sugar (glycogen) in your muscles. Having the right amount of carbohydrates is essential to replenish what’s been consumed. The athletes prefer white rice as a fantastic carbohydrate selection for this purpose. White rice ranks highly in the glycemic index.

Does Rice White naturally?

White rice is generally a supply of “empty” calories and carbs with a small amount of important nutrients. 100 grams (3.5 pounds) of brown rice cooked offer 1.8 milligrams of fiber while 100g of white rice offer just 0.4 milligrams of fiber (1 2). Brown Rice is rich in fiber, vitamins and minerals.

Is pasta better than rice?

If we examine the calories in the two, both rice and pasta are considerably lower, with the 117 calories per 100g, compared to the pasta’s calories of 160. If you are looking to lose weight with a calorie-controlled diet selecting rice over pasta could be the best choice for you.

It is possible that you are interested in frequently asked: What does raw Rice appear like?

Which rice is more nutritious?

Rice is available in various sizes, colors, and shapes. However, the most sought-after are brown and white rice. Rice that is white is most frequently consumed variety; however, brown rice is widely regarded as being healthier. Brown Rice is higher in fiber, vitamins and minerals.

Do you have to wash Uncle Ben’s rice?

Uncle Ben’s Rice Products don’t need to be rinsed prior to even cooking. Rinsing rice gets rid of any dirt, and more important, it eliminates the starch layer that can cause the rice to get clumped and become gummy when it cooks.

Is Uncle Ben’s rice good?

Uncle Ben’s original Converted Long Grain Rice helps aid in maintaining a healthy heart as well as an energizing diet. Additionally, it is gluten-free and sodium-free. It is also cholesterol-free, and has no trans-fat and has no saturated fat, so Uncle Ben’s Original Converted Brand Rice is an option you can be at ease about.

Is Rice more harmful than sugar?

Although the majority of calories found in brown and white rice are from carbohydrates however, white rice has an elevated glycemic index compared to brown rice. This means that a cup of white rice can cause an earlier blood sugar spike that according to Harvard Medical School, “has almost the same effect as eating pure table sugar “.

Are potatoes healthier than rice?

White rice is rich in nutrients. The most important is fiber – which is much lower than potatoes. It consists of Vitamin E and B vitamins in small amounts. It also contains manganese, calcium selenium, phosphorous and iron in tiny amounts. A low-calorie diet – 200 calories per serving of rice cooked.

What are the negatives to eating rice?

White rice is often linked to weight gain. Although it is an energy source however, eating white rice in the absence of exercise can lead to weight gain. Consuming white rice can cause constipation as it is a lower source of fiber. Carbohydrates in white rice may cause digestive problems in the event of frequent consumption.

Wrapping up

If you’re trying to decide what rice is the best choice, my personal opinion is it’s all going to be good. However, one thing to be aware of is that white rice is not bleached. The color difference is due to a milling process that eliminates the bran and husks and is not a chemical process that involves dye. The extended shelf life is just one of the reasons the product is sold in huge numbers in the rice market.