
Why Scoring Duck Breast Actually Matters
If you’ve ever cooked duck breast and ended up with rubbery, chewy skin instead of that deep golden crunch, you’re definitely not the only one. It’s honestly kind of frustrating. And weirdly common. The fix, though? It’s simpler than people expect — almost annoyingly simple once you see it. So, let us come to the point of discussion on how to score duck breast for perfectly crispy skin here.
Scoring the skin is what makes the real difference. Not a small tweak. A proper, noticeable shift from “meh” to “okay wow, that worked.”
Duck breast has a thick layer of fat sitting right under the skin — much thicker than chicken, which, I guess, is where people misjudge it. You throw an unscored piece into a pan, and the fat just… sits there. It doesn’t render properly. It kind of steams the skin from below instead of melting away cleanly. And yeah, that’s how you end up with that soft, greasy texture that no amount of heat really fixes afterward.
Scoring gives that fat somewhere to go. As it cooks, it melts and escapes through those little cuts, leaving the skin in direct contact with the pan. That’s where the crisp happens. Not magic — just basic cooking science doing its thing.
There’s also the texture side of things. When you score properly, the skin crisps evenly instead of puffing up in random spots while other parts stay pale. And visually… those diagonal lines? They look good. Like, restaurant-good. Not the main goal, but still nice.
What You’ll Need Before You Start
You don’t need much here, which is honestly refreshing. Just a sharp knife — and sharper than you think. A dull one will drag and tear, and that kind of ruins the whole idea of clean scoring
A boning knife or a thin chef’s knife works well. Some people prefer a small paring knife for control, which, to be fair, makes sense if your hands feel steadier that way. There’s no strict rule — just use what feels right, but make sure it’s sharp. That part isn’t optional.
You’ll also need a stable cutting board. Nothing fancy. Just something that doesn’t slide around mid-cut (learned that the slightly annoying way once).
Cold duck breast is easier to work with than room temperature. The fat stays firm, which helps the blade glide more predictably instead of slipping. If it just came out of the fridge, you can let it sit for a few minutes — maybe five — but don’t let it warm too much. Soft fat gets tricky.
And yeah, grab a paper towel. Patting the skin dry helps more than it sounds like it would. A dry surface gives your knife a bit of grip instead of sliding around. Small detail, but it changes things.
How to Score Duck Breast Step by Step
Step 1: Pat the Skin Dry
Take the duck breast out and pat the skin dry really well with paper towels. Don’t just dab the middle — get the edges too. Moisture makes everything messier than it needs to be, and later on it interferes with crisping. Dry skin just behaves better. Simple as that
Step 2: Place the Breast Skin-Side Up
Set the duck breast on your cutting board with the skin facing up. You want to clearly see what you’re doing — sounds obvious, but rushing this part can throw you off.
Take a second and look at it. The fat layer is usually pretty thick — somewhere around a quarter inch, sometimes closer to half. That’s a lot of fat to deal with, which is exactly why scoring matters here. Otherwise, it just… lingers.
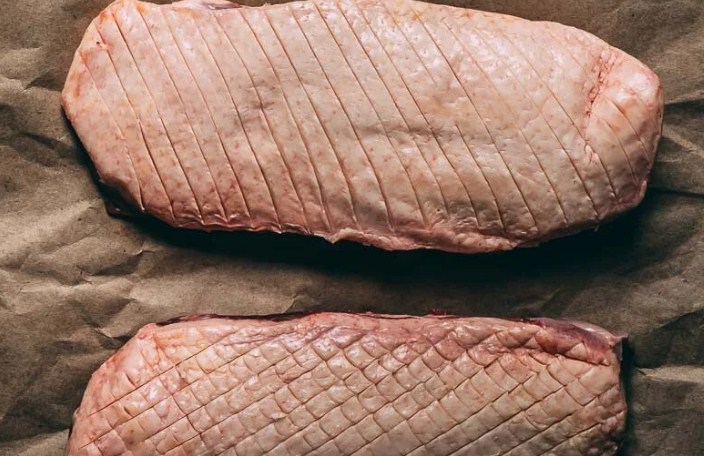
Step 3: Make Your First Set of Diagonal Cuts
Hold your knife at about a 45-degree angle and start making diagonal cuts across the skin. Not straight lines — angled ones. Space them roughly half an inch apart.
The cuts should go through the skin and into the fat, but not into the meat. This is where most people hesitate a bit — and yeah, it does feel slightly nerve-wracking at first. Totally normal.
Try using light, steady strokes instead of pressing hard. Let the knife do the work. You’re aiming for about a quarter-inch depth, maybe a little less depending on the fat thickness. There’s no exact formula here, honestly — you kind of adjust as you go.
Step 4: Make a Second Set of Cuts in the Opposite Direction
Now turn the breast (or just adjust your angle) and make another set of cuts crossing the first ones. This gives you that classic crosshatch or diamond pattern.
It’s not just for looks — though it does look nice. These intersecting lines increase the surface area, which helps the fat render more evenly. More pathways = better rendering = crispier skin. That’s the idea, and in practice, it actually works.
Step 5: Check Your Depth — Don’t Cut Into the Meat
Take a closer look at your cuts. If you see pink meat peeking through, you’ve gone a bit too deep. Not a disaster — it’ll still cook fine — but ideally you want to stay within the fat layer.
If it keeps happening, try holding your knife at a slightly shallower angle next time. It’s one of those things that improves naturally with practice. First attempt might feel clumsy. That’s okay.
Step 6: Season Immediately After Scoring
Once you’re done scoring, season right away. Salt is key — it helps draw out moisture, seasons the fat, and improves browning.
Season the skin side generously, and don’t forget the meat side. You can add pepper, maybe thyme, or even a bit of five-spice if that’s your thing. Nothing complicated required.
Let it sit for a few minutes before cooking. Not long — just enough to settle in.
Common Scoring Mistakes (And How to Avoid Them)
Cutting too deep
This happens a lot, especially early on. If you cut into the meat, it can dry out faster during cooking.
The fix is simple: lighter pressure and a sharper knife. Actually, it almost always comes back to the knife. If it’s dull, you press harder without realizing it — and then you go too deep.
Spacing Cuts Too Far Apart
If your cuts are too far apart — say over an inch — large areas of fat don’t get a way out. That leads to uneven rendering.
Half an inch is a solid target. Some people go closer, like a third of an inch, especially if the fat layer is thick. It’s not exact science, but tighter spacing usually helps.
Scoring Warm or Room Temperature Fat
Warm fat is soft and slippery, and the knife tends to drag instead of slice cleanly. It just feels off.
Keep the duck cold before scoring. If it starts getting too soft while you’re working, just pop it back in the fridge for a few minutes. No big deal.
Using a Dull Knife
This one’s worth repeating — dull knives cause multiple issues. They tear the skin, create uneven cuts, and force you to apply more pressure.
If there’s one thing to fix before you start, it’s this. A sharp knife changes everything. Seriously.
Forgetting to Dry the Skin First
Easy to skip, especially if you’re in a rush. But wet skin leads to steam, and steam kills crispiness.
Dry the skin. Always. Even if it feels like an extra step you could skip — don’t.
Tips for Getting the Crispiest Skin When Cooking
Scoring helps a lot, but cooking technique still matters — maybe more than we like to admit.
Start with a cold pan, not a hot one. This surprises people. But placing the duck skin-side down in a cold pan and then slowly heating it allows the fat to render gradually. If you start hot, the outside browns too quickly while the fat underneath is still solid. You end up with a nice color… but not the texture you want.
Keep the heat around medium or medium-low for most of the time. It’s tempting to crank it up — I’ve done that too — but it usually backfires.
As the fat renders, pour it off occasionally. And maybe save it. Duck fat is kind of amazing for cooking later (roast potatoes, for example — worth trying at least once).
Press the breast gently with a spatula during the first minute or so. Sometimes it curls slightly, and this helps keep the skin flat against the pan.
Cook skin-side down for most of the time — around 80%, give or take depending on thickness. Flip it only briefly at the end to finish the meat side.
Then let it rest. At least five minutes. Loosely cover it with foil. It feels like a pause you could skip, but resting really does help keep the meat juicy when you slice it.
How Scoring Fits Into the Bigger Picture
It’s easy to think of scoring as just one small step, but it kind of sets the tone for everything else. You can season perfectly, cook at the right temperature, rest it properly — and still end up with disappointing skin if the scoring wasn’t done well.
It’s not the most exciting part of cooking duck, to be honest. Takes maybe a couple of minutes once you’re used to it. But those minutes matter more than you’d expect.
Over time, it starts to feel natural. You don’t think as much about angle or depth — your hands just sort of figure it out. And that’s when things get consistent.
Duck breast, overall, is a great cut to work with. It’s flavorful, fairly forgiving, and impressive enough for guests without being overly complicated. Scoring is just the first step in getting it right.
Final Thoughts
There’s nothing particularly mysterious about how to score duck breast once you understand what’s happening. You’re creating pathways for fat to escape, increasing surface area, and setting up the skin to crisp properly instead of staying soft.
Sharp knife. Cold breast. Crosshatch cuts. Controlled depth. That’s basically it.
Give it a try, even if it feels a bit awkward the first time. It usually does. But after that, it starts to click — and you’ll probably wonder why you didn’t do it this way earlier.