Best Cast Iron Skillets And Pans
Are you here because you are searching for the best cast-iron skillets? If the answer is yes, read this long post carefully as we have documented a detailed account of the best cast iron skillets and pans of the present year and I am sure, after going through the reviews and buying guide about this cast iron cookware, you will be able to make an informed decision about the kind of cast iron skillet you should buy for your home.
In a hurry? Check our best overall cast iron skillet:
Well, like a hammer or a screwdriver, a good quality mattress and a comfortable lounge chair to sit and relax, a cast-iron skillet is one of the things that almost every household needs. Cast iron requires a little more attention and care than a stainless steel pan, but in return for a well-cared-for seasoning layer, you get a cooking pan that’s sturdy enough to fry even the thickest steak, but gentle enough to let a fried egg slide across the surface without sticking. A cast iron skillet can also last for generations if you don’t abuse it.
Recently, however, cast iron has seen a resurgence, with many newer brands emerging on the scene. It’s hard to say what lies is behind this renaissance in cast iron, but I presume that the growing interest in heritage objects over the last decade, combined with crowdfunding models, has played an important role. Of course, it is worth noting that a plethora of websites have also been praising cast iron products for ages. So, they certainly have played a role in this context as well.
Just a few years ago, we didn’t see any point in testing cast iron cookwares because there were few options. Today, the situation is markedly different. The market is full of options, and the price differences can be huge: a 10-inch pan can cost from less than $20 to over $200 – and that’s not even taking into account more expensive enamelled cast iron products like Le Creuset.
Truly, cast iron skillets or pans are a must in the kitchen. In addition to spoons, spatulas and frying pans, you should always have one or two cast iron pans in your cupboard. These extremely durable pans can be used on the grill, on the stove, in the oven and even over a campfire.
The non-stick surface of high-temperature cast iron skillets and pans can sear a nice ribeye, roast a whole chicken and bake buttery cornbread. It can also bake a giant biscuit to a perfect golden color.
And unlike non-stick pans or even stainless steel pans, cast iron can hardly be destroyed. If you know how to care for and clean cast iron pans, they can last a lifetime – and even be passed down to children and grandchildren as valuable heirlooms.
That’s why buying cast-iron pots and pans should be considered an investment. The right pot, chosen by the right cook and used properly, can be used for decades for dinners, desserts and more. Here, we’ve selected the 10 best cast iron stoves so you can find the one that suits your cooking style and needs. To compile this list, we drew on thousands of reviews from chefs all over the world and also our own experiences. We think we have found some awesome products that you’ll love.
The best cast iron pots and pans in a nutshell:
Cast Iron Skillets
Cast iron skillets have been an essential tool in American kitchens for more than a century. Cooks have used these durable pans to fry, sauté, bake and poach eggs. When used and maintained properly, cast iron can be an effective alternative to non-stick cookware, as a smooth coating of polymerized fat forms over time. Unlike non-stick pans, cast iron pans are safe at temperatures above 500 degrees. The lifespan of non-stick pans is short, three to five years at the most, depending on use. However, well-maintained cast iron skillets can last for generations. And while cast iron requires special attention (and can’t go in the dishwasher), it’s not much harder to care for than other cookware.
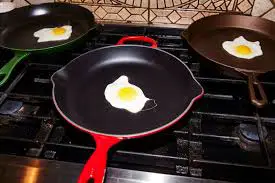
With care, cast iron can also be used for low-temperature techniques such as omelettes and fried eggs. However, cast iron cannot distribute heat as evenly as aluminium or three layers of stainless steel, so you need to be careful with your eggs. And if you’re making pancakes, for example, you may need to move them back and forth to achieve even browning.
What to look for when buying a cast iron pan
Cast iron is prized by amateur and professional cooks alike because it can be heated to very high temperatures, stays hot longer than stainless steel or non-stick coated pans, and has a natural non-stick surface that’s second to none. But despite everything you may like about cast iron pans, there are a few things that can help you make your choice and find the right pan for you and your kitchen.
Size
A typical cast iron skillet is 10 inches, but 8 and 12 inch pans are also common. Larger sizes are available but may need to be ordered separately.
Recipes such as cakes and cornbread may call for a specific size, so it’s important to have the size called for in your recipes and use it for best results. Beyond that, it’s all about preference. The larger the casserole, the heavier it will be. But the larger the casserole, the more surface area you have for cooking chicken, steak and other foods.
Spicy surface
Seasoning is a natural non-stick property of a cast iron skillet. With use, cast iron skillets become seasoned. As seasoning improves, vintage pans become so popular with antique and consignment buyers.
Today, most manufacturers pre-season frying pans before they leave the factory, and all cast iron pans must be seasoned regularly. Lubricate the inside of the frying pan or skillet with a high temperature oil, such as vegetable oil. Bake the pan in a 190°C oven for one hour. Allow to cool. Wipe with a cloth and store.
Handles
Cast iron pans are very heavy, and the larger they are, the heavier they become. (Lids also add weight.) To make these heavy pots easier to carry or move around the kitchen, many manufacturers have added extra U-shaped handles to the long, narrow handles of all pots. If you find it difficult to lift heavy objects, you can buy a cast iron pan with these extra handles or one that is lighter.
With these considerations taken into account, it’s time to look at our list of the best cast iron skillets you can buy. If you see one you like, click on the page to learn more and add it to your cart.
1. Best over-all cast iron skillet: 12 inch lodge cast iron skillet

 When it comes to cast iron skillets, Lodge is royalty – and for good reason. The American-made company (its foundry is located in South Pittsburg, Tennessee) has been making heirloom-worthy cast-iron bowls and pans since 1896. The brand has grown in popularity through word of mouth and now through rave reviews online. They make pots of all shapes and sizes and have expanded their collection with fun accessories such as silicone handles and custom-made pots for historic occasions.
However, their 12-inch frying pan is by far the most popular, and is sure to be used in every chef’s kitchen. The large size is suitable for a whole chicken or several steaks. It is slightly heavier than Lodge’s smaller 8-pound pans, so Lodge has added an extra handle. The pan also has a silicone handle to make it easier to get the pan in and out of the oven. This product is oven safe and withstand up to 500 degrees.
Lodge’s cast iron skillets come pre-seasoned, so they’re ready to use right out of the box. However, we’ve found that the pan needs to be re-seasoned fairly quickly, so make sure you know how to season your cast iron skillet to maintain its non-stick quality.
On Amazon, the pan has over 97,000 reviews and still has a 4.5 star rating. One reviewer writes: “The more we use the pan, the better it gets. My husband and I love it.”
2. Best high-end cast iron skillet: Le Creuset Signature Iron handle


Few brands are as loyal and enthusiastic as Le Creuset. The French company is known for its very high quality cast iron, and its enameled cast iron pans are no exception. Individually cast in sand molds and hand-checked by experts, the pans have a black enamel interior that does not require re-pouring. In addition, enameled cast iron retains heat better than other non-stick pans and is dishwasher safe, making it easier to clean. Le Creuset pans also have a large handle that allows you to lift the pan easily (even with oven mitts!), and a pouring spout on two sides so you can pour without drips. You can choose from a range of colors, including bright cherry and chic oyster.
Professional chefs and hobby cooks alike swear by their Le Creuset pans. There are hundreds of five-star reviews on Amazon, where users praise the tool for its versatility and durability, saying it’s worth the investment. “These pans are expensive, but they literally last forever,” says one customer. “They cook evenly, they’re sturdy and heavy, and I’ve started buying a whole set of them.”
Another customer writes, “I’ve cooked the best steaks, meatballs and eggs in my life on this pan. And it’s ridiculously easy to clean! Consider me a convert. I will never use anything else again.”
3. Best enameled cast iron skillet: Staub 10-inch enameled cast iron traditional deep skillet

 Staub’s Dutch ovens are popular for their easy-to-clean enamel surface and black enamel interiors that don’t show stains, and the brand’s cast-iron pans have these great benefits as well. The 10-inch enamel-finished cast-iron skillet is available in five colors and has two spouts on either side of the pan for easy pouring. The deeper pan is ideal for cakes and skillet dinners, but you can also use it for frying as the sides protect the stove and kitchen counter from splatter.
Among other enameled cast iron pans, Staub pans are appreciated by professional and home cooks alike because the thick cast iron heats evenly and holds heat well. If you have a glass or induction stove, you’ll appreciate the flat bottom of this pan because it can be used on these surfaces. It is also dishwasher safe, which is not possible with traditional cast iron.
“This is my first purchase of Staub cookware and it has exceeded my expectations in every way! I am used to cast iron cookware needing to be “seasoned” before you can cook in it without food sticking. Not so with this pan. It has worked great from the first use. This is of excellent value,” effuses one Williams Sonoma reviewer.
4. Best cast-iron skillet for beginners: the FINEX 10-inch cast-iron skillet

 Why should a novice cast-iron pan owner invest such a large amount in a pan? Because a well-built cast-iron skillet can forgive many beginner mistakes. And by the time you learn how to properly care for the pan, it will have developed natural defenses (called seasoning) so it will last you for years of use.
The surface of a cast iron pan can tell you a lot about its quality. The smoother the surface, the better the quality – and the easier it is to develop a natural seasoning layer, the faster your pan will reach the beautiful stage of a natural non-stick surface. This FINEX cast iron pan is polished and machine-smoothed for the easiest possible release, making it ideal for first-time cast iron pan owners.
The 12-inch skillet has a unique octagonal shape for easy pouring. The pan is quite heavy (just over nine kilograms), so you can find a natural position that suits you thanks to several tilting zones. The coil-spring handle also cools quickly, so it can be touched almost immediately after removing it from the oven.
5. The best double-handled cast-iron skillet: the Lodge dual-handle pan

 For cooks who prefer double-handled Dutch ovens, this Lodge double-handled cast iron skillet is a great choice. You get Lodge’s popular quality in a pre-stamped, ready-to-use, sturdy double-handled design. Like many Lodge products, this pan is designed for almost any cooking method, from stovetop cooking to cooking over a fire.
Made in the USA, this cast iron skillet boasts over 10,000 reviews on Amazon and still maintains a 4.8 star rating. “The only problem I see with owning this beautiful creation is who I leave it to in my will. Two short arms is a dream come true for me, as my long arms and short arms don’t always live peacefully side by side. If Amazon would let me, I would give this cast iron skillet from Lodge more than 5 stars,” pens one reviewer.
6. Best budget-friendly cast-iron skillet: Utopia kitchen 3-piece cast-iron skillet set

 One of the best features of cast iron cookware is its affordability. And while good quality pans can cost you more than than $50, true bargain seekers will want to consider this set from Kitchen Utopia. The collection of three pans costs around $40 – that’s just over $13 for each of the 10-inch, 8-inch and 6-inch pans, which are available here. They all have easy-grip handles and double spouts for draining grease.
More than 4,200 Amazon customers have given the Utopia Kitchen set a perfect rating, saying the pans are reliable, versatile, and at an excellent price. “The dimensions cover everything I cook,” says one reviewer. “They are sturdy but not too heavy. Just what I hoped they would be.”
7. Best cast iron grill pan: Lodge pre-seasoned cast iron grill pan

 Cast iron pans can be used on the grill, but they can also be grilled. The cast iron heats up strongly, making it grill-like: the quick sealing on the outside locks in moisture, caramelizes the natural sugars, and creates a hint of smoky deliciousness.
The raised rows of this cast iron grill pan from Lodge help melt and drain the fat or liquid, so food cooks and braises rather than simmers. The extra U-shaped handle makes it easy to carry or move the pan (it weighs 6.5 lbs). With over 19,000 reviews on Amazon, this casserole has a rating of 4.6 stars, and thousands of customers confirm its usefulness every night of the week.
“Honestly, I love this pan and regret not trying to use it indoors instead of buying several indoor grilling options that never worked. I definitely recommend this pan if you are considering grilling indoors, and of all the recommended cleaning methods, washing under hot water, then wiping and adding oil, and then reheating worked best for me,” wrote one satisfied reviewer.
8. Best Frying Pan: Cuisinart Chef’s 12-inch Classic Enameled Cast Iron Chicken Frying Pan with Lid

 If you regularly bake fried chicken or apple pies, you need a cast iron skillet with high sides to prevent splashing. In that case, this deep enamel cast iron skillet from Cuisinart is the right choice for you.
Cast iron pans heat up quickly, get hot evenly and stay hot, which is ideal for deep frying when you want the oil to get hot batch after batch, as in this recipe for fried fish. Additionally, the pan comes with a lid, making it versatile if you decide to bake bread in it or cook stews and soups in it.
On Amazon, this frying pan has more than 1,500 reviews and a rating of 4.6 stars, with reviewers praising its quality and value (some similar-sized pans can cost more than $200).
Related: Can you use the same cast iron skillet for sweet and savory dishes?
“Great product for cooking on the stove or in the oven. Ideal for dishes where you combine ingredients on the go. No need to use multiple pots and pans for cooking. Love it,” wrote an Amazon reviewer.
9. The cast iron frying pan with the best price: The Cuisinel Pre-seasoned Cast Iron Frying Pan, 2-piece set

 Cuisinel may not be as famous as some other cast iron pan brands, but its cast iron pans have a strong following and many devoted customers. This two-piece set (one 10-inch cast iron pan and one 12-inch cast iron pan) has received more than 5,000 reviews and 4.7 stars. That’s all wonderful, but then you see the price – just under $48 for two pans and two heat-resistant holders.
Reviewers like the fact that these cast iron pans come pre-seasoned, meaning they are ready to use right out of the box. However, it’s not a bad idea to season the pans before using them for foods that can stick, such as eggs. One reviewer even recommends cooking the bacon first.
“These are so great! So easy to clean! Cooking in them is a real experience. Nothing sticks in them, and the taste of burgers or other foods cooked in them is delicious!” wrote one Amazon reviewer.
10. The most versatile cast-iron skillet: the Lodge preheated cast-iron combo cooker

 Cast iron ovens and pans are naturally very versatile. They can be used to roast steaks, bake desserts or roast vegetables, but this Lodge combination cooker can be used for even more things. The lid of the larger pot is actually a 10.25-inch pot with a shallow depth.
Because this cast iron combination cooker can be used to cook food in a variety of ways, it’s a great choice for campers. You can use the frying pan to roast meat or fry eggs, while the bottom allows you to heat up casseroles or fry potato chips. For bakers, this is a good choice for baking bread.
One Amazon reviewer writes: “I really like the ability to use it as a frying pan or deep pan. I have not only this combination pan, but also the one with the short handles. Very well made – even if I add a little extra seasoning before use, nothing beats the heat retention of cast iron.”
Caring for your new cast iron skillet
Most cast iron skillets are now treated with oil at the factory, but it’s always a good idea to rinse the pan with water and re-season it before using it for the first time. Why. Pans sit on shelves for weeks, even months, before being sent to shoppers to gather dust. A quick rinse and re-season will help you do it safely.
Do you have a rusty cast iron pan? Here’s how to bring your rusty cast iron back to life.
When washing your cast iron skillet, remember that water is the enemy and soap is a poor runner-up. You can use a brush or scrubbing pad to remove stuck-on bits, but don’t use soap – it removes natural seasonings – and make sure the pan is very dry when you rinse it with water.
The best way to dry cast iron is to heat a freshly washed pan over a low heat and allow the water in the pan to evaporate. If there is still a lot of seasoning left in the pan after rinsing, you can either season the pan again on the spot or wait until the next use and season it just before using.
What should I do with my cast iron pans?
One of the other advantages of cooking with cast iron is that you can use it from the saucepan to the oven and back again. It’s very versatile. Check out our collection of recipes where you can use cast iron skillets. And here are a dozen of our best recipes for cooking with a cast iron skillet.
With a few exceptions, we found during our testing that most cast iron skillets perform the same basic tasks, like frying a steak or frying eggs, in the same way. However, many factors can influence how easy and comfortable a pan is to use, and ultimately set it apart from others. Here’s what we look for in a good cast iron skillet:
Factory sealed: Most cast iron skillets are insured, which means they have one or more layers of polymerized oil that forms a non-stick coating and rust-resistant surface. Unseasoned cast iron is silver-grey, while seasoned pans are usually black or brown. You know a pan is properly seasoned when it is evenly coloured throughout with no dark spots or stains. A good seasoning works almost as well as a non-stick coating, which prevents foods like eggs and cornbread from sticking.
Easy to handle: most cast iron pans are quite heavy – a classic 12-inch Lodge pan weighs about 8½ pounds – so it’s important to have a comfortable handle and a large extra handle on one side of the pan. Both handles ensure safety when you take the pan off the stove and drain the hot fat. We prefer slightly rounded handles, which provide a natural grip on the bottom for good control. Both handles also get very hot, so it’s important to have a firm grip, even with a large glove.
Large slope pin: We like pans with functional, sloping mouthpieces or lips that won’t spill bacon grease and cause a huge mess. Given the weight and heat of a cast iron skillet, it’s already challenging to get into the small opening of the pan.
Affordable: over the years I have tested pans from $20 to $200 and found that they do not perform that differently from each other. They differ primarily because of their weight and construction. Most modern, inexpensive cast iron equipment is heavy and has a somewhat rough texture. The new generation of high-quality cast iron pans from small companies like Stargazer have a very smooth cooking surface. they are also quite a few pounds lighter. In my opinion, however, the smoother pans are no stickier than the coarser pans, which also become flatter as use progresses, as the layers of seasoning accumulate with years. It is worth noting that since Lodge now makes a cast iron pan for around $40, there is no point in paying more than $100 for these fancy pans.
Wrapping up: Best Cast Iron Skillets
Hopefully, this review on the best cast iron skillets and pans would give you enough food for thought as to which cast iron skillet should suit your budget and requirement. Indeed, all kitchens, fancy or modest, would remain incomplete without a cast iron skillet or a pan and hence you should definitely buy one that not only serves your purpose but also last long enough. These cast iron skillets serves a lot of purpose and is a real utility product, which is why a kitchen without a cast iron skillet is simply unthinkable.
Though it can be a bit intimidating for beginners, many professional chefs choose cast iron as their go-to item—and for a good reason. Not only is cast iron one regarded as one of the best cookware materials for heat retention and distribution, but it’s also immensely durable, lasting for generations if you care for it properly. Hence, no matter whether you’re searing meat or baking cake, the best cast iron skillets deliver top- class results.
I am sure you would find one for youself. Happy buying!


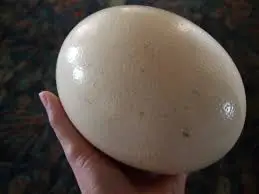

 Ostriches are the largest birds in the world. So it’s no surprise that they also have the largest eggs. Ostriches are native to Africa, but are now found on every continent in the world. They belong to a group of birds called ratites – birds that cannot fly. In addition to the ostrich, this group includes birds such as the hippo, emu and kiwi, to name a few.